Beef Steak Recipe: There’s nothing quite like a perfectly cooked beef steak. It’s juicy, flavorful, and can turn an ordinary dinner into a gourmet experience.
Whether you’re a beginner in the kitchen or just looking to refine your steak game, this detailed step-by-step guide will walk you through everything you need to know—from choosing the right cut to serving it with style.
Let’s dive into the ultimate beef steak recipe that guarantees restaurant-quality results right at home.
Why Beef Steak is a Classic Favorite
Beef steak has held its place at the top of the culinary food chain for centuries—and for good reason. It’s incredibly versatile, rich in protein, and just hits different when cooked right. Whether you’re celebrating a special occasion or just craving some meaty goodness, steak is always a win.
What makes beef steak so beloved? For starters, it’s all about the texture and flavor. That perfect crust on the outside with a juicy, tender center? Absolutely mouthwatering. Plus, steak can be as simple or as fancy as you like. You can season it with just salt and pepper or go all out with herbs, spices, and sauces.
Not to mention, steak pairs well with everything. Mashed potatoes? Check. Grilled veggies? You bet. A glass of red wine? Perfection. It’s a dish that speaks to everyone’s tastes, whether you’re a minimalist or a flavor chaser.
And then there’s the satisfaction of cooking it yourself. Hearing that sizzle when it hits the pan, watching it develop that golden crust, and slicing into a perfectly cooked center—it’s not just food, it’s an experience. And once you master it, you’ll never look at store-bought or restaurant steak the same way again.
Different Cuts of Beef for the Perfect Steak
Before we dive into the actual cooking process, let’s talk about the cuts. Not all steaks are created equal, and choosing the right cut makes a huge difference in taste, tenderness, and cooking technique.
Ribeye
Ribeye is prized for its rich marbling and juicy flavor. It’s one of the most forgiving steaks to cook and almost guarantees a melt-in-your-mouth experience. If you’re new to cooking steak, ribeye is a great starting point.
Sirloin
Sirloin is leaner than ribeye but still packed with flavor. It’s typically less expensive and works well for grilling or pan-searing. However, it’s a bit firmer, so don’t overcook it or it might get tough.
Tenderloin (Filet Mignon)
This is the most tender cut of beef. It has a buttery texture and a mild flavor. Since it’s very lean, it benefits from being wrapped in bacon or paired with a rich sauce. Filet mignon is your go-to for elegance.
T-Bone and Porterhouse
These cuts give you the best of both worlds: part tenderloin and part strip steak. They’re big, bold, and perfect for grilling. Just be careful with cooking times—since they have two different muscles, one side might cook faster than the other.
How to Choose the Best Cut of Beef
Picking the right steak at the butcher or grocery store can feel overwhelming, but it doesn’t have to be. Here’s what to look for:
- Marbling: This refers to the little white flecks of fat within the meat. More marbling generally means more flavor and tenderness.
- Color: You want beef that’s bright red (or deep red if it’s aged) with minimal browning or grey spots.
- Thickness: A good steak should be at least 1 to 1.5 inches thick. Anything thinner will cook too quickly and might dry out.
Don’t be afraid to ask the butcher for advice either. They can recommend cuts based on your cooking method or even custom-cut something for you.
List of Ingredients You’ll Need
Let’s keep it simple and effective. Here’s everything you’ll need to get that perfect steak on the plate:
Basic Ingredients
- 1 Beef Steak (Ribeye, Sirloin, or your favorite cut)
- Kosher Salt
- Freshly Ground Black Pepper
- Olive Oil or Canola Oil
- Butter (for basting)
- Garlic Cloves (crushed)
- Fresh Herbs (Thyme, Rosemary – optional)
Optional Marinade Ingredients
- Soy Sauce
- Worcestershire Sauce
- Balsamic Vinegar
- Dijon Mustard
- Lemon Juice
Optional Toppings & Sauces
- Caramelized Onions
- Mushroom Sauce
- Garlic Butter
- Chimichurri
- Blue Cheese Crumbles
These ingredients are easy to find, affordable, and allow room for customization. Whether you’re going classic or experimenting, you’re covered.
Essential Kitchen Tools and Equipment
Having the right tools can make your steak-cooking adventure smoother and more successful. Here’s what you’ll need:
- Cast Iron Skillet or Grill Pan
- Meat Thermometer
- Tongs (no forks—you don’t want to pierce the meat)
- Cutting Board
- Sharp Knife
- Aluminum Foil (for resting)
- Mixing Bowl (for marinades, if using)
A cast iron skillet is highly recommended for its heat retention and ability to create a solid sear. But if you don’t have one, a heavy-bottomed stainless steel pan will work too.
Prepping the Steak: What You Need to Know
Before you slap that steak on the pan or grill, proper prep is key. First, remove the steak from the fridge at least 30–45 minutes before cooking. Why? Because cold meat won’t cook evenly. Letting it come to room temp ensures a nice, even doneness.
Next, pat the steak dry with paper towels. Moisture is the enemy of a good sear, and if the steak’s surface is wet, it’ll steam instead of sizzle.
Then comes the seasoning. Don’t be shy with the salt and pepper. Season all sides generously—it creates that beautiful crust and enhances the natural beef flavor.
If you’re using a marinade, let the steak soak for at least 30 minutes, or up to 24 hours in the fridge. Just remember to pat it dry before cooking, even after marinating.
Marinating vs. Dry Rub: Which One is Better?
This really comes down to personal preference. Marinades can infuse flavor deeper into the meat, especially with acidic ingredients like vinegar or citrus. However, they can also make the surface too wet, which isn’t ideal for searing.
Dry rubs, on the other hand, create a flavorful crust and don’t interfere with the cooking process. If you’re after that classic steakhouse sear, a dry rub is your best friend.
Still torn? Try both! Marinate your steak for flavor, then give it a quick dry rub before searing for the best of both worlds.
Step-by-Step Guide to Cooking Beef Steak
Let’s get into the heart of the matter—actually cooking that juicy steak. This guide will walk you through the entire process step-by-step so that you know exactly what to do at every stage.
Step 1: Bring the Steak to Room Temperature
This might seem minor, but it’s one of the most important steps. Take your steak out of the fridge about 30 to 45 minutes before you cook it. Why? Because a cold steak thrown on a hot pan will cook unevenly—burnt outside, raw inside. Letting it rest at room temp allows the meat to relax and cook evenly. It also helps create a better crust when searing.
Step 2: Season the Steak Generously
Don’t be afraid to go heavy with the seasoning. A steak is thick, and you need enough salt and pepper to enhance its flavor all the way through. Season both sides liberally with kosher salt and freshly cracked black pepper. If you want extra flavor, you can add garlic powder, onion powder, or smoked paprika. Press the seasoning in so it sticks to the surface.
Step 3: Preheat the Pan or Grill
Heat is key. Whether you’re using a cast iron skillet or a grill, you want it smoking hot before adding the steak. This intense heat is what creates that irresistible crust. Add a high smoke-point oil (like canola or avocado oil) and wait until it starts shimmering. That’s your green light.
Step 4: Sear the Steak Perfectly
Once the pan is hot, gently place your steak in—away from you to avoid oil splatter. Let it sit untouched for 2 to 3 minutes to develop that golden-brown crust. You might be tempted to flip it or move it around, but resist! Searing needs direct contact and time.
Step 5: Flip and Finish Cooking
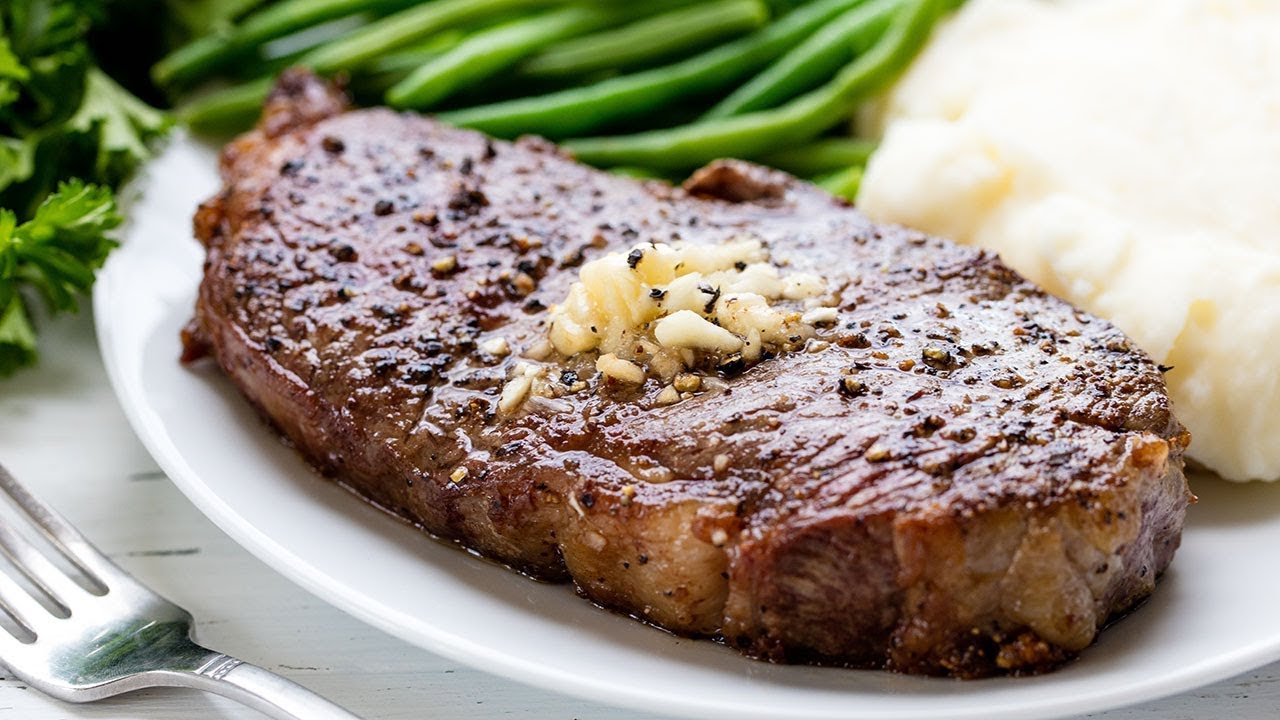
Flip your steak using tongs, not a fork (you don’t want to lose those precious juices). After flipping, you can add butter, crushed garlic, and herbs like rosemary or thyme for a restaurant-style basting. Tilt the pan and use a spoon to baste the steak in melted butter for added richness.
Step 6: Use the Finger or Thermometer Test
Doneness is personal. Use your fingers to press the steak and compare it to the base of your thumb (the firmer it is, the more done it is). But for accuracy, use a meat thermometer:
- Rare: 125°F (52°C)
- Medium Rare: 135°F (57°C)
- Medium: 145°F (63°C)
- Medium Well: 150°F (66°C)
- Well Done: 160°F+ (71°C)
Stick the thermometer into the thickest part of the steak for the most accurate reading.
Step 7: Let It Rest
This step is non-negotiable. Resting your steak for at least 5–10 minutes lets the juices redistribute. If you slice it too soon, all that flavor spills onto your cutting board. Tent it with foil and be patient—you’re almost there.
Cooking Times and Temperature Guide
Even if you’re confident in your cooking, a temperature guide is super helpful. Here’s a breakdown based on thickness and desired doneness.
| Doneness | Temp (°F) | Temp (°C) | Cooking Time (1-inch steak) |
|---|---|---|---|
| Rare | 125°F | 52°C | 2–3 minutes per side |
| Medium Rare | 135°F | 57°C | 3–4 minutes per side |
| Medium | 145°F | 63°C | 4–5 minutes per side |
| Medium Well | 150°F | 66°C | 5–6 minutes per side |
| Well Done | 160°F+ | 71°C+ | 6–7 minutes per side |
Note: Times vary depending on your pan, stove, or grill. Always trust your thermometer over the clock.
How to Get the Perfect Crust on Your Steak
You know that crispy, caramelized outer layer that makes your mouth water? That’s called the Maillard reaction, and it’s what gives steak its signature crust. Here’s how to make it happen:
- Dry the steak: Moisture is your enemy. Use paper towels to pat it bone-dry before seasoning.
- High heat: Your pan needs to be hot enough to make a drop of water dance. That’s the sweet spot.
- Don’t overcrowd: One steak at a time if needed. Overcrowding lowers the pan temperature and ruins your sear.
- Let it sit: Avoid flipping or poking while it sears. A proper crust takes 2–3 minutes per side.
Pro tip: After flipping, add a spoon of butter and aromatics, then baste. It enhances both flavor and color.
Making a Simple Pan Sauce
Want to elevate your steak even more? Use the drippings left in the pan to whip up a quick sauce.
Basic Pan Sauce Recipe
Ingredients:
- ½ cup beef stock or red wine
- 1 tablespoon Dijon mustard
- 1 teaspoon Worcestershire sauce
- 1 tablespoon butter
Instructions:
- After removing the steak, keep the pan on medium heat.
- Add the stock or wine to deglaze the pan, scraping up the brown bits.
- Stir in Dijon and Worcestershire sauce.
- Let it simmer and reduce slightly.
- Finish with butter for a silky finish.
Drizzle over your sliced steak for a pro-level touch.
Serving Suggestions for Your Steak
What you serve with your steak can make or break the whole meal. Whether you’re going classic or creative, here are some top pairings:
Classic Sides
- Garlic mashed potatoes
- Grilled asparagus
- Creamed spinach
- Baked potato with sour cream and chives
- Corn on the cob
Healthy Alternatives
- Cauliflower mash
- Zucchini noodles
- Steamed broccoli
- Roasted Brussels sprouts
- Mixed greens salad with balsamic vinaigrette
Feeling indulgent? Add a fried egg on top or melt some blue cheese over the hot steak. The combinations are endless.
Common Mistakes to Avoid
Cooking steak isn’t hard, but a few small errors can ruin a good cut. Here’s what to watch out for:
- Cooking it straight from the fridge – Always let it come to room temp first.
- Under-seasoning – Be generous. Meat needs salt.
- Poking with a fork – Use tongs to preserve juices.
- Skipping the rest time – Don’t rush. Resting locks in the flavor.
- Using the wrong pan – Non-stick doesn’t sear well. Go for cast iron or stainless steel.
Avoid these, and you’re already ahead of most home cooks.
Cleaning Up After Cooking Steak
A good meal often leaves a mess, but cleaning up doesn’t have to be a pain. Here’s a quick post-steak cleanup checklist:
- Soak the pan while it’s still warm – Add hot water (never cold on hot cast iron) and let it sit.
- Use a wooden scraper or sponge – Avoid metal tools that damage seasoning or scratch the surface.
- Dry and oil cast iron after washing – This prevents rust and keeps it non-stick.
- Wipe down counters immediately – Don’t let grease sit and harden.
- Ventilate the kitchen – Steak can leave a strong smell, so open windows or turn on a fan.
Clean tools, clean kitchen, clean slate for your next steak night.
Final Tips for Steak Success
Here’s your cheat sheet to make every steak a winner:
- Invest in quality meat – It makes all the difference.
- Use a meat thermometer – No guessing needed.
- Rest your steak – Always. Without fail.
- Don’t overthink it – Simple seasoning and technique often beat fancy tricks.
- Practice makes perfect – The more you cook steak, the better you’ll get.
Mastering steak is like riding a bike—once you nail it, you’ll never forget.
FAQs about Beef Steak Recipe
1. How long should I rest my steak after cooking?
Let it rest for at least 5–10 minutes. This allows the juices to redistribute and keeps the steak juicy.
2. Can I cook steak without a cast iron pan?
Yes! A heavy stainless steel pan or even a grill will do. Just make sure it gets hot enough for a proper sear.
3. What’s the best oil for searing steak?
Use high smoke-point oils like canola, avocado, or grapeseed oil. Avoid butter alone—it burns too quickly.
4. How do I store leftover steak?
Wrap it tightly in foil or airtight containers and store in the fridge for up to 3 days. Reheat gently to avoid drying it out.
5. Can I freeze cooked steak?
Absolutely. Let it cool completely, then wrap in foil or plastic wrap, and place it in a freezer bag. It’ll stay good for up to 2 months.
Conclusion
Cooking the perfect beef steak at home isn’t just about skill—it’s about confidence, patience, and knowing the right steps. From choosing the cut to resting the meat, each detail adds to the final bite. Once you try it and taste the results, you’ll wonder why you didn’t start sooner. This guide gives you all the tools to impress yourself, your family, or your dinner guests. So grab that steak, heat up your pan, and get ready to make something amazing.


