Bear Claw Pastry Recipe: Ever heard of a pastry that looks like a bear’s claw but tastes like heaven? That’s exactly what a bear claw pastry is. Flaky, buttery, slightly sweet, and often filled with rich almond paste or fruit, this iconic pastry is a favorite in bakeries across North America. Whether you’re craving a cozy weekend bake or something impressive to serve at brunch, this recipe will become your new go-to.
The name “bear claw” comes from its distinct shape—those curved cuts at the top of the pastry resemble the claws of a bear. Don’t let the intricate design fool you though. With a bit of patience and the right instructions, making bear claws at home is totally doable—even fun!
You’ll love this recipe for a few reasons. First, it’s flexible. You can switch out the filling to whatever you like—chocolate, apple cinnamon, cream cheese, you name it. Second, it’s bakery-quality. These aren’t your average store-bought pastries—they’re flaky, fresh, and full of flavor. And third? There’s nothing like the smell of fresh pastries baking in your kitchen. It’s the stuff cozy mornings are made of.
Ready to learn how to make your very own batch of bear claw pastries? Let’s dive into the ingredients you’ll need first.
List of Ingredients You’ll Need
Before you get your hands doughy, make sure you’ve got all the right ingredients. Having everything prepped and ready will make the baking process smoother and way more enjoyable. Here’s what you’ll need:
Dry Ingredients:
- 3 ½ cups all-purpose flour (plus extra for dusting)
- ¼ cup granulated sugar
- 1 teaspoon salt
- 2 ¼ teaspoons active dry yeast (one packet)
Wet Ingredients:
- ¾ cup warm milk (about 110°F)
- 2 large eggs (room temperature)
- 1 teaspoon vanilla extract
- 1 cup unsalted butter (cold, cut into small cubes)
For the Almond Filling:
- ¾ cup almond paste
- ¼ cup powdered sugar
- 1 egg white
- ½ teaspoon almond extract
For the Egg Wash and Toppings:
- 1 egg yolk + 1 tablespoon milk (for brushing)
- Sliced almonds (optional)
- Coarse sugar (optional)
For the Glaze:
- 1 cup powdered sugar
- 2 tablespoons milk
- ½ teaspoon vanilla extract
Optional Add-Ins:
- Dried fruit (like raisins or cranberries)
- Chocolate chips
- Cinnamon sugar
Make sure to measure everything accurately, especially the flour and yeast. It really makes a difference in how the dough rises and bakes. If you want to get a head start, some bakers even prep the dough a day in advance and refrigerate it overnight for deeper flavor. Now that your ingredients are lined up, let’s talk tools.
Essential Kitchen Tools
You don’t need a fancy bakery setup to make bear claws at home, but a few reliable kitchen tools can make all the difference.
Baking Tools Checklist:
- Mixing bowls (medium and large)
- Stand mixer with dough hook (or a strong arm for kneading!)
- Rolling pin
- Sharp knife or pizza cutter
- Pastry brush
- Baking sheets
- Parchment paper or silicone baking mats
- Cooling rack
Useful Extras for Better Results:
- Bench scraper (for easy dough handling)
- Digital kitchen scale (for precise measurements)
- Instant-read thermometer (to check milk and oven temp)
- Pastry wheel or cutter for shaping claws
Having these tools ready can help you move smoothly from step to step. Next up, let’s get to know the dough you’ll be working with. It’s the heart of any pastry, so don’t rush this part.
Understanding the Dough
Great pastries always start with great dough—and the bear claw is no exception. This isn’t just any dough; it’s a rich, buttery, yeasted dough that gives the bear claw its tender layers and golden crispiness. Think of it as a cross between a Danish and a croissant. It’s soft inside but has that slightly flaky exterior we all love in a bakery-style pastry.
Yeast Dough Basics
This recipe uses active dry yeast, which needs to be “proofed” or activated in warm milk. This step is super important because it wakes the yeast up from its dry, dormant state and starts the rising magic. The milk should be warm to the touch—about 110°F. Too cold, and the yeast won’t activate. Too hot, and you’ll kill it. Always double-check the temperature if you’re unsure.
When mixed with flour, sugar, eggs, and butter, the yeast begins to ferment the dough, producing gas bubbles that cause it to rise. This is what creates that soft, airy interior we want.
Why Cold Butter is Key
Unlike bread dough, pastry dough calls for cold butter. Why? Because as the dough bakes, the cold chunks of butter melt and create steam, forming those signature flaky layers. If your butter is too soft or melted before baking, your pastries will turn out dense and greasy.
You’ll be folding and rolling the dough a few times in a process similar to laminating croissant dough. This is what gives the bear claw its slightly layered texture.
Tips for Perfect Pastry Dough
- Don’t overmix: Overmixing develops gluten, which makes dough tough instead of tender.
- Keep everything cold: If your kitchen is warm, pop your flour in the freezer for 10 minutes before starting.
- Be patient: Good dough takes time. Let it rest and rise fully—it’s worth it.
Now that you understand what makes the dough special, let’s start putting it together.
Preparing the Dough
Making the dough from scratch may sound intimidating, but once you break it down step by step, it becomes totally manageable—even fun! Here’s how to bring your dough to life.
Mixing the Ingredients
Start by proofing your yeast. In a large mixing bowl, combine warm milk and the active dry yeast. Let it sit for about 5–10 minutes, until it becomes foamy on top. That’s your sign that the yeast is alive and ready to do its thing.
Next, add in the sugar, salt, eggs, and vanilla extract. Mix until just combined. Slowly start adding the flour, one cup at a time, mixing as you go. When a soft dough begins to form, stop and get ready to add the butter.
Add the cold, cubed butter into the dough. You don’t want to fully incorporate the butter into the dough like with cookie dough. Instead, you want the butter to stay in little pieces throughout. This is what will give the bear claws that flaky texture.
Kneading and Resting
Once the dough is formed, transfer it to a lightly floured surface. Knead for about 5–6 minutes until smooth and slightly elastic. If it’s too sticky, sprinkle on a little more flour.
Place the dough into a greased bowl, cover it with plastic wrap or a damp towel, and let it rest in a warm place. The goal is for the dough to double in size, which usually takes 1–2 hours depending on your kitchen temperature.
First Dough Rise: What to Watch For
Here are a few signs your dough is ready:
- It’s doubled in size
- When you press it lightly with your finger, the indentation slowly springs back
- It has a slight, yeasty aroma
Once the dough has risen, it’s time to move on to the fun part: the almond filling!
Making the Almond Filling
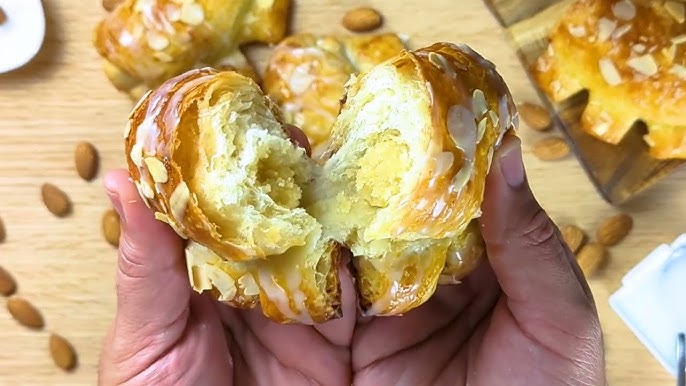
Bear claws are best known for their almond filling—it’s sweet, nutty, and creamy, with just the right amount of richness to balance the buttery pastry. If you’ve never made your own almond paste before, you’re in for a treat.
What is Almond Paste?
Almond paste is a blend of ground almonds and sugar, with just enough moisture to make it pliable. It’s different from marzipan, which is sweeter and often used for candy. For pastries, almond paste is the star—it adds both texture and flavor without being overwhelming.
You can buy almond paste at most grocery stores, but homemade is even better (and often cheaper!).
Homemade Almond Filling Recipe
Here’s how to make the filling from scratch:
Ingredients:
- ¾ cup almond paste
- ¼ cup powdered sugar
- 1 egg white
- ½ teaspoon almond extract
Instructions:
- In a mixing bowl, break up the almond paste into smaller pieces.
- Add powdered sugar, egg white, and almond extract.
- Beat the mixture using a hand mixer until smooth and spreadable.
The result should be thick but spreadable—kind of like a nutty frosting. If it feels too stiff, add a tiny splash of milk. Too runny? Add a bit more powdered sugar.
Substitutes for Almond Filling
Not a fan of almonds? No problem! Try these alternatives:
- Cream cheese + sugar + vanilla
- Apple or cherry pie filling
- Nutella or chocolate ganache
- Cinnamon sugar butter
Once your filling is ready, it’s time to shape those claws.
Assembling the Bear Claws
Here’s where things get creative! Shaping bear claws looks fancy, but it’s actually pretty straightforward once you get the hang of it.
Rolling Out the Dough
Start by punching down the risen dough to release air bubbles. Then turn it out onto a lightly floured surface. Roll it out into a large rectangle, roughly 12 x 16 inches.
If your dough keeps springing back, let it rest for a few more minutes to relax the gluten.
Adding Filling and Shaping
Spread your almond filling over half of the rectangle, leaving a little space at the edges. Then fold the other half of the dough over the filling like a book. Gently press down the edges to seal.
Using a sharp knife or a pizza cutter, cut the folded dough into strips about 2 inches wide. Each strip will become a bear claw.
To create the claws, make 3–4 small slits on one side of each strip, about ½ inch apart. Then slightly curve the strip into a crescent shape, so the slits fan out like claws.
Place each shaped pastry on a parchment-lined baking sheet, making sure there’s room for them to rise and expand.
Second Proofing: Letting the Pastries Rise Again
Now that your bear claws are shaped and lined up on your baking sheet, it’s time for the second rise—also called proofing. This step might seem like a small one, but it has a big impact on how soft and airy your final pastries will be.
Why Second Proofing is Crucial
Think of this stage as the dough’s final stretch before hitting the oven. During the second proof, the shaped pastries puff up as the yeast continues to release gases. This creates a light, tender interior and gives the bear claws that signature puff and lift.
Skipping or rushing this step could leave you with dense or flat pastries that don’t bake evenly. Plus, second proofing helps hold the claw shape during baking.
How Long to Let It Rest
Cover the shaped bear claws loosely with a clean kitchen towel or lightly greased plastic wrap to prevent drying out. Let them rest at room temperature for about 30–45 minutes, or until slightly puffy. If your kitchen is cooler, it may take up to an hour.
If you gently poke the side of a pastry and the dough springs back slowly, it’s ready. If it springs back too quickly, give it more time.
Once they’ve risen, it’s time to add that beautiful finishing touch before baking: the egg wash and toppings.
Egg Wash and Toppings
Here’s where you turn your pastries from good to gorgeous. The egg wash gives the bear claws that golden-brown shine we all associate with bakery-quality goods, and the toppings add texture and flavor.
How to Make an Egg Wash
Making an egg wash is simple, but makes all the difference. Just whisk together:
- 1 egg yolk
- 1 tablespoon milk or cream
Use a pastry brush to gently brush the tops of each bear claw. Be careful not to let the wash drip down the sides, as it can cause uneven baking or burnt edges.
Best Toppings for Bear Claws
- Sliced Almonds: Classic and crunchy. Sprinkle a few over each pastry before baking.
- Coarse Sugar: Adds sparkle and a bit of crunch. Try turbinado or pearl sugar.
- Cinnamon Sugar: For a warm, sweet topping with extra flavor.
Want to get creative? Add a light sprinkle of shredded coconut, poppy seeds, or even mini chocolate chips for a unique twist.
Once they’re brushed and topped, your bear claws are oven-ready!
Baking the Bear Claws
It’s time to bring all your hard work to life. The baking process not only cooks the dough through but also crisps the outer layers, melts the filling, and gives the claws that irresistible golden finish.
Ideal Oven Temperature
Preheat your oven to 375°F (190°C). Always let your oven fully preheat before placing your pastries inside—it ensures even baking and helps the dough puff up correctly.
If you have a convection setting, that’s even better for pastry—it circulates the air and promotes even browning.
When Are They Fully Baked?
Bear claws typically take 18 to 22 minutes to bake. Keep an eye on them toward the end of baking. You’re looking for:
- Deep golden-brown edges
- A puffy appearance
- Slightly crisp tops
The bottoms should be golden but not burned. If your oven tends to run hot, check them a couple of minutes early.
Avoiding Overbaking
Overbaked pastries turn dry and brittle. To avoid this:
- Use an oven thermometer for accuracy.
- Check doneness around the 18-minute mark.
- Rotate your pans halfway through for even heat.
Once they’re out of the oven, let them cool on a wire rack for about 10–15 minutes before glazing. Speaking of glaze…
Icing and Glazing
You could eat your bear claws as-is right out of the oven, but adding a simple glaze takes them to a whole new level. It adds sweetness, shine, and that “wow” factor that makes them look like they came straight from a bakery.
How to Make Simple Vanilla Glaze
Ingredients:
- 1 cup powdered sugar
- 2 tablespoons milk (adjust as needed)
- ½ teaspoon vanilla extract
Instructions:
- In a small bowl, whisk all ingredients together until smooth.
- If it’s too thick, add more milk, 1 teaspoon at a time.
- If it’s too thin, add a bit more powdered sugar.
When to Glaze the Pastries
Make sure the bear claws are completely cooled before you drizzle on the glaze. If they’re too warm, the glaze will melt and slide off.
Use a spoon or small whisk to drizzle it over each pastry in a zigzag motion. Let the glaze set for 10–15 minutes before serving.
Want to make it even more special? Try mixing in a little maple syrup or almond extract for a flavor twist.
Serving Suggestions
Bear claws are best enjoyed fresh, slightly warm, and paired with your favorite drink. Whether you’re having one as a breakfast treat or a cozy afternoon snack, here are some delicious ways to enjoy them.
Best Ways to Serve Bear Claws
- Warm from the oven: Nothing beats that fresh, warm, gooey center.
- With coffee or tea: The perfect pairing. The almond flavor complements coffee wonderfully.
- Topped with fresh fruit: Serve with sliced strawberries or blueberries for a sweet brunch platter.
Pairing Ideas
- Coffee: Try a vanilla latte or cappuccino.
- Hot tea: Earl Grey or chai adds lovely spice.
- Cold milk: Classic and kid-friendly!
Serve your bear claws on a rustic wooden tray or cake stand for a brunch display that’s sure to impress. Want to go the extra mile? Dust with a little powdered sugar right before serving.
Storage Tips
So, you’ve made a batch of glorious bear claw pastries—now what? While they’re absolutely best enjoyed fresh, you can store them for later without losing too much of that magic.
Keeping Them Fresh
If you’re planning to eat them within 1–2 days, here’s how to store them:
- Room Temperature: Place the pastries in an airtight container or wrap them tightly in plastic wrap. Store at room temperature for up to 2 days.
- Reheating: When ready to eat, pop them in a 300°F (150°C) oven for 5–8 minutes. This revives the flakiness without over-drying.
Avoid storing them in the fridge, as the cold can make the pastry go stale faster due to condensation.
How to Freeze for Later
Bear claws freeze beautifully—whether baked or unbaked.
To Freeze Baked Bear Claws:
- Let the pastries cool completely.
- Wrap each one individually in plastic wrap, then place them in a freezer-safe bag.
- Label with the date and freeze for up to 2 months.
To reheat: Thaw at room temperature, then reheat in the oven at 300°F for 10 minutes.
To Freeze Unbaked Bear Claws:
- Shape the pastries and place them on a baking sheet lined with parchment paper.
- Freeze until solid (about 2 hours).
- Transfer to a freezer-safe bag and freeze for up to 1 month.
When ready to bake: Let them thaw and proof for 1–2 hours at room temp, then bake as usual.
Pro tip: Glaze the bear claws after reheating, not before freezing!
Troubleshooting Common Issues
Baking can be a little tricky, especially when working with yeast doughs and delicate fillings. But don’t stress—here are solutions to some of the most common problems you might face when making bear claws.
Dough Too Sticky or Too Dry?
- Too Sticky: Add a little more flour, 1 tablespoon at a time, during kneading. But don’t go overboard—stickiness can actually be a good sign that the dough is moist.
- Too Dry: Add a teaspoon of milk or water and knead it in slowly until the dough softens up.
Why Didn’t My Pastries Puff Up?
- Could be inactive yeast—always proof your yeast first.
- The dough may not have had enough time to rise. Yeast needs warmth and patience.
- Oven not hot enough? Make sure it’s fully preheated before baking.
Burnt Bottoms or Undercooked Tops?
- Use light-colored baking sheets—dark ones absorb more heat and may burn the bottoms.
- Bake in the middle of the oven, not the bottom rack.
- Rotate the baking sheet halfway through baking for even browning.
Filling Leaking Out?
- Don’t overfill the dough.
- Seal the edges well.
- Make sure the filling is thick enough—runny fillings will always cause problems.
Everyone makes mistakes, even experienced bakers. The good news? Even the “ugly” bear claws taste amazing!
FAQs about Bear Claw Pastry Recipe
1. Can I use puff pastry instead of making dough from scratch?
Yes! Using store-bought puff pastry is a great shortcut when you’re short on time. Just roll it out, fill, shape, and bake. Keep in mind that puff pastry gives a flakier but slightly different texture than the yeasted dough in traditional bear claws.
2. How long do bear claw pastries last?
They’re best fresh but will keep for about 2 days at room temperature. For longer storage, freeze them and reheat when needed.
3. Can I make bear claws without nuts?
Absolutely. You can swap out almond filling for cream cheese, fruit jam, or even chocolate spread. Just make sure the filling isn’t too runny or it may leak during baking.
4. Are bear claws the same as Danish pastries?
They’re similar but not the same. Bear claws are a type of Danish pastry, but their shape and filling (typically almond) are what set them apart. Danish pastries also come in many other shapes and flavor profiles.
5. Can I freeze baked bear claws?
Yes, and they freeze well! Wrap them tightly after they’ve cooled completely and store them in the freezer for up to 2 months. Reheat in the oven for a fresh-from-the-bakery taste.
Conclusion
There’s something incredibly satisfying about making bear claw pastries from scratch. From working the buttery dough to creating the claw shapes and drizzling the final glaze, the whole process feels like an edible art project—and the results are bakery-worthy.
This recipe gives you all the tools you need to master bear claws at home. Whether you’re baking for a lazy weekend brunch, a special holiday breakfast, or just because you love a good pastry, these treats will always impress.
Plus, once you’ve nailed the basics, the possibilities are endless. Try new fillings, add toppings, experiment with shapes—make it yours! Baking is all about having fun and learning along the way.
So roll up your sleeves, preheat that oven, and get ready to impress your friends, family, or just yourself. You deserve it.


