Whole Grain Sourdough Bread Recipe: So, you’re ready to roll up your sleeves and bake a hearty loaf of whole grain sourdough bread? Great choice! There’s something incredibly satisfying about baking your own bread—especially when it’s whole grain sourdough. It’s not just about the mouthwatering aroma that fills your kitchen or the golden crust that crackles under your fingers. It’s also about crafting something deeply nourishing, rooted in tradition, and surprisingly simple once you get the hang of it.
Whole grain sourdough bread is more than just bread. It’s a labor of love that connects us to old-world techniques and modern-day nutrition. Unlike store-bought loaves filled with preservatives and hidden sugars, this bread is made with just a few honest ingredients—flour, water, salt, and your trusty sourdough starter. Yet it delivers unmatched flavor, texture, and health benefits.
In this guide, we’ll take you through every single step—from mixing and fermenting to shaping and baking. Whether you’re a total newbie or someone who’s dabbled in baking before, this detailed walkthrough will help you bake a beautiful, crusty, whole grain sourdough loaf that’s as delicious as it is good for you.
Let’s get baking!
Ingredients You’ll Need
Before you start baking, let’s make sure you’ve got everything you need. One of the best things about sourdough bread is its simplicity. No fancy chemicals or long ingredient lists—just a few key players doing all the work.
Essential Ingredients
Here’s what you’ll need to make one medium-sized loaf of whole grain sourdough bread:
- 500g whole wheat flour (preferably organic, stone-ground for the best results)
- 375g water (filtered or spring water preferred)
- 100g active sourdough starter (at 100% hydration)
- 10g sea salt
Optional Add-Ins
These extras are totally up to you, but they can elevate your loaf:
- 25g flaxseeds or sunflower seeds (for crunch and nutrition)
- 1 tsp dried rosemary or thyme (for a herby twist)
- A handful of chopped walnuts or cranberries
- Rolled oats or seeds for topping
Keep in mind, whole grain flour absorbs more water than white flour, so this recipe already accounts for that with a fairly high hydration level. You may need to adjust slightly depending on the brand or freshness of your flour.
Understanding Your Ingredients
Understanding why we use each ingredient can really level up your baking game. This isn’t just a recipe—it’s a foundation for creativity and confidence in the kitchen.
Whole Wheat Flour
Whole wheat flour includes the bran, germ, and endosperm of the grain. That means it’s packed with fiber, vitamins, and minerals—unlike refined white flour that’s stripped of its nutritional value. The downside? Whole wheat flour can make the dough denser, but we’ll balance that with proper fermentation and hydration.
Sourdough Starter
Your starter is the soul of the bread. It’s a live culture of wild yeast and lactic acid bacteria that naturally ferments the dough. This brings complex flavor, better digestibility, and a longer shelf life. Make sure your starter is bubbly and active before baking—ideally, it should pass the float test when ready.
Water
Water activates the flour and hydrates the starter, allowing gluten to form and fermentation to happen. It’s more than just a liquid—hydration levels affect the dough’s texture, crumb, and oven spring.
Salt
Salt isn’t just for flavor—it regulates fermentation, strengthens gluten structure, and improves the overall keeping quality of your loaf. Never skip it!
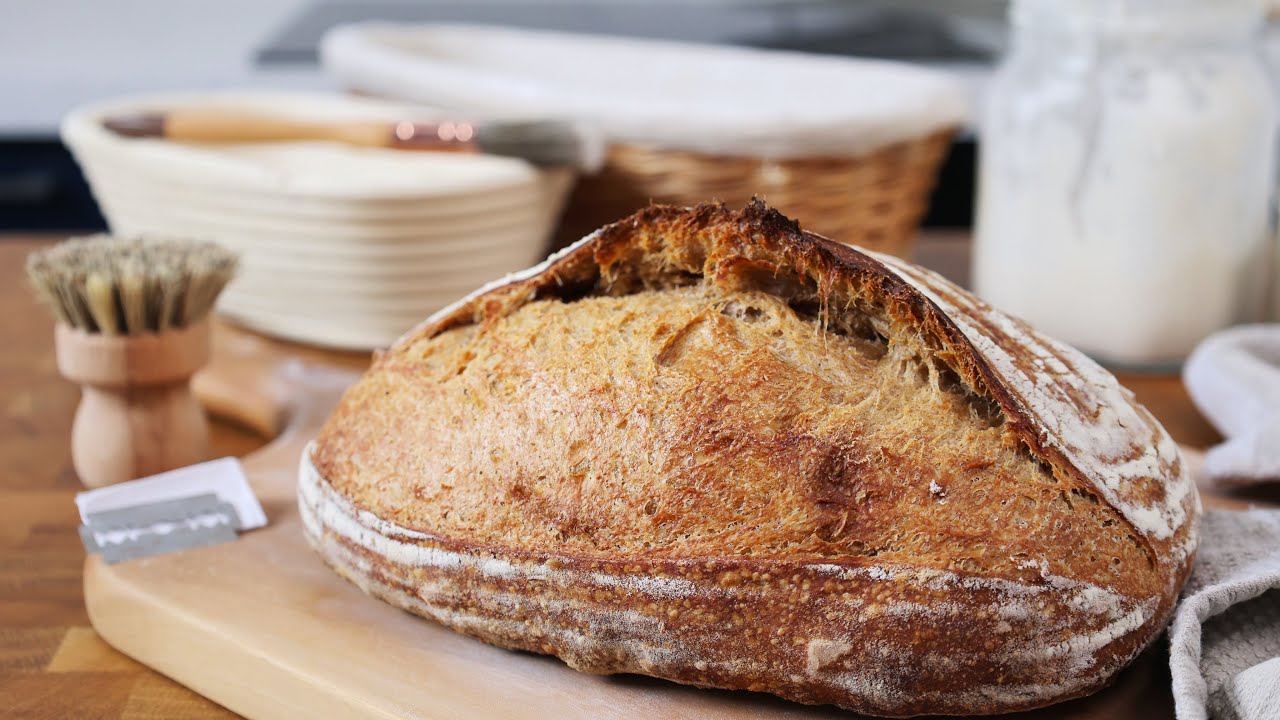
Tools You’ll Need
To make life easier, having the right tools can really make a difference. Here’s what we recommend:
- Digital kitchen scale (accuracy is everything in bread baking)
- Mixing bowl (preferably glass or ceramic)
- Dough scraper or bench knife (helps with folding and shaping)
- Dutch oven or baking stone (to create steam for a crusty finish)
- Proofing basket (banneton) or a bowl lined with a floured towel
- Lame or sharp knife (for scoring the dough)
These tools aren’t mandatory, but they do help create a more consistent and pro-looking loaf.
Preparing Your Sourdough Starter
A healthy, active sourdough starter is the heart of any great loaf. If your starter is sluggish or not mature enough, your bread won’t rise properly, and the flavor might be off. Here’s how to make sure your starter is ready for baking.
Feeding Your Starter
Start feeding your starter about 4–6 hours before you plan to use it, depending on the room temperature. You’ll want to use a 1:1:1 ratio of starter, flour, and water by weight. For example:
- 50g starter
- 50g whole wheat flour
- 50g water (room temperature)
Mix everything well in a clean jar and cover it loosely. Let it sit at room temperature until it doubles in size and becomes bubbly and airy. This is when it’s at its peak and ready to use.
How to Know If It’s Ready
Use the float test: Drop a spoonful of your starter into a cup of water. If it floats, it’s ready to use. If it sinks, give it more time or another feeding.
Other signs it’s ready:
- Has doubled in volume
- Smells tangy and slightly fruity
- Looks bubbly and active
Troubleshooting Starter Issues
- Too sour? You might be over-fermenting. Try feeding it more frequently.
- Not rising? It may be too cold in your kitchen or your starter may need more feedings.
- Weird smell? A slight tang is fine, but a foul or rotten smell means you may need to discard and refresh.
The better your starter, the better your bread. Give it love, and it’ll reward you tenfold.
Step-by-Step Guide to Making Whole Grain Sourdough Bread
Now for the part you’ve been waiting for—the full process of making your own whole grain sourdough loaf from scratch. Let’s break it down into easy, manageable steps.
Step 1: Mixing the Dough
Start with a good balance: about 70–75% hydration works well for whole grain flour (e.g., 350–375 g water for 500 g flour). Mix flour and water until no dry bits remain. Cover and rest for 30–60 minutes—this is the autolyse. It hydrates the flour, kick-starts gluten development, and improves dough strength and flavor.
Step 2: Adding Salt and Starter
After autolyse, add active sourdough starter and salt. Adding them later prevents salt from slowing hydration and lets gluten form more easily. Pinch and fold the dough to combine, then mix gently until cohesive—avoid overworking.
Step 3: Bulk Fermentation
Ferment at 72–78°F (22–26°C) for 3–5 hours, depending on activity. During the first 2 hours, perform 3–4 sets of stretch and folds every 30 minutes to build structure. The dough should rise slightly, feel airy, and show bubbles.
Step 4: Shaping the Dough
Turn the dough onto a lightly floured surface. Gently pre-shape, rest 15 minutes, then final shape. Create surface tension by pulling the dough toward you and tucking edges underneath—this helps the loaf rise upward.
Step 5: Final Proofing
Place seam-side up in a floured banneton or bowl. Proof at room temperature for 1–2 hours, or cold proof in the fridge for 8–14 hours for better flavor and easier scoring.
Step 6: Scoring and Baking
Preheat oven with a Dutch oven to 475°F (245°C). Score with a sharp blade for controlled expansion. Bake with steam (lid on) for 20 minutes, then uncover and bake 20–25 minutes until deeply golden and crisp.
Cooling and Storing the Bread
You’ve just pulled your crusty, golden-brown loaf from the oven, and it smells heavenly—but don’t slice into it just yet! Cooling is one of the most overlooked yet critical steps in sourdough baking.
Why Cooling Matters
When bread comes out of the oven, it’s still baking internally. The steam inside continues to cook the crumb and stabilize the structure. If you cut it too early, you’ll end up with a gummy, undercooked center. Resist the temptation and let the loaf rest on a wire rack for at least 1 to 2 hours.
During this time:
- Moisture redistributes evenly
- Crumb sets properly
- Flavor deepens
If you listen closely, you’ll even hear your bread “sing”—that soft crackling sound of the crust cooling and contracting.
How to Store Sourdough Bread
Sourdough has a longer shelf life than store-bought bread due to its natural acidity, but it still needs proper storage to stay fresh.
Short-term (1–3 days):
- Wrap the loaf in a clean kitchen towel or place in a paper bag.
- Store at room temperature in a cool, dry place.
Avoid plastic bags if you want to keep the crust crisp—they trap moisture and make the crust soggy.
Medium-term (4–5 days):
- Use a bread box or wrap in beeswax wrap to retain freshness.
Long-term:
- Slice and freeze in an airtight bag.
- Toast slices directly from the freezer—no need to thaw.
Serving Suggestions
Whole grain sourdough is incredibly versatile. Its nutty flavor and chewy crumb make it perfect for just about any meal—or snack. Here are a few delicious ways to enjoy your fresh loaf:
Breakfast Ideas:
- Classic Avocado Toast: Add sliced avocado, a sprinkle of chili flakes, and a squeeze of lemon.
- Nut Butter + Banana: Smear with almond butter and top with banana slices and honey.
- Eggs on Toast: Poached, fried, or scrambled—sourdough makes the perfect base.
Lunch and Dinner:
- Grilled Sandwiches: Layer cheese, veggies, or deli meats and press until golden.
- Soup Sidekick: Dip into hearty soups like tomato, lentil, or vegetable.
- Open-Faced Tartines: Add goat cheese, roasted veggies, or smoked salmon for an elegant touch.
Snacks and Appetizers:
- Garlic Bread: Rub slices with garlic, brush with olive oil, and toast.
- Bruschetta: Top with fresh tomatoes, basil, and balsamic glaze.
However you serve it, this bread is the kind that brings people to the table and makes you feel like a baking hero—even if you’re just getting started.
Tips for Perfect Whole Grain Sourdough Every Time
Baking sourdough is a journey—one full of experimentation and, yes, occasional flops. But that’s part of the fun. Here are some tried-and-true tips to help you consistently bake a better loaf.
1. Watch the Dough, Not the Clock
Fermentation times can vary wildly depending on the temperature and humidity in your kitchen. Instead of relying solely on a timer, learn to read your dough:
- Has it doubled in size?
- Is it bubbly and soft to the touch?
- Does it jiggle slightly when moved?
These signs matter more than minutes.
2. Adjust Hydration Based on Flour Type
Whole grain flour absorbs more water than white flour, but not all whole wheat flours are the same. Some are thirstier than others. If your dough feels too dry or too sticky, don’t panic—adjust as needed. With experience, you’ll know what the right consistency feels like.
3. Use a Kitchen Scale
Sourdough baking is science. Measuring by volume (cups) can be inconsistent. Invest in a digital scale and weigh everything in grams for accuracy and repeatable results.
4. Don’t Skip the Stretch and Folds
These help build gluten strength and improve dough elasticity without kneading. They also create a more open crumb (those beautiful holes inside the bread).
5. Practice Patience
Sourdough isn’t a “quick” bread. Embrace the slower pace and enjoy the process. Every loaf teaches you something new, even if it doesn’t turn out picture-perfect.
Benefits of Whole Grain Sourdough Bread
This bread isn’t just tasty—it’s seriously good for you. Let’s break down why whole grain sourdough is one of the healthiest choices you can make.
1. Improved Digestion
Thanks to natural fermentation, the gluten in sourdough is broken down more than in conventional bread. This makes it easier on your digestive system and may reduce bloating for some people.
2. Better Nutrient Absorption
Whole grains are rich in minerals like magnesium, iron, and zinc. The phytic acid in grains can block absorption, but sourdough fermentation reduces this compound, making nutrients more bioavailable.
3. Lower Glycemic Index
Sourdough causes a slower rise in blood sugar compared to white bread. The acids produced during fermentation help prevent spikes, making it a better option for blood sugar control.
4. Long Shelf Life (Naturally!)
Because of its acidity, sourdough bread resists mold better than commercial loaves. That means fewer preservatives and a longer-lasting product.
5. Boosts Gut Health
The natural lactobacilli in sourdough are beneficial bacteria that support a healthy microbiome. It’s not a probiotic in the strictest sense, but it’s definitely a gut-friendly food.
Troubleshooting Guide
Even experienced bakers run into issues from time to time. Don’t let a less-than-perfect loaf discourage you. Here are some common problems and how to fix them.
Problem 1: My Bread Didn’t Rise
Likely Cause: Your starter wasn’t active enough, or fermentation time was too short.
Solution: Feed your starter regularly and ensure it passes the float test. Give the dough enough time to ferment—watch for signs, not the clock.
Problem 2: My Crust Is Too Hard or Too Soft
Hard crust? You might’ve overbaked or skipped the steam.
Soft crust? You may have stored the bread before it cooled.
Solution: Use a Dutch oven or add steam to your oven. Let bread cool completely on a wire rack before storing.
Problem 3: The Crumb Is Too Dense
Dense crumb is often caused by under-proofing, low hydration, or not enough gluten development.
Solution: Try a longer bulk ferment, increase hydration slightly, and perform more stretch and folds.
Problem 4: Overproofed Dough
If your dough feels very loose, doesn’t spring back when pressed, or collapses after baking, it’s likely overproofed.
Solution: Shorten the final proofing time next bake, and use the finger dent test to judge readiness.
Problem 5: My Dough Sticks Everywhere!
Sticky dough is normal with high hydration, but it can be frustrating.
Solution: Use lightly wet or oiled hands, a bench scraper, and avoid adding too much flour—flour can dry out the dough and affect texture.
Experimenting with Variations
Once you’ve mastered the basic whole grain sourdough loaf, the real fun begins—customizing and experimenting! Think of your dough as a blank canvas and your pantry as a paintbox. With a few tweaks, you can create an endless variety of flavors, textures, and styles.
1. Adding Seeds and Grains
Seeds not only add crunch but also boost the nutrition of your bread.
Try these additions (20–30g of each per loaf):
- Sunflower seeds
- Pumpkin seeds
- Flaxseeds (soak in water first!)
- Chia seeds
- Sesame seeds
- Rolled oats (great for topping too)
Tip: Toasting seeds beforehand enhances their flavor. You can also roll the shaped dough in seeds for a rustic finish.
2. Flavor Boosters
Want to kick up the taste a notch? Add herbs, spices, or sweet elements to match your mood or the season.
Savory options:
- Chopped garlic and rosemary
- Black olives and thyme
- Caramelized onions
- Sun-dried tomatoes and basil
Sweet options:
- Cinnamon and raisins
- Dried cranberries and walnuts
- Orange zest and honey
Tip: Add mix-ins during the second set of stretch and folds so they incorporate evenly without disrupting the gluten structure too early.
3. Playing with Flours
Whole wheat is the base here, but don’t be afraid to experiment with other grains.
Alternative flours to try (replace up to 30–40% of the whole wheat flour):
- Rye flour – adds deep flavor and softness
- Spelt flour – nutty and slightly sweet
- Einkorn – ancient and rich in nutrients
- Kamut or emmer – bold, hearty textures
Each flour behaves differently, especially with water absorption and gluten strength, so adjust hydration as needed.
4. Shaping Styles
Try different shaping styles for variety:
- Bâtard (oval loaf)
- Boule (round loaf)
- Pan loaves (use a loaf tin)
- Rolls or mini loaves (great for sharing!)
With each variation, you learn a bit more. Think of every loaf as a delicious science experiment—and the best part is, you get to eat your results!
FAQs about Whole Grain Sourdough Bread Recipe
1. Can I use store-bought sourdough starter?
Yes, many bakeries or online retailers sell active sourdough starters. Just be sure to feed it for a few days in your own kitchen environment before baking with it. This helps it adjust and become more active.
2. What’s the difference between white and whole wheat sourdough?
Whole wheat sourdough uses flour that contains the entire grain, including the bran and germ. This makes it more nutritious and flavorful, but also a bit denser. White sourdough is lighter and softer but lacks the fiber and nutrients of whole wheat.
3. How long does sourdough bread last?
At room temperature, a sourdough loaf will last 3–5 days if stored properly (in a paper bag or wrapped in a towel). After that, it can be frozen for up to 3 months. Avoid plastic unless freezing.
4. Can I freeze whole grain sourdough?
Absolutely! Once the loaf is cooled, slice it and freeze the slices in a freezer-safe bag. You can toast slices directly from frozen. Whole grain loaves freeze particularly well due to their moisture content.
5. What if my dough doesn’t rise?
Most likely, your sourdough starter wasn’t active enough or your kitchen was too cold. Make sure the starter passes the float test, and give your dough enough time to ferment—especially during colder months.
Conclusion
Remember, no one bakes the perfect sourdough on the first try. Each loaf teaches you something new. Maybe your first was a bit dense or spread a little too much—so what? You made bread. Real, honest, living bread. And each time you repeat the process, you’ll get better at understanding your dough, your starter, and your oven.
The simplicity of the ingredients—flour, water, salt, and starter—is humbling. But within that simplicity lies a world of flavor, tradition, and satisfaction. With this guide, you now have the tools and confidence to create your own bakery-level loaves from your own kitchen.
So go ahead—feed that starter, roll up your sleeves, and bake your first (or next) masterpiece. Your perfect whole grain sourdough loaf is waiting.


