Saltine Toffee Recipe: There’s just something magical about that sweet and salty combo, right? Saltine Toffee, also called “Christmas Crack,” is the ultimate no-fuss treat that wins hearts every single time.
With just a handful of pantry staples, you can create a rich, buttery, crunchy dessert that’s as addictive as it is easy to make. If you’ve never tried making toffee with saltine crackers, you’re in for a treat.
Let’s dive into the delicious details with this foolproof, step-by-step guide.
What is Saltine Toffee?
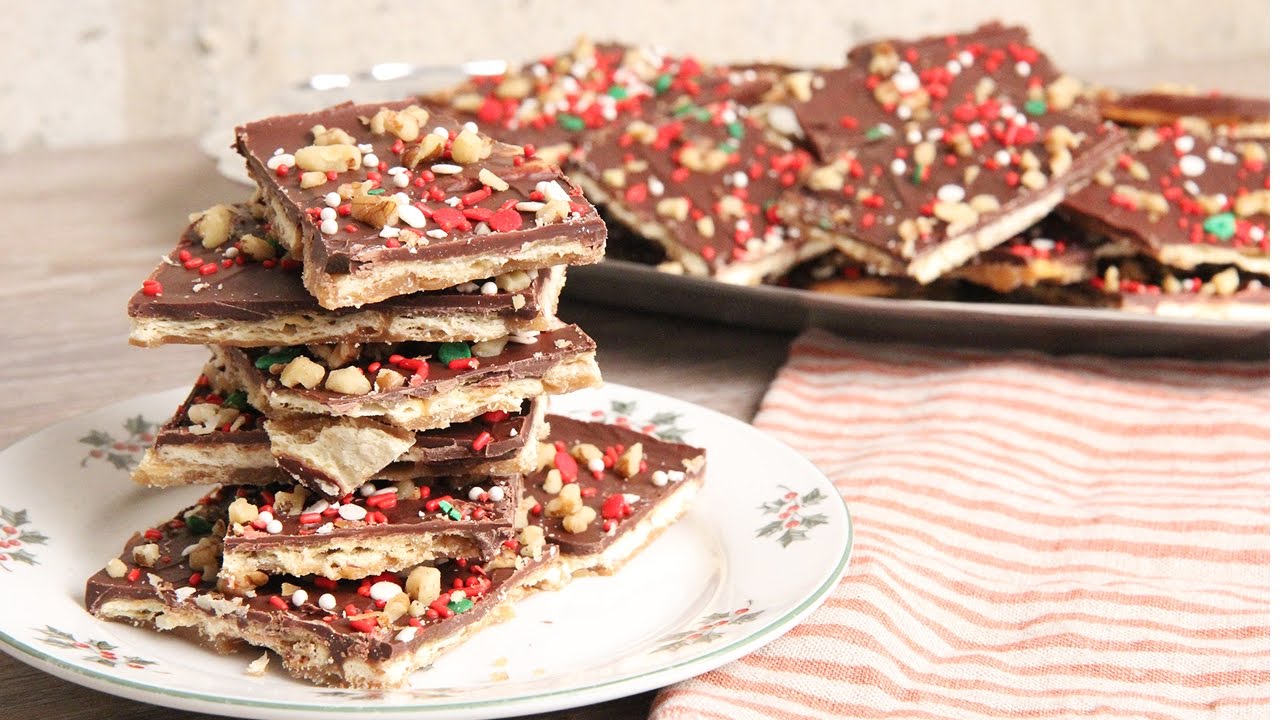
Saltine Toffee is one of those desserts that sounds strange at first—crackers in candy? But once you taste it, you get it. It’s a layered dessert that starts with a crispy base of saltine crackers, then a hot butter and brown sugar mixture is poured over them to create a caramel-like toffee. After baking, chocolate chips are added and melted, then spread across the top like a rich, silky blanket. You can add toppings like chopped nuts, sprinkles, or sea salt for that extra wow.
The result? A crunchy, sweet, salty, chocolaty treat that breaks apart like brittle but tastes like a candy bar. It’s the ultimate blend of textures and flavors. It’s also a go-to holiday treat because it’s quick, makes a large batch, and keeps well—perfect for gifting!
Why This Recipe is a Holiday Favorite
Saltine Toffee tends to show up everywhere around the holidays—and for good reason. First off, it’s insanely easy. There’s no need for a candy thermometer, and it comes together in under 30 minutes. Plus, it uses common ingredients you probably already have. But the best part? It tastes like you spent hours on it. It’s rich, indulgent, and feels like something special.
The sweet caramel pairs perfectly with the salty crunch of the crackers, and the chocolate on top ties it all together. It’s ideal for cookie trays, potlucks, and midnight snacking. Whether you’re hosting a party, making edible gifts, or just want a sweet treat on hand, this recipe is a solid winner.
List of Ingredients You’ll Need
Let’s start with what you’ll need in your kitchen. Good news: you probably have most of these already!
Main Ingredients:
- Saltine crackers – About 40 crackers (one sleeve)
- Unsalted butter – 1 cup (2 sticks)
- Brown sugar – 1 cup, packed (light or dark works)
- Chocolate chips – 2 cups (semi-sweet is standard, but feel free to mix it up)
Optional Toppings:
- Chopped pecans or walnuts
- Sea salt flakes
- Mini M&Ms
- Crushed candy canes
- White chocolate drizzle
- Sprinkles (for a festive touch)
This simple ingredient list is what makes this recipe so lovable. Even if you’re short on time or don’t want to make a store run, odds are you can pull this off with what’s already in your pantry.
Kitchen Tools You’ll Need
Before we get to the steps, here’s what you’ll want ready:
- Baking sheet (preferably rimmed)
- Aluminum foil or parchment paper
- Spatula or offset spatula
- Medium saucepan
- Measuring cups
- Knife (for breaking pieces)
- Refrigerator space for chilling
Having everything prepped and ready makes the process smooth and mess-free.
Step-by-Step Guide to Making Saltine Toffee
Step 1: Preheat and Prepare the Baking Sheet
First things first—preheat your oven to 400°F (200°C). Then, line a rimmed baking sheet with aluminum foil or parchment paper and spray it lightly with nonstick spray. This step is key, because once that toffee sets, it gets super sticky. Lining the pan saves your cleanup and helps you remove the toffee easily later.
Step 2: Line the Saltine Crackers
Next, arrange the saltine crackers in a single layer across the baking sheet. Don’t worry if they don’t line up perfectly—just cover the pan. The idea is to create a solid cracker base for your toffee. You might need to break a few to fit them snugly in the corners.
Step 3: Make the Toffee
In a medium saucepan, melt 1 cup of butter over medium heat. Once melted, add in the 1 cup of brown sugar, stir to combine, and bring the mixture to a rolling boil. Stir constantly while it boils for about 3 minutes—you want it thick and bubbly.
Be careful here—it’s hot sugar, and it gets sticky fast. Don’t walk away or overcook it, or you risk burning the sugar. You’re aiming for a smooth, golden-brown caramel sauce.
Step 4: Pour the Toffee Over Crackers
Immediately pour the hot toffee mixture evenly over the crackers. Use a spatula to spread it out if needed so that all the crackers are covered. Work quickly—this mixture sets fast!
Step 5: Bake Until Bubbly
Pop the baking sheet into the preheated oven and bake for 5 minutes. The toffee will start bubbling up through the crackers, which is exactly what you want. This step helps it really soak into the cracker layer and create that perfect crunch.
Step 6: Add Chocolate Chips
Once baked, remove the pan from the oven and immediately sprinkle the chocolate chips over the hot toffee. Let them sit for a few minutes—they’ll start to melt from the heat.
Step 7: Spread the Chocolate
Once the chips are soft, use a spatula to spread them into an even, smooth layer across the toffee. Take your time to get a nice finish—this is the top layer, so make it pretty!
Step 8: Add Toppings
Before the chocolate sets, go wild with toppings. Sprinkle on chopped nuts, crushed candy canes, or even drizzle melted white chocolate over the top. This is where you can customize the toffee to fit your vibe—holiday, birthday, or just because.
Step 9: Chill Until Set
Now comes the hardest part: waiting. Place the whole tray in the refrigerator for at least 1–2 hours until fully set. The toffee should harden completely and the chocolate layer should be firm to the touch.
Step 10: Break Into Pieces
Once fully chilled, lift the toffee out of the pan using the parchment or foil. Then break it into pieces using your hands or a sharp knife. Don’t worry about making perfect squares—jagged, uneven chunks are part of the charm.
Helpful Tips for the Best Saltine Toffee
Making Saltine Toffee is easy, but a few tips can take your batch from good to phenomenal. Here’s how to guarantee success every time:
- Use good-quality chocolate. You’ll taste the difference. Cheap chocolate chips may not melt well or have that silky finish.
- Don’t overboil the toffee. Three minutes of boiling is usually just right. Overcooking it can cause it to harden too much or taste bitter.
- Work fast. Toffee sets quickly, so pour it and spread it immediately. Have your crackers ready before you start cooking the toffee.
- Line the pan properly. Don’t skip lining your tray! Toffee can stick badly, and foil or parchment makes removal a breeze.
- Add toppings right away. You’ve got a small window while the chocolate is soft. Don’t wait too long or they won’t stick.
These small details make a big impact. The recipe is forgiving, but with these tricks, your toffee will look and taste like a professional made it.
How to Store Saltine Toffee
Saltine Toffee stores like a dream! Once your toffee is fully cooled and broken into pieces, place it in an airtight container. It will stay fresh at room temperature for up to 2 weeks—if it even lasts that long!
If your kitchen runs warm or it’s the middle of summer, store it in the fridge to keep the chocolate firm. Just be sure to separate layers with parchment paper to prevent sticking.
It’s also a perfect make-ahead treat for the holidays. You can prepare it days in advance and store it for gifting, parties, or your own snack stash.
Can You Freeze Saltine Toffee?
Yes, you absolutely can freeze Saltine Toffee, and it actually freezes really well. Here’s how to do it right:
- Break the toffee into pieces after it’s fully set.
- Place the pieces in a freezer-safe bag or container, separating layers with parchment or wax paper.
- Freeze for up to 3 months.
When you’re ready to enjoy, just take out a few pieces and let them sit at room temperature for 10–15 minutes. Or honestly? It tastes pretty amazing straight from the freezer too—cool, crisp, and still packed with flavor.
Common Mistakes to Avoid
Even simple recipes come with a few potential slip-ups. Avoid these common mistakes for toffee that’s flawless every time:
- Not boiling the toffee long enough. It won’t harden properly and may be too gooey.
- Overboiling the sugar. Burnt toffee is bitter and grainy.
- Using margarine instead of butter. It won’t set the same way and affects the flavor.
- Skipping the liner. You’ll end up chiseling candy off your tray. Save yourself the trouble!
- Not spreading chocolate quickly. If you wait too long, it will harden before you get a smooth layer.
Mistakes can be a learning experience, but with these tips, you can skip the trial and error and get it perfect on your first go.
Flavor Variations to Try
Once you’ve mastered the classic version, get creative! Saltine Toffee is like a blank canvas for your dessert imagination. Here are some fun variations to try:
- Peanut Butter Twist: Add a few dollops of peanut butter on the hot toffee before the chocolate layer.
- Mocha Crunch: Mix instant espresso powder into your chocolate layer for a coffee kick.
- White Chocolate & Cranberries: Swap out the semi-sweet chips for white chocolate and sprinkle with dried cranberries.
- Spicy Sweet: Add a pinch of cayenne or chili flakes on top for a surprising heat.
- S’mores Style: After spreading chocolate, add mini marshmallows and broil for a few seconds until toasty.
Feel free to experiment with flavors and textures. As long as the base remains crispy and the toffee layer is sweet and buttery, you really can’t go wrong.
Is Saltine Toffee Gluten-Free?
Traditional Saltine crackers contain gluten, so this recipe is not gluten-free by default. However, if you use gluten-free saltine-style crackers (available at many grocery stores or online), you can easily make a version that’s gluten-free.
Make sure to check all your other ingredients as well—some chocolate chips and toppings may contain gluten or be processed in facilities that handle wheat. Always read the labels if you’re preparing this for someone with celiac disease or gluten sensitivity.
Perfect Occasions to Serve Saltine Toffee
Saltine Toffee might be most popular during Christmas, but it’s really perfect any time of year. Here are a few ideas for when to serve it:
- Holiday parties – Add to your cookie platter or dessert spread.
- Gifting – Wrap in cellophane bags with ribbons or fill small tins.
- Potlucks – It travels well and always gets compliments.
- Movie nights – Sweet, crunchy, and impossible to stop eating.
- Birthday favors – Add custom toppings to match the theme.
You can even turn this into a fun baking project with kids or friends. It’s a great way to spend time together and make something tasty.
Make it a Family Tradition
Some of the best recipes are the ones passed down or repeated every year. Saltine Toffee is perfect for becoming part of your family’s holiday traditions. Let the kids sprinkle the toppings. Share a batch with your neighbors. Make it every December and enjoy the memories you bake into each piece.
Every crack and crunch tells a story—of holiday cheer, late-night cravings, or just that unbeatable feeling of nailing a recipe that brings people joy.
FAQs about Saltine Toffee Recipe
1. How long does saltine toffee last?
Saltine Toffee can last up to 2 weeks in an airtight container at room temperature. For longer storage, freeze for up to 3 months.
2. Can I use margarine instead of butter?
It’s best to stick with real butter for this recipe. Margarine has a higher water content and won’t create the same rich toffee layer.
3. What if the chocolate chips don’t melt?
If your chips don’t melt enough to spread, place the pan back into the warm oven for 1 minute to soften them, then try spreading again.
4. Can I make this recipe nut-free?
Absolutely! Skip the nut toppings or try safe alternatives like sprinkles, coconut flakes, or crushed pretzels.
5. Can I double the recipe?
Yes, just use a larger half-sheet baking pan and double all the ingredients. Make sure your toffee layer still covers the crackers evenly.
Conclusion
There’s a reason Saltine Toffee has earned its nickname: Christmas Crack. It’s deliciously addictive, super easy to make, and endlessly customizable. Whether you’re prepping for a festive gathering or just want to satisfy your sweet tooth, this treat hits every note—salty, sweet, crunchy, and chocolatey.
Now that you’ve got the step-by-step guide, ingredients, tips, and variations, you’re more than ready to whip up your own batch. And trust me—once you make it, you’ll want to make it again (and again).


