Pretzel Bun Recipe: Craving something soft, chewy, golden brown, and oh-so-delicious? You’re in the right place. This pretzel bun recipe will take your sandwiches, burgers, and snack time to a whole new level.
Whether you’re a seasoned baker or just trying your hand at homemade bread for the first time, this guide breaks down every step in an easy, approachable way. Plus, we’ll throw in some pro tips to help you get that iconic pretzel flavor and shiny crust right at home.
Ready to roll (literally)? Let’s get baking!
Why Pretzel Buns Are So Popular
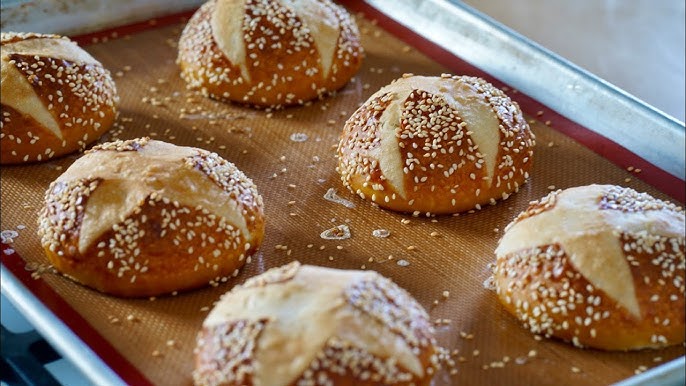
You’ve probably seen pretzel buns popping up on burger menus, in bakeries, or at gourmet sandwich shops—and there’s a good reason for it. Pretzel buns are soft on the inside, chewy on the outside, and have a rich, slightly salty flavor that’s incredibly satisfying. What sets them apart is the baking soda bath, which gives them their deep brown crust and distinct “pretzel” bite.
Not only do they taste amazing, but they also hold up incredibly well to juicy burgers, BBQ pulled pork, crispy chicken, or even egg salad. Unlike some soft buns that get soggy fast, pretzel buns are sturdy enough to handle all the fillings you can throw at them.
And the best part? You can make them at home with simple ingredients and a little time.
What Makes Pretzel Buns Different?
Let’s talk science (briefly). The magic behind pretzel buns lies in their alkaline bath—a solution of baking soda and water. This bath is what sets them apart from regular dinner rolls or sandwich buns.
Here’s what the bath does:
- Color: Turns the outside of the bun deep brown.
- Texture: Creates a chewy crust that contrasts beautifully with the soft interior.
- Flavor: Gives that signature pretzel taste (slightly tangy and savory).
Without this bath, you’d just have regular rolls. But with it? You’ve got golden perfection.
Perfect Uses for Pretzel Buns
Pretzel buns aren’t just for show—they’re functional and flavorful. Here are some ways to enjoy them:
- Burger buns: Use instead of classic white buns for a gourmet twist.
- Sliders: Make mini versions for game days or parties.
- Sandwiches: Turkey, ham, roast beef—all taste better with a pretzel bun.
- Breakfast buns: Try one toasted with scrambled eggs and cheese.
- Snack rolls: Serve warm with mustard or cheese dip.
List of Ingredients You’ll Need
Let’s get our kitchen prepped. Here’s everything you’ll need to make homemade pretzel buns from scratch.
Dry Ingredients
- 4 cups all-purpose flour
- 1 tablespoon granulated sugar
- 2 ¼ teaspoons (1 packet) instant yeast
- 1 ½ teaspoons salt
Wet Ingredients
- 1 ½ cups warm water (around 110°F or 43°C)
- 2 tablespoons unsalted butter, melted
Boiling Solution for Pretzel Texture
- 10 cups water
- ½ cup baking soda (yes, half a cup!)
Optional Toppings
- Coarse sea salt
- Sesame seeds
- Shredded cheese
- Everything bagel seasoning
Tools You’ll Need in the Kitchen
Making pretzel buns is easier when you’ve got the right tools ready to go:
- Large mixing bowl
- Dough hook or your hands
- Measuring cups and spoons
- Large pot (for boiling)
- Slotted spoon
- Parchment paper
- Baking sheet
- Kitchen towel or plastic wrap
- Cooling rack
- Pastry brush (optional)
Step-by-Step Guide to Making Pretzel Buns
Step 1: Making the Dough
In a bowl, mix warm water, yeast, sugar, flour, salt, and melted butter. Stir until a soft dough forms.
Step 2: Kneading and First Rise
Knead the dough for 8–10 minutes until smooth and elastic. Place in a lightly oiled bowl, cover, and let rise for about 1 hour, or until doubled in size.
Step 3: Shaping the Buns
Punch down the dough and divide into equal portions. Shape each piece into a smooth ball, pinching the bottom seam closed.
Step 4: Second Rise
Place the shaped buns on a lined baking sheet. Cover lightly and let rise for 20–30 minutes until slightly puffy.
Step 5: Preparing the Baking Soda Bath
Bring water to a boil and carefully add baking soda. Stir gently until dissolved, then reduce to a simmer.
Step 6: Boiling the Buns
Boil each bun for 20–30 seconds per side. Remove with a slotted spoon and return to the baking sheet.
Step 7: Topping and Baking
Brush buns with egg wash and sprinkle with coarse salt or seeds. Bake at 425°F (220°C) for 12–15 minutes until deep golden brown.
Step 8: Cooling and Serving
Cool slightly before serving. Enjoy warm as sandwich buns or on their own.
Tips for the Best Pretzel Buns Every Time
Want that perfect glossy crust and soft inside every single time? Keep these pro tips in mind:
- Don’t skip the baking soda bath – it’s what gives you that pretzel flavor and appearance.
- Use warm—not hot—water for yeast to activate it without killing it.
- Avoid too much flour – if your dough is too dry, your buns will be dense.
- Score the tops before baking – this helps control how the bun expands in the oven.
- Bake on parchment paper to avoid sticking and for easy cleanup.
- Let buns cool on a wire rack so they don’t get soggy bottoms.
Making pretzel buns may sound fancy, but once you try it, you’ll see just how doable it is!
Common Mistakes and How to Avoid Them
Here are a few common missteps—and how to dodge them like a baking ninja:
- Using cold water with yeast: It won’t activate, and your dough won’t rise. Always use warm water around 110°F.
- Skipping the second rise: It may seem like a time-saver, but it results in dense buns.
- Over-kneading the dough: This can make buns tough. Knead just until smooth and elastic.
- Overcrowding the baking sheet: Give the buns space to rise and bake evenly.
- Forgetting to score the tops: Without that slice, buns can burst at random spots while baking.
Pretzel Bun Variations to Try
Feeling adventurous? Once you’ve mastered the basic recipe, try these tasty twists:
Cheddar-Stuffed Pretzel Buns
Add a cube of cheddar into the center of each dough ball before shaping. You’ll get melty, cheesy centers that are chef’s kiss.
Garlic Herb Pretzel Buns
Add minced garlic and chopped rosemary or thyme into the dough for a savory, aromatic bun.
Sweet Cinnamon Pretzel Buns
Skip the salt topping and brush with butter and cinnamon sugar after baking. Serve warm for a dessert-style twist.
These variations let you customize the flavor to match any meal or occasion.
How to Store and Reheat Pretzel Buns
So you’ve made a batch of glorious pretzel buns—but what if you don’t eat them all in one sitting (as hard as that may be)?
Here’s how to store them right and keep that amazing texture:
Short-Term Storage (1–3 Days)
- Let the buns cool completely.
- Store them in an airtight container or zip-top bag at room temperature.
- Keep them away from direct sunlight or heat.
Important: Avoid refrigerating pretzel buns—it can make them go stale faster due to the starches recrystallizing.
To Reheat
- Wrap in foil and warm in a 350°F (175°C) oven for about 5–7 minutes.
- Or pop in the microwave for 15–20 seconds (cover with a damp paper towel to retain moisture).
- For crispy edges, slice and toast on a skillet with a bit of butter.
Reheating brings the crust back to life and makes them taste bakery-fresh again.
Can You Freeze Pretzel Buns?
Absolutely, and they freeze beautifully. If you want to prep ahead or save leftovers:
How to Freeze
- Let buns cool fully after baking.
- Wrap each bun tightly in plastic wrap or foil.
- Place wrapped buns in a freezer-safe zip bag or container.
- Label with the date. They’ll stay fresh for up to 2 months.
How to Thaw & Reheat
- Thaw at room temperature for 1–2 hours, still wrapped.
- For that fresh-baked taste, warm in the oven at 350°F (175°C) for about 10 minutes.
You can also slice them and toast directly from frozen for breakfast sandwiches or sliders.
Serving Suggestions
Now that you’ve got the buns, it’s time to put them to delicious use. Pretzel buns are incredibly versatile, and here are some killer ways to serve them:
Burgers
- Classic cheeseburgers
- BBQ bacon burgers
- Veggie or black bean burgers
Sandwiches
- Turkey and Swiss with honey mustard
- Roast beef with horseradish mayo
- Grilled chicken with chipotle aioli
Breakfast
- Egg, bacon & cheddar pretzel sandwich
- Sausage, egg & cheese sliders
Snacks & Appetizers
- Pretzel bun sliders for game day
- Mini buns with spinach artichoke dip
- Serve warm with beer cheese or mustard
Their chewy texture and bold flavor make pretzel buns stand out in any dish.
Nutrition Facts (Per Bun)
Here’s an approximate breakdown for 1 homemade pretzel bun (without added cheese or toppings):
| Nutrient | Amount |
|---|---|
| Calories | 210–240 kcal |
| Carbohydrates | 40g |
| Protein | 6–8g |
| Fat | 3–5g |
| Fiber | 1–2g |
| Sodium | 400–500mg |
| Sugar | 1–2g |
Note: These values can vary based on size, toppings, and flour brand used. Always adjust based on your specific ingredients if tracking nutrition.
FAQs about Pretzel Bun Recipe
1. Can I use whole wheat flour instead of all-purpose flour?
Yes, but it will change the texture slightly. Use half whole wheat and half all-purpose to keep them soft while adding fiber and a nuttier flavor.
2. Why are my buns not getting brown enough?
Make sure your baking soda bath is at a simmer and you’re using enough baking soda. Also, your oven must be fully preheated to 425°F for a deep brown crust.
3. Can I make the dough ahead of time?
Absolutely! Make the dough, cover, and refrigerate overnight. Let it come to room temp before shaping and baking the next day.
4. Can I make mini pretzel slider buns with this recipe?
Yes! Just divide the dough into 12–14 small balls and reduce baking time to around 12 minutes.
5. What’s the best dip to serve with pretzel buns?
Cheddar cheese sauce, spicy mustard, ranch dip, or even garlic butter are all fantastic with pretzel buns.
Conclusion
There’s something truly magical about homemade pretzel buns—they’re golden, soft, chewy, and packed with flavor. They instantly upgrade any burger or sandwich, and once you try making them yourself, you’ll never go back to store-bought.
From shaping and boiling to baking and serving, every step brings you closer to bakery-style perfection right in your own kitchen. Plus, you can customize them with cheese, herbs, or even cinnamon sugar for sweet treats.
So grab your apron, heat up that oven, and get ready to fall in love with baking all over again. These buns aren’t just food—they’re an experience.


