Palmiers Recipe: Golden, crispy, and flaky, Palmiers are a true testament to the magic of puff pastry and sugar. Whether you know them as elephant ears, French hearts, or palm leaves, these elegant pastries are surprisingly easy to make at home—even if you’re not a seasoned baker.
In this detailed, step-by-step guide, we’ll walk you through every stage of making the perfect Palmiers, from prepping the dough to the final golden bake. You’ll be amazed how a few simple ingredients can turn into a bakery-level treat.
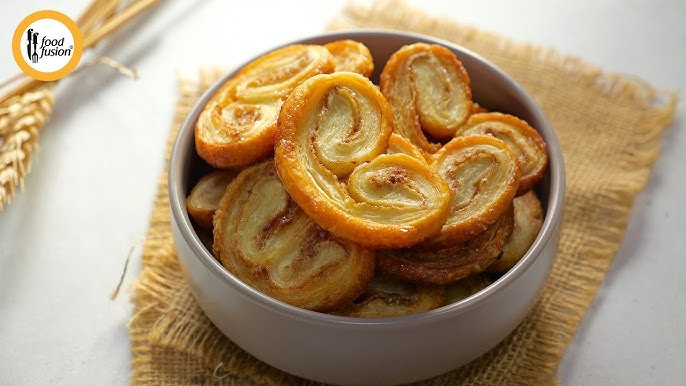
What Are Palmiers?
Palmiers are classic French pastries made from puff pastry and sugar. The dough is rolled, folded, sliced, and baked until it caramelizes into golden, buttery layers with a beautifully crisp texture. Their name—Palmier—comes from the French word for “palm tree,” as their curled shape resembles a palm frond.
Despite their delicate appearance, Palmiers are wonderfully simple. Their appeal lies in their versatility. While the traditional version is sweet, they can be turned into savory appetizers with just a few tweaks. Whether you enjoy them with a cup of coffee or as a party snack, Palmiers are always a hit.
Why You’ll Love This Recipe
Here’s why you’ll fall in love with this palmier recipe:
- Minimal ingredients – You only need 2 main ingredients to make the classic version.
- Super simple – No mixer, no fancy gadgets, no stress.
- Quick to prepare – From start to finish, you can whip these up in under 30 minutes (plus baking time).
- Perfect for any occasion – Great for brunches, parties, dessert trays, or snacking.
- Endlessly customizable – Want savory? Add cheese. Want festive? Try cinnamon and nutmeg.
- Elegant yet effortless – They look like something straight out of a patisserie, but you’ll know the secret!
List of Ingredients You’ll Need
Main Ingredients
For the classic sweet Palmiers, you only need:
- 1 sheet of puff pastry (store-bought or homemade, thawed if frozen)
- ½ cup granulated sugar
That’s it for the basic version! But to make your Palmiers extra special, you can add a few optional ingredients.
Optional Add-ons for Variation
Want to jazz up your Palmiers? Consider these:
- Cinnamon (1 tsp mixed with sugar for cinnamon Palmiers)
- Brown sugar (for a richer caramel flavor)
- Vanilla sugar (for a subtle aroma)
- Crushed nuts (almonds, pecans, or hazelnuts)
- Chocolate chips (mini-sized work best)
- Parmesan and herbs (for a savory twist)
These ingredients aren’t mandatory, but they add delicious flair that can match any mood or event.
Tools and Equipment Required
You don’t need any fancy baking tools here, but having the following will make things easier:
- Rolling pin
- Baking sheet
- Parchment paper or silicone baking mat
- Sharp knife or pastry cutter
- Measuring cups and spoons
- Cooling rack
Optional but helpful:
- Pastry brush (for egg wash or brushing off excess sugar)
- Offset spatula (for handling delicate dough)
Preparing Your Workspace
Before you dive into making Palmiers, take a moment to set up your space. Trust me, it makes the process smoother:
- Clean your counter and dust it lightly with sugar (not flour—we want that caramelization).
- Preheat your oven to 400°F (200°C). Puff pastry loves high heat.
- Line your baking sheet with parchment paper.
- Gather your ingredients and tools—you’ll want everything within arm’s reach.
This bit of prep helps you stay focused and keeps the dough from warming up too much.
Choosing the Right Puff Pastry
Store-Bought vs. Homemade
Let’s be honest—most of us don’t have the time (or patience) to make puff pastry from scratch. Luckily, high-quality frozen puff pastry works beautifully for Palmiers.
Store-bought puff pastry is:
- Convenient
- Consistent
- Ready in minutes
Just be sure to choose all-butter puff pastry for the best flavor.
Homemade puff pastry, on the other hand, gives you full control and a slightly richer taste, but it’s labor-intensive. If you’re up for the challenge, go for it—but the store-bought route is perfectly acceptable and still delicious.
Step-by-Step Guide to Making Classic Palmiers
Let’s get to the good part: baking!
Step 1: Thaw the Puff Pastry
Take your puff pastry out of the freezer and let it thaw for about 30–40 minutes at room temperature. Don’t try to rush it in the microwave—it’ll mess with the layers.
Pro tip: Unroll or unfold the pastry gently once thawed. If it cracks, wait a few more minutes before handling.
Step 2: Prepare Your Sugar Mixture
Pour about ½ cup of sugar onto your clean counter or pastry board. If you’re going the cinnamon route, mix in 1 tsp of ground cinnamon.
Spread the sugar out evenly. You’re going to roll your dough over this sugar, so it becomes embedded into the layers.
Step 3: Roll and Shape the Dough
Place the puff pastry sheet directly onto the sugar. Roll it lightly to press the sugar in and thin the dough slightly.
Now, fold the long sides inward so they meet in the center. Then fold again to form a log—like a closed book.
You should have 6 layers total (3 on each side). This classic fold gives Palmiers their signature double-spiral look.
Wrap the log in plastic wrap and chill for 15 minutes. This firms it up for slicing.
Step 4: Slice the Dough
Once chilled, use a sharp knife to slice the log into ½-inch thick slices. You should get about 12–15 pieces.
Arrange the slices on your baking sheet, leaving 2 inches of space between each (they expand as they bake).
If desired, sprinkle a little extra sugar on top for more crunch.
Step 5: Bake to Perfection
Bake at 400°F (200°C) for about 12–15 minutes, then flip each Palmier and bake for another 5–7 minutes.
You’ll know they’re ready when they’re golden brown and caramelized. Watch closely—they can go from perfect to burned fast!
Transfer to a cooling rack and let them cool completely.
Tips for the Best Palmiers
Making Palmiers might be easy, but getting them perfect every time requires a few tricks up your sleeve. Want those gorgeous caramelized edges and a flaky, buttery center? Follow these tried-and-true tips:
- Chill before slicing: After shaping your dough, chilling it for at least 15 minutes helps the butter firm up again. This makes slicing cleaner and prevents the layers from mushing together.
- Use granulated sugar generously: Don’t skimp! The sugar not only sweetens the pastry but also helps it caramelize for that classic golden crunch.
- Press sugar into both sides: Roll the dough gently over the sugar-covered surface to ensure it sticks. Do this on both sides so every inch of the dough is sweet and crisp.
- Flip halfway through baking: Flipping the Palmiers allows both sides to caramelize evenly. If you skip this, the bottoms may burn while the tops stay pale.
- Watch your oven: Every oven is a little different, so keep an eye on the pastries during the last 5 minutes. Once they’re golden brown, they’re done.
- Space them out: Palmiers puff and expand a lot, so make sure there’s enough room between them on your baking sheet to avoid them sticking together.
- Don’t overhandle the dough: Puff pastry is delicate. Warm hands and overworking the dough can ruin the layers, so work quickly and keep it chilled when needed.
With just a little extra care, your Palmiers will look like they came straight from a Parisian bakery.
Common Mistakes to Avoid
Palmiers are simple, but it’s still easy to fall into a few common traps. Here are some mistakes to steer clear of:
- Using warm puff pastry: This is a recipe for disaster. If the dough gets too soft, the butter melts before baking, ruining the flakiness.
- Overbaking or underbaking: Palmiers should be a rich golden color. If they’re too pale, they’ll be chewy, not crispy. Too dark? Burnt sugar and bitter taste.
- Not using enough sugar: Without a generous sugar coating, you miss out on the signature crunch and caramelized layers.
- Folding too tightly or loosely: Fold gently and evenly. Too tight and they lose their shape; too loose and they unravel.
- Skipping the chill time: That quick fridge break before slicing makes all the difference for clean, uniform cuts.
- Placing too close on the pan: These beauties need space. Otherwise, they’ll bake into each other and lose their shape.
Remember, practice makes perfect. Once you’ve made these once or twice, you’ll be a Palmier pro.
Sweet vs. Savory Palmiers: How to Customize
While most people know Palmiers as a sweet treat, they’re actually incredibly versatile—and can go savory with just a few ingredient swaps.
Sweet Variations
Want to dress up your Palmiers for the holidays or make them kid-friendly? Try these options:
- Cinnamon Sugar Palmiers – Classic and cozy.
- Nutella Palmiers – Spread Nutella inside before rolling.
- Honey & Almond – Drizzle with honey and sprinkle slivered almonds.
- Lemon Zest & Sugar – Adds a zingy brightness.
- Chocolate Dipped – After baking, dip one side in melted chocolate.
Savory Variations
Turning Palmiers into appetizers? Here are some savory twists:
- Parmesan & Black Pepper – Bold, salty, and addicting.
- Pesto & Cheese – Spread pesto and sprinkle with mozzarella.
- Sun-Dried Tomato & Feta – Mediterranean flair in every bite.
- Ham & Gruyère – Mini French-style pinwheels.
- Olive Tapenade – Briny and delicious, great with wine.
The folding and baking method stays the same—just swap the sugar for your desired filling, and make sure it’s not too wet or oily.
Storage and Shelf Life
So you’ve made a batch of golden, crispy Palmiers—how do you keep them that way?
Room Temperature
- Store in an airtight container at room temperature.
- They’ll stay fresh and crisp for 2–3 days.
- Avoid humid environments, as moisture will soften them.
In the Fridge
- While not necessary, if you used fillings like cheese or ham, refrigerate them.
- Place in a container lined with a paper towel to absorb moisture.
- Reheat briefly in the oven to restore crispiness.
How to Freeze Palmiers
Want to make a big batch and save some for later? Great idea!
Freezing Unbaked Palmiers
- After slicing, arrange the raw Palmiers on a baking sheet in a single layer.
- Freeze until solid (1–2 hours).
- Transfer to a zip-top freezer bag or airtight container.
- Bake from frozen, adding 2–3 minutes to the baking time.
Freezing Baked Palmiers
- Let them cool completely.
- Freeze in a single layer, then store in bags.
- Reheat in the oven at 350°F (175°C) for 5–7 minutes to crisp them up again.
They’ll keep in the freezer for up to 2 months. This makes them perfect for holiday baking or unexpected guests!
Serving Suggestions
Palmiers are more than just a tea-time treat. Here are a few creative ways to serve them:
- With coffee or espresso – A perfect match.
- On a dessert platter – Pair with macarons, truffles, or mini eclairs.
- As a brunch side – Sweet Palmiers go well with fruit and yogurt bowls.
- Savory Palmiers with cocktails – Great for happy hour or as a party starter.
- Crushed on ice cream – Adds a crispy texture to soft desserts.
No matter how you serve them, Palmiers add elegance and flavor with minimal effort.
FAQs about Palmiers Recipe
1. Can I use puff pastry straight from the freezer?
No, it’s best to let it thaw until pliable but still cold. Trying to roll or fold frozen puff pastry will cause it to crack.
2. Why are my Palmiers not crispy?
This usually means they weren’t baked long enough or your oven temperature was too low. Make sure they’re golden brown and bake on the middle rack.
3. Can I make Palmiers ahead of time?
Yes! You can prepare and freeze them raw, or bake them and store them in an airtight container for up to 3 days.
4. Are Palmiers supposed to be super sweet?
Classic Palmiers are sweet due to the caramelized sugar, but you can control the sweetness by using less sugar or opting for a savory version.
5. Do I need to use parchment paper when baking?
Yes, it prevents sticking and makes cleanup easy—especially since the sugar can caramelize and harden on the pan.
Conclusion
There’s something truly magical about Palmiers. What starts as a simple sheet of puff pastry transforms into a golden, caramelized delight that’s crispy on the outside and soft in the center. Whether you stick with the classic sugar version or venture into creative sweet or savory flavors, Palmiers are a foolproof way to impress guests—or simply treat yourself.
And the best part? You don’t have to be a pastry chef to master them. With just a few ingredients and this step-by-step guide, you can whip up bakery-style Palmiers in your own kitchen.
So go ahead—dust off that puff pastry in your freezer and give it a try. Your taste buds will thank you!


