Oyster Sauce Recipe: Ever wondered what gives many Asian dishes that deep, savory, umami kick? That glossy, thick sauce with a hint of ocean flavor that ties a dish together so beautifully? That’s oyster sauce. If you’ve only ever used the bottled stuff from the store, you’re in for a delicious surprise. Today, we’re diving deep into making your own homemade oyster sauce — yes, from scratch! Don’t worry, it’s not nearly as intimidating as it sounds. In fact, with just a few ingredients and a bit of time, you’ll create a sauce that not only rivals but surpasses anything you can buy.
Homemade oyster sauce has been a secret weapon in many home kitchens, especially for those who love Asian cooking. It’s been used for over a century in Cantonese cuisine and now globally in stir-fries, noodles, dumpling dips, and more. Why make it yourself? Because when you do, you know exactly what’s going in — no MSG, no excessive salt, just pure umami goodness. Plus, the satisfaction of creating something so rich and flavorful from simple ingredients is unbeatable. Let’s get started on your culinary journey to oyster sauce mastery.
Benefits of Homemade Oyster Sauce
Sure, grabbing a bottle from the grocery store is convenient, but the magic of homemade lies in the details. First and foremost, you control the quality of ingredients. That means no weird preservatives or unnecessary thickeners. If you want less sugar or salt, go for it. Prefer organic ingredients? You’re the boss.
Not only that, but it’s also a win for your taste buds. Freshly made oyster sauce has a depth that commercial versions simply can’t replicate. It’s richer, more balanced, and full of nuanced umami notes. You can also adjust the flavor depending on how you like it—maybe you want a little more sweetness or a bit of heat.
Lastly, if you’re someone with dietary restrictions, like needing a gluten-free or vegan option, making it at home gives you the freedom to substitute. Plus, it’s surprisingly cost-effective. A small bottle of high-quality oyster sauce can be pricey, while a homemade batch gives you more for less. It’s a rewarding and practical skill every food lover should try.
List of Ingredients You’ll Need
Let’s talk ingredients. Most are pantry staples, but a few may require a quick trip to your local Asian market or fishmonger. Here’s what you’ll need:
Core Ingredients:
- 1 cup fresh oysters (or canned oysters in water)
- 1 cup water
- 2 tablespoons soy sauce (use light soy for classic flavor)
- 1 tablespoon dark soy sauce (for color and richness)
- 1 tablespoon sugar (adjust based on sweetness preference)
- 1 teaspoon cornstarch (as a thickener)
- 1 tablespoon water (to dissolve cornstarch)
Optional Add-Ins:
- A few slices of ginger (for added aroma)
- A clove of garlic (for depth)
- A dash of rice wine or Shaoxing wine
- A few drops of sesame oil
- Black pepper to taste
Ingredient Substitutes:
- Soy Sauce Alternative: Coconut aminos or tamari (for gluten-free version)
- Sweetener Alternative: Use honey, agave, or brown sugar instead of white sugar
- Cornstarch Alternative: Tapioca starch or arrowroot powder for thickening
These ingredients come together to create that rich, glossy, sweet-salty magic we call oyster sauce. And don’t worry if you can’t get fresh oysters—canned works just fine for homemade recipes and still gives that signature umami punch.
Tools and Equipment Required
You don’t need a fancy kitchen to make oyster sauce, but having the right tools makes things a whole lot easier. Here’s what you’ll want on hand:
- Medium Saucepan: For simmering your oysters and reducing the liquid
- Fine Mesh Strainer or Cheesecloth: To remove solids and get that silky texture
- Wooden Spoon or Silicone Spatula: For stirring the sauce without scratching your cookware
- Glass Jars or Bottles: For storing the finished sauce
- Measuring Cups and Spoons: Precision matters, especially for flavor balance
- Blender or Food Processor (Optional): If you want to puree the oysters for a thicker, more intense sauce
These basic tools are likely already in your kitchen, making this recipe accessible even for beginners. Just be sure everything is clean and dry—sauce longevity depends a lot on proper sanitation.
Choosing the Right Oysters
Here’s where things get a bit more personal. The oysters you use will dramatically affect the final flavor. So, what’s the best kind?
Fresh Oysters: These offer the richest, most authentic flavor. Look for ones that are plump, smell briny but not fishy, and are tightly closed (a sign of freshness).
Canned Oysters: Super convenient and still delicious. Look for canned oysters packed in water rather than oil. Bonus: they’re pre-cooked, saving you a step.
Frozen Oysters: A great middle ground. Thaw them completely before use and be sure to pat dry any excess moisture before simmering.
Sustainable Seafood Tip: Check for responsibly farmed or sustainably harvested oysters to ensure you’re cooking in an eco-friendly way. Brands like “FishWatch” or certifications from MSC (Marine Stewardship Council) can help guide your purchase.
Fresh or canned, the key is quality. Avoid anything overly briny, fishy-smelling, or packed in flavored sauces — those will throw off your final product.
Preparing the Oysters
Alright, you’ve got your oysters—now let’s prep them properly so your sauce is clean, flavorful, and smooth. If you’re using fresh oysters, give them a good rinse first. These guys come from the sea and sometimes carry bits of sand or shell, and trust me, you don’t want gritty oyster sauce. Use a brush to scrub the outside if needed, and gently pry them open using an oyster shucker or a sturdy knife.
For fresh oysters:
- Shuck the oysters and collect the meat along with their juices.
- Place the oyster meat in a bowl and give it a quick rinse with cold water.
- Pat dry with a paper towel before cooking.
For canned oysters:
- Open the can and drain the oysters, but save the liquid—that’s gold! It adds depth to your broth.
- Give the oysters a quick rinse if they smell too fishy, then set aside.
Pro Tip: If you’re going for maximum flavor, chop the oysters roughly before simmering. This exposes more surface area and helps release their juices, creating a more intense, umami-rich broth.
Once your oysters are prepped, you’re ready to move on to the fun part—making the actual sauce. It’s time to simmer and stir your way to homemade magic.
Step-by-Step Guide to Making Oyster Sauce
This is where things get real. Follow this process and you’ll be rewarded with a glossy, flavorful sauce that’s far superior to anything from the store.
Step 1: Simmer the Oysters
Begin by placing fresh, shucked oysters along with their liquid into a small saucepan. Add just enough water to cover them. Simmer gently over low heat for 8–10 minutes until the oysters turn plump and opaque. Avoid boiling too hard, as this can make the oysters tough and affect the flavor.
Step 2: Strain and Reduce the Broth
Remove the oysters and strain the cooking liquid through a fine mesh sieve to remove any grit. Return the clear broth to the saucepan and simmer over medium-low heat until it reduces by at least half. This concentrates the natural briny sweetness essential to oyster sauce.
Step 3: Add Seasonings
Stir in soy sauce, a bit of sugar, and optional ingredients like rice wine or a small dash of salt. These additions balance the flavor and help recreate the depth found in traditional oyster sauce. Adjust seasoning to taste.
Step 4: Thicken the Sauce
To achieve the classic glossy texture, mix a small amount of cornstarch with water to create a slurry. Slowly whisk it into the simmering broth until the sauce thickens to your preferred consistency. Continue stirring to avoid lumps.
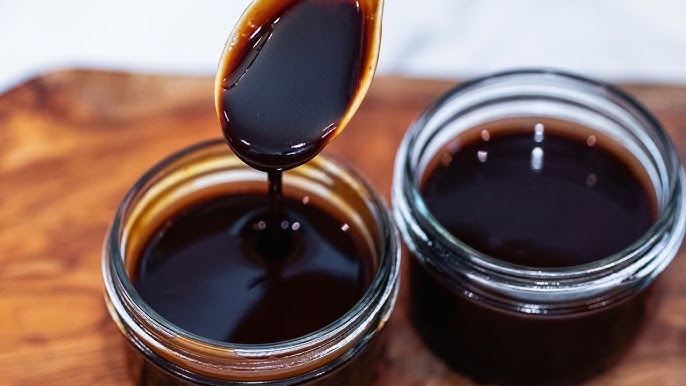
Step 5: Cool and Bottle
Let the sauce cool completely before transferring it to a sterilized jar or bottle. Refrigerate and use within 1–2 weeks for best flavor.
Flavor Variations to Try
Feeling adventurous? Good! Oyster sauce is super customizable. Here are a few flavor twists you can try once you’ve nailed the basic recipe:
Spicy Oyster Sauce
Want to bring some heat to your sauce?
- Add 1–2 chopped Thai chilies during the simmering process.
- Or stir in ½ teaspoon chili oil or Sriracha when adding the soy sauce.
- The result? A bold, fiery oyster sauce that’s amazing with stir-fried noodles or grilled meats.
Sweet Oyster Sauce
If you like your sauces on the sweeter side (think teriyaki-style):
- Use brown sugar or honey instead of white sugar.
- Add a tiny splash of molasses or maple syrup.
- This version pairs beautifully with roasted veggies or glazed tofu.
Vegan Oyster Sauce (Mushroom-Based)
Yes, you can make a vegan “oyster” sauce and it’s ridiculously good.
- Use shiitake mushrooms or oyster mushrooms (go figure!) as the base.
- Simmer chopped mushrooms with water and a dash of soy sauce.
- Strain, then follow the same steps to reduce, season, and thicken.
It’s packed with umami and makes a perfect plant-based alternative.
Storage and Shelf Life
Now that you’ve made your homemade oyster sauce, let’s talk about how to store it properly. After all, you’ve put in the effort—so you want it to last!
Once your sauce has cooled completely, transfer it into a sterilized glass jar or airtight bottle. Glass is the best choice here because it doesn’t retain odors or react with acidic ingredients like metal containers might. Plus, it makes your sauce look fancy on the fridge shelf!
Refrigeration is a must. Even though it’s cooked, homemade oyster sauce doesn’t contain the preservatives that store-bought versions do. It’ll stay fresh in the fridge for up to 2 weeks. If you want it to last longer, freeze it in small portions using an ice cube tray or silicone mold—perfect for tossing a cube or two into your next stir-fry.
Tips for Storing:
- Label your jar with the date you made it.
- Always use a clean, dry spoon when scooping sauce out.
- If the sauce develops a sour smell, unusual color, or mold, toss it.
Proper storage = prolonged flavor. Treat it like liquid gold, because in the world of cooking, that’s exactly what it is.
How to Use Oyster Sauce in Cooking
So you’ve made a delicious homemade oyster sauce—now what? This versatile condiment adds savory depth to almost any dish. It’s like the secret handshake of the flavor world: once you add it, everything just clicks.
Here are some of the best ways to use it:
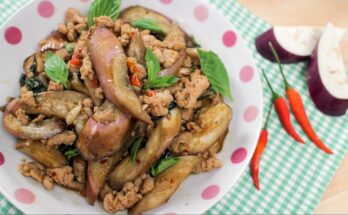
1. In Stir-Fries
Probably the most iconic use. Just a tablespoon or two can transform a simple veggie stir-fry into restaurant-quality goodness. It pairs beautifully with:
- Broccoli and beef
- Bok choy and mushrooms
- Chicken and snap peas
- Noodles and bell peppers
Pro Tip: Add it near the end of cooking to preserve its bold flavor.
2. As a Marinade
Mix oyster sauce with garlic, ginger, and soy sauce for a killer marinade. Use it on:
- Chicken thighs
- Pork ribs
- Tofu or tempeh
- Eggplant (for a plant-based twist)
Let it soak in for at least an hour—or overnight if you want maximum flavor infusion.
3. In Soups & Sauces
Yup, a little goes a long way even in soups. Stir a spoonful into:
- Hot and sour soup
- Wonton soup
- Ramen broth
- Dumpling dipping sauces
It adds umami richness that makes every slurp more satisfying.
4. As a Finishing Glaze
Brush it over grilled meats or roasted vegetables right before serving. It adds a glossy, flavorful coating that makes everything look and taste better. Think of it as the final mic-drop in your dish.
Nutritional Information
Homemade oyster sauce can be surprisingly healthy when compared to commercial alternatives. Because you control the ingredients, you avoid artificial flavorings, preservatives, and excessive sodium.
Here’s an approximate nutritional breakdown for 1 tablespoon of homemade oyster sauce:
| Nutrient | Amount |
|---|---|
| Calories | 20–30 kcal |
| Carbohydrates | 3–5 g |
| Sugars | 2–4 g |
| Protein | 1–2 g |
| Sodium | 200–300 mg |
| Fat | 0–1 g |
Gluten-Free and Vegan Notes:
- For a gluten-free version, use tamari or coconut aminos instead of soy sauce.
- For a vegan version, replace oysters with mushrooms and follow the same cooking steps.
Homemade = healthier and tastier. That’s a win-win in any kitchen.
Common Mistakes to Avoid
Even though this recipe is pretty straightforward, there are a few common pitfalls that can affect your results. Let’s make sure your oyster sauce turns out perfect the first time.
1. Overcooking the Oysters
Too much simmering can make oysters rubbery and bitter. Keep it gentle and under 15 minutes. You’re trying to extract flavor, not destroy it.
2. Not Straining the Broth Properly
Skipping this step can result in a gritty or chunky sauce—no thanks. Use a fine mesh strainer or cheesecloth for the smoothest texture.
3. Going Overboard with Salt or Sugar
It’s easy to think more = better, but balance is key here. Taste as you go, especially after adding soy sauce. Remember, you can always add more, but you can’t take it out once it’s in.
4. Skipping the Thickener
Cornstarch might seem optional, but it’s what gives oyster sauce its signature glossy finish. Without it, the sauce will be watery and won’t coat ingredients the way it should.
5. Not Letting It Cool Properly Before Storing
Bottling it while hot can lead to moisture buildup and spoilage. Always let it cool to room temp first.
Avoid these mistakes, and you’ll have a homemade oyster sauce that rivals any restaurant-quality version.
Comparison: Homemade vs. Store-Bought Oyster Sauce
Let’s put them head-to-head and see how your homemade creation stacks up against what’s on supermarket shelves.
| Feature | Homemade Oyster Sauce | Store-Bought Oyster Sauce |
|---|---|---|
| Flavor | Deep, rich, customizable | Often overly salty or artificial |
| Ingredients | Natural, fresh, preservative-free | Preservatives, MSG, additives |
| Cost | More cost-effective long term | Cheaper per bottle, but adds up |
| Shelf Life | 2 weeks (fridge) | 6–12 months (with preservatives) |
| Diet Flexibility | Gluten-free, vegan possible | Limited options |
Bottom line? If you care about quality, taste, and ingredients, homemade oyster sauce wins every time.
FAQs about Oyster Sauce Recipe
Before we wrap things up, let’s address some of the most common questions people have about oyster sauce—especially when making it at home.
1. Can I make oyster sauce without soy sauce?
Yes! If you’re avoiding soy, you can substitute with coconut aminos or a mushroom broth reduction for a soy-free and gluten-free alternative. Keep in mind, the flavor will be milder, but still delicious.
2. What type of sugar works best in homemade oyster sauce?
Brown sugar gives a deep, caramel-like sweetness, which pairs beautifully with the umami of the oysters. White sugar is more neutral. You can also try palm sugar, honey, or agave for different flavor profiles.
3. How can I make my oyster sauce thicker without cornstarch?
You can use arrowroot powder, tapioca starch, or reduce the sauce longer over low heat. These natural thickeners work well and maintain a smooth consistency without altering the flavor too much.
4. Why is my sauce too salty?
This usually happens when using too much soy sauce or over-reducing the broth. To fix it, add a bit of water and a pinch of sugar to rebalance. Next time, taste frequently while reducing.
5. Can I can or jar this oyster sauce for long-term storage?
Yes, but it requires proper sterilization and possibly vacuum sealing. If you plan to can it, follow safe food preservation practices to avoid spoilage or contamination. For most home cooks, refrigeration or freezing is safer and easier.
Conclusion
There’s something incredibly satisfying about making your own sauces from scratch—especially when they turn out better than the store-bought versions. Oyster sauce is one of those magic ingredients that can transform a dull dish into something extraordinary, and now you know exactly how to make it in your own kitchen.
Whether you’re a home cook experimenting with Asian flavors or someone looking to eat cleaner without sacrificing taste, this recipe delivers on all fronts. Rich, flavorful, and customizable, homemade oyster sauce is a must-try condiment that deserves a permanent spot in your fridge.
Next time you’re whipping up a quick stir-fry or marinating your favorite protein, reach for that jar you made yourself—you’ll taste the difference.