Mexican Gorditas Recipe: If you’ve never had a freshly made Mexican gordita, you’re seriously missing out. Imagine a warm, thick corn cake, slightly crispy on the outside, soft on the inside, and stuffed with your favorite fillings—anything from spicy chorizo and cheese to beans, nopales, or even shredded chicken. Sounds mouthwatering, right?
This guide is here to walk you through every step of making traditional Mexican gorditas from scratch. Whether you’re new to Mexican cooking or already a fan, you’ll master this recipe like a pro.
What Are Gorditas?
Gorditas are a beloved Mexican dish made from masa (corn dough), shaped into thick discs and cooked on a griddle or deep-fried. The word “gordita” literally means “little fat one” in Spanish—an affectionate name for their plump shape. Once cooked, they’re sliced open like a pita and stuffed with flavorful fillings. Think of them as a cross between a tortilla and a pocket sandwich.
Unlike tacos or quesadillas, gorditas are thicker and heartier, making them perfect for holding rich, saucy fillings. Some are stuffed after cooking (common in northern Mexico), while others are stuffed before being cooked (typical in central regions). This diversity makes them incredibly versatile—and delicious!
The Origins of Gorditas
Gorditas have deep roots in Mexican culinary history. They trace back to pre-Columbian times when Indigenous peoples used ground corn to make staple foods like tortillas, tamales, and yes—early forms of gorditas. Over centuries, the dish evolved, influenced by regional ingredients and techniques.
In northern Mexico, gorditas are usually made with wheat flour (gorditas de harina), thanks to European influence. In central and southern Mexico, corn reigns supreme, and gorditas de maíz are the norm. Today, you’ll find different types all across Mexico—some grilled, some fried, all deeply satisfying.
Why You’ll Love Making Gorditas at Home
Let’s face it—store-bought gorditas or restaurant versions rarely beat the homemade kind. When you make them from scratch, you control everything: the thickness, the flavor, the fillings, and even the cooking method. Plus, the smell of fresh masa sizzling on a hot griddle? Irresistible.
Here’s why they’re worth your time:
- Super customizable
- Naturally gluten-free (when made with corn masa)
- Family-friendly—kids love helping shape them!
- Budget-friendly and filling
- Perfect for meal prep or quick weeknight dinners
Once you get the hang of it, making gorditas becomes second nature. Trust me—your kitchen will smell like an authentic Mexican fonda in no time.
Types of Mexican Gorditas
Not all gorditas are created equal. Depending on where you are in Mexico—or who’s making them—you’ll encounter different types.
Gorditas de Harina vs. Gorditas de Maíz
Gorditas de Maíz: These are made with masa harina (corn flour) and are the most traditional version. They have that classic corn flavor and are usually cooked on a comal (griddle). They’re slightly crispy on the outside, soft and steamy on the inside.
Gorditas de Harina: Popular in northern Mexico, these are made with wheat flour and often pan-fried. Think of them like thick tortillas or soft pitas. They’re chewy, rich, and oh-so-good when stuffed with melted cheese and meats.
For this guide, we’re focusing on gorditas de maíz—the most iconic and traditional version.
Essential Tools You’ll Need
Before we jump in, make sure you have these kitchen essentials on hand:
- Mixing bowl
- Measuring cups
- Tortilla press or rolling pin (optional but helpful)
- Cast iron skillet or griddle (comal)
- Spatula
- Sharp knife
- Damp kitchen towel (to keep dough moist)
- Ziplock bag or plastic wrap (for pressing dough)
If you don’t have a tortilla press, don’t stress. You can easily flatten the dough with your hands or a plate.
Ingredients You’ll Need for Mexican Gorditas
Here’s what you’ll need to make the dough and stuff your gorditas with tasty fillings.
Main Ingredients for Gordita Dough
- 2 cups masa harina (Maseca or similar)
- 1 1/2 cups warm water
- 1/4 tsp salt
- Optional: 1 tsp vegetable oil (for softer texture)
That’s it! Just three main ingredients. Masa harina is key—it’s a special type of corn flour treated with lime (nixtamalization) for better nutrition and flavor.
Optional Fillings (Savory & Sweet)
You can go crazy here! Mix and match your favorite ingredients:
Savory Filling Ideas:
- Refried beans and cheese
- Chorizo and potatoes
- Tinga (shredded chipotle chicken)
- Carnitas (pulled pork)
- Picadillo (ground beef with potatoes and veggies)
- Nopales (cactus paddles)
Sweet Filling Ideas (Yes, Really!):
- Cajeta (goat’s milk caramel)
- Sweetened condensed milk with cinnamon
- Chocolate spread and bananas
Step-by-Step Guide to Making Gorditas
Let’s get cooking! Follow these steps and you’ll be biting into warm, homemade gorditas in no time.
Step 1: Prepare the Dough
In a large mixing bowl, combine the masa harina and salt. Slowly add the warm water while mixing with your hands. Knead the dough for about 3–5 minutes until smooth and pliable—not sticky, not dry.
Test it: Roll a small ball in your hand. If it cracks, add a bit more water. If it sticks, add a little more masa harina.
Cover the bowl with a damp towel to keep the dough from drying out while you shape the gorditas.
Step 2: Shape the Gorditas
Divide the dough into equal portions—about the size of a golf ball. Roll them into smooth balls. Using a tortilla press lined with plastic or a rolling pin, flatten each ball into a disc about 1/4 to 1/3 inch thick.
They should be thicker than tortillas but not overly thick—about the size of a CD (if you remember those!).
Place the shaped discs on a plate covered with a damp towel to prevent them from drying.
Step 3: Cook on the Comal or Griddle
Heat a dry skillet or comal over medium-high heat. Once hot, cook each gordita for about 1–2 minutes per side, flipping once or twice. You’ll see some light browning and puffing—perfect signs they’re cooking right.
Pro tip: Press them slightly with a spatula to help them puff up. That puff is what gives you space to slice and stuff them later.
Remove and let them cool for a few minutes before slicing.
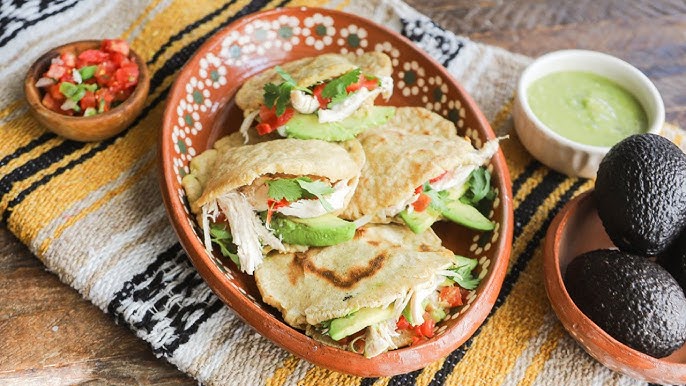
Step 4: Slice and Fill
Once slightly cooled, slice open each gordita about halfway around the edge to create a pocket. Be gentle—you don’t want to tear them completely.
Now the fun part: Fill with your favorite toppings! Whether it’s beans and cheese or spicy tinga, the gordita acts like a soft, pillowy taco pocket.
Top Fillings for Mexican Gorditas
Alright, now that your gorditas are warm and ready to stuff, let’s talk fillings. This is where you can get really creative. Whether you’re all about meat, prefer vegetarian options, or just want something cheesy and comforting—there’s something here for everyone.
Popular Meat Fillings
If you’re a meat lover, Mexican gorditas are a dream come true. Here are some of the best, most traditional options:
- Chorizo con Papas – Spicy ground chorizo sausage sautéed with diced potatoes. Rich, bold, and oh-so-satisfying.
- Tinga de Pollo – Shredded chicken in a smoky chipotle-tomato sauce. This one brings heat and deep flavor.
- Carnitas – Slow-cooked, tender pork with crispy edges. Toss in some onions and salsa—perfection.
- Carne Asada – Marinated and grilled beef sliced thin. Juicy, flavorful, and a total crowd-pleaser.
- Barbacoa – Slow-braised beef, deeply seasoned and falling apart. Great for a weekend treat.
These fillings are often paired with toppings like diced onions, cilantro, salsa verde, crumbled cheese, or a splash of lime juice.
Vegetarian and Vegan Fillings
Gorditas don’t need meat to shine. Here are a few plant-based combos that taste just as amazing:
- Refried Beans & Avocado – Creamy and rich, this is a classic combos that taste just as amazing:
- Refried Beans & Avocado – Creamy and rich, this is a classic and comforting filling.
- Nopales (Cactus) – Sautéed cactus paddles with tomatoes and onions. Tart, tender, and healthy.
- Mushroom & Poblano – Earthy mushrooms with roasted poblanos and onions make for a hearty veggie stuffing.
- Tofu Tinga – Vegan twist on the chicken classic. Same smoky chipotle flavors, plant-based goodness.
- Zucchini & Corn – A light and sweet combination, especially tasty with a sprinkle of queso fresco.
Cheesy Fillings
Cheese lovers, this one’s for you. In Mexican cooking, cheese isn’t just a topping—it’s a filling all its own.
- Queso Oaxaca – Melty, stringy, and ideal for stuffing.
- Queso Fresco – Crumbly and tangy, perfect with beans or salsa.
- Queso Chihuahua – Creamy and mild, melts beautifully inside a warm gordita.
You can mix and match cheese with any other ingredients, or just go cheese-only for a gooey, comforting bite.
How to Serve Gorditas
Once your gorditas are cooked and stuffed, it’s time to serve. The best part? They’re incredibly versatile. Here’s how to plate them like a pro:
- Serve hot off the griddle – Warm gorditas are the tastiest. You can keep them in a tortilla warmer or wrapped in a towel to stay hot.
- Add toppings – A drizzle of Mexican crema, a handful of chopped onions and cilantro, maybe a splash of your favorite salsa. Don’t forget the lime wedges!
- Pair with sides – Mexican rice, black beans, or a fresh green salad go great on the side.
- Great for gatherings – Set up a “gordita bar” with different fillings and let everyone build their own.
They work great as lunch, dinner, or even a hearty brunch. And if you’re serving a crowd? Make a big batch ahead of time—they reheat like a dream.
Tips for Making Perfect Gorditas Every Time
Let’s make sure your gorditas turn out perfect on your very first try. These expert tips will make the process smoother and your results even tastier:
- Use warm water for dough – Cold water doesn’t hydrate masa harina as well. Warm water gives you a softer, more pliable dough.
- Don’t overwork the dough – Mix until just smooth. Over-kneading can make it tough.
- Keep the dough moist – Cover with a damp towel while you work to avoid dryness.
- Cook on a preheated griddle – A hot comal or skillet gives you that golden brown crust and a puffed center.
- Wait before slicing – Let the gorditas rest a few minutes before slicing them open. If they’re too hot, they can tear.
- Make extra for later – Gorditas freeze well! Just wrap tightly and store in a ziplock bag.
Follow these and you’ll be on your way to gordita greatness.
Common Mistakes to Avoid
Making gorditas is easy, but a few slip-ups can lead to a not-so-great experience. Let’s make sure you don’t fall into these common traps:
- Dry dough – If the dough cracks when shaping, it’s too dry. Add more warm water a tablespoon at a time.
- Too thin – Gorditas aren’t tortillas. They should be thick enough to slice and stuff.
- Undercooked centers – Make sure to cook each side long enough so the center isn’t doughy.
- Overstuffing – Don’t overload them. Too much filling will make them fall apart.
- Skipping the rest time – Always let cooked gorditas sit a few minutes before slicing. It makes them easier to handle.
Avoiding these mistakes will save you time, ingredients, and frustration.
How to Store Leftover Gorditas
Made a few too many? Don’t worry—gorditas are perfect for storing and reheating. Here’s how to do it right:
- Refrigerator: Store cooked, unfilled gorditas in an airtight container for up to 3–4 days.
- Freezer: Wrap individually in plastic wrap and place in a ziplock bag. They’ll last up to 2 months.
- Reheat on the skillet: Avoid the microwave—it makes them soggy. Reheat on a dry skillet for best texture.
You can also freeze filled gorditas, but be aware that ingredients like lettuce or fresh salsa don’t freeze well.
Are Gorditas Gluten-Free?
Yes—as long as you’re using masa harina (corn flour), gorditas are naturally gluten-free. Just be sure to check the packaging to ensure it’s certified gluten-free and not processed in facilities with wheat.
Gorditas made with wheat flour (gorditas de harina) are not gluten-free, so stick with corn if you’re cooking for someone with gluten sensitivity or celiac.
FAQs about Mexican Gorditas Recipe
1. Can I deep-fry gorditas instead of cooking them on a griddle?
Yes! Fried gorditas are crispy and indulgent. Just be sure to seal the edges tightly if you’re stuffing them before frying to avoid leaks.
3. What’s the difference between gorditas and arepas?
Absolutely. Prepare the dough, wrap it tightly in plastic wrap, and refrigerate for up to 24 hours. Let it come to room temp before shaping.
3. What’s the difference between gorditas and arepas?
They’re similar but not the same. Arepas are South American and often made with pre-cooked cornmeal (masarepa), while gorditas use masa harina. The flavor and texture are slightly different.
4. Can I use a tortilla press to shape gorditas?
Yes! Just be careful not to press them too thin. Use a gentle press to keep the thickness right.
5. What’s the best salsa to serve with gorditas?
You can’t go wrong with salsa verde, chipotle salsa, or pico de gallo. Choose based on your filling and heat preference!
Conclusion
There you have it—your ultimate, step-by-step guide to making authentic Mexican gorditas at home. From kneading the dough to sizzling them on the griddle and stuffing them with your favorite fillings, this dish is as fun to make as it is to eat. Once you taste the fresh, steamy masa filled with bold, flavorful toppings, you’ll understand why gorditas have been a beloved Mexican staple for centuries.
The best part? You can keep it traditional or go wild with fillings. Whether you’re feeding your family on a busy weeknight or hosting a Mexican-themed dinner with friends, gorditas are sure to impress.
So roll up your sleeves, get that masa harina ready, and let your kitchen become a flavor-packed fiesta. Your taste buds will thank you.


