Kataifi Recipe: If you’ve ever tried baklava and thought it couldn’t get any better—think again. Kataifi is like the eccentric cousin of baklava, wrapped in shredded phyllo dough and drenched in a heavenly sugar syrup.
This Greek dessert is crunchy, nutty, sticky, and absolutely unforgettable. Whether you’re preparing for a family gathering, a festive celebration, or just want to indulge your sweet tooth with something authentic and satisfying, this guide has got your back.
Let’s dive deep into every step so you can make the perfect Kataifi right in your kitchen.
What is Kataifi?
Kataifi (pronounced kah-tah-EE-fee) is a traditional Middle Eastern and Mediterranean dessert made with shredded phyllo dough, a mixture of chopped nuts, and soaked in a spiced sugar or honey syrup. It’s similar in taste to baklava but stands out due to its texture—think of golden strands of crispy dough wrapped around a rich, nutty center and soaked in syrup that makes each bite melt in your mouth.
This dessert is incredibly popular in Greek, Turkish, and Middle Eastern cuisines and can also be found across the Balkans. Its appearance is always impressive—looking like mini shredded nests or cylinders—and its taste even more so. It’s perfect with a hot cup of Greek coffee or tea. The best part? It’s easier to make than it looks.
Why You’ll Love This Recipe
There are plenty of reasons to fall in love with this Kataifi recipe. It hits all the right notes—crunchy, sweet, buttery, nutty, and totally addictive.
- Authentic flavors: You’re making it from scratch, with all the spices and ingredients that give it that genuine Mediterranean taste.
- Perfect texture: Crisp and golden on the outside, moist and nutty on the inside.
- Make-ahead friendly: It stores beautifully and tastes even better the next day.
- Crowd-pleaser: Serve this at a party, and you’ll be the star of the evening.
- Customizable: You can switch up the nuts, add spices, or even drizzle with chocolate if you’re feeling bold.
The Origin of Kataifi
Kataifi has deep roots in the Middle East and later traveled through the Ottoman Empire, gaining popularity in Greek, Turkish, and Arabic cuisines. The term kataifi actually refers to the finely shredded dough itself, which is used to make a range of sweet and savory dishes.
In Greek tradition, Kataifi is especially popular during holidays like Easter and Christmas, as well as weddings and baptisms. The combination of nuts and syrup represents abundance and celebration. While it’s a dessert, its historical significance makes it a cultural icon in Mediterranean culinary heritage.
Difference Between Kataifi and Baklava
At first glance, Kataifi and Baklava might seem like close relatives—and they are—but they have some notable differences:
| Feature | Kataifi | Baklava |
|---|---|---|
| Dough | Shredded phyllo (kataifi dough) | Whole phyllo sheets |
| Appearance | Rolled or shaped into nests | Layered in rectangular pans |
| Texture | Crispy and stringy | Flaky and layered |
| Assembly | Rolled individually | Layered in pan then cut |
| Common fillings | Walnuts, pistachios, almonds | Typically walnuts or pistachios |
While both are delicious and soaked in syrup, Kataifi’s unique noodle-like texture gives it an edge if you’re looking for something a little different.
List of Ingredients You’ll Need
To get that authentic Greek flavor, make sure to use high-quality ingredients. Here’s everything you’ll need:
For the Kataifi Filling
- 2 cups walnuts (chopped finely)
- 1 cup almonds or pistachios (optional, for extra flavor)
- 1 tsp ground cinnamon
- 1/4 tsp ground cloves (optional)
- Zest of 1 orange (optional, for citrusy aroma)
For the Kataifi Pastry
- 1 lb kataifi dough (shredded phyllo, thawed if frozen)
- 1 cup unsalted butter (melted)
For the Sugar Syrup
- 2 cups sugar
- 1 cup water
- 1 cinnamon stick
- 1 tbsp lemon juice
- 1 tsp vanilla extract
- 1 tbsp honey (optional, for richer flavor)
- 2–3 orange or lemon peels (for added aroma)
Make sure to get the pastry from a Mediterranean grocery or specialty store. It’s usually found in the freezer section labeled as kataifi dough.
Tools & Equipment Needed
Before jumping into the process, make sure you have these tools ready:
- Pastry brush
- Sharp knife or scissors
- Mixing bowls
- Baking dish (9×13 inch works well)
- Saucepan (for syrup)
- Clean kitchen towel (for covering the dough)
- Grater or zester (for orange/lemon peel)
These tools will make the entire process smoother, especially when it comes to handling the delicate shredded dough.
Before You Start: Tips for Working With Kataifi Pastry
Working with kataifi dough can feel a bit tricky the first time, but once you know how to handle it, it’s smooth sailing:
- Thaw overnight: If using frozen dough, thaw it in the fridge overnight and bring it to room temp before using.
- Keep it moist: Cover the dough with a slightly damp towel as you work. It dries out really fast.
- Gently separate strands: Don’t tear or mash the dough—fluff it gently with your fingers to loosen the strands.
- Work in batches: Don’t try to roll all at once. Take small amounts at a time for best results.
- Use good butter: Quality butter gives Kataifi that rich, golden finish. Clarified butter works great too.
Now that everything’s in place, let’s dive into the step-by-step preparation.
Step-by-Step Guide to Making Kataifi
Making Kataifi might seem intimidating at first glance, but once you go step by step, it becomes a super satisfying process. Let’s break it down, so you can absolutely crush it on your first try.
Step 1: Prepare the Nut Filling
Start by combining finely chopped walnuts, pistachios, or almonds with sugar and cinnamon. Mix well until the flavors blend. This fragrant filling gives Kataifi its signature crunch and richness.
Step 2: Handle and Separate Kataifi Dough
Gently loosen the Kataifi dough using your fingers. Pull apart small sections to keep the strands fluffy and untangled. Cover the dough with a slightly damp cloth to prevent it from drying out.
Step 3: Assemble the Kataifi Rolls
Take a small handful of dough, place a spoonful of nut mixture at one end, and roll tightly into a neat log. Continue until all filling and dough are used.
Step 4: Brush Generously with Butter
Arrange the rolls in a baking tray and brush each one with melted butter. Ensure every strand is coated to achieve a crispy texture.
Step 5: Bake to Golden Perfection
Bake in a preheated oven until the rolls turn golden and crisp, usually 40–50 minutes.
Step 6: Make the Sugar Syrup
While baking, simmer water, sugar, and lemon juice until slightly thickened. Pour the warm syrup over the hot Kataifi for perfect absorption.
Cooling and Soaking Time
Patience really is a virtue here. Kataifi needs time to fully absorb the syrup and settle into its final glorious form.
- Let the Kataifi sit uncovered at room temperature for several hours (overnight is even better).
- This allows the syrup to work its way into every nook and cranny of the filling and pastry.
When it’s ready, the Kataifi will be sticky, glossy, crisp, and ready to impress. Don’t rush this step—you’ll thank yourself later.
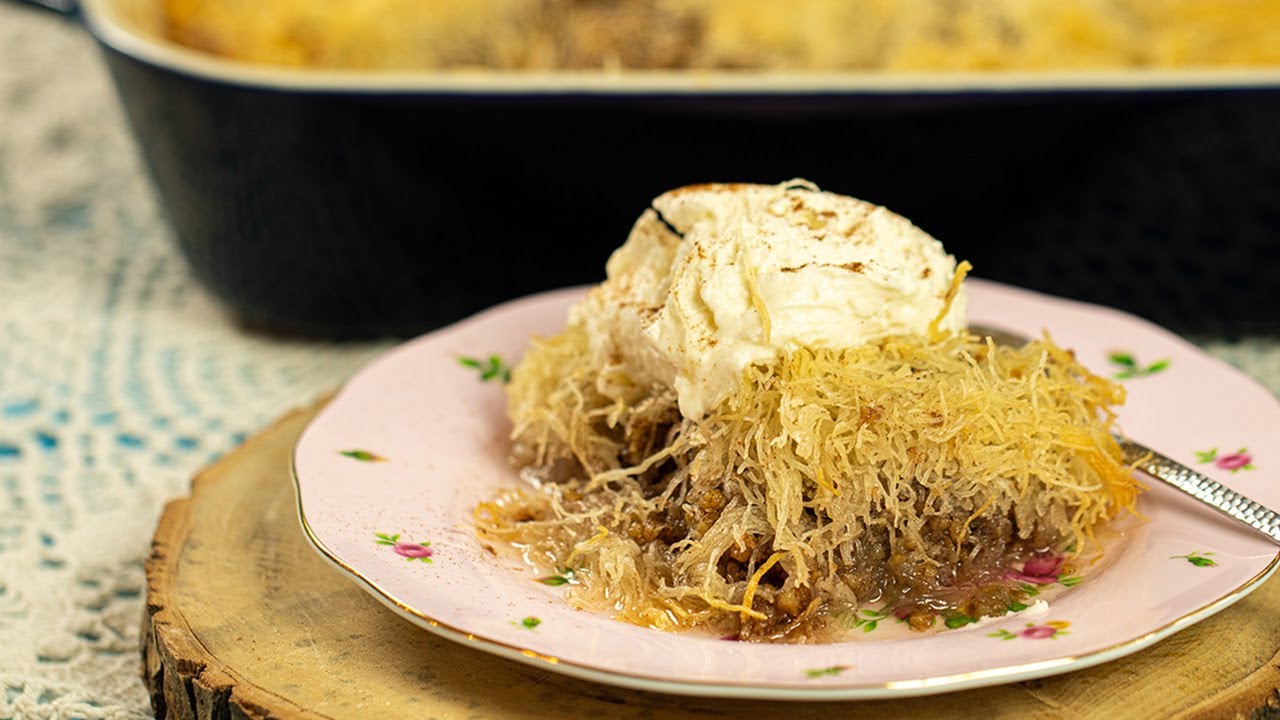
Serving Suggestions
Once your Kataifi has soaked up all that glorious syrup, it’s time to serve. And trust me, this dessert knows how to steal the show.
- Serve at room temperature: Kataifi is best enjoyed when it’s neither too hot nor too cold. Let the syrup settle, and you’ll get that perfect bite—crunchy, chewy, and nutty.
- Pair with a hot drink: A small piece of Kataifi goes perfectly with a cup of Greek coffee, strong espresso, or even a light herbal tea.
- Garnish for extra flair:
- A sprinkle of crushed pistachios or almonds on top
- A light dusting of cinnamon
- A dollop of whipped cream or a scoop of vanilla ice cream (for the ultimate indulgence)
- Make it fancy: If you’re hosting, serve each Kataifi roll in individual paper liners and add a twist of orange or lemon zest on top for color and aroma.
Pro tip: Kataifi also makes a beautiful addition to dessert platters or mezze-style spreads during holidays and celebrations.
How to Store Kataifi
Kataifi holds up surprisingly well—another reason it’s such a great make-ahead dessert.
- At room temperature: Store it in an airtight container for up to 3–4 days. Make sure it’s in a cool, dry place.
- In the fridge: If your kitchen is particularly warm or humid, pop it in the fridge. It will keep for up to 7–10 days. Just know that refrigeration can soften the texture a bit.
- Reheating: Want that crispness back? Reheat Kataifi in a 300°F (150°C) oven for 5–10 minutes. Avoid the microwave—it makes the pastry soggy.
Quick tip: Always store Kataifi uncovered for the first couple of hours after baking and syruping. This helps the syrup distribute evenly and keeps the texture crisp.
Can You Freeze Kataifi?
Yes, absolutely! Kataifi is freezer-friendly, whether you want to prepare it ahead of time or save leftovers.
Freezing Before Baking:
- Assemble the Kataifi rolls, place them in a baking dish, and don’t add syrup.
- Wrap the dish tightly in plastic wrap and aluminum foil.
- Freeze for up to 2 months.
- When ready to bake, thaw overnight in the fridge and follow the baking instructions. Add the syrup as usual once baked.
Freezing After Baking:
- Let the baked and syrup-soaked Kataifi cool completely.
- Freeze in an airtight container with parchment paper between layers.
- To serve, thaw at room temperature. You can crisp it up in the oven for a few minutes.
Freezing is a fantastic option if you want to prep ahead for holidays or events. Just think—delicious homemade Kataifi, ready to go whenever you need it.
Common Mistakes to Avoid
Kataifi is easy once you get the hang of it, but a few common missteps can trip you up. Here’s what to watch for:
1. Not handling the dough gently
- Kataifi dough is delicate. If you pull too hard, it’ll break or clump together.
- Always fluff it gently and keep it moist under a damp cloth.
2. Rolling too tight
- A tightly rolled Kataifi won’t cook evenly and can end up doughy in the middle.
- Keep the rolls light and loose—air helps them bake properly.
3. Using hot syrup on hot pastry
- This is the golden rule: hot syrup + hot Kataifi = soggy mess.
- Let the syrup cool completely before pouring over freshly baked pastry.
4. Skimping on butter
- Butter is what makes Kataifi crispy and flavorful. Don’t hold back!
- Brush every roll thoroughly before baking.
5. Not letting it soak long enough
- The syrup needs time to fully absorb. Cutting into it too soon can leave it dry inside.
- Be patient—it’s worth it.
Avoid these mistakes, and you’ll end up with bakery-level Kataifi that’ll have people begging for the recipe.
Healthier Variations and Substitutions
Want to enjoy Kataifi without all the guilt? Here are a few ways to lighten things up while keeping the flavor intact.
1. Reduce the sugar
- Cut down the syrup sugar by 25–30%. You’ll still get that sweetness without it being overpowering.
2. Use less butter
- Swap out half the butter with a neutral oil like grapeseed or avocado oil.
- Or use clarified butter (ghee) which has fewer impurities and a cleaner taste.
3. Add dried fruit
- Mix in finely chopped dates, raisins, or figs with the nuts to cut down on added sugar and boost fiber.
4. Go vegan
- Use plant-based butter and skip the honey in the syrup. The rest of the recipe is already egg- and dairy-free!
5. Add seeds and superfoods
- Toss in a tablespoon of ground flaxseed, chia, or hemp hearts with the nuts for an extra nutrition punch.
You can enjoy this traditional treat with a modern, health-conscious twist—and it’ll still taste amazing.
FAQs about Kataifi Recipe
Can I make Kataifi in advance?
Yes! Kataifi is a great make-ahead dessert. You can assemble the rolls and freeze them before baking or bake the entire dish and store it for up to a week. In fact, it tastes even better the next day.
How long does Kataifi last?
Properly stored, Kataifi lasts 5–7 days at room temperature or up to 10 days in the fridge. Keep it in an airtight container and enjoy it gradually over the week.
Can I use different nuts for the filling?
Absolutely. Walnuts are traditional, but pistachios, almonds, pecans, or even hazelnuts work great. You can even mix a few types for added complexity.
Why did my Kataifi turn out soggy?
The most common reason is pouring hot syrup onto hot pastry. Always let your syrup cool before drizzling over the fresh-out-of-the-oven Kataifi. Also, don’t cover it immediately—let it breathe.
Is Kataifi gluten-free?
Traditional Kataifi dough contains wheat, so it’s not gluten-free. However, some specialty stores may carry gluten-free versions, or you can make your own shredded dough with alternative flours (though it’s very advanced).
Conclusion
There you have it—an incredibly detailed, step-by-step guide to making authentic Greek Kataifi at home. Whether you’re a seasoned baker or trying this dessert for the first time, this recipe is designed to guide you through the entire process with confidence and ease.
From flaky, buttery dough to the sticky-sweet syrup, every bite of Kataifi is a celebration of texture and flavor. It’s a dessert that feels special, tastes indulgent, and always impresses.
So gather your ingredients, roll up your sleeves, and start rolling—because once you try homemade Kataifi, there’s no going back.


