Jammy Eggs Recipe: Jammy eggs are the culinary sweet spot between soft-boiled and hard-boiled—featuring a silky, rich yolk that’s just slightly set on the edges and wonderfully runny in the center. Whether you’re layering them on toast, adding them to your ramen, or dropping one onto a rice bowl, jammy eggs are the perfect way to add creaminess and protein to almost any meal.
But while they seem simple, nailing the perfect jammy egg consistently requires a little science and a lot of precision. That’s why we’ve created this foolproof, step-by-step guide to making jammy eggs just the way you like them—every single time.
What Are Jammy Eggs?
Jammy eggs are the happy middle ground between a soft-boiled and hard-boiled egg. The whites are firm and fully cooked, while the yolk is thick, golden, and just barely set—think of the texture of a soft, slightly runny jam. They’re not liquid like soft-boiled eggs but not crumbly like hard-boiled ones either.
Imagine the yolk spreading ever so gently onto your plate or toast, almost like butter. That’s the magic of a jammy egg. It’s no surprise these eggs have become a star in dishes like ramen, avo toast, and salads across the globe.
Why You’ll Love This Recipe
You might be wondering: why go through the hassle of making jammy eggs when I can just soft-boil or hard-boil? The answer is simple—texture and taste. The rich, velvety yolk offers a flavor and consistency that elevates any dish it touches.
Here’s why jammy eggs should be in your regular rotation:
- Quick & Easy: Ready in just 7–8 minutes.
- Meal Prep Friendly: They store well in the fridge for a few days.
- Versatile: Perfect in noodles, grain bowls, or on toast.
- Protein-Packed: Great source of high-quality protein.
Once you master this recipe, you’ll find yourself making a batch every week.
Ideal Time and Temperature for Jammy Eggs
Cooking jammy eggs is a science, and timing is everything. Even a 30-second difference can dramatically change the outcome. Here’s the timing sweet spot for most medium-to-large eggs straight from the fridge:
- Boil for 6 minutes and 30 seconds for a slightly runnier yolk.
- Boil for 7 minutes for that perfect “jammy” center.
- Boil for 8 minutes for a firmer yet still creamy yolk.
Remember: these times are based on eggs going into already boiling water, not cold-started. Water temperature and egg size matter, so adjust accordingly if you’re using extra-large eggs or farm-fresh ones at room temp.
Ingredients You’ll Need
To keep things simple, here’s your basic shopping list:
Main Ingredients
- Large eggs – As fresh as possible
- Water – For boiling
- Ice – For your post-boil ice bath
Optional Additions
- Salt or vinegar – A splash in the water may help with easier peeling
- Soy sauce or chili oil – For flavoring after cooking
That’s it—just 2 or 3 staple kitchen items and you’re in business!
Kitchen Tools Required
No fancy gadgets here—just kitchen basics. But each one plays a role in ensuring your eggs come out just right.
- Saucepan (medium-sized)
- Slotted spoon or ladle
- Timer (phone works great!)
- Bowl (for ice bath)
- Paper towels (for drying)
- Egg piercer (optional, but helps prevent cracking)
If you’ve got these on hand, you’re all set.
Step-by-Step Guide to Making Perfect Jammy Eggs
1. Boil the Water First
Start by bringing a medium pot of water to a rolling boil. Don’t start with cold water and eggs—this is one of the most common mistakes. You want to lower cold eggs into boiling water, not warm them up gradually. This helps control the exact cooking time.
2. Gently Lower the Eggs
Once the water is boiling, reduce the heat slightly to avoid splashing and use a slotted spoon to gently lower in your cold eggs one by one. Avoid dropping them—cracks mean disaster.
3. Set a Timer for Precision
As soon as your eggs hit the water, start your timer immediately:
- For perfectly jammy yolks: 7 minutes is your golden number.
Don’t guess. Don’t eyeball it. Set that timer. This is where the magic happens.
4. Prepare an Ice Bath
While your eggs are cooking, prep a large bowl of water with plenty of ice. This halts the cooking process immediately and locks in that jammy texture. The longer the eggs sit in hot water, the more you lose that soft center.
5. Shock and Peel the Eggs
Once the timer goes off, immediately transfer the eggs to the ice bath using a slotted spoon. Let them sit for at least 5 minutes. This not only stops cooking but also makes them easier to peel.
After they’ve cooled, gently tap the shell all over, roll it lightly on the counter, and peel under running water if needed.
How to Peel Jammy Eggs Without Breaking Them
Peeling eggs can be frustrating—especially when the shell sticks or chunks of white come off with it. But don’t worry, there’s a strategy to make this easy and mess-free. The key is all in timing and technique.
After the eggs have sat in the ice bath for about 5–10 minutes, they should be cool to the touch. Start by gently tapping the egg on a hard surface to create cracks all over the shell. Then, roll it lightly to loosen the shell beneath.
Here’s what helps:
- Peel under running cold water – It helps lift the shell away cleanly.
- Start from the wider end – That’s where the air pocket is, making it easier to get under the membrane.
- Use a spoon – Slide it between the shell and the egg to lift large pieces.
Be patient. A little gentleness goes a long way in keeping the white smooth and intact.
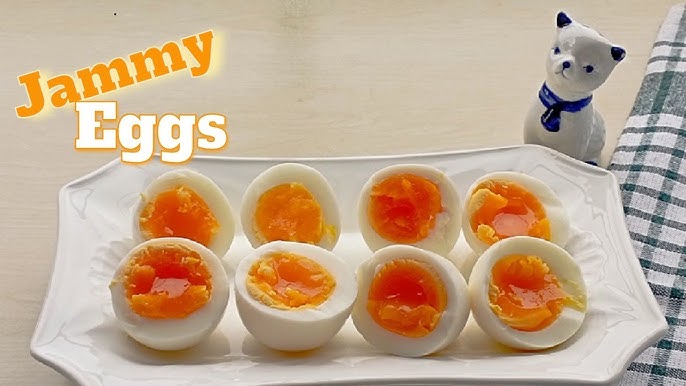
The Perfect Texture: What to Expect
So, what exactly is the texture of a jammy egg supposed to feel like? Here’s how to tell you’ve nailed it:
- The white should be firm, fully set, and not rubbery.
- The yolk should be thick, rich, and slightly runny—like a soft jam or a golden custard.
When you cut it open, the yolk should gently ooze but hold its shape. It shouldn’t pour out like water (undercooked), nor should it be dry or powdery (overcooked).
This golden center is packed with flavor, which is why it pairs so well with bold, umami-rich dishes like ramen and savory toasts. It adds creaminess, color, and indulgence without any extra effort.
Tips for Consistently Great Results
Mastering jammy eggs isn’t about getting lucky—it’s about being consistent. Here are tried-and-true tips to help you get it right every single time:
- Use cold eggs straight from the fridge – It ensures even cooking from a known starting temperature.
- Boil the water first – Never start with eggs in cold water if you want control over the cook.
- Use a timer religiously – Even being off by 30 seconds can change the texture.
- Make an ice bath ahead of time – Don’t scramble to throw one together while your eggs overcook.
- Cook in batches – Doing 3–4 eggs at a time allows the water to stay at a steady boil.
Once you dial in your method, you’ll be able to whip up perfect jammy eggs in your sleep.
Common Mistakes to Avoid
Even the most seasoned home cooks mess up eggs from time to time. Let’s skip the trial and error—here are the most common mistakes and how to avoid them:
- Starting with cold water – Leads to overcooking and unpredictable results.
- Using old eggs – Fresh eggs peel better and have a creamier yolk.
- Forgetting the ice bath – Skipping this means the eggs keep cooking inside and lose that soft center.
- Not timing properly – Guessing = disappointment.
- Using too many eggs at once – Overcrowding the pot drops water temperature and alters cook time.
Avoid these, and you’re on the fast track to jammy egg perfection.
Ways to Enjoy Jammy Eggs
Now that you’ve mastered jammy eggs, it’s time to eat! These little flavor bombs are insanely versatile. Here are some of the best ways to serve them:
1. On Toast
Spread some mashed avocado or a swipe of hummus on sourdough, slice a jammy egg on top, and sprinkle with chili flakes, sesame seeds, or microgreens. It’s Instagram-worthy and delicious.
2. With Ramen
A warm bowl of noodles just isn’t complete without a halved jammy egg soaking in the broth. It adds richness and soaks up all the flavor like a sponge.
3. In Salads
Toss a halved jammy egg onto your favorite green salad, grain bowl, or even a Nicoise-style plate. It adds protein and turns a light dish into a hearty meal.
4. On Rice Bowls
Think poke bowls, bibimbap, or sushi bowls. That rich yolk spilling into warm rice? Absolutely dreamy.
Want to get fancy? Marinate them in soy sauce and mirin for a few hours to turn them into Japanese-style ajitsuke tamago.
How to Store Leftover Jammy Eggs
While jammy eggs are best enjoyed fresh, you can definitely prep them ahead of time. Here’s how to store them properly:
- Refrigerate in an airtight container – If peeled, wrap them in paper towels to absorb moisture.
- Store unpeeled for best results – The shell protects them from drying out.
- Use within 3–4 days – Any longer and the texture starts to change.
Avoid freezing them. The yolk turns grainy and the white becomes rubbery. Trust us—it’s not worth it.
How Long Do Jammy Eggs Last in the Fridge?
Generally, jammy eggs last about 3–4 days when stored properly in the fridge. Here’s a quick guide:
| Condition | Shelf Life in Fridge |
|---|---|
| Unpeeled | 4 days |
| Peeled | 2–3 days (wrapped) |
| Marinated | 2–3 days |
To enjoy later, let them sit at room temp for a few minutes before eating. Do not microwave—this can overcook the yolk and ruin the texture.
Jammy Eggs vs. Soft-Boiled and Hard-Boiled Eggs
Let’s break it down:
| Type | Cook Time | Yolk Texture | Best Use |
|---|---|---|---|
| Soft-Boiled | 5–6 min | Runny | Dipping, toast soldiers |
| Jammy Eggs | 7 min | Thick & creamy | Ramen, bowls, salads |
| Hard-Boiled | 10–12 min | Fully set & firm | Deviled eggs, sandwiches |
Jammy eggs are the goldilocks of the boiled egg world—not too runny, not too firm. Just right.
Nutritional Information (Per Egg)
Here’s what one jammy egg typically delivers:
- Calories: 70–80
- Protein: 6–7g
- Fat: 5g
- Cholesterol: 185mg
- Carbs: 0g
- Fiber: 0g
- Sugar: 0g
They’re low-carb, keto-friendly, and packed with high-quality protein. A powerhouse for any meal!
FAQs about Jammy Eggs Recipe
1. How do I know when jammy eggs are done?
Set a timer for 7 minutes exactly after dropping them into boiling water. Remove immediately into an ice bath to stop the cooking.
2. Can I make jammy eggs in advance?
Absolutely! Cook, cool, and store them unpeeled in the fridge. They’ll stay fresh for up to 4 days.
3. Can I reheat jammy eggs?
It’s not recommended. Reheating changes the texture. If you must, soak them in warm water for 2–3 minutes—not in the microwave.
4. Why do my jammy eggs turn out runny?
You’re likely undercooking them. Try boiling for an extra 30 seconds and ensure you’re starting with boiling water.
5. Can I make jammy eggs in an air fryer?
Technically yes, but boiling gives more consistent results. Air frying can lead to unevenly cooked whites or yolks.
Conclusion
Jammy eggs are the unsung hero of quick, protein-packed meals. They’re the perfect middle ground between soft and hard-boiled, offering a golden yolk that’s equal parts creamy and indulgent. Whether you’re a busy parent, meal-prepper, or food lover looking for that next level of flavor, mastering jammy eggs is a total game changer.
With just a pot of boiling water, a timer, and some ice, you can create restaurant-quality eggs in your own kitchen. So next time you’re thinking of what to add to your toast, ramen, or salad—make it jammy. You’ll never go back.