Icebox Cake Recipe: Ever crave a dessert that’s simple, sweet, and absolutely stress-free? That’s exactly what an icebox cake brings to the table. This nostalgic no-bake treat has been around for decades, and it’s still as dreamy as ever. Whether it’s a hot summer day or you’re just too tired to fire up the oven, the icebox cake is here to save dessert time.
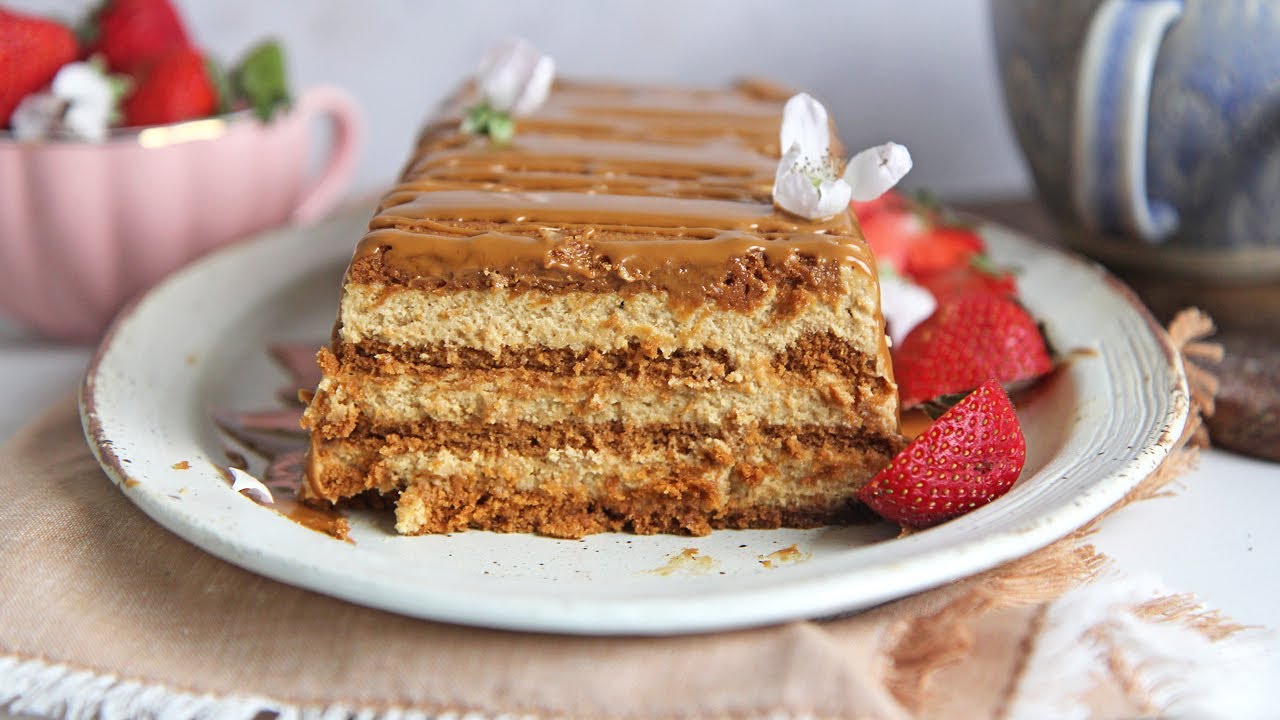
Think of it as a dessert lasagna – but way better. Layers of whipped cream and cookies soften into a chilled, cake-like wonder that practically melts in your mouth. It’s the kind of recipe that feels like a cheat code: throw a few things together, chill overnight, and boom — magic on a plate.
But don’t mistake its simplicity for boring. You can go classic, chocolatey, fruity, or even fancy it up for special occasions. In this full guide, I’ll walk you through everything: ingredients, step-by-step instructions, variations, tips, and even common mistakes to avoid. Ready to whip up something incredible?
Let’s get started.
List of Ingredients You’ll Need
Before diving into the recipe, here’s a look at what you’ll need. Don’t worry, the list is short and sweet — literally.
Basic Ingredients for Classic Icebox Cake
- Heavy whipping cream – 2 cups (or a large tub of Cool Whip)
- Powdered sugar – 1/4 cup (adjust to taste)
- Vanilla extract – 1 teaspoon
- Chocolate wafer cookies or graham crackers – about 2-3 sleeves (roughly 40-50 cookies)
- Optional toppings – chocolate shavings, cocoa powder, crushed nuts, or berries
Optional Add-ins and Flavor Variations
Want to level up your icebox cake? Try adding:
- Fresh fruit – sliced strawberries, bananas, blueberries, or mango
- Pudding or custard – for an extra creamy layer
- Nutella, peanut butter, or cookie butter
- Espresso or coffee liqueur – for a tiramisu vibe
- Mint or almond extract – to switch up the flavor
Tools & Equipment Needed
Nothing fancy needed here:
- Mixing bowl
- Electric mixer or whisk (for homemade whipped cream)
- Rubber spatula
- 9×13-inch baking dish or loaf pan
- Plastic wrap or foil
Got everything? Let’s get to the fun part.
Understanding the Icebox Cake Concept
Icebox cake is one of those desserts that feels like a magic trick. You layer crispy cookies with soft whipped cream, let it chill, and somehow it transforms into a moist, sliceable dessert that tastes like it took hours.
So, how does this work?
The Origin of Icebox Cake
Back in the 1920s and 30s, refrigerator sales were booming in the U.S. Companies began promoting “icebox desserts” as a way to showcase these new appliances. The idea was simple: make a no-bake treat that sets in the fridge, rather than the oven. Smart marketing — and delicious results.
How the Layers Work Together
As the cake chills in the fridge, the moisture from the whipped cream seeps into the cookies or crackers, softening them until they resemble layers of sponge cake. The longer it sits, the more melded and delicious the layers become.
The Science Behind Setting in the Fridge
It’s all about moisture migration. The cream hydrates the dry cookies, and the cold temperature helps everything firm up without freezing. This gives the dessert structure, making it easy to slice and serve — no oven necessary.
Choosing the Right Ingredients
Here’s where things get exciting. The core ingredients are super customizable, and your choices can make or break the final flavor.
Best Cookies or Crackers for Icebox Cakes
The key is to pick a cookie that absorbs moisture but doesn’t disintegrate too quickly.
Top choices include:
- Chocolate wafer cookies (classic!)
- Graham crackers
- Biscoff cookies
- Oreo thins
- Digestive biscuits
Avoid super hard cookies (like biscotti) unless you’re adding a soaking liquid.
Whipped Cream vs Cool Whip – Which One Wins?
- Whipped cream – Light, fluffy, and made fresh. Best flavor, but you’ll need to whip it yourself.
- Cool Whip – Super convenient, stable, and easy to work with. A little sweeter and more processed.
No wrong answer here — just what works best for your style.
Sweeteners and Flavoring Options
- For sweetening, use powdered sugar for smoothness.
- Add vanilla extract or go bold with coffee, cocoa powder, or liquors.
- Want a tangy twist? Fold in a bit of cream cheese or Greek yogurt into the cream mixture.
Flavor Variations to Try
One of the best parts of making an icebox cake? You can totally make it your own. Whether you’re into rich chocolate, fruity freshness, or something totally unexpected, the possibilities are endless. Let’s explore a few fun and delicious variations you can try out.
Chocolate Lover’s Icebox Cake
If you’re a chocoholic, this one’s for you. Use chocolate graham crackers or Oreo thins as your cookie base. For the cream layer, add 2–3 tablespoons of cocoa powder to the whipped cream, or fold in chocolate pudding for extra richness. Top it with chocolate chips, ganache, or even chopped up brownies for a real treat.
You can also drizzle some chocolate syrup between the layers for a deeper chocolate flavor. This one’s decadent and perfect for celebrations.
Berry Vanilla Icebox Cake
This version screams summer and is super light and refreshing. Use vanilla wafers or graham crackers as your base, then layer in fresh strawberries, blueberries, or raspberries. For the cream, vanilla extract is a must, and you can even fold in a bit of lemon zest for brightness.
Top with fresh berries and mint for a stunning presentation. It’s like a no-bake strawberry shortcake — and it’s a hit every single time.
Tiramisu-Inspired Icebox Cake
Want that classy coffee kick? This twist takes inspiration from tiramisu. Use ladyfingers or digestive biscuits soaked lightly in espresso (or coffee liqueur). For the cream, fold in mascarpone cheese with whipped cream and a splash of vanilla or coffee extract.
Dust each layer with cocoa powder and finish the top with chocolate shavings or a sprinkle of espresso powder. Serve chilled with a shot of espresso — Italian café vibes right at home.
Nutella and Banana Icebox Cake
This combo is a crowd favorite. Use chocolate graham crackers or even Oreo thins. For the cream layer, mix whipped cream with a few tablespoons of Nutella. Layer in sliced bananas between each layer for a smooth, fruity contrast.
Once it’s chilled, top it with more banana slices, crushed hazelnuts, and a drizzle of warm Nutella. Dessert doesn’t get much better than this.
Step-by-Step Instructions
Now that you’ve got your ingredients and a flavor plan, let’s walk through making your icebox cake from start to finish. This is the fun part — layering, chilling, and watching it all come together.
Step 1: Prepare Your Ingredients
Lay out everything you’ll need so the process is smooth and stress-free. If you’re using fresh whipped cream, make that first. If you’re adding fruit, slice it up now so it’s ready to go. And make sure your dish or pan is clean and dry.
Quick prep tips:
- Line your pan with parchment for easy removal and slicing.
- Make sure your cookies are in good shape — not too crumbly or broken.
Step 2: Whip the Cream (if using homemade)
Using an electric mixer, beat 2 cups of heavy whipping cream on high until soft peaks form. Add 1/4 cup powdered sugar and 1 teaspoon vanilla extract, and continue to whip until stiff peaks form.
If you’re using Cool Whip or a pre-made topping, make sure it’s thawed and ready to spread.
Step 3: Layering the Cookies and Cream
Start with a thin layer of whipped cream on the bottom of your dish to anchor the first cookie layer. Then add a single, even layer of cookies. Don’t worry about gaps — you can break some cookies to fit if needed.
Next, spread a generous layer of whipped cream over the cookies. Use a spatula to smooth it out. Repeat with more cookies, more cream — and any add-ins like fruit, Nutella, or pudding.
Layering pattern:
Cookies → Cream → Cookies → Cream → (Add-ins if using) → Repeat
Step 4: Repeat and Build the Layers
Keep going until your dish is full or you run out of ingredients. Most icebox cakes work best with 3 to 5 layers. End with a thick layer of cream on top — this will become your “frosting.”
If you want to get fancy, pipe some cream along the edges or top it with decorative elements now, or wait until it’s chilled.
Step 5: Chill Overnight
This is the hardest part — waiting. Cover the cake tightly with plastic wrap or foil, and place it in the fridge for at least 6–8 hours, though overnight is best. This gives the cookies time to soften and the flavors to meld.
Resist the urge to slice it early — it won’t hold together well until it’s properly chilled.
Step 6: Decorate and Serve
Once fully chilled and set, remove the plastic wrap and add your toppings:
- Fresh fruit
- Shaved chocolate
- Cookie crumbs
- Nuts
- Mint leaves
- Cocoa powder
Cut into squares or slices using a sharp knife. Wipe the blade clean between cuts for neat edges. Serve chilled and watch the smiles roll in.
Tips for the Perfect Icebox Cake
Want to make a show-stopping dessert every time? Here are some insider tips that’ll take your icebox cake from “yum” to “WOW.”
Let It Chill Long Enough
This is non-negotiable. The magic only happens if you let the cookies soak up the moisture from the cream. At minimum, chill for 6 hours, but overnight is truly ideal. If you’re in a rush, try the freezer for 2–3 hours, but note that the texture may differ slightly.
Use a Clear Dish
A glass or clear-sided dish shows off all those pretty layers. It makes the cake look much more impressive — even if it only took 20 minutes to put together.
Don’t Overload the Layers
Keep your cream layers generous but not overwhelming. If you add too much filling or fruit between layers, it can get messy and difficult to cut. Aim for even, balanced layers every time.
Make It Ahead
Icebox cake is the perfect make-ahead dessert. You can prepare it up to 2 days in advance and store it in the fridge until you’re ready to serve. In fact, it often tastes even better the next day.
Common Mistakes to Avoid
Even though icebox cake is one of the easiest desserts to make, a few simple missteps can affect how it turns out. Let’s make sure you steer clear of these common mistakes, so your dessert turns out picture-perfect every time.
Using the Wrong Type of Cookies
Not all cookies are created equal. Some are too hard and don’t soften well (like biscotti), while others are too soft and turn mushy (like soft-baked cookies). The best options are crisp, dry cookies like:
- Chocolate wafers
- Graham crackers
- Digestive biscuits
- Ladyfingers
These absorb just the right amount of moisture to create that soft, cake-like texture without falling apart.
Not Letting It Chill Long Enough
We’ve said it before, but it’s worth repeating: patience is key. If you try to serve your icebox cake too soon, the layers won’t be properly set. You’ll end up with crunchy cookies and runny cream — not what you want.
Always allow a minimum of 6–8 hours, preferably overnight. Trust the process — it’s worth the wait.
Overloading the Layers
It might be tempting to pack in extra fruit, pudding, or thick cream layers, but more isn’t always better. Overloaded layers can cause the cake to collapse or become overly soggy.
Stick to a balanced ratio:
- Thin, even layers of cookies
- Light, fluffy whipped cream spread evenly
- Optional fruit or fillings in moderation
Skipping the Lining or Not Using the Right Pan
If you’re planning to remove your icebox cake from the dish before serving, line it with parchment paper or plastic wrap. This makes it so much easier to lift and slice.
Also, be sure to choose the right size pan. A 9×13-inch dish is ideal for most recipes, but if you’re going smaller or making mini versions, adjust the layers accordingly.
Icebox Cake for Special Occasions
Icebox cakes are the unsung hero of party desserts. They’re no-bake, low-effort, and super adaptable for all kinds of events. You can easily dress them up for birthdays, holidays, or casual get-togethers.
Birthday Icebox Cake Ideas
Who needs a traditional birthday cake when you can stack up layers of cookies and cream? For a festive birthday version:
- Use rainbow sprinkles in the cream
- Add crushed Oreos or chocolate chip cookies
- Decorate with colorful candies or a “happy birthday” cake topper
Bonus tip: Make a layered round icebox cake using a springform pan and slice it just like a regular birthday cake.
Holiday-Inspired Variations
Holidays are the perfect excuse to get creative:
- Christmas: Add peppermint extract to the cream and sprinkle crushed candy canes on top.
- Thanksgiving: Use gingersnaps and pumpkin spice whipped cream.
- Fourth of July: Layer with red and blue berries for a patriotic look.
You can even build a layered trifle version in a big glass bowl for more visual impact during gatherings.
Kid-Friendly Icebox Cake Versions
Making dessert with your kids? Icebox cake is a great place to start. It’s fun, messy (in a good way), and lets them build their own masterpiece. Try:
- Using animal crackers, vanilla wafers, or Teddy Grahams
- Adding layers of chocolate pudding or fruit snacks
- Letting them decorate the top with M&Ms, sprinkles, or gummy bears
No ovens, no knives — just pure fun.
Healthy Icebox Cake Alternatives
Trying to cut down on sugar, dairy, or gluten? Good news: you can still enjoy icebox cake with a few smart swaps. It might not be the classic version, but it’ll still taste amazing.
Low-Sugar & Keto Versions
To make a low-carb or keto-friendly icebox cake:
- Use keto cookies or homemade almond flour crackers
- Sweeten the whipped cream with erythritol or monk fruit
- Add sugar-free chocolate chips or unsweetened cocoa powder
Keep the portion sizes in check and it’ll fit nicely into your low-carb lifestyle.
Dairy-Free and Vegan Options
There are so many great alternatives for dairy-free and vegan eaters now:
- Use coconut cream or vegan whipped topping
- Opt for plant-based cookies (like oat or almond cookies)
- Add layers of vegan pudding or mashed fruit
Check labels to ensure everything is truly vegan, and you’ve got a dessert everyone can enjoy.
Gluten-Free Substitutes
For a gluten-free version:
- Use certified gluten-free graham crackers or cookies
- Make sure your whipped topping is GF-certified
- Add naturally gluten-free fruits like berries and bananas
The texture and flavor are just as dreamy — no gluten required.
Serving and Presentation Ideas
Icebox cake is a showstopper when plated right. Whether you’re keeping it simple or going all out, these presentation tips will elevate your dessert game.
Garnish Tips
Finish your cake with eye-catching garnishes like:
- Fresh fruit (strawberries, raspberries, kiwi)
- Chocolate shavings or cocoa powder
- Crushed cookies or nuts
- Edible flowers or mint sprigs
Don’t go overboard — a little goes a long way in making your cake look like it came from a bakery.
Fun Ways to Present Mini Icebox Cakes
Want to make it personal? Try individual servings:
- Layer ingredients in mason jars or clear cups
- Use a piping bag for the cream to keep things neat
- Seal and store in the fridge for grab-and-go treats
These are perfect for dinner parties, picnics, or kid birthdays.
Using Molds and Jars
If you want super clean slices or a unique shape:
- Try using a loaf pan lined with plastic wrap
- Build the cake, chill it, and lift it out for slicing
- You can even freeze it slightly for cleaner edges
Silicone molds or springform pans also make for easy removal and a pro-looking finish.
Storage and Shelf Life
Once your icebox cake is ready, you’ll want to know how to store it properly so you can enjoy it over the next few days — or freeze it for later.
How Long Does Icebox Cake Last?
Stored in the refrigerator, icebox cake will stay fresh for 3–4 days. After that, the texture may start to degrade — cookies can get too soft and cream can loosen up.
Always keep it tightly wrapped or in an airtight container to prevent it from absorbing fridge odors.
Freezing and Thawing Instructions
Yes, you can freeze an icebox cake! Just follow these tips:
- Wrap it well in plastic wrap, then aluminum foil
- Freeze for up to 1 month
- Thaw in the refrigerator overnight before serving
The texture will be slightly firmer, but still delicious.
Pro tip: Frozen mini icebox cakes are AMAZING during hot weather — almost like ice cream sandwiches.
Why This Dessert is Perfect Year-Round
No matter the season, icebox cake just works. It’s light enough for summer BBQs, cozy enough for winter holidays, and easy enough for anytime cravings.
- In summer, it’s the ultimate no-bake treat. Keep your kitchen cool and your dessert chilled.
- In winter, add rich flavors like mocha, caramel, or cinnamon for a comforting twist.
- In spring and fall, lean into seasonal fruits or spices.
You don’t need a special reason to make icebox cake — just a spoon and a fridge.
FAQs about Icebox Cake Recipe
1. Can I use pudding instead of whipped cream?
Yes! Pudding is a great substitute or addition to the cream layer. Try layering chocolate, vanilla, or banana pudding for a richer, creamier cake.
2. What’s the best cookie for icebox cakes?
Chocolate wafers, graham crackers, and digestive biscuits are top choices. You want something dry and crisp so it softens perfectly without turning mushy.
3. How far in advance can I make it?
You can make icebox cake up to 2 days in advance. It actually tastes better after resting for at least 24 hours in the fridge.
4. Can I freeze an icebox cake?
Absolutely! Wrap it well and freeze for up to a month. Just thaw it overnight in the fridge before serving.
5. Is it safe to leave it out at room temperature?
Not for long. Icebox cake contains dairy, so it should only sit out for 1–2 hours max. Keep it chilled until you’re ready to serve.
Conclusion
There you have it — a complete, foolproof guide to making your own icebox cake. Whether you’re a beginner in the kitchen or a seasoned dessert lover, this no-bake beauty is guaranteed to impress. With its endless variations, customizable flavors, and super simple steps, it’s no wonder the icebox cake is a timeless favorite.
So next time you need a crowd-pleaser (or just something sweet after dinner), skip the oven and build yourself an icebox masterpiece. Just layer, chill, slice, and serve. Easy, right?
Happy no-baking!