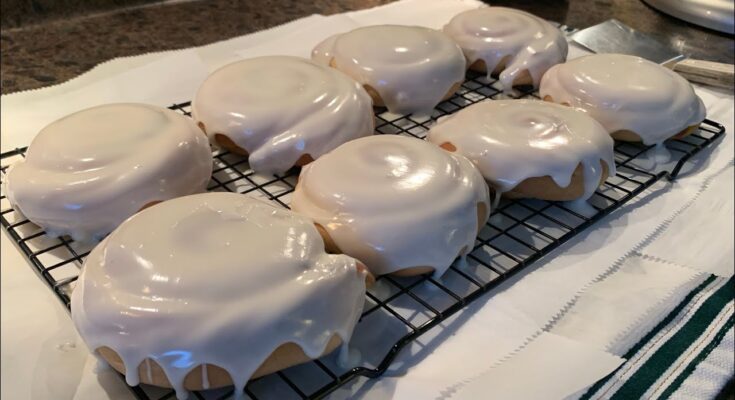
Honey Bun Recipe: Ever taken a bite of a soft, gooey honey bun and just paused to enjoy the magic? That golden swirl of cinnamon, the sticky honey glaze coating your fingertips, and the warm, buttery aroma—that’s the stuff comfort food dreams are made of. Honey buns have been a staple in snack aisles and bakeries for decades, but trust me, nothing beats a fresh batch made right in your own kitchen. Whether you’re baking for a lazy Sunday breakfast, a family gathering, or just because your sweet tooth demanded it, this guide will walk you through every step to creating honey buns that taste like they came from a high-end bakery.
In this article, I’ll share everything from the ingredients you’ll need, to common pitfalls to avoid, and even a few creative twists to customize your buns. By the end, you’ll be confidently rolling, baking, and glazing your way to honey bun heaven. Ready to dive in? Let’s get sticky!
Ingredients You’ll Need
Let’s get real—great baking always starts with the right ingredients. For these classic honey buns, you’ll want to keep things simple but high quality. Here’s what you’ll need:
For the Dough:
- 3 ¾ cups all-purpose flour
- 1 packet (2 ¼ tsp) active dry yeast
- ¾ cup warm milk (110°F)
- ¼ cup granulated sugar
- ¼ cup unsalted butter, softened
- 1 tsp salt
- 2 large eggs
For the Filling:
- ½ cup brown sugar, packed
- 2 tbsp ground cinnamon
- ¼ cup unsalted butter, softened
For the Glaze:
- ½ cup honey
- 1 tbsp unsalted butter
- ½ tsp vanilla extract
- Pinch of salt
Optional Add-ins:
- Chopped pecans or walnuts
- Raisins or dried cranberries
- Dash of nutmeg or cardamom in filling
Ingredient Substitutions:
- Dairy-free? Use almond milk and vegan butter.
- No brown sugar? Mix white sugar with a tablespoon of molasses.
- Watching your sugar intake? Try a monk fruit sweetener blend.
These ingredients come together to form a pillowy-soft dough, a warm spiced filling, and that iconic shiny glaze. But don’t worry if you don’t have every single one—there’s always room for substitutions or creativity.
Kitchen Tools Required
Before we roll up our sleeves, make sure your kitchen is stocked with the right tools. Trust me, the last thing you want is to get halfway through and realize you’re missing something crucial.
Must-Haves:
- Large mixing bowl
- Measuring cups and spoons
- Rolling pin
- Baking sheet or 9×13 baking dish
- Parchment paper or non-stick spray
- Sharp knife or dough cutter
- Small saucepan (for the glaze)
- Whisk or wooden spoon
Helpful Extras:
- Stand mixer with dough hook (for easier kneading)
- Pastry brush (for brushing glaze)
- Thermometer (to check milk temperature)
- Plastic wrap or clean towel (for covering dough)
Don’t have a stand mixer? No worries—you can knead by hand. No pastry brush? Just drizzle the glaze with a spoon. These buns are very forgiving, and with a little effort, even basic tools will do the trick.
Understanding Honey Buns: A Brief Overview
You might think of honey buns as a quick snack from the store, but they actually have a sweet history rooted in American baking traditions. Originally inspired by classic cinnamon rolls, honey buns evolved into their own distinct treat thanks to the signature glaze and slightly denser texture.
What makes a honey bun unique?
- The Dough: Unlike super fluffy cinnamon rolls, honey buns are slightly chewier and more enriched with eggs and milk.
- The Shape: Rolled, sliced, and then flattened slightly to get that signature spiral with a dense, melt-in-your-mouth center.
- The Glaze: A luscious honey-based syrup that soaks into the bun, adding sweetness and shine.
Today, they come in all forms—from prepackaged snack-size versions to gourmet bakery creations. But once you’ve tasted your own homemade version, you’ll never look at store-bought the same way again.
Preparing the Dough
Alright, now let’s get our hands into the heart of this recipe—the dough. If you’ve never worked with yeast dough before, don’t sweat it. I’ll guide you through the process step by step, so you’ll know exactly what to expect.
Step 1: Activate the Yeast
Start by warming your milk to about 110°F. Not boiling—just warm to the touch. Too hot, and it’ll kill the yeast. Too cold, and it won’t activate. Pour the warm milk into a bowl and sprinkle in your packet of active dry yeast. Add a pinch of sugar to feed the yeast, then let it sit for 5–10 minutes. You’ll know it’s working when it gets foamy on top. If it doesn’t foam, toss it and start with fresh yeast.
Step 2: Mix the Wet Ingredients
In a large mixing bowl (or stand mixer bowl), combine your softened butter, sugar, salt, and eggs. Beat them together until creamy. Then add in the yeast mixture.
Step 3: Add the Flour
Start adding flour one cup at a time, mixing as you go. Once the dough begins to form, knead it by hand or with a dough hook for about 7–10 minutes. The dough should be smooth, elastic, and just a little tacky—but not sticky.
Step 4: First Rise
Place your dough in a greased bowl, cover it with a towel or plastic wrap, and set it in a warm, draft-free spot. Let it rise until doubled in size—usually about 1 to 1.5 hours.
This part is magical. As the dough rises, the yeast does its thing, making the dough soft and airy. Resist the urge to rush it—good dough takes patience!
Making the Filling
Once the dough has risen and you’re greeted with that gorgeous puffy texture, it’s time to add the flavor-packed swirl inside. This is where your honey buns really start to come to life.
Step 1: Mix the Filling
In a small bowl, mix together the brown sugar and cinnamon. If you’re feeling adventurous, this is also the perfect place to stir in a pinch of nutmeg or cardamom for a warm, spiced kick. Add your softened butter and mix it into a thick paste. It should be spreadable but not runny.
Optional Add-ins:
- Nuts: Chopped pecans or walnuts give a delightful crunch.
- Fruit: Raisins or dried cranberries add chew and natural sweetness.
- Citrus Zest: A touch of orange or lemon zest gives a refreshing twist.
Step 2: Roll Out the Dough
After the dough has risen, punch it down and transfer it to a lightly floured surface. Roll it into a rectangle about ¼ inch thick—roughly 12×18 inches. Try to keep it as even as possible to ensure consistent buns.
Step 3: Spread the Filling
Using a spatula or the back of a spoon, spread your cinnamon-sugar mixture over the rolled dough, leaving a ½-inch border around the edges. Don’t skimp here—this filling is the star of the show.
Shaping the Honey Buns
Now comes the fun part—rolling and shaping those beautiful spirals. This step is crucial for that iconic honey bun look.
Step 1: Roll It Up
Starting from the long edge of your dough rectangle, roll it up tightly like a jelly roll. Roll slowly and gently to keep the swirl tight. Once rolled, pinch the seam closed to seal.
Step 2: Cut into Buns
Use a very sharp knife or a piece of unflavored dental floss to cut the log into 1 to 1½ inch slices. You should get about 12–15 buns, depending on how thick you slice them.
Step 3: Flatten Slightly
Unlike cinnamon rolls, honey buns are traditionally a bit flatter. After placing each slice onto a parchment-lined baking sheet, gently press them down with your hand or the bottom of a glass. This helps them bake more evenly and absorb the glaze better later.
Second Rise – Letting the Dough Breathe
Before you bake, it’s time to let your shaped buns rise one more time. This second proofing gives them the final puff and tenderness.
How Long?
Cover your tray loosely with a clean towel or plastic wrap and let them rise for about 30–45 minutes. They should look visibly puffier and feel slightly springy to the touch.
Ideal Proofing Environment:
- A warm kitchen counter
- Inside a turned-off oven with the light on
- Near a sunny window
Avoid over-proofing—if they rise too much, they may collapse during baking. Keep an eye on them and move to the next step once they’re just right.
Baking the Honey Buns
Now for the transformation—time to bake these beauties and let your kitchen fill with that mouthwatering aroma.
Step 1: Preheat Your Oven
Set your oven to 350°F (175°C). Make sure it’s fully preheated before the buns go in.
Step 2: Bake the Buns
Place your tray in the center rack and bake for 18–22 minutes, or until the tops are golden brown and the buns are cooked through. Don’t overbake—dry honey buns are a crime against dessert!
Pro Tips:
- Rotate the tray halfway through for even browning.
- Lightly tent with foil if tops brown too quickly.
Once baked, remove from the oven and let them cool slightly—but not too much! Warm buns absorb glaze better, and that’s what we’re tackling next.
Making the Honey Glaze
The glaze is the finishing touch that takes your honey buns from good to unforgettable. It seeps into the swirls, adding sweetness, moisture, and a glossy finish.
Ingredients:
- ½ cup honey
- 1 tbsp butter
- ½ tsp vanilla extract
- Pinch of salt
Step-by-Step:
- In a small saucepan, melt the butter over low heat.
- Add the honey and stir until fully combined.
- Remove from heat and stir in the vanilla and salt.
Glazing Technique:
While the buns are still warm, drizzle the glaze generously over each one using a spoon or pastry brush. The warmth helps the glaze melt right in, making every bite gooey and flavorful.
If you like extra sweetness, go in with a second layer once the first sets. No judgment here!
Finishing Touches
At this stage, your buns are looking pretty fabulous—but we can always go a little extra, right?
Add Some Flair:
- Powdered Sugar Dusting: A light dusting adds elegance.
- Drizzle with Icing: Mix powdered sugar and milk for a thicker topping.
- Top with Chopped Nuts: Adds crunch and visual appeal.
Let them cool slightly before serving—or dive in while they’re still warm for the ultimate indulgence. Serve with coffee, milk, or just pure bliss.
Tips to Make Your Honey Buns Even Better
So you’ve followed the recipe to a T, but want to take your honey buns to the next level? Here are some tried-and-true tips to elevate your baking game and ensure every batch turns out bakery-quality.
1. Use Room Temperature Ingredients
Cold eggs or butter can mess with dough consistency. Let your eggs and butter sit out for 30–60 minutes before mixing. This helps them blend better and results in a softer, more elastic dough.
2. Don’t Rush the Rise
Patience is a key ingredient in any yeast-based recipe. Letting the dough fully rise gives your honey buns that airy, light texture. If your kitchen is cool, place the dough in the oven (turned off) with the light on to encourage rising.
3. Try Bread Flour
Want a chewier texture? Swap half of your all-purpose flour with bread flour. It has more protein, which gives the dough extra strength and elasticity.
4. Go Heavy on the Filling
Don’t be shy with the cinnamon-sugar mixture. A generous layer ensures every bite is packed with that warm, spiced flavor. Just leave a small border to prevent spillage when rolling.
5. Bake Close Together for Pull-Apart Buns
If you want soft, pull-apart-style honey buns, place them close together in a baking dish rather than spaced out on a sheet. They’ll rise and bake into each other, keeping the sides extra soft.
6. Add a Flavor Boost to the Glaze
Enhance your glaze with a splash of bourbon, a touch of citrus zest, or a spoonful of cream cheese for a twist. These small touches can make a big impact.
7. Reheat Like a Pro
Pop leftover buns in the microwave for 10–15 seconds or wrap in foil and warm in a low oven. They’ll taste freshly baked again.
Honey Bun Variations to Try
Once you’ve mastered the classic version, the sky’s the limit! Here are a few irresistible variations to inspire your next batch:
Chocolate Chip Honey Buns
- Add a handful of mini chocolate chips into the filling before rolling.
- Drizzle with a chocolate glaze (melted chocolate + cream).
- Serve warm with whipped cream for dessert vibes.
Maple Pecan Honey Buns
- Replace honey in the glaze with maple syrup.
- Add chopped pecans into the filling and sprinkle on top after glazing.
- A fall favorite that pairs beautifully with coffee or chai tea.
Cream Cheese-Filled Honey Buns
- Mix softened cream cheese with a touch of sugar and vanilla.
- Spread a thin layer over the dough before the cinnamon filling.
- Extra gooey and decadent.
Vegan Honey Buns
- Swap eggs for flaxseed eggs (1 tbsp flax + 3 tbsp water per egg).
- Use plant-based milk and vegan butter.
- Replace honey with agave syrup or maple syrup in the glaze.
Gluten-Free Honey Buns
- Use a gluten-free all-purpose flour blend.
- Add 1 tsp xanthan gum if not already included in the flour.
- Keep the dough slightly wetter to prevent dryness.
Play around and find your signature flavor. Whether you’re going traditional or going wild, there’s no wrong way to enjoy a honey bun!
Nutritional Information
We all love a sweet treat—but if you’re curious about what’s in your honey bun, here’s a rough breakdown for a standard-sized homemade bun:
| Nutrient | Per Bun (approx.) |
|---|---|
| Calories | 290–350 kcal |
| Carbs | 45–50g |
| Sugar | 20–25g |
| Fat | 10–15g |
| Protein | 4–6g |
| Fiber | 1–2g |
Health Tips:
- Reduce sugar in the filling and glaze if you want a lighter version.
- Swap white flour for half whole wheat flour for extra fiber.
- Use a sugar alternative like monk fruit or stevia to cut calories.
Even with some indulgence, homemade honey buns are far better than store-bought versions filled with preservatives. And hey, life’s about balance—treat yourself!
Troubleshooting Common Problems
Sometimes things don’t go quite as planned—but don’t worry. Here’s how to fix the most common honey bun baking hiccups.
1. Dough Didn’t Rise
- Possible Causes: Old yeast, water/milk too hot, or cold environment.
- Fix: Always test your yeast first with warm water and sugar. If it doesn’t bubble, toss it and try fresh.
2. Buns Are Dry
- Possible Causes: Overbaking or not enough moisture in the dough.
- Fix: Check oven temp with a thermometer. Pull them out when just golden. Add extra butter or milk to the dough next time.
3. Filling Leaked Out
- Possible Causes: Overfilling or loose rolling.
- Fix: Leave a ½-inch border, and roll the dough tightly. Chill the dough roll before slicing to help it hold shape.
4. Glaze Didn’t Set
- Possible Causes: Buns were too cold or glaze was too thin.
- Fix: Always glaze while buns are warm. Thicken glaze with a bit of powdered sugar if needed.
5. Dough Too Sticky to Handle
- Possible Causes: Too much liquid or warm environment.
- Fix: Dust with extra flour in small increments, but don’t overdo it. A slightly tacky dough is better than dry.
Storing and Freezing Honey Buns
Homemade honey buns are best fresh, but they can absolutely be stored or frozen for later indulgence.
Room Temperature (2–3 days)
- Store in an airtight container.
- Keep away from direct sunlight or heat.
- Microwave for 10 seconds before eating for best texture.
Refrigerator (Up to 1 week)
- Store in a sealed container.
- Reheat in microwave or oven for 5–10 minutes at 300°F.
Freezer (Up to 2 months)
- Wrap each bun individually in plastic wrap.
- Store in freezer-safe bags or containers.
- Thaw overnight in the fridge, then warm in the oven or microwave.
Freezing Tip: You can also freeze the dough log before slicing. Just wrap tightly and freeze. When ready to bake, thaw in fridge, slice, proof, and bake.
Honey Bun Pairing Ideas
Honey buns are delicious solo, but why stop there? Pair them with something that makes the experience even more indulgent.
Beverage Pairings
- Coffee: A bold brew balances the sweetness perfectly.
- Chai Tea: Warm spices echo the cinnamon filling.
- Milk: Classic combo—especially for kids!
- Hot Chocolate: Because sometimes, more sweetness is the answer.
Serving as a Dessert
- Warm honey bun + scoop of vanilla ice cream = bliss.
- Add a drizzle of chocolate or caramel syrup for extra flair.
Breakfast Companions
- Pair with eggs and bacon for a sweet and savory breakfast.
- Serve with fresh fruit and yogurt for a balanced morning spread.
FAQs about Honey Bun Recipe
1. Can I make honey buns without yeast?
Yes, but they won’t have the same fluffy texture. You can try a quick bread version using baking powder and baking soda, but expect more of a biscuit-like bun.
2. How long do homemade honey buns last?
Stored properly, they last 2–3 days at room temperature, 1 week in the fridge, or up to 2 months in the freezer.
3. Can I freeze the dough for later?
Absolutely. You can freeze the dough log before slicing or freeze the shaped, unbaked buns. Just thaw overnight, let rise, and bake as usual.
4. What can I use instead of honey?
Maple syrup, agave syrup, or a simple sugar glaze are great substitutes if you’re out of honey or avoiding it.
5. Why did my buns turn out dry?
They may have been overbaked or had too much flour. Try reducing bake time or adding a bit more butter/milk to your dough next time.
Conclusion
And there you have it—your complete guide to making rich, gooey, and irresistible honey buns from scratch. From mixing the perfect dough to mastering the honey glaze, you’re now armed with all the tools (and tricks) to bake like a pro. These sweet spirals aren’t just delicious—they’re a nostalgic, cozy treat that never fails to bring smiles.
Whether you stick to the classic recipe or try out one of the fun variations, making honey buns at home is an experience worth savoring. So preheat that oven, gather your ingredients, and roll your way into sweet, sticky bliss.
Happy baking!


