Hawaiian Haystacks Recipe: Ever heard of a meal that feels like a vacation in a bowl? That’s exactly what Hawaiian Haystacks are. They’re colorful, flavorful, and super easy to make. Think of them as a build-your-own rice bowl with tropical flair. You get warm rice topped with creamy chicken gravy and a rainbow of toppings like pineapple, crispy noodles, cheese, and more. It’s the kind of dish that turns even picky eaters into fans, and trust me, everyone ends up asking for seconds.
Despite the name, Hawaiian Haystacks aren’t originally from Hawaii. They became popular in the western U.S.—especially among families and church potlucks—because they’re simple, cheap, and fun to assemble. Each person gets to build their own stack just the way they like it. No complaints at the dinner table? That’s a win.
So, if you’re looking for a comforting, crowd-pleasing meal that’s also weeknight easy, you’re in the right place. Let’s break it all down and get cooking!
What Makes Hawaiian Haystacks So Popular?
There’s something magical about meals where everyone can be their own chef. Hawaiian Haystacks are popular because they’re all about customization. One base (usually rice), a creamy chicken gravy, and then… the toppings. You lay them all out and let everyone dive in. It’s like a food bar at your own kitchen table.
This dish works great for busy families, picky eaters, large gatherings, or even solo meal-preppers. Got leftover veggies? Toss them in. Want to keep it healthy? Use brown rice or cauliflower rice. Prefer spicy? Add jalapeños or a splash of sriracha.
What really keeps people coming back to this recipe is how fun it is. It’s not just dinner—it’s an activity. Plus, it’s relatively inexpensive. A few cans of soup, a couple of chicken breasts, rice, and whatever toppings you have on hand. Done. You’ll feel like a kitchen rockstar without spending hours at the stove.
Ingredients You’ll Need
Let’s break this down into sections so your kitchen doesn’t turn into chaos. Hawaiian Haystacks are all about layering, and here’s everything you’ll need to build them from the bottom up.
Base Ingredients
- Rice – White jasmine or basmati rice works great, but brown rice or even cauliflower rice can be used if you’re going for a healthier twist.
Creamy Chicken Gravy
This is the soul of the haystack. You can keep it easy or go fully homemade.
- Chicken breasts or rotisserie chicken – About 2–3 cups shredded
- Cream of chicken soup – 2 cans (or make from scratch if you’re avoiding canned)
- Sour cream – 1/2 cup
- Chicken broth – 1/2 to 1 cup (depending on how thick you want it)
- Seasonings – Garlic powder, salt, black pepper to taste
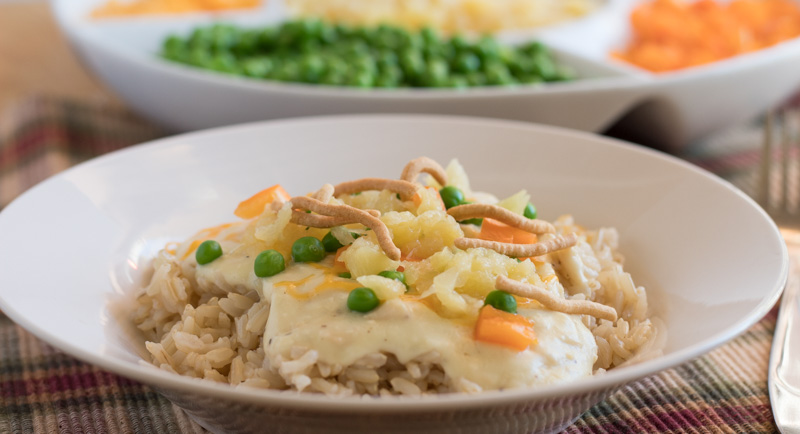
Classic Toppings
Here’s where the fun begins! Mix and match based on what you like.
- Pineapple tidbits
- Shredded cheddar cheese
- Chopped green onions
- Chopped celery
- Chopped tomatoes
- Mandarin oranges
- Crispy chow mein noodles
- Sliced black olives
- Sweetened shredded coconut
- Slivered almonds
Optional Toppings
Want to take it to the next level?
- Diced bell peppers
- Avocado slices
- Crumbled bacon
- Fresh cilantro
- Jalapeños or hot sauce
Kitchen Tools You’ll Need
You don’t need fancy tools, but a few basics will make this smooth sailing:
- Rice cooker or pot – For cooking your rice to fluffy perfection
- Saucepan – To make that dreamy chicken gravy
- Mixing bowls – For toppings
- Serving dishes or trays – Lay out your toppings buffet-style
Step-by-Step Guide to Making Hawaiian Haystacks
Step 1: Cook the Rice
Prepare fluffy rice using either the stovetop or an Instant Pot. For stovetop, rinse rice, bring to a boil, cover, and simmer. For Instant Pot, use a 1:1 ratio and cook on high for 4 minutes with a natural release. Fluffy rice is key to stable haystack layers.
Step 2: Prepare the Creamy Chicken Sauce
Cook chicken from scratch or use shredded rotisserie for convenience. In a pot, combine cream of chicken soup, sour cream, and chicken broth. Add chicken and simmer until creamy and smooth. Season with salt, pepper, and garlic for extra flavor.
Step 3: Chop and Prep Your Toppings
Dice pineapple, green onions, tomatoes, celery, peppers, olives, and cheese. Arrange toppings in bowls for easy assembly. Store extras in airtight containers if prepping ahead.
Step 4: Assemble Your Hawaiian Haystacks
Start with rice, pour warm chicken gravy over top, then add colorful toppings. Layer for flavor and eye-catching presentation. Enjoy!
Tips to Make It Even Better
Want to take your Hawaiian Haystacks from good to unforgettable? Here are a few pro tips that elevate the whole experience:
- Balance the flavors: Mix sweet and salty toppings. Pineapple with cheese, coconut with chow mein noodles—contrast is what makes every bite exciting.
- Build a topping bar: Especially for parties or picky eaters, setting up a topping bar lets everyone take control of their plate. It also makes for less cleanup.
- Keep textures in mind: Creamy sauce + crunchy noodles + juicy fruit = the perfect bite.
- Spice it up: If you like heat, add jalapeños, chili flakes, or a drizzle of sriracha.
- Make it fun for kids: Use small bowls and let them assemble their own stacks. Some even love arranging toppings by color or shape.
Don’t be afraid to experiment. That’s the beauty of Hawaiian Haystacks—it’s not about perfection, it’s about personalization.
Variations of Hawaiian Haystacks
This dish is ultra-flexible. Whether you’re feeding someone with dietary restrictions or just want to mix things up, try one of these delicious variations:
Vegan Hawaiian Haystacks
- Use plant-based chicken or chickpeas instead of meat
- Swap cream of chicken soup with vegan cream of mushroom or cashew-based sauce
- Use dairy-free cheese and sour cream
Low-Carb or Keto Haystacks
- Replace rice with cauliflower rice
- Avoid sugary toppings like mandarin oranges and pineapple
- Add avocado, bacon, and cheese for healthy fats
Mexican-Style Haystacks
- Use Mexican rice or cilantro lime rice
- Swap gravy for queso or enchilada sauce
- Use black beans, corn, salsa, jalapeños, and crushed tortilla chips as toppings
You can tailor this recipe to almost any cuisine or diet—you just need a base, a sauce, and fun toppings. Easy!
Make-Ahead and Storage Tips
Busy week ahead? Hawaiian Haystacks are a meal prep dream. Here’s how to stay ahead of the game:
- Make the chicken gravy in advance and refrigerate it for up to 4 days. It also freezes well—just thaw and reheat gently on the stove.
- Cook your rice the night before and store in a sealed container. Reheat with a splash of water to fluff it back up.
- Chop all your toppings the day before, except avocado (which browns quickly). Keep everything in airtight containers.
- Leftovers? Store the toppings, rice, and gravy separately for easy lunch boxes the next day.
The best part is, this meal doesn’t lose quality after reheating. In fact, some say the flavors get better!
Nutritional Breakdown (Approximate)
Want to know what you’re putting on your plate? Here’s a general nutritional estimate per serving (one fully loaded haystack):
| Component | Calories | Protein | Carbs | Fat |
|---|---|---|---|---|
| Rice (1 cup) | 200 | 4g | 45g | 0g |
| Chicken Gravy | 250 | 20g | 10g | 15g |
| Average Toppings | 150 | 3g | 20g | 5g |
| Total (1 stack) | 600 | 27g | 75g | 20g |
Of course, your numbers will vary depending on toppings and portions, but overall, it’s a balanced meal with good carbs, protein, and healthy fats—especially if you tweak it to your goals.
Perfect for Meal Prep and Leftovers
One of the greatest things about Hawaiian Haystacks? They make meal prep feel like a breeze. Not only are they easy to put together, but they also reheat like a dream. You can batch-cook most of the components, store them separately, and enjoy customizable bowls throughout the week without losing any of that deliciousness.
Here’s how to make meal prepping work for you:
- Cook rice in bulk: Make enough rice for 3–4 meals and store it in an airtight container in the fridge. When ready to serve, just microwave it with a damp paper towel on top or reheat it on the stovetop with a splash of water.
- Double the chicken gravy: This sauce freezes beautifully. Just cool it down, pour it into a freezer-safe bag or container, and freeze it for up to 2 months. Reheat it gently on the stove with a little broth or water to loosen the texture.
- Toppings in containers: Chop and store toppings in separate containers so they stay fresh. Hard veggies like celery or green onions last several days in the fridge. Wait to prep items like avocado or tomatoes until just before serving for best results.
- Lunch bowls on the go: If you’re taking it to work, pack the rice and chicken sauce in one container and toppings in another. Reheat the base, then add your toppings cold—it’s like a tropical rice bowl anywhere you go!
This dish is a lifesaver on those “I don’t know what to make” nights. It’s simple, fast, and every bite feels like a fresh meal—even days later.
Common Mistakes to Avoid
Even though Hawaiian Haystacks are easy, a few small missteps can take your stack from wow to meh. Avoid these common mistakes to keep your haystacks on point:
1. Watery Chicken Gravy
Thin gravy equals a soggy mess. Use just enough broth to loosen the cream of chicken soup and sour cream, but don’t overdo it. If it ends up too runny, simmer uncovered to reduce it, or mix in a cornstarch slurry to thicken.
2. Overcooked or Undercooked Rice
Rice is the base—don’t let it mess up the meal. Always rinse it first, measure your water accurately, and keep it covered during cooking. If it’s crunchy or sticky, your whole stack suffers.
3. Going Overboard with Toppings
Yes, variety is key—but piling on every topping can overwhelm the dish. Stick to 4–6 toppings that complement each other. Keep a balance between creamy, crunchy, savory, and sweet.
4. Cold Toppings on Cold Sauce
The warmth of the rice and chicken gravy should contrast nicely with your cool toppings. If the gravy’s cold, reheat it! You want that cozy factor in every bite.
5. Skipping Seasoning
Taste your gravy before serving. A pinch of salt and pepper can go a long way. Add a bit of garlic powder, onion powder, or a splash of hot sauce if it feels bland.
Avoid these pitfalls, and you’ll be stacking like a pro in no time.
Why You’ll Love This Recipe
Still not convinced this should be your next dinner? Here’s why you’ll absolutely fall in love with Hawaiian Haystacks:
- Totally customizable – Whether you’re vegan, gluten-free, or low-carb, there’s a way to make it work.
- Family and kid-friendly – Let everyone build their own. No fuss, no fights, just happy plates.
- Budget-conscious – Most of the ingredients are pantry staples or inexpensive.
- Great for leftovers – It tastes just as good the next day. Or the next.
- Fast and flexible – Got 30 minutes? You can whip this up and still have time to binge your favorite show.
It’s not just a meal—it’s an experience. Hawaiian Haystacks turn an ordinary dinner into something colorful, flavorful, and just plain fun. You won’t regret adding this to your regular rotation.
FAQs about Hawaiian Haystacks Recipe
1. Can I make Hawaiian Haystacks without canned soup?
Absolutely! You can make a homemade gravy using butter, flour, chicken broth, and cream. Just whisk together 2 tbsp butter with 2 tbsp flour, then slowly add 1 cup broth and 1/2 cup cream or milk. Simmer until thick and season to taste.
2. What’s the best rice for this recipe?
White jasmine or basmati rice is the most commonly used, but brown rice, wild rice, or even cauliflower rice work great. Just make sure it’s cooked properly—fluffy, not mushy.
3. Are Hawaiian Haystacks gluten-free?
They can be! Use gluten-free cream of chicken soup or make your own from scratch. Double-check all toppings like chow mein noodles or soy-based products for hidden gluten.
4. Can I make this dish vegan?
Yes, with a few swaps: Use plant-based chicken or chickpeas, dairy-free sour cream, and vegan cream soup alternatives. Top with vegan cheese or avocado, and avoid animal-based toppings like bacon.
5. How do I keep leftovers fresh?
Store the rice, gravy, and toppings separately in the fridge. Reheat the rice and sauce before assembling. Toppings like fruits and veggies should be eaten within 2–3 days for best freshness.
Conclusion
There you have it—a complete, step-by-step guide to making Hawaiian Haystacks that will have your family and friends raving. This isn’t just another boring dinner recipe. It’s interactive, flavorful, tropical, and incredibly comforting all at once. Whether you’re throwing together a last-minute weeknight meal or planning a big family gathering, this dish delivers every single time.
From its creamy, savory chicken gravy to the vibrant, sweet-and-crunchy toppings, every layer of a Hawaiian Haystack is packed with personality. And because it’s so customizable, you can reinvent it every time you make it. That’s the kind of meal that keeps things exciting in the kitchen.
So go ahead, grab a spoon, build your stack, and take a trip to flavor paradise—right from your dinner table.