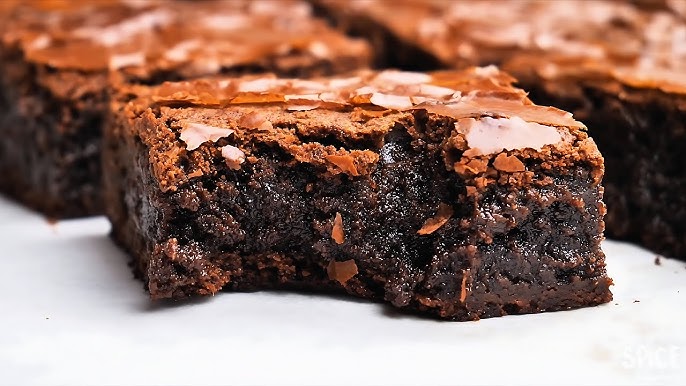
Gooey Brownie Recipe: Brownies are the ultimate comfort dessert. But let’s be honest—there’s a huge difference between a dry, crumbly brownie and one that’s decadently rich, fudgy, and gooey in the center. If you’re the kind of person who heads straight for the middle piece of the pan (you know, the one that’s extra soft and chocolatey), this gooey brownie recipe is going to be your new favorite obsession.
We’re diving deep into how to make gooey brownies from scratch. Forget the boxed mix. With a few pantry staples and a handful of pro baking tips, you’ll be whipping up a batch of brownies that are dense, moist, and perfectly crackled on top. Ready to level up your baking game?
Why You’ll Love This Gooey Brownie Recipe
This isn’t your average brownie recipe. These brownies are:
- Super fudgy with a rich chocolate flavor that melts in your mouth.
- Incredibly gooey in the center, almost like a molten lava cake.
- Crispy on the edges for the best of both worlds.
- Quick and easy, ready in under an hour start to finish.
- Customizable, so you can add in whatever your sweet tooth desires—chocolate chips, sea salt, peanut butter swirls, you name it.
Still skeptical? Bake these once, and you’ll never go back.
Tools and Equipment You’ll Need
You don’t need fancy gadgets, but the right tools make a big difference when it comes to baking perfect gooey brownies. Here’s what you’ll want to have on hand:
- 8×8 inch or 9×9 inch baking pan – A square pan gives you the classic brownie shape and proper thickness.
- Mixing bowls – One large for wet ingredients, one medium for dry.
- Rubber spatula or wooden spoon – Essential for mixing without overworking the batter.
- Whisk – To beat eggs and incorporate air.
- Measuring cups and spoons – Accuracy is key!
- Parchment paper – For easy removal and no-stress cleanup.
- Cooling rack – Let those brownies breathe!
List of Ingredients You’ll Need
Here’s the lineup of what you’ll need to make ultra-gooey brownies:
Basic Ingredients:
- 1 cup (2 sticks) unsalted butter – For that rich base.
- 8 oz semi-sweet or dark chocolate – Chopped or use chips. This adds intensity.
- 1 ½ cups granulated sugar – Balances the chocolate’s bitterness.
- ½ cup brown sugar – Adds moisture and deeper flavor.
- 3 large eggs + 1 yolk – Extra yolk = more gooeyness.
- 1 tbsp vanilla extract – Always a flavor booster.
- ¾ cup all-purpose flour – Keeps it dense and chewy.
- ½ cup unsweetened cocoa powder – Deepens the chocolate flavor.
- ½ tsp salt – Enhances everything.
- ½ tsp baking powder – Just a touch for a slight lift.
Optional Add-ins:
- 1 cup chocolate chips or chunks – Double the chocolate!
- ½ cup chopped nuts – Walnuts or pecans are classic.
- Caramel or peanut butter swirls – For a flavor twist.
- Flaky sea salt – A sprinkle on top for that gourmet touch.
You probably already have most of these in your kitchen—and if not, they’re easy to find.
The Science Behind Gooey Brownies
What makes a brownie gooey instead of cakey? It all comes down to the fat-to-flour ratio, sugar content, and baking time.
- More butter and chocolate = fudgy texture
- Less flour = denser consistency
- Brown sugar = extra moisture
- Underbaking = gooey center
That extra egg yolk helps too. Yolks add richness and prevent the batter from drying out. Plus, using real melted chocolate (not just cocoa) gives these brownies their luscious bite.
Think of it like this: If cakey brownies are a chocolate sponge, gooey brownies are like chocolate fudge in bar form. Pure indulgence.
Step-by-Step Guide to Make Gooey Brownies
Let’s break it down into simple, easy-to-follow steps. This method ensures you get that irresistible gooey center every time, with just the right amount of chew and crust.
Step 1: Preheat Oven and Prep the Pan
First things first—preheat your oven to 350°F (175°C). It’s crucial to let the oven fully preheat so the brownies bake evenly.
Next, line your 8×8 or 9×9 baking pan with parchment paper, letting some hang over the edges for easy removal. Lightly grease the paper with butter or cooking spray. This little prep step saves a lot of hassle later and ensures that beautiful, intact brownie block slides right out.
If you don’t have parchment, lightly greasing and flouring the pan works too—but parchment gives a cleaner finish.
Step 2: Melt Butter and Chocolate Together
Grab a medium saucepan or a microwave-safe bowl. Combine:
- 1 cup unsalted butter (2 sticks)
- 8 oz chopped chocolate (semi-sweet or dark)
Melt it slowly over low heat or in the microwave in 30-second intervals, stirring each time until smooth and glossy. Let it cool for 5–10 minutes before moving on—this prevents you from scrambling the eggs in the next step.
Step 3: Whisk in Sugar and Eggs
Now comes the magic. Add:
- 1 ½ cups granulated sugar
- ½ cup brown sugar
Stir until combined. Then whisk in:
- 3 large eggs
- 1 egg yolk
- 1 tablespoon vanilla extract
Whisk vigorously for 1–2 minutes. This step is key! It introduces air, which helps give the brownies that perfect shiny, crinkly top.
You’ll start to see the batter thicken slightly and turn glossy—that’s your sign you’re on the right track.
Step 4: Sift and Mix Dry Ingredients
In a separate bowl, combine the dry ingredients:
- ¾ cup all-purpose flour
- ½ cup cocoa powder
- ½ tsp salt
- ½ tsp baking powder (optional—omit for extra dense brownies)
Sift the dry ingredients to avoid lumps. Then gently fold the dry mix into the wet mixture using a rubber spatula. Don’t overmix—just fold until no dry streaks remain. Overmixing = tough brownies.
Step 5: Add Extras and Final Stir
Now is your time to shine with creativity. Fold in any of the following:
- 1 cup chocolate chips or chunks
- ½ cup chopped walnuts or pecans
- Swirls of peanut butter, Nutella, or caramel
- A handful of mini marshmallows for that gooey s’mores effect
Mix until just combined. Again, minimal stirring preserves that luscious texture we’re aiming for.
Step 6: Pour and Smooth the Batter
Pour the thick, chocolatey batter into your prepared pan. Use a spatula to spread it out evenly and smooth the top.
If you’re adding a topping (like flaky sea salt or more chocolate chips), now’s the time to sprinkle it over the surface.
Step 7: Bake to Perfection
Place your pan in the center of the oven and bake for 28–35 minutes, depending on your oven and how gooey you want them. Start checking around the 28-minute mark.
How do you know they’re done? The edges should look set and pull slightly away from the pan, but the center will still jiggle just a tiny bit when shaken. A toothpick inserted about 2 inches from the edge should come out with moist crumbs—not wet batter.
Remember, don’t overbake. They’ll continue to set as they cool.
Step 8: Cool Before Cutting
This is the hardest part—waiting. But it’s essential. Let your brownies cool in the pan for at least 30–45 minutes. Then lift them out using the parchment paper and place them on a cutting board.
For clean cuts, use a sharp knife and wipe it between slices. You can even chill the brownies in the fridge for 20 minutes before slicing for super sharp squares.
Pro Tips for Perfect Gooey Brownies
Want to make these your signature dessert? Here are a few pro-level brownie tips:
- Room temperature eggs mix better with melted chocolate and help create a smoother batter.
- Don’t skip the yolk – It adds that custardy, fudgy center you’re after.
- Use real chocolate, not just cocoa – It adds richness and that melt-in-your-mouth feel.
- Underbake slightly – That’s the golden rule for gooey brownies. They’ll finish setting as they cool.
- Use parchment paper – It’s not optional. It ensures easy lift-out and perfect edges.
- For extra gooeyness, refrigerate brownies for a few hours and then gently warm individual squares in the microwave for 10–15 seconds before eating.
Ingredient Swaps and Substitutions
Got dietary restrictions or just feeling experimental? No problem. Try these swaps:
Dairy-Free Version
- Use plant-based butter or coconut oil (refined to avoid coconut taste).
- Choose dairy-free chocolate brands (like Enjoy Life or Hu Kitchen).
Gluten-Free Brownies
- Replace all-purpose flour with a 1:1 gluten-free flour blend.
- Almond flour also works but yields a slightly more crumbly texture.
Vegan Brownies
- Replace eggs with:
- 3 tablespoons of aquafaba (chickpea brine) per egg
- OR ¼ cup unsweetened applesauce per egg
They won’t be as gooey but still super moist!
Flavor Variations
- Add 1 tsp espresso powder for deep, bold chocolate flavor.
- Mix in orange zest for a zesty twist.
- Stir in crushed candy canes during the holidays.
Best Toppings and Mix-ins
Get creative with what you toss into your batter or sprinkle on top. Here are crowd-pleasers:
| Mix-In | Flavor Impact |
|---|---|
| Chocolate chunks | Extra pools of melted chocolate |
| Walnuts or pecans | Crunchy contrast to gooey texture |
| Caramel drizzle | Sweet & sticky surprise |
| Peanut butter swirl | Nutty richness |
| Sea salt | Balances sweetness, elevates flavor |
| Mini marshmallows | Classic s’mores vibes |
| Crushed cookies | Oreo or Biscoff = next-level brownies |
Just be sure not to overload the batter. Stick to about 1 to 1½ cups of add-ins total.
How to Store Gooey Brownies
You’ve made the perfect batch of gooey brownies—now the big question is, how do you keep them fresh and fudgy?
At Room Temperature:
Brownies actually store really well at room temperature for up to 4 days—if they even last that long!
- Let them cool completely before storing.
- Place them in an airtight container with a piece of parchment or wax paper between layers to prevent sticking.
- For extra freshness, add a slice of bread in the container. The brownies absorb moisture from the bread and stay soft longer.
Avoid keeping them uncovered or in a humid environment—this can lead to dried-out edges or soggy bottoms (no thanks).
In the Fridge:
Brownies can be refrigerated, especially if your kitchen is warm. Just note that chilling them will make them firmer.
- Wrap tightly in plastic wrap or store in a sealed container.
- Let them sit out for 15 minutes before serving, or give them a quick 10-second microwave zap to restore that gooey magic.
Freezing Instructions:
Yes, you can freeze brownies! In fact, they freeze beautifully.
- Once cooled, cut brownies into individual squares.
- Wrap each piece tightly in plastic wrap, then in foil.
- Store in a freezer-safe bag or container for up to 3 months.
To enjoy, thaw at room temp or microwave for 20–30 seconds. You’ll get that warm, melty center like they were just baked.
Reheating Brownies – Yes or No?
Absolutely YES—especially if you’re all about that soft, warm, gooey texture. Reheating brownies takes them from good to glorious.
How to Reheat Brownies:
- Microwave: Place one brownie on a microwave-safe plate. Heat for 10–15 seconds for that just-out-of-the-oven gooeyness.
- Oven: If you’re reheating a whole batch, cover the pan with foil and warm in a 300°F (150°C) oven for 10–15 minutes.
Avoid overheating. You want the chocolate to melt slightly without drying them out. And if you top them with a scoop of vanilla ice cream afterward? Chef’s kiss.
Common Mistakes and How to Avoid Them
Even the best bakers can make a few missteps when it comes to brownies. Here’s how to dodge the most common brownie blunders:
1. Overbaking
This is the number one sin in gooey brownie-making. Even a few extra minutes can turn a fudgy dream into a cakey disappointment.
Fix: Always start checking at the 28-minute mark. The center should still look a bit soft when you pull them out.
2. Not Cooling Before Cutting
We get it. Waiting is hard. But cutting too early turns your brownies into a sticky mess.
Fix: Let them cool in the pan for at least 30–45 minutes, then chill for even cleaner cuts.
3. Using Cold Eggs
Cold eggs can cause the chocolate to seize or make the batter clump.
Fix: Let your eggs sit out at room temp for 15–20 minutes before baking.
4. Not Measuring Properly
Baking is science. Eyeballing ingredients will mess with the balance of gooeyness.
Fix: Use measuring cups and level off dry ingredients with a flat edge.
5. Overmixing the Batter
Mixing too much incorporates air and makes brownies cakier.
Fix: Fold until the flour disappears—then stop. It’s okay if a few streaks remain.
Fun Serving Ideas
Let’s be real—brownies are amazing on their own, but if you want to impress or just treat yourself, try these next-level serving ideas:
1. Brownie Sundae Bar
- Scoop vanilla ice cream on warm brownies
- Add hot fudge, whipped cream, sprinkles, and cherries
- Set up a DIY bar for parties—people love it!
2. Brownie Trifles
- Layer brownie cubes, whipped cream, and berries in a glass
- Repeat the layers and chill
- Great for elegant desserts at dinner parties
3. Brownie Ice Cream Sandwiches
- Slice brownies in half horizontally
- Add a thick layer of ice cream between
- Freeze and cut into squares—kids and adults will go wild
4. Brownie Skewers
- Alternate brownie chunks, strawberries, and marshmallows on a skewer
- Drizzle with chocolate syrup
- Fun for picnics or birthday treats
5. Holiday Style
- Cut brownies into tree shapes for Christmas
- Decorate with frosting and sprinkles
- Instant festive fun
FAQs about Gooey Brownie Recipe
Here are some burning questions home bakers often ask (you might be wondering them too):
Can I double this recipe?
Totally! Just use a 9×13 inch pan and increase bake time to 35–40 minutes. Keep an eye out near the end to avoid overbaking.
Can I use cocoa powder instead of chocolate?
You can—but it won’t be quite as gooey. Melted chocolate adds richness and that melty bite. If you must use cocoa, increase the butter to balance the dryness.
Why don’t my brownies have that crackly top?
Ah, the elusive shiny top! It comes from whipping the sugar and eggs well and using real chocolate. That glossy film is basically a super-thin meringue layer.
How can I make brownies even more gooey?
Add an extra egg yolk, reduce the flour slightly, and shave a few minutes off the bake time. And never skip the melted chocolate!
Can I make these brownies in advance?
Absolutely. In fact, brownies often taste better the next day once the flavors settle. Store them airtight and warm up before serving for peak gooeyness.
Conclusion
There’s just something magical about biting into a warm, gooey brownie with a crackly top and melty center. And the best part? You don’t need to be a pro baker or have any fancy tools to make it happen. This step-by-step gooey brownie recipe is beginner-friendly, ultra-chocolatey, and guaranteed to become a staple in your baking lineup.
Whether you’re treating yourself after a long day, baking for friends, or showing off at a potluck, these brownies deliver. Dense, chewy, moist, and loaded with flavor—they hit all the right notes.
So grab your whisk, preheat that oven, and treat yourself to the kind of brownie dreams are made of.