Garlic Herb Butter Recipe: Ever had a boring piece of bread transformed into something extraordinary with just a dab of flavored butter? That magic—that flavor explosion—that’s garlic herb butter at work. It’s not just a condiment; it’s a flavor-packed secret weapon every home cook should have tucked away in the fridge or freezer.
Whether you’re trying to impress your dinner guests with restaurant-level flavor or simply want to spice up your weekday dinners, this simple yet delicious garlic herb butter is your go-to. It adds a punch of flavor to steaks, chicken, roasted vegetables, seafood, pasta, or even just a warm baguette. And the best part? It takes less than 10 minutes to make from scratch. No preservatives, no artificial ingredients—just real, wholesome flavor.
Garlic herb butter isn’t just tasty, it’s functional. It melts beautifully over a hot steak, can be used as a base for sautéing, and works wonderfully spread over warm toast. Think of it as a kitchen staple, like olive oil or salt, but with personality. Once you start making it at home, you’ll wonder how you ever lived without it.
Ingredients You’ll Need
When it comes to garlic herb butter, quality is everything. You don’t need a long grocery list—just a few fresh, flavorful ingredients that come together like magic. Here’s what you’ll need to whip up the perfect batch.
Butter
The heart and soul of this recipe. Use unsalted butter so you have full control over the saltiness. Make sure it’s at room temperature—soft but not melted.
Garlic
Fresh garlic cloves are ideal. You can either mince them finely, crush them into a paste, or roast them for a sweeter, mellower flavor. Avoid garlic powder unless you’re in a pinch—it doesn’t pack the same punch.
Herbs
Use fresh herbs if you can. Here are some go-to options:
- Parsley (adds brightness)
- Thyme (earthy)
- Rosemary (piney and bold)
- Chives (mild onion flavor)
- Dill (for seafood-friendly butter)
Salt and Pepper
A pinch of sea salt or kosher salt and freshly ground black pepper to balance out all the flavors.
Optional Add-Ins
- Lemon zest for brightness
- Parmesan for umami richness
- Crushed red pepper flakes if you like a little kick
These basic ingredients can be customized in dozens of ways, making your garlic herb butter truly your own.
Choosing the Right Butter
Butter may seem like a simple ingredient, but the type you choose can have a big impact on the final flavor of your garlic herb butter.
Salted vs. Unsalted Butter
While both work, unsalted butter is preferred because it gives you more control over seasoning. Salted butter can vary in salt content between brands, which can throw off your flavor balance.
Grass-Fed vs. Regular Butter
Grass-fed butter, like Kerrygold, has a richer flavor and is higher in nutrients like Omega-3s and Vitamin K2. It also tends to have a deeper golden color, thanks to the cows’ diet. If you want that gourmet touch, it’s worth the upgrade.
Butterfat Content
European-style butters have higher butterfat (82–85%) compared to standard American butter (around 80%). More butterfat means creamier, more flavorful herb butter.
A little care in choosing your butter can elevate your garlic herb butter from good to gourmet.
Garlic: Fresh, Roasted, or Powdered?
Garlic is the star of the show, and how you prepare it can completely change the flavor profile.
Fresh Garlic
For bold, punchy flavor, finely mince or crush fresh garlic cloves. Use a garlic press or microplane for a smooth texture that blends easily.
Roasted Garlic
Want something mellower and sweeter? Roast the garlic! Wrap whole garlic bulbs in foil, drizzle with olive oil, and bake at 400°F (200°C) for 30–40 minutes. Roasted garlic turns soft, caramelized, and spreads like butter itself. It’s ideal for people who want garlic flavor without the sharp bite.
Garlic Powder
Only use it if you’re truly out of fresh options. It lacks the complexity of fresh or roasted garlic but can work in a pinch.
In short: Fresh garlic gives bite, roasted gives sweetness, and powdered is the fallback option.
Herbs That Work Best
Herbs are where you get to play. They bring freshness, aroma, and personality to your garlic herb butter.
Fresh vs. Dried
Fresh herbs are always the best option. They provide vibrant color and flavor. Dried herbs can work, but they’re more concentrated—use 1/3 of the amount compared to fresh.
Top Herb Choices
- Parsley – The classic. Mild and bright.
- Thyme – Woodsy and fragrant.
- Rosemary – Bold and piney; best in small amounts.
- Basil – Sweet and peppery.
- Chives – Delicate onion flavor.
- Tarragon – Slightly anise-like; pairs well with chicken.
Mix and match according to your dish. Want a steak-friendly butter? Go with rosemary and thyme. Making something for fish? Try dill and parsley.
Optional Add-Ins to Elevate Flavor
Want to take your garlic herb butter to the next level? A few extra ingredients can really elevate its taste and make it more tailored to your specific dishes. Think of these add-ins as your butter’s “personality boosters.”
Lemon Zest
A little zest goes a long way. Lemon zest adds brightness and a subtle zing that cuts through the richness of the butter. It’s especially great for seafood dishes or roasted vegetables. Use a microplane to finely grate the zest of half a lemon into your butter mixture.
Parmesan Cheese
Want some savory umami depth? Grated Parmesan cheese brings salty, nutty notes that pair well with pasta, bread, and even steak. Make sure it’s freshly grated for the best flavor and texture—it’ll blend right in and melt beautifully.
Crushed Red Pepper Flakes
For a bit of a kick, sprinkle in a small pinch of crushed red pepper flakes. Not enough to overwhelm the butter, but just enough to give it a subtle warmth. It’s ideal for spicy garlic bread or grilled veggies.
Other Ideas
- Paprika or smoked paprika for color and a smoky twist
- Truffle oil for a luxurious flair
- Mustard powder for a tangy edge
- Honey for sweet-savory pairings like roasted carrots or pork
Each add-in opens up a new layer of flavor, allowing your garlic herb butter to be as simple or sophisticated as you want it to be.
Tools You’ll Need
The great thing about this recipe? You don’t need fancy kitchen gadgets. Just a few basic tools and you’re good to go.
Mixing Tools
- Medium bowl – Glass or stainless steel works well.
- Silicone spatula or spoon – For smooth mixing and scraping down the sides.
- Hand mixer or food processor (optional) – Makes it even easier to blend the butter to a creamy consistency, especially if you’re doing a large batch.
Storage Containers
- Plastic wrap or parchment paper – For shaping your butter into logs.
- Small glass jars or ramekins – Perfect for fridge storage and serving.
- Freezer bags or airtight containers – For long-term storage.
That’s it. No need to overthink it—just make sure your tools are clean and ready, and you’ll be done in no time.
Preparing Your Ingredients
Before you dive into mixing, take a few minutes to prep everything properly. It makes the final steps quicker and easier—and ensures your butter tastes amazing.
Softening the Butter
Leave your butter out at room temperature for at least 30–45 minutes before mixing. It should be soft enough to press your finger into easily but not melted. Don’t rush it in the microwave—it can melt unevenly and ruin the texture.
Mincing the Garlic
Peel the garlic cloves and mince them very finely. You can also use a garlic press or grate them for a smoother consistency. For roasted garlic, squeeze the soft garlic pulp out of each clove and mash it with a fork until smooth.
Chopping the Herbs
Wash your fresh herbs and dry them thoroughly. Water and butter don’t mix well, so make sure there’s no excess moisture. Use a sharp knife to chop them finely—it helps distribute the flavor evenly throughout the butter.
Once your ingredients are prepped, the actual process of making the butter becomes a breeze.
Step-by-Step Guide: How to Make Garlic Herb Butter
Alright, time to get your hands buttery! Here’s the full breakdown, step-by-step.
Step 1: Soften the Butter
Take your butter out of the fridge and let it sit at room temperature until it becomes soft but not melted. This usually takes about 30–45 minutes. Soft butter ensures smooth mixing and helps the herbs and garlic blend evenly.
Step 2: Prepare the Garlic and Herbs
While the butter is softening, mince your garlic cloves or mash your roasted garlic. Finely chop your fresh herbs of choice. If you’re using Parmesan, lemon zest, or any other add-ins, prep them now too.
Step 3: Combine and Mix
Place the softened butter in a mixing bowl. Add your garlic, chopped herbs, and any optional ingredients. Mix thoroughly using a spatula, fork, or electric mixer until everything is evenly combined.
Want a smoother, more uniform texture? Use a food processor to blitz everything together—it makes the butter incredibly creamy and well-integrated.
Step 4: Taste and Adjust Seasoning
Now’s the time to adjust the flavor. Add salt and pepper to taste. Want more zing? Add more lemon zest. Too mild? Add another garlic clove. Trust your palate.
Step 5: Shape and Store
You’ve got options here:
- Log form: Spoon the butter onto a piece of parchment or plastic wrap, then roll it into a log shape. Twist the ends and refrigerate or freeze.
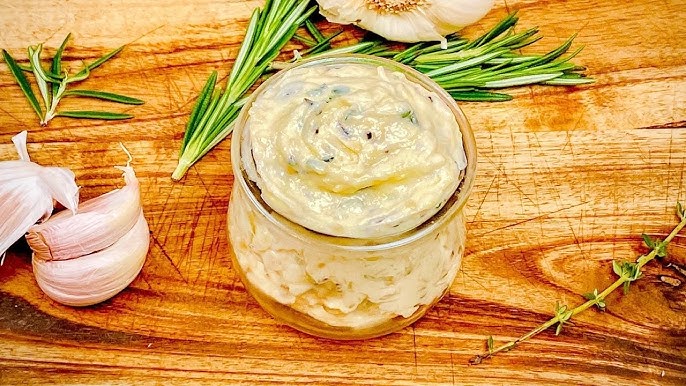
- Jar form: Scoop the butter into a glass jar or container and smooth the top.
Label it with the date so you know how long it’s good for. That’s it—you’ve just made gourmet garlic herb butter from scratch!
Storing Garlic Herb Butter Properly
Proper storage is key if you want your butter to last and retain its flavor.
Fridge Storage
If you’re planning to use it within a week, keep it in the fridge in an airtight container or wrapped log. It’ll stay fresh for 7–10 days.
Freezing Garlic Butter
For long-term storage, freeze it:
- Wrap it tightly in plastic wrap or foil
- Place in a freezer bag and label
- Slice off pieces as needed
Frozen garlic butter can last up to 3 months and still taste amazing when thawed.
Pro Tip: Make garlic herb butter “coins” by slicing the log into discs before freezing. Super handy when cooking!
How to Use Garlic Herb Butter
You’ve made your butter—now what? Here’s how to put it to delicious use.
Cooking Ideas
- Melt over steak, grilled chicken, or fish for restaurant-quality flavor
- Sauté vegetables in it for rich, herbaceous flavor
- Add a spoonful to pasta, rice, or mashed potatoes
- Toss it with roasted potatoes or carrots right before serving
Spreading Ideas
- Slather it on toasted baguettes, bagels, or English muffins
- Make the best-ever garlic bread
- Spread onto corn on the cob
- Use it to butter your sandwich bread before toasting
Seriously, there’s no wrong way to use it.
Common Mistakes to Avoid
Even though garlic herb butter is simple to make, there are a few common mistakes that can mess with the flavor, texture, or longevity of your homemade spread. Let’s save you from those kitchen blunders.
1. Using Cold Butter
Trying to mix cold butter is like wrestling a brick. It won’t blend properly, and you’ll end up with uneven pockets of herbs and garlic. Make sure your butter is properly softened at room temperature. Not melted, not hard—just nice and pliable.
2. Overpowering with Garlic
We get it—garlic is the hero here. But too much of it can overwhelm the other ingredients and make your butter almost spicy with raw garlic heat. The trick is to balance. One or two cloves of fresh garlic are usually enough for one stick (½ cup) of butter. If you want more garlic flavor without the raw bite, use roasted garlic instead.
3. Wrong Herb Ratios
Mixing too many herbs or using them in the wrong proportions can lead to a muddy, confused flavor. Stick to 2–3 herbs max, and always go heavier on the milder ones like parsley and lighter on bold ones like rosemary or tarragon.
4. Not Tasting as You Go
One of the best parts of making your own garlic herb butter is being in control of the taste. Don’t be shy—taste as you mix. Adjust the salt, add more garlic, or zest a little extra lemon. You’re the boss here.
5. Not Drying Herbs Properly
If your herbs are wet when mixed into the butter, you’ll shorten its shelf life. Water and fat don’t play well together, especially when stored for days. Always pat herbs completely dry after washing.
Avoid these missteps, and your butter will turn out like something straight out of a high-end kitchen.
Garlic Herb Butter Variations
One of the best things about this recipe? It’s endlessly customizable. Here are a few flavor twists that can give your butter a unique personality and pair perfectly with different meals.
Spicy Garlic Butter
Want heat with your flavor? Add:
- Crushed red pepper flakes
- A pinch of cayenne
- Smoked paprika for depth
This version is perfect for grilled corn, seafood, or even spicy garlic bread.
Garlic Herb Compound Butter with Citrus
Brighten things up with lemon or lime zest. Add:
- 1 tsp lemon zest
- Fresh dill and parsley
- A splash of lemon juice
Use this version on baked fish, steamed veggies, or roasted potatoes for a zesty kick.
Garlic Parmesan Butter
Add that umami bomb by mixing in:
- 2–3 tbsp finely grated Parmesan
- A pinch of black pepper
- A little extra garlic
Perfect for pasta, steak, or brushing onto pizza crusts before baking.
Sweet and Savory Blend
Yes, you can go sweet-savory with a touch of:
- Honey or maple syrup
- Thyme or sage
- A little cinnamon or nutmeg (trust us)
This works surprisingly well on sweet potatoes or holiday dishes.
Experiment with small batches until you find your personal favorite. The base recipe is just the beginning.
Nutritional Information
Wondering what you’re actually eating when you spread a generous layer of this butter on toast or melt it over steak? Here’s a breakdown for 1 tablespoon of homemade garlic herb butter (made with unsalted butter, garlic, herbs, salt):
| Nutrient | Amount (per tbsp) |
|---|---|
| Calories | 100–110 kcal |
| Total Fat | 11–12g |
| Saturated Fat | 7–8g |
| Carbohydrates | <1g |
| Protein | <1g |
| Sodium | Depends on added salt |
| Fiber | 0g |
| Sugar | <0.1g |
Of course, values will vary slightly based on what herbs and extras you include. Parmesan will raise sodium and protein, while honey or zest may add trace carbs.
FAQs about Garlic Herb Butter Recipe
1. Can I use margarine instead of butter?
Technically, yes—but the flavor and texture will suffer. Margarine doesn’t carry the same rich taste as butter and doesn’t mix as well with herbs. For the best results, stick with real, unsalted butter.
2. How long does garlic herb butter last in the fridge?
Properly stored in an airtight container, it will stay fresh for 7–10 days. Just make sure your herbs are dry before mixing to avoid introducing extra moisture.
3. Can I use dried herbs instead of fresh?
Yes, but in smaller amounts. Use one-third the quantity of dried herbs compared to fresh ones, as they are more concentrated in flavor.
4. What’s the best way to freeze garlic herb butter?
Roll it into a log using parchment or plastic wrap, then freeze. You can slice off coins as needed. It lasts up to 3 months in the freezer without losing much flavor.
5. Is this butter good for grilling steaks?
Absolutely! Slice off a piece and place it on top of a hot steak just before serving. It’ll melt and create a rich, herb-infused sauce that makes your steak taste restaurant-quality.
Conclusion
There you have it—your complete, step-by-step guide to making the ultimate garlic herb butter at home. Whether you’re elevating your grilled steak, upgrading plain veggies, or transforming a humble slice of toast, this compound butter is a total game changer.
And the best part? You’re in control. From the type of butter to the herbs you mix in, you get to build your perfect flavor blend. It’s easy, quick, and infinitely customizable. Keep a batch in your fridge or freezer, and you’ll always have something delicious ready to add a gourmet twist to even the simplest meals.
So the next time you’re looking for that “secret ingredient” to make your cooking shine, remember: the answer might just be a slab of this homemade garlic herb butter.


