Fried Wings Recipe: There’s just something magical about biting into a perfectly fried chicken wing. The crackling golden crust, the juicy interior, the punch of flavor—it’s no wonder fried wings have become a universal favorite at game nights, BBQs, parties, and even weeknight dinners. In this guide, we’re going to walk through everything you need to know to make restaurant-quality fried wings right at home. Whether you’re a seasoned home cook or just learning the ropes, this step-by-step breakdown will help you fry up some of the crispiest wings ever—crispy on the outside, juicy on the inside, and bursting with flavor.
And here’s the good news: you don’t need a deep fryer. A simple pan and a bit of patience are all it takes. Ready to get started? Let’s dig into every delicious detail.
Why Fried Chicken Wings Are Always a Hit
Fried chicken wings are crowd-pleasers for a reason. They’re the perfect blend of textures and flavors—crispy, tender, juicy, salty, spicy, and everything in between. The bite-size nature makes them easy to eat, and they adapt beautifully to a wide range of flavors. Want them sweet and sticky? Toss them in honey garlic. Craving heat? Drench them in buffalo sauce. Prefer a more savory approach? A simple dry rub works wonders.
Another reason people love fried wings is nostalgia. For many, they evoke memories of family gatherings, football Sundays, or late-night snacks with friends. They’re comforting yet exciting. And the fact that you can make them in your kitchen without much fancy equipment? That’s the cherry on top.
They’re also super versatile. You can serve them as an appetizer, main course, party snack, or even as part of a picnic spread. And unlike other fried foods, wings seem to reheat better, especially when done right.
Choosing the Right Chicken Wings
Before you start seasoning or marinating, the quality and type of chicken wings you use can make or break your recipe. Here’s how to choose the right wings for frying:
Whole Wings vs. Wingettes and Drumettes
Chicken wings typically come in three parts:
- Drumette – Looks like a tiny drumstick and has more meat.
- Wingette (Flat) – The middle section, flatter and usually juicier.
- Tip – The very end, mostly bone and skin, often discarded or used for stock.
You can buy wings whole and break them down yourself (more cost-effective), or buy them pre-cut into drumettes and flats for convenience. If you’re new to cooking wings, go for pre-cut—they’re easier to manage and cook evenly.
Look for fresh wings with firm flesh, pinkish color, and no off odor. Frozen wings work too—just thaw them thoroughly and pat them dry before use.
List of Ingredients You’ll Need
Before we get into the nitty-gritty of frying, let’s make sure your kitchen is fully stocked. Here’s what you’ll need to make the ultimate batch of fried wings:
Pantry Essentials
- 2 lbs Chicken Wings (drumettes and flats)
- 2 cups Buttermilk (for marinating)
- 2 cups All-Purpose Flour (for dredging)
- 2 teaspoons Salt
- 1 teaspoon Black Pepper
- 1 teaspoon Garlic Powder
- 1 teaspoon Onion Powder
- 1 teaspoon Paprika
- ½ teaspoon Cayenne Pepper (optional for heat)
- Vegetable Oil or Canola Oil (for frying)
Optional Flavor Enhancers
- Hot Sauce (for marinating or tossing)
- Cornstarch (for extra crunch in coating)
- Dried Herbs (like oregano or thyme for seasoning flour)
- Honey, BBQ Sauce, or Buffalo Sauce (for serving)
This is your base setup. You can always customize the spices or sauces depending on your mood. If you’re feeling adventurous, add a pinch of Chinese five-spice, Cajun seasoning, or even curry powder.
Kitchen Tools Required
Let’s make sure your tools are ready to rock. You don’t need anything fancy, but these basics will make your frying process easier:
- Large Mixing Bowls – For marinating and coating
- Tongs – To flip and remove wings from oil
- Deep Skillet, Dutch Oven, or Fryer – For frying
- Wire Rack or Paper Towels – For draining fried wings
- Food Thermometer – To check oil and internal temp
- Slotted Spoon – Optional, but helps remove fried pieces
Having a thermometer isn’t mandatory, but it will seriously help you avoid undercooked or burnt wings. Aim to keep your oil between 350°F and 375°F (175°C – 190°C).
Prepping the Chicken Wings
Alright, time to prep the star of the show. Properly prepping your wings can make a massive difference in texture and taste.
Cleaning and Drying
First things first: clean your chicken. While there’s debate about washing raw chicken, you can rinse them briefly under cold water if desired—just make sure to pat them completely dry using paper towels. This step is critical for a crispy finish.
Moisture is the enemy of crispiness. If the wings are too wet, the flour coating won’t stick properly, and you’ll end up with soggy skin. Nobody wants that.
Marination Tips
Once the wings are dry, it’s time to marinate them. This step adds flavor and tenderizes the meat. The most common and effective marinade base? Buttermilk. The acidity breaks down the protein slightly, resulting in juicy, flavorful wings.
In a large bowl:
- Combine wings with 2 cups of buttermilk.
- Add a few dashes of hot sauce for extra kick.
- Cover and refrigerate for at least 1 hour, but overnight is best.
If you’re in a rush, even 30 minutes can help. But the longer, the better.
How to Make the Perfect Marinade
Creating a marinade that actually penetrates and flavors the wings isn’t rocket science, but it does take some balance. A good marinade should tenderize, flavor, and help in browning the wings during frying.
Simple But Flavorful Marinade
Here’s a go-to marinade you can whip up in minutes:
- 2 cups buttermilk – Acts as the tenderizing agent.
- 1 tablespoon hot sauce – Adds heat and tang.
- 1 teaspoon salt – Essential for drawing in flavor.
- 1 teaspoon black pepper – For sharpness.
- 1 teaspoon garlic powder
- ½ teaspoon smoked paprika – Adds a smoky note.
- 1 teaspoon Dijon mustard (optional) – Adds depth.
Mix all ingredients together in a large bowl, add the wings, toss to coat, cover with plastic wrap, and refrigerate.
Overnight vs. Quick Marination
- Quick Marination (30-60 minutes): Works in a pinch. You’ll get surface-level flavor, and it will help with tenderness to a degree.
- Overnight Marination (8-12 hours): This is where the magic happens. The buttermilk really penetrates the meat, making the wings moist inside and super flavorful.
A pro tip? Add a little sugar or honey to the marinade if you want that subtle caramelized crust during frying. Just don’t overdo it, or it might burn in the hot oil.
The Secret to a Crispy Coating
Let’s be honest: the crunch is what we all live for when it comes to fried wings. If your coating isn’t right, the whole experience falls flat. Here’s how to achieve restaurant-level crispiness every time.
Best Breading Ingredients
Your basic dredge (dry coating) should include:
- 2 cups all-purpose flour
- 1/2 cup cornstarch – This is the secret weapon. Cornstarch adds extra crunch.
- 1 teaspoon salt
- 1 teaspoon black pepper
- 1 teaspoon paprika
- 1/2 teaspoon garlic powder
- 1/2 teaspoon onion powder
- Optional: a pinch of cayenne for heat
Mix all dry ingredients thoroughly in a large shallow dish or tray.
Wet Batter vs. Dry Dredge
There are two popular methods for coating wings:
- Dry Dredge – Most common. Simply remove wings from the marinade, shake off excess liquid, and toss in the seasoned flour mix. This gives a crispy, flaky crust.
- Wet Batter – Combines flour and water/milk to make a pancake-batter-like coating. Great for ultra-crispy Korean-style wings, but can get messy and may mask the chicken’s texture.
For a happy medium? Double-dip:
- Dredge in flour → dip back in buttermilk → dredge again in flour. This creates layers and maximizes crunch.
Step-by-Step Guide to Frying Wings
Now we get to the fun (and sizzling) part. Frying chicken wings is simple when you follow the steps carefully. The key here is temperature control and not overcrowding the pan.
Step 1: Heating the Oil
Start by heating a large pot of vegetable or canola oil to 350°F (175°C). Use a thermometer for accuracy—proper temperature ensures crispy skin without greasy wings. Make sure the pot is deep enough to prevent splashing.
Step 2: Coating the Wings
Pat the chicken wings dry to help them crisp. Coat lightly with seasoned flour, cornstarch, or a mix of both. This creates a thin, crunchy crust. Avoid heavy batter so the wings fry evenly and don’t clump together.
Step 3: Frying in Batches
Carefully lower the wings into the hot oil, frying only a few at a time to avoid overcrowding. Cook for 8–10 minutes, turning occasionally, until golden brown and fully cooked. Keeping batches small helps maintain oil temperature and perfect crispiness.
Step 4: Draining and Resting
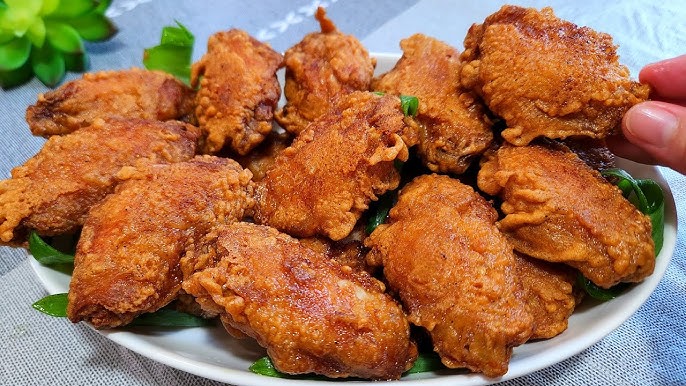
Remove the wings and place them on a wire rack or paper towels to drain excess oil. Let them rest briefly before tossing in sauce or seasoning. Serve hot and enjoy!
Tips for Deep Frying Success
You can fry wings without setting off your smoke alarm or ending up with a soggy mess. Here are the golden rules:
- Use neutral oil – Vegetable, canola, or peanut oil all work great.
- Don’t crowd the pot – Work in small batches to keep oil temp stable.
- Shake off excess flour – Too much dredge causes clumping and uneven browning.
- Let oil return to temp between batches.
- Avoid flipping too much – Two flips are plenty; constant turning ruins the crust.
Want to fry ahead of time for a party? You can fry wings 2-3 hours in advance, let them cool, then re-crisp in the oven at 400°F (200°C) for 10 minutes before serving.
Making Sauces for Your Wings
A fried wing is great on its own—but a killer sauce? That takes it to a whole new level. Here are a few classic and creative sauces to try:
Classic Buffalo Sauce
- 1/2 cup Frank’s RedHot
- 1/4 cup melted butter
- 1 tbsp honey (optional)
- Mix and toss wings immediately after frying.
Sweet and Spicy Glaze
- 1/4 cup honey
- 2 tbsp soy sauce
- 1 tbsp Sriracha
- 1 tsp rice vinegar
- Simmer in a pan until slightly thickened, then toss wings.
Garlic Parmesan Coating
- 1/4 cup melted butter
- 2 cloves garlic (minced)
- 1/4 cup grated Parmesan
- 1 tsp dried parsley
- Mix and coat hot wings right after frying.
You can also go wild with teriyaki, lemon pepper, mango habanero, or even BBQ sauces. Just make sure the wings are hot when you toss them—this helps the sauce stick.
How to Toss Wings in Sauce Without Losing Crispiness
Nothing worse than a wing going from crunchy to soggy after being drowned in sauce, right? Here’s the trick:
- Use a large stainless steel bowl.
- Place hot wings in the bowl.
- Drizzle sauce around the sides of the bowl, not directly on the wings.
- Toss gently with tongs or by flipping the bowl.
- Serve immediately.
Avoid soaking the wings in sauce for more than a minute. The longer they sit in sauce, the soggier they’ll get.
Serving Suggestions
So you’ve got a plate of crispy, golden-fried wings—now what? Time to serve them up with sides and extras that complement all that crunchy goodness.
Classic Side Dishes
- French Fries: Nothing beats wings and fries. Go classic or try sweet potato fries for a twist.
- Coleslaw: The cool, creamy crunch of slaw balances out the heat and richness of the wings.
- Mac & Cheese: Ultra-comforting and indulgent. Perfect for soaking up any leftover sauce.
- Cornbread or Biscuits: Soft, buttery carbs pair beautifully with crispy chicken.
- Celery & Carrot Sticks: A must-have with buffalo wings. Don’t forget the ranch or blue cheese dip!
Dipping Sauces
Dipping sauces add another flavor layer and are a crowd favorite at any gathering. Try these:
- Ranch Dressing
- Blue Cheese Dip
- Honey Mustard
- Spicy Aioli
- BBQ Sauce
Want to impress your guests? Serve wings on a platter with multiple sauces in ramekins so everyone can customize their experience.
Plating Tips
If you’re hosting, presentation matters:
- Use a large wooden cutting board or a serving tray lined with parchment.
- Garnish with chopped parsley, green onions, or sesame seeds for color.
- Serve with lemon wedges for a zesty squeeze before biting in.
Storing and Reheating Leftover Wings
Fried wings don’t always make it to the leftovers stage (they’re that good), but if they do, here’s how to keep them crispy and tasty.
How to Store Them
- Refrigerator: Place wings in an airtight container with a paper towel at the bottom to absorb moisture. Store for up to 3-4 days.
- Freezer: Let wings cool completely, spread them on a baking sheet to freeze individually, then transfer to freezer bags. Store up to 2 months.
How to Reheat for Maximum Crunch
Skip the microwave unless you like soggy wings. Instead, reheat in the oven or air fryer:
- Oven: Preheat to 400°F (200°C). Spread wings on a wire rack over a baking sheet. Bake for 10–15 minutes until hot and crispy.
- Air Fryer: Heat at 375°F (190°C) for 5–7 minutes.
Avoid reheating wings with sauce already on them—sauce can burn or cause the coating to go soft. Reheat plain, then re-sauce afterward.
Mistakes to Avoid When Frying Chicken Wings
Even seasoned cooks slip up sometimes. Let’s go over the most common mistakes and how to steer clear of them:
1. Frying Wet Wings
If you don’t pat your wings dry before coating or frying, you’ll never get that crispiness you’re after. Moisture causes splattering and soggy skin.
2. Overcrowding the Pan
Putting too many wings in the oil at once drops the temperature dramatically. This results in uneven cooking and greasy wings. Fry in small batches!
3. Skipping the Rest After Coating
Letting the dredged wings rest before frying helps the flour stick better and form that crunchy crust. Don’t skip the 5–10 minute rest time.
4. Using the Wrong Oil
Extra virgin olive oil has a low smoke point—it’ll burn before your wings are cooked. Use neutral oils like canola, vegetable, or peanut oil instead.
5. Not Seasoning Enough
Under-seasoning = bland wings. Always season your marinade, dredge, and even toss in a little finishing salt right after frying.
Avoid these mistakes, and you’ll go from “just okay” wings to legendary wings that your friends will rave about for weeks.
FAQs about Fried Wings Recipe
1. Can I make fried wings without buttermilk?
Yes! If you don’t have buttermilk, you can make a substitute by mixing 1 cup of milk with 1 tablespoon of vinegar or lemon juice, letting it sit for 5–10 minutes before using. Yogurt thinned with water can also work.
2. How do I know when the wings are fully cooked?
The safest and easiest way is to check the internal temperature. It should be at least 165°F (74°C). Also, the juices should run clear when pierced, and the outside should be golden brown and crispy.
3. Can I oven-bake wings instead of frying them?
Absolutely. While frying gives the crispiest results, oven-baked wings can still be delicious. Bake them at 425°F (220°C) on a wire rack for 40–45 minutes, flipping halfway through. For extra crispiness, toss them in baking powder before baking.
4. What’s the best oil to use for frying wings?
Use a neutral oil with a high smoke point like canola oil, vegetable oil, or peanut oil. Avoid olive oil or butter—they’ll burn before the chicken is done cooking.
5. Can I reuse frying oil?
Yes, but strain it through a fine mesh sieve to remove debris, store it in a sealed container, and use it within a week or two. Don’t reuse it more than 2–3 times, especially if it gets too dark or starts to smoke.
Conclusion
There you have it—your complete, no-fail, step-by-step guide to making the crispiest, most flavorful fried chicken wings right at home. Whether you’re serving them plain, tossed in buffalo sauce, coated in garlic parmesan, or drenched in honey glaze, there’s no denying that homemade wings are pure comfort food magic.
Once you master the balance between marinade, coating, and frying technique, you’ll never feel the need to order takeout again. You’re now officially armed with everything you need—from choosing the right cut of wings and prepping them properly to nailing that golden fry and mixing up the perfect sauce.
So, what are you waiting for? Go heat up that oil, grab those wings, and fry up a batch that’ll have your friends thinking you secretly trained at a five-star kitchen.


