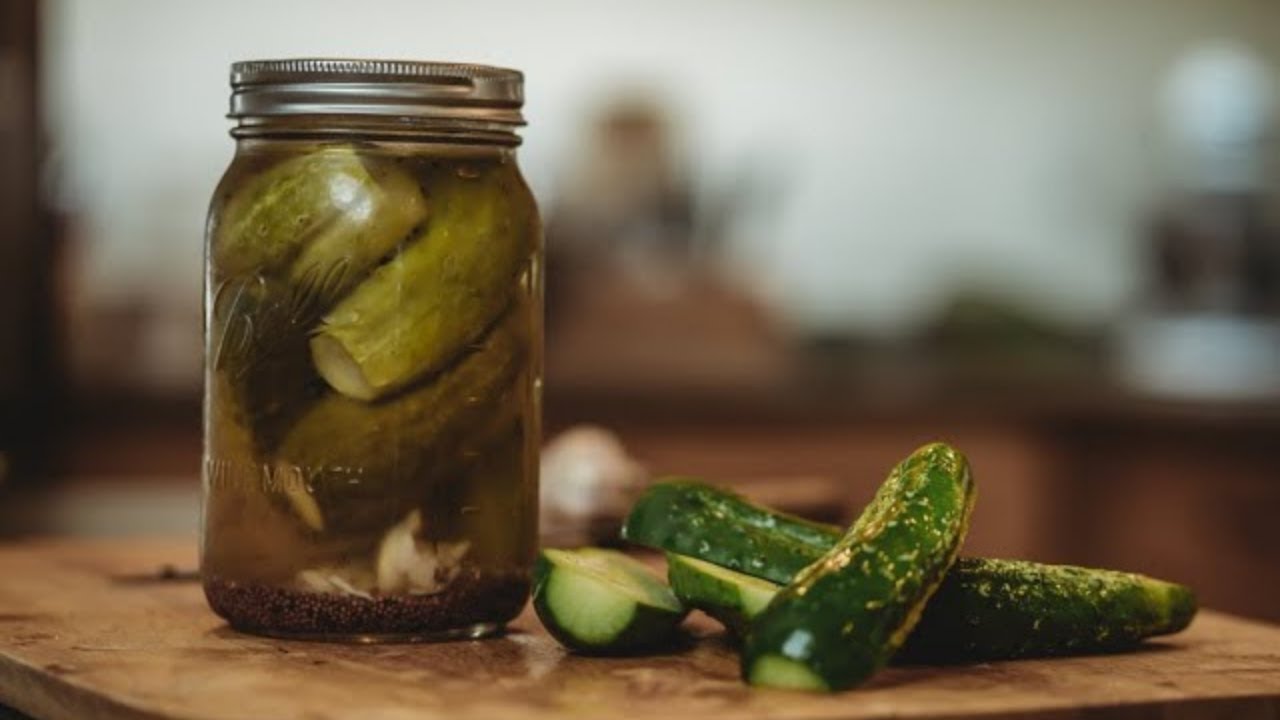
Fridge Pickle Recipe: Ever had that craving for something tangy, crunchy, and utterly satisfying? That’s where fridge pickles come in. Unlike traditional pickles that require canning, boiling, and a whole lot of patience, fridge pickles are quick, easy, and beginner-friendly. You can make them in under 30 minutes and enjoy them in just 24 hours. No fancy equipment, no special skills—just a simple jar and a craving for deliciousness.
Fridge pickles are essentially vegetables that are soaked in a vinegar-based brine and stored in the refrigerator. They’re not shelf-stable, which means you’ll need to keep them chilled—but the trade-off is totally worth it. They stay crisp, vibrant, and full of flavor. Plus, you get full control over the ingredients, so you can customize the heat, sweetness, salt, and spice levels exactly to your liking.
Whether you’re snacking on them straight from the jar, tossing them into a salad, or layering them into sandwiches, these pickles bring that extra punch to your dishes. Ready to become a fridge pickle master? Let’s dive in.
List of Ingredients You’ll Need
Making your own fridge pickles is all about flexibility. You can stick to the basics or get super creative with herbs and spices. But to start, here’s the foundational list of ingredients you’ll need:
Core Ingredients:
- Cucumbers – Go for Persian, Kirby, or English cucumbers. Avoid wax-coated ones.
- Vinegar – White distilled vinegar for a neutral taste, or apple cider vinegar for a fruitier flavor.
- Water – Helps dilute the vinegar to the perfect pickling ratio.
- Salt – Pickling salt or kosher salt works best. Avoid iodized salt.
- Sugar – Optional, but great for sweet pickles or balancing strong vinegar.
Flavor Boosters:
- Garlic cloves – Adds a strong, savory bite.
- Fresh dill – Essential for classic dill pickles.
- Mustard seeds – A hint of tang and complexity.
- Black peppercorns – A mild heat that balances the brine.
- Crushed red pepper flakes – Perfect if you like it spicy.
Optional Add-ins:
- Jalapeños or chili peppers – For a spicy kick.
- Turmeric – Gives pickles that vibrant yellow hue.
- Bay leaves, coriander seeds, fennel seeds – Add depth and aroma.
- Ginger slices, lemon peel, or fresh herbs like thyme or rosemary – For creative variations.
Tools You’ll Need:
- Glass jars with lids – Mason jars are perfect, but any clean jar will do.
- Medium saucepan – For heating the brine.
- Measuring cups and spoons – Precision is key to balance.
- Knife and cutting board – For prepping the vegetables.
With everything ready, it’s time to get pickling. But first, let’s talk about choosing the right cucumbers for the crunchiest results…
Choosing the Right Cucumbers
When it comes to fridge pickles, not all cucumbers are created equal. The type you choose will directly affect the crunch, flavor, and overall quality of your pickles. You don’t want a soggy, limp slice—you want that satisfying snap every time you take a bite. So let’s talk cucumber selection like a pro.
Kirby cucumbers are the top choice for most pickle lovers. They’re small, bumpy, and bred specifically for pickling. Their firm texture holds up well in the brine and keeps them crispy even after days in the fridge. If you can find them at your local farmer’s market or grocery store, grab them.
Next up, Persian cucumbers. These are slightly longer and smoother than Kirbys but still a fantastic choice. They have thin skin and very few seeds, which means your pickles won’t get mushy over time. Plus, their mild flavor makes them a blank canvas for your brine flavors.
English cucumbers, the long, seedless ones often wrapped in plastic, can be used too, but they’re more water-heavy. If you go this route, try slicing them thicker and skipping the center core if it’s soft. These are great for quick pickles you’ll eat within a few days.
Avoid waxed cucumbers—those grocery store types with a shiny coating. That wax prevents the brine from penetrating the skin properly, so your pickles won’t absorb the flavors as well. If waxed cukes are your only option, peel them first.
Pro Tips for Prepping Cucumbers:
- Wash them thoroughly. Even organic cucumbers can have dirt or residue.
- Trim the blossom end. That’s the end opposite the stem. It contains enzymes that can make pickles soft.
- Slice to your liking. Spears, chips, sandwich slices, or whole baby cucumbers—choose what works for you.
- Optional: soak in ice water. If your cucumbers seem a little soft, soak them in an ice bath for 30 minutes before pickling. This revives the crunch!
With the right cucumbers prepped and ready, it’s time to move on to another key ingredient in the pickling equation—vinegar.
Types of Vinegar for Fridge Pickles
The vinegar you choose sets the tone for your entire batch of pickles. It’s not just about acidity; it’s about flavor, balance, and personality. Let’s break down the top options and how they affect your end result.
1. Distilled White Vinegar
This is the go-to classic for most pickle recipes. It’s sharp, clean, and doesn’t compete with your spices or sweeteners. Plus, it gives your pickles that traditional tartness and helps preserve their bright green color.
- Flavor Profile: Sharp, neutral
- Best For: Classic dill pickles, spicy pickles
- Ratio Suggestion: 1 part vinegar to 1 part water for balanced tartness
2. Apple Cider Vinegar
Want a touch of natural sweetness and depth? Apple cider vinegar brings a fruitier, slightly softer edge to your pickles. It’s ideal for bread & butter styles or anything with a sweeter brine.
- Flavor Profile: Mild, fruity, slightly sweet
- Best For: Sweet pickles, gourmet flavor blends
- Tip: Use raw apple cider vinegar for added health benefits—but be aware it can cloud the brine.
3. Rice Vinegar
This is the mellowest option and often used in Asian-inspired pickles. It has a delicate sweetness and lower acidity, so you may need to add a splash of distilled vinegar to keep the brine safe and tangy enough.
- Flavor Profile: Mild, sweet, smooth
- Best For: Pickled carrots, daikon, or radishes
4. Other Options
- White wine vinegar: Slightly floral and perfect for more sophisticated blends.
- Malt vinegar: Earthy, great for British-style pickles but changes the color of the brine.
The Ideal Vinegar-to-Water Ratio
For fridge pickles, the golden ratio is usually:
- 1 cup vinegar
- 1 cup water
- 1 tablespoon salt
- 1 tablespoon sugar (optional)
This gives you a safe and tasty brine that’s flexible enough for tweaks.
Now that you know which vinegar works best, let’s talk about what kind of flavor you want to bring out: sweet, savory, or a mix of both?
Sweet or Savory? Deciding Your Pickling Style
When making fridge pickles, one of the most fun parts is choosing your flavor direction. Are you craving that classic garlicky, dill-packed crunch? Or are you more of a sweet pickle fan? Maybe you’re adventurous and want something spicy-sweet? Here’s how to decide—and nail the balance.
Classic Savory Pickles (Dill-Style)
These are the pickles you toss on burgers and crunch with grilled cheese. They’re heavy on garlic, dill, peppercorns, and vinegar, with little to no sugar.
- Key Ingredients: Fresh dill, garlic cloves, black peppercorns, mustard seeds
- Optional Add-ins: Red chili flakes for heat, celery seeds for complexity
- Pro Tip: Use distilled white vinegar and avoid adding sugar to keep it crisp and bold.
Sweet Pickles (Bread & Butter Style)
These are the golden pickles you find on chicken sandwiches and deli platters. They’re sweet, tangy, and a little spiced.
- Key Ingredients: Sugar, apple cider vinegar, turmeric, mustard seeds, onion slices
- Optional Add-ins: Cloves, cinnamon stick, ginger slices
- Pro Tip: A 1:1 ratio of sugar to vinegar works well, but adjust to taste.
Sweet & Spicy Combos
Want the best of both worlds? Add a kick of chili or jalapeño to a sweet base. This flavor fusion is perfect for tacos, pulled pork sandwiches, or straight-up snacking.
- Key Ingredients: Sugar, vinegar, red pepper flakes, garlic, jalapeño slices
- Pro Tip: Start with 1 tsp of chili flakes per jar and adjust as you go. Spice intensifies over time!
Tips for Balancing Flavors:
- Start with a small batch if trying a new combo.
- Taste your brine before pouring it over your veggies. It should be strong and a little salty—it mellows in the fridge.
- Add spices like coriander, allspice, or fennel seeds for more nuanced flavors.
Once you’ve decided your flavor path, it’s time to dive into the exciting world of spices and herbs…
Essential Spices and Add-Ins
This is where fridge pickles get fun. You’ve got your vinegar, cucumbers, and your sweet/savory base—but the real magic happens when you layer in spices and herbs. The combinations are endless, and each one can take your pickles from ordinary to gourmet. Think of it like building a playlist—each spice is a note, and together they create something unforgettable.
Must-Have Spices for Pickling:
- Garlic: Fresh cloves add bold, savory depth. Smash them lightly before adding to release more flavor.
- Mustard Seeds: These tiny yellow or brown seeds add mild heat and a pop of flavor. They’re a classic ingredient in both sweet and savory brines.
- Black Peppercorns: Whole peppercorns lend a subtle kick without overpowering the pickles.
- Red Pepper Flakes: Just a pinch can turn your pickles spicy. Use more if you’re into bold heat.
- Dill Seeds or Fresh Dill: Dill is a defining flavor in many pickle types. Use both fresh fronds and dried seeds for a layered effect.
Optional Flavor Enhancers:
- Coriander Seeds: Slightly citrusy and floral—great for adding a gourmet edge.
- Bay Leaves: Earthy and aromatic, bay leaves bring a background note that rounds out the brine.
- Allspice Berries: Sweet and peppery, a perfect addition to bread-and-butter styles.
- Turmeric: Adds warmth and vibrant yellow color—used often in sweet pickles.
- Ginger Slices: Fresh or dried, it introduces a bright, spicy warmth that pairs well with sweet or spicy brines.
Fresh Herbs:
- Rosemary or Thyme: Give your pickles a Mediterranean feel.
- Basil or Oregano: Lovely in tomato-based pickles or anything with garlic.
- Mint: Refreshing in lighter brines, especially for cucumber-onion combos.
Veggie & Fruit Add-Ins:
- Onion slices: Red or white onions can be pickled with cucumbers for added flavor and color.
- Jalapeños: Bring the heat—and look great in jars!
- Lemon or lime zest: Adds brightness and acidity.
How to Layer Flavors Like a Pro:
- Start simple. Don’t overload your first jar. Try garlic, dill, and mustard seed for a balanced base.
- Build from there. Want more complexity? Add a bay leaf or some red chili flakes next time.
- Taste test. After 24 hours in the fridge, open a jar and try one. Adjust your spice levels on the next batch.
Now that your spice rack is officially in the game, let’s make sure you’ve got the right gear to bring your fridge pickle recipe together seamlessly.
Tools and Containers You’ll Need
Before you start boiling brine or slicing cucumbers, you need to have the right tools on hand. The good news? You probably already have everything you need in your kitchen. Unlike traditional canning, fridge pickles don’t require any fancy equipment—just clean containers and a little organization.
Must-Have Tools:
- Glass Jars: Mason jars are the gold standard. Quart-size is perfect, but pint jars work well for small batches. Wide-mouth jars make packing easier.
- Lids: You don’t need canning lids, just tight-sealing lids to keep air out and flavor in.
- Saucepan: For making the brine. A small to medium stainless steel pot works great.
- Cutting Board & Sharp Knife: Precision matters—uniform slices make for even pickling.
- Measuring Cups & Spoons: For brine accuracy. Don’t eyeball vinegar or salt.
- Funnel (optional): Helps avoid messes when pouring brine into jars.
Pro Tips for Containers:
- Skip plastic when possible. Glass is non-reactive and won’t absorb flavors or colors.
- Avoid metal lids. The vinegar in the brine can corrode metal, affecting taste and safety.
- Label your jars. Add the date and type of pickle so you know when they’re ready and what’s inside.
Cleaning & Prep:
- Fridge pickles don’t need full sterilization like canned goods.
- Just wash your jars with hot, soapy water and rinse well.
- Let them air dry or wipe with a clean towel before packing.
With your tools prepped and ingredients ready, it’s time to get to the heart of the process—making the actual pickles!
Step-by-Step Fridge Pickle Recipe
Now for the moment you’ve been waiting for—making your own crunchy, flavor-packed fridge pickles! This step-by-step guide walks you through the entire process from start to fridge. It’s super easy and very forgiving. Ready? Let’s go.
Step 1: Wash and Prep the Cucumbers
Start by rinsing the cucumbers thoroughly under cold water. Trim the ends and slice them into spears or rounds, depending on your preference. Smaller pickling cucumbers work best for crisp results.
Step 2: Prepare the Brine
In a saucepan, combine water, vinegar, salt, and sugar. Heat until the salt and sugar dissolve completely. Add garlic, peppercorns, mustard seeds, or dill to the brine if you like extra flavor. Let it cool slightly before using.
Step 3: Pack the Jars
Place fresh dill, garlic cloves, and spices at the bottom of clean jars. Pack the cucumber slices tightly inside without crushing them. A snug fit helps ensure even pickling.
Step 4: Pour in the Brine
Carefully pour the warm brine over the cucumbers, ensuring they are fully submerged. Leave a little headspace at the top to prevent overflow.
Step 5: Seal and Refrigerate
Seal the jars with lids and place them in the refrigerator. Let them pickle for at least 24 hours, though the flavor improves over 2–3 days. Enjoy crisp, tangy fridge pickles anytime!
How Long Do Fridge Pickles Last?
One of the biggest advantages of fridge pickles—aside from how ridiculously easy they are to make—is their impressive shelf life. While they aren’t shelf-stable like canned pickles, they do last a surprisingly long time in the fridge if stored properly.
Average Shelf Life:
Fridge pickles typically last 3 to 4 weeks in the refrigerator, sometimes even longer if you use a clean utensil each time you dip into the jar and the cucumbers remain fully submerged in the brine. The vinegar and salt act as natural preservatives, so as long as you’re following a solid ratio and keeping everything chilled, you’re good to go.
Signs Your Pickles Are Still Fresh:
- They smell tangy and herby. A funky or sour odor (outside of the vinegar) is a red flag.
- They remain crisp. While a little softening over time is normal, a mushy texture usually means it’s time to toss.
- There’s no mold or cloudy slime. Cloudiness in brine can be normal due to garlic or spices, but stringy, slimy textures mean spoilage.
Tips for Longer-Lasting Pickles:
- Always use clean utensils. Double-dipping or using your fingers can introduce bacteria.
- Keep them fully submerged. If the pickles poke out of the brine, they’re exposed to air and spoil faster.
- Tight seal = longer life. A good lid keeps your pickles fresh and crisp.
When to Toss Them:
- If you see mold on the surface or inside the jar.
- If the brine smells off or sour in a bad way.
- If the cucumbers are limp and discolored.
- If there’s any fizzing or pressure buildup when you open the jar—rare, but a warning sign.
Keeping your pickles fresh and flavorful is as easy as staying clean and cold. But even fridge pickles can go wrong if you’re not careful. Let’s dive into the most common pitfalls and how to dodge them.
Do’s and Don’ts of Fridge Pickling
Fridge pickling might be the easiest form of preserving food, but that doesn’t mean it’s mistake-proof. A few slip-ups can lead to soggy, bland, or even spoiled pickles. Here’s a quick guide to keep your pickle game strong.
Do’s:
- Do use fresh, firm cucumbers. The fresher the cucumber, the crunchier your pickles.
- Do wash your jars and tools. A clean workspace keeps bacteria at bay.
- Do experiment with spices and herbs. Fridge pickling is super forgiving—play around with flavor!
- Do let the brine cool slightly before pouring. Too hot, and it could soften your cucumbers too quickly.
- Do label your jars. You’ll thank yourself later when you forget how old a batch is.
Don’ts:
- Don’t use iodized table salt. It can turn the brine cloudy and affect the taste. Stick to kosher or pickling salt.
- Don’t skip the vinegar-to-water ratio. Too little vinegar = unsafe brine, even for fridge storage.
- Don’t use waxed cucumbers. The brine won’t penetrate well, and the pickles may taste off.
- Don’t overpack the jars. Cucumbers need space to soak up the flavors evenly.
- Don’t reuse brine unless boiling it first. Leftover brine can harbor bacteria if not properly treated.
Even if you mess up slightly, fridge pickles are very forgiving. Try, taste, and adjust with each batch. And if you’re feeling confident, why not branch out and try some delicious flavor variations?
Flavor Variations You Must Try
Once you’ve mastered the basics, the real fun begins—making custom pickles that fit your taste buds perfectly. Whether you love heat, crave sweetness, or want something unique, these flavor combos will inspire your next jar.
1. Spicy Sriracha Pickles
- Brine Add-ins: Garlic, red pepper flakes, sliced jalapeños, a tablespoon of Sriracha sauce.
- Perfect For: Burgers, tacos, or eating straight out of the jar if you’re brave.
2. Garlic-Dill Classic
- Brine Add-ins: Lots of fresh dill, smashed garlic cloves, mustard seeds, black peppercorns.
- Pro Tip: Use white vinegar for that iconic sharpness.
3. Sweet & Spicy Thai-Style
- Brine Add-ins: Rice vinegar, sugar, ginger slices, garlic, Thai chili flakes, fresh mint.
- Perfect For: Asian slaws, lettuce wraps, and rice bowls.
4. Bread & Butter Pickles
- Brine Add-ins: Apple cider vinegar, sugar, turmeric, sliced onions, mustard seeds, celery seeds.
- Pro Tip: These get better the longer they sit—wait 72 hours before eating.
5. Mediterranean Lemon-Herb Pickles
- Brine Add-ins: Lemon zest, fresh rosemary or thyme, black pepper, garlic, red onion.
- Perfect For: Sandwiches, grilled chicken, or mezze platters.
Play around and make your own signature jar. Just don’t forget to write down what you added—you’ll want to recreate your masterpiece again!
Next up: let’s talk about that all-important crunch. Because soggy pickles? No thanks.
How to Make Fridge Pickles Crunchy
Let’s be real: nobody dreams of a soft, soggy pickle. That loud, satisfying crunch? That’s the gold standard. And while fridge pickles are known for retaining their bite better than canned ones, here are some smart techniques to make sure every bite delivers.
1. Use the Right Cucumbers
As we’ve covered, Kirby and Persian cucumbers are your best friends. Thin-skinned, firm-fleshed varieties = maximum crunch.
2. Keep Things Cold
Soaking your cucumbers in an ice bath for 30 minutes before pickling helps firm them up. Cold temps contract the cell walls, keeping them tight and crispy.
3. Don’t Overheat the Brine
Boiling your brine is a rookie mistake. Hot liquid softens cucumbers faster. Instead, warm it just enough to dissolve the salt and sugar, then let it cool a bit before pouring.
4. Add Grape Leaves (Seriously!)
Old-school picklers swear by grape leaves—they contain tannins that prevent softening. You can also use black tea leaves for a similar effect.
5. Slice Strategically
- Thicker slices = more crunch.
- Spears hold up better than chips.
- Whole baby cucumbers are the ultimate in crisp.
6. Don’t Rush It
Yes, you can eat your fridge pickles after 24 hours—but the crunch deepens around day 3. Let them marinate and you’ll be rewarded.
Now that your cucumbers are crisp and seasoned to perfection, why stop there? Let’s pickle everything.
Making Pickles with Other Veggies
Sure, cucumbers get all the love, but did you know you can pickle almost any vegetable using the same fridge method? Once you’ve nailed the basic brine, the door opens to a world of colorful, crunchy, and flavorful possibilities. From carrots to radishes, fridge pickling is the easiest way to transform everyday veggies into gourmet bites.
Top Vegetables for Fridge Pickling:
Carrots
- Slice into sticks or thin coins.
- Great with ginger, garlic, or chili for an Asian twist.
- Blanching optional, but raw keeps the crunch.
Red Onions
- Super fast pickling (ready in 30 minutes!).
- Use apple cider vinegar, sugar, and salt for the perfect taco topper.
Radishes
- Add zing and color to salads and sandwiches.
- Brine turns them a bright pink—visually stunning!
Green Beans
- Make for great stir-ins in Bloody Marys.
- Add garlic, dill, and a little chili for kick.
Cauliflower
- Absorbs flavor beautifully and stays crisp.
- Try curry spices or mustard seeds for bold flavor.
Beets
- Roast or boil first for tenderness.
- Go sweet and tangy with clove, cinnamon, and honey.
Bell Peppers
- Slice into strips and pair with oregano, garlic, and olive oil for an Italian vibe.
Do You Need to Blanch?
Blanching—boiling the veggies briefly, then plunging into ice water—helps soften tougher vegetables (like green beans or cauliflower) so the brine can penetrate better. That said, for most fridge pickles, it’s optional. Want more crunch? Skip it. Want more flavor absorption? Blanch lightly.
Flavor Pairing Ideas:
| Vegetable | Vinegar | Suggested Spices |
|---|---|---|
| Carrots | Rice vinegar | Ginger, garlic, red pepper flakes |
| Red Onion | Apple cider | Sugar, mustard seed, bay leaf |
| Green Beans | White vinegar | Dill, garlic, chili flakes |
| Cauliflower | White vinegar | Turmeric, curry powder, peppercorn |
| Radishes | White vinegar | Coriander, cumin, garlic |
Jar Packing Tips:
- Always layer spices at the bottom of the jar first.
- Pack veggies vertically for an eye-catching display.
- Add onions, herbs, or lemon slices between layers for extra flair.
Once you realize how easy it is to pickle beyond cucumbers, it’s kind of addictive. But what if you’re on a special diet like keto or paleo? No worries—we’ve got you covered next.
Fridge Pickles for Keto, Paleo, and Vegan Diets
One of the best things about making fridge pickles at home? You control every single ingredient. That means no mystery sugars, preservatives, or weird additives—and total freedom to make your pickles match your dietary goals. Whether you’re low-carb, all-natural, or fully plant-based, here’s how to adapt the recipe.
Keto-Friendly Fridge Pickles
- Skip the sugar. Instead, use a keto-approved sweetener like erythritol, monk fruit, or stevia.
- Stick to vinegar with zero carbs. White or apple cider vinegar is perfect.
- Watch your veggies. Cucumbers, radishes, and cauliflower are all keto-approved, but avoid high-carb options like carrots or beets.
Paleo Fridge Pickles
- Natural sweeteners only. Use honey or maple syrup in moderation.
- Use raw apple cider vinegar. Adds a probiotic bonus!
- No refined salt. Go for Himalayan pink salt or sea salt.
Vegan Fridge Pickles
- You’re mostly in the clear. Most basic pickle recipes are already vegan.
- Avoid honey. Use organic cane sugar or agave nectar instead.
- Add flavor with herbs, spices, and veggies. No need for animal-derived flavorings—plants pack a punch on their own.
Pro Tips for Clean-Eating Pickles:
- Always read the labels on vinegar and sweeteners.
- Make your brine in small batches to test your preferred level of sweetness or saltiness.
- Store in glass to avoid chemicals leaching from plastic.
Whatever your dietary style, pickles can fit right in. And now that your jars are packed with flavor, let’s talk about how to serve these tangy treasures in ways that’ll seriously upgrade your meals.
Serving Suggestions and Pairings
Now that you’ve got a fridge full of beautiful pickles, it’s time to put them to work. Pickles aren’t just side snacks—they’re bold, punchy flavor bombs that can totally transform a dish. Whether you’re building a sandwich or plating up a fancy appetizer, there’s always room for a pickle.
Everyday Serving Ideas:
- Burgers and Sandwiches: Layer pickle slices on grilled cheese, turkey clubs, pulled pork, or a veggie wrap.
- Tacos: Pickled onions, jalapeños, or radishes add brightness to fish or chicken tacos.
- Salads: Add chopped pickles to potato salad, pasta salad, or even leafy greens for a crunchy punch.
- Charcuterie Boards: A mix of pickled veggies cuts through the richness of meats and cheeses.
- Bloody Mary Garnish: Skewer a spicy pickle spear with olives and celery—boom, instant upgrade.
Creative Pairings:
- Sweet pickles + grilled chicken = amazing contrast
- Dill pickles + sharp cheddar = unbeatable in grilled cheese
- Spicy pickles + hummus = creamy meets heat
- Pickled carrots + peanut noodles = Thai-inspired magic
- Pickled beets + goat cheese = tangy, earthy, and divine
Hosting Tip:
Make a “pickle bar” for your next cookout or brunch. Offer a mix of pickle types—spicy, sweet, garlic-dill, pickled onions, and carrots. Let guests build their own flavor combos!
No matter how you serve them, one thing’s for sure—your homemade fridge pickles will be the star of the show.
FAQs about Fridge Pickle Recipe
1. Can I reuse the brine for another batch of pickles?
Technically, yes—but it’s not recommended unless you reboil it. Used brine can contain bacteria or break down in flavor after sitting with the first batch of veggies. For best results, make a fresh brine every time.
2. Do I need to boil the brine for fridge pickles?
Nope! Just heat it enough to dissolve the salt and sugar. Let it cool slightly before pouring it over your veggies to help keep them crisp.
3. How soon can I eat my fridge pickles?
You can taste them after 24 hours, but the real flavor develops after 2–3 days. They get better the longer they sit—within reason!
4. Can I make fridge pickles without sugar?
Absolutely. Sugar is optional. If you’re going for a tangy or savory pickle, skip it. Or use a sugar substitute if you’re on a low-carb or keto diet.
5. What’s the best way to slice cucumbers for pickles?
It depends on how you plan to eat them:
- Spears: Great for snacking.
- Chips: Perfect for sandwiches and burgers.
- Thin rounds: Good for layering in wraps or charcuterie boards.
Just keep your slices consistent so they pickle evenly.
Conclusion
Fridge pickles are one of those rare kitchen projects that check all the boxes: easy, fast, customizable, and crazy delicious. In under 30 minutes, you can whip up a batch of crunchy, flavorful pickles that’ll level up everything from sandwiches to charcuterie boards. No canning, no special gear, no waiting for weeks.
Whether you’re sticking to classic dill, branching into sweet & spicy blends, or trying out colorful veggie combinations, there’s no limit to the flavor profiles you can create. Plus, you get all the bonus points for being able to say, “Yep, I made these myself.”
So next time you’ve got extra cucumbers (or carrots, or onions, or… anything!), don’t let them go to waste. Toss together some vinegar, salt, and your favorite spices, and make magic happen—one jar at a time.
Now it’s your turn to grab a jar, get creative, and start pickling!


