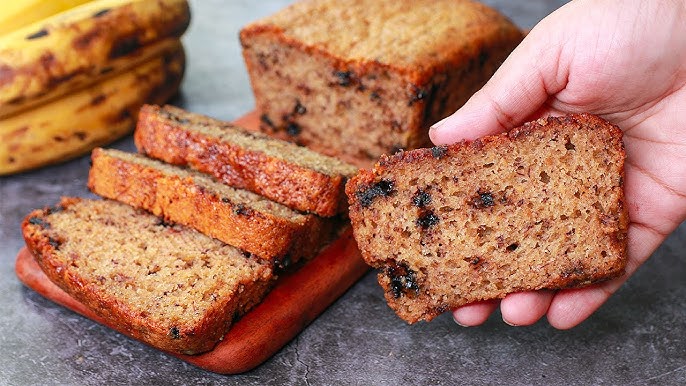
Eggless Banana Bread Recipe: Who doesn’t love a slice of warm, moist banana bread? It’s comforting, wholesome, and surprisingly easy to make. But here’s the twist: you don’t need eggs to whip up this delicious loaf! Whether you’re vegan, allergic to eggs, or just ran out of them, this eggless banana bread recipe will become your go-to favorite. With the right texture, perfect sweetness, and tons of banana flavor, this version is every bit as delightful as the traditional one.
Let’s walk through everything you need—from ingredients to detailed step-by-step instructions—so even if this is your first time baking, you’ll absolutely nail it.
Ingredients You’ll Need
Let’s start by rounding up all the ingredients. You don’t need anything fancy—just basic pantry staples, and you’re good to go.
Basic Ingredients
Here’s what you need for the banana bread base:
- Ripe Bananas (3 medium-sized): The riper, the better. Spotty bananas are gold here. They’re sweeter and mash more easily.
- All-purpose Flour (1½ cups): Gives structure and fluff to the bread.
- Baking Soda (½ tsp): Helps the bread rise.
- Baking Powder (1 tsp): Adds extra lift, especially important since we’re not using eggs.
- Granulated Sugar (½ to ¾ cup): Adjust based on sweetness of bananas. You can also use brown sugar for a deeper flavor.
- Oil (⅓ cup): Keeps the loaf moist. You can use vegetable oil, coconut oil, or melted butter.
- Milk (½ cup): Dairy or plant-based like almond or soy—either works great.
- Vanilla Extract (1 tsp): For that sweet, aromatic flavor.
- Salt (¼ tsp): Enhances all the flavors.
Optional Add-ins
Want to level up your banana bread? Add any of these to the batter:
- Chopped Walnuts or Pecans (½ cup): Add crunch and nutty flavor.
- Chocolate Chips (½ cup): For a dessert-like twist.
- Cinnamon (½ tsp): Adds warmth and depth.
- Nutmeg (¼ tsp): A small pinch goes a long way.
Having your ingredients measured and ready will make the baking process smoother and more enjoyable.
Tools You’ll Need
You don’t need a professional kitchen for this recipe—just some basic tools:
- Mixing bowls (1 large, 1 medium)
- Whisk or electric mixer (optional)
- Measuring cups and spoons
- Spatula
- Loaf pan (9×5 inch is ideal)
- Oven (preheat required)
- Toothpick (for testing doneness)
Set everything out before you begin—it makes the process seamless and less stressful.
Step-by-Step Guide to Make Eggless Banana Bread
Now that everything’s ready, let’s get baking! This step-by-step guide will walk you through the entire process—from preparing your loaf pan to slicing up the finished bread. Stick to these instructions and you’ll be rewarded with a perfectly moist, fluffy, egg-free banana bread.
Step 1: Preheat the Oven
Before you do anything else, go ahead and preheat your oven to 350°F (175°C). This gives your oven enough time to reach the right temperature so the banana bread bakes evenly. A preheated oven ensures your batter starts cooking immediately when it goes in, which helps the bread rise properly. Never skip this step—baking is all about precision, and temperature plays a huge role.
Pro tip: Use an oven thermometer if you have one. Most ovens aren’t 100% accurate, and even being off by 10 degrees can change how your bread bakes.
Step 2: Grease and Prep the Loaf Pan
Use a 9×5 inch loaf pan—it’s the standard size and perfect for this recipe. Grease it well with oil, butter, or a non-stick spray. You can also line it with parchment paper for easy removal (and easier cleanup).
Here’s a little trick: cut a piece of parchment paper slightly larger than the base, so you have extra “handles” to lift the loaf out once it’s baked. This prevents sticking and keeps your bread looking bakery-worthy.
Step 3: Mash the Bananas
Now for the star ingredient: bananas. Peel 3 medium ripe bananas and toss them into a large mixing bowl. Use a fork, potato masher, or even a whisk to mash them down until smooth but still slightly chunky. You don’t want banana soup here—some texture adds character.
The bananas should be very ripe—think black-spotted skins, soft texture, and a strong banana smell. Ripe bananas are sweeter, moister, and much easier to mash. If yours are under-ripe, you can microwave them for 30 seconds to soften and sweeten them a bit.
Step 4: Mix Wet Ingredients
To the mashed bananas, add:
- ⅓ cup of oil
- ½ to ¾ cup sugar (adjust based on your bananas)
- ½ cup milk (any kind)
- 1 tsp vanilla extract
Whisk everything together until it forms a smooth, well-combined mixture. This wet base will carry all the flavor and moisture of your banana bread.
If you want to add a little extra flavor, this is the time to mix in ½ tsp cinnamon or a splash of maple syrup.
Step 5: Sift and Mix Dry Ingredients Separately
Grab another bowl and sift together the dry ingredients:
- 1½ cups all-purpose flour
- 1 tsp baking powder
- ½ tsp baking soda
- ¼ tsp salt
Sifting helps eliminate any lumps and ensures that all your dry ingredients are evenly distributed. It also aerates the flour, which contributes to a lighter texture.
If you’re using add-ins like cinnamon or nutmeg, mix them into the dry ingredients now so they get distributed evenly.
Step 6: Combine Wet and Dry Mixtures
Time to bring it all together! Slowly pour the dry ingredients into the wet mixture. Use a spatula or wooden spoon to gently fold the two together. Be careful here—don’t overmix. You want to combine them just until you no longer see dry flour.
Overmixing activates the gluten in the flour and can make your banana bread dense and chewy—not what we’re going for. The batter should be thick, slightly lumpy, and easy to pour.
Step 7: Add Optional Ingredients
If you’re adding nuts, chocolate chips, seeds, or any other mix-ins, fold them in now. Add about ½ cup of your favorite extras.
Here are a few tasty combinations to try:
- Walnuts + cinnamon
- Chocolate chips + peanut butter swirls
- Dried cranberries + orange zest
- Coconut flakes + dark chocolate
Sprinkle a few extra chips or nuts on top of the batter for a bakery-style finish.
Step 8: Pour Batter into Loaf Pan
Pour the batter into your greased loaf pan. Use a spatula to smooth out the top so it bakes evenly. You can gently tap the pan on the counter a couple of times to remove any large air bubbles.
Want to make it look fancy? Slice half a banana lengthwise and place it on top for a decorative touch before baking.
Step 9: Bake to Perfection
Place the loaf in your preheated oven and bake for 50–60 minutes. Ovens can vary, so start checking around the 50-minute mark. Insert a toothpick or skewer in the center—if it comes out clean or with just a few moist crumbs, it’s done.
If the top is browning too fast but the middle isn’t set, cover it loosely with foil for the final 10–15 minutes. This prevents overbrowning while ensuring the loaf cooks through.
Step 10: Cool Before Serving
Once baked, remove the loaf from the oven and let it sit in the pan for 10–15 minutes. Then, carefully transfer it to a cooling rack.
This step is crucial. Banana bread continues to set as it cools. Cutting into it too soon can make it fall apart or seem underdone. Let it cool for at least 30 minutes before slicing, though we know the smell makes it really hard to wait!
Tips for Perfect Eggless Banana Bread
Even though this recipe is beginner-friendly, a few pro tips can really elevate your banana bread from “good” to “wow, this is bakery-level!” Whether you’re making it for the first time or the fiftieth, these tips can help you avoid common slip-ups and get the best texture and flavor every single time.
Use Very Ripe Bananas
Let’s say it again: the riper the banana, the better the bread. You’re looking for bananas with black spots or even fully black skins. Overripe bananas are naturally sweeter and give the bread that classic moist texture. If your bananas aren’t quite ready, pop them in a paper bag for a day or two—or microwave them for 30 seconds to soften them up.
Measure Accurately
Baking is a science. Eyeballing ingredients can totally throw off the final result. Use measuring cups and spoons for dry and liquid ingredients. Want even more precision? Use a digital kitchen scale to weigh your flour and sugar.
Don’t Overmix
This is one of the most common banana bread mistakes. Once you combine the dry and wet ingredients, mix gently until you don’t see any more flour. Overmixing develops the gluten in the flour, which can make your bread chewy or rubbery. We want soft and tender, not dense and heavy!
Let it Cool Completely
It’s tempting to slice into that golden loaf while it’s still warm. But cutting it too early can make it gummy inside. Let the loaf cool on a wire rack for at least 30–45 minutes so it firms up and slices neatly.
Play With Flavors
Banana bread is super versatile. Add cinnamon, nutmeg, cardamom, or even orange zest to switch things up. You can also experiment with add-ins like raisins, dates, coconut, or different types of nuts.
Try Healthier Swaps
Want a healthier version? Here are some easy swaps:
- Use whole wheat flour instead of all-purpose.
- Replace sugar with maple syrup, honey, or coconut sugar.
- Swap oil with unsweetened applesauce or Greek yogurt.
- Use plant-based milk to keep it vegan.
With these tips, your eggless banana bread will always turn out moist, flavorful, and irresistibly good.
Nutritional Breakdown
Wondering how your slice stacks up? Here’s an approximate nutrition breakdown per slice (based on 10 slices per loaf and standard ingredients).
| Nutrient | Amount (per slice) |
|---|---|
| Calories | 180–220 kcal |
| Carbohydrates | 30–35 g |
| Sugars | 12–18 g |
| Protein | 2–3 g |
| Fat | 6–8 g |
| Fiber | 1–2 g |
| Saturated Fat | 1–2 g |
| Cholesterol | 0 mg (eggless!) |
Note: The values can vary depending on add-ins and specific ingredients used.
It’s a satisfying snack or breakfast option that doesn’t feel like a dessert overload. Plus, it’s easy to adjust the recipe to make it lighter or even more indulgent based on your needs.
Common Mistakes to Avoid
Making eggless banana bread is simple, but there are a few sneaky mistakes that can trip up even seasoned bakers. Avoid these, and your loaf will come out perfectly every time.
Using Underripe Bananas
If your bananas are yellow with no spots or slightly green, wait it out. Underripe bananas don’t mash well and lack the natural sweetness needed for great banana bread. They also make the bread dry and bland.
Overmixing the Batter
We’ll say it again: don’t overmix. This is the #1 reason banana bread turns out dense. Mix just until the ingredients come together—no more.
Baking at the Wrong Temperature
If your oven is too hot, the outside will brown too quickly while the inside stays raw. If it’s too cool, the bread may not rise properly and end up gummy. Always preheat your oven and use an oven thermometer if you’re unsure.
Skipping the Cooling Time
Slicing too early can ruin the texture. Let your loaf cool on a wire rack to firm up completely. It’s worth the wait.
Using Too Much Flour
Packing flour into your measuring cup adds extra weight, making your bread dry. Spoon the flour into the cup and level it off with a knife instead of scooping directly.
Avoid these pitfalls, and your banana bread will always be bakery-level good.
Serving Suggestions
Banana bread is one of those magical recipes that works for breakfast, a snack, or dessert. Here’s how to serve it like a pro:
- With Coffee or Tea: A warm slice paired with a cup of coffee or chai is a match made in heaven.
- Toasted with Butter: Toast it lightly and spread a pat of butter or vegan margarine on top—so simple, so good.
- Topped with Nut Butter: Almond butter, peanut butter, or cashew butter adds protein and richness.
- With Yogurt and Berries: Turn your slice into a mini-breakfast parfait. Top with Greek yogurt and fresh fruit.
- As a Dessert: Serve with a scoop of vanilla ice cream or a drizzle of chocolate sauce.
No matter how you serve it, banana bread is comforting and delicious in every bite.
Storing and Freezing
One of the best things about banana bread? It keeps really well! Follow these tips to store your loaf and enjoy it over several days (or weeks!).
Room Temperature
Store cooled banana bread in an airtight container at room temperature for up to 3 days. Wrap it in foil or plastic wrap to keep it moist.
Refrigerating
If your kitchen is warm or humid, refrigerate the loaf to keep it fresh. Just know that refrigeration can slightly dry it out—wrap it tightly to help prevent that.
Freezing
Banana bread freezes beautifully. Here’s how:
- Slice the bread once it cools.
- Wrap each slice individually in plastic wrap or foil.
- Place wrapped slices in a ziplock freezer bag.
- Label and freeze for up to 3 months.
When you’re ready to enjoy, just thaw a slice at room temperature or pop it in the toaster or microwave for a quick warm-up.
FAQs about Eggless Banana Bread Recipe
1. Can I use whole wheat flour instead of all-purpose flour?
Yes! Whole wheat flour adds a nutty flavor and more fiber. Just note it might make the bread slightly denser. You can also do a 50/50 mix of whole wheat and all-purpose for a balance.
2. What can I use instead of sugar?
You can substitute sugar with maple syrup, honey (if not vegan), coconut sugar, or even mashed dates. Keep in mind that liquid sweeteners may slightly alter the texture.
3. How do I make this banana bread gluten-free?
Use a gluten-free all-purpose flour blend. Make sure it’s labeled as a 1:1 replacement. Avoid single flours like almond or coconut flour alone—they need different ratios.
4. Can I add yogurt instead of milk?
Absolutely. Plain yogurt or even plant-based yogurt works well. It adds a tangy flavor and a moist texture.
5. How long does eggless banana bread stay fresh?
It stays fresh for up to 3 days at room temp, 5–6 days in the fridge, or 2–3 months in the freezer. Just store it properly and keep it sealed.
Conclusion
There you have it—a complete, no-fail, step-by-step guide to making the best eggless banana bread you’ve ever tasted. Whether you’re baking for yourself, your family, or friends, this simple loaf is sure to please everyone. It’s moist, flavorful, and customizable to suit any palate.
With everyday pantry ingredients and no eggs required, it’s a recipe you can whip up anytime. Don’t forget the ripe bananas—they’re the secret weapon! Make it once, and you’ll keep coming back to this one-bowl wonder again and again.
Now it’s your turn—grab those bananas and get baking. Your kitchen is about to smell amazing.


