Dumpling Wrapper Recipe: There’s something oddly satisfying about making dumpling wrappers from scratch. The smell of fresh dough, the soft, pliable texture, and the way it perfectly hugs your filling? Pure magic.
Whether you’re a dumpling pro or just getting started, this guide will walk you through everything—from ingredients to storing the wrappers.
Ready to ditch store-bought? Let’s go make the best dumpling wrappers of your life.
Why Make Dumpling Wrappers at Home?
Let’s be real—store-bought wrappers are convenient, but they rarely hit the mark like fresh, homemade ones. Making them at home gives you full control over texture, thickness, and ingredients. Ever had wrappers that fall apart when cooked? Or ones that are too thick to cook properly? Homemade solves that. Plus, there’s something deeply satisfying about creating food from scratch—it tastes better, feels rewarding, and connects you to tradition.
Also, homemade wrappers are versatile. You can tweak them to match your recipe—make them thinner for delicate dim sum, or thicker for juicy potstickers. And if you have dietary restrictions? You can customize them—gluten-free, low-carb, eggless—your kitchen, your rules.
Different Types of Dumpling Wrappers
Wheat-Based Wrappers
These are the most common and are typically made with all-purpose flour and water. They’re perfect for pan-frying, steaming, or boiling. They hold their shape well and have a pleasant chewiness.
Gluten-Free Options
If you’re gluten-intolerant, you’re not left out. Using rice flour, tapioca starch, or a gluten-free all-purpose blend can give you beautiful, soft wrappers. They’re a bit trickier to handle, but with practice, they can be just as delicious.
Rice Flour Wrappers
Used often in Southeast Asian recipes, rice wrappers are transparent, delicate, and often used for fresh rolls rather than cooked dumplings. Different, but worth exploring if you want variety.
Essential Tools You’ll Need
Before diving in, make sure your kitchen’s stocked with these essentials:
- A large mixing bowl
- Measuring cups and spoons
- Rolling pin (a small one is ideal)
- Dough cutter or knife
- Clean surface for rolling
- Damp towel or plastic wrap
- Cookie cutter (optional, for uniform rounds)
Trust us, the right tools make a world of difference. A small rolling pin especially helps in getting those wrappers thin without tearing them.
List of Ingredients You’ll Need
Here’s your simple dumpling wrapper shopping list:
- 2 cups all-purpose flour
- ½ teaspoon salt (optional, but enhances flavor)
- ¾ cup warm water (adjust as needed)
- Cornstarch or flour for dusting
Optional (for variation):
- Egg – For a richer dough
- Oil – Adds softness and flexibility
- Food coloring (natural like spinach or beet juice for fun wrappers)
That’s it—just a few pantry staples are all you need to start your dumpling journey.
Choosing the Right Flour for Dumpling Wrappers
Flour isn’t just flour. The protein content makes a big difference in how your dough behaves. All-purpose flour (10–11% protein) is the go-to—it’s balanced, easy to handle, and gives that classic chewy texture.
Want a slightly firmer bite? Try bread flour. Prefer soft and tender wrappers? Go with pastry flour, but note that they might tear more easily. For gluten-free versions, you’ll need to combine flours like rice, tapioca, and xanthan gum for elasticity.
Pro tip: Always sift your flour before mixing. It removes lumps and aerates it, which helps with consistency.
Cold Water vs. Hot Water Dough – What’s the Difference?
This is where things get technical—in a fun way.
- Cold Water Dough: This dough is firmer and has more elasticity. It’s great for boiled or steamed dumplings because it holds shape better.
- Hot Water Dough: Using boiling water partially cooks the flour, resulting in a softer, more tender dough. It’s ideal for potstickers and pan-fried dumplings.
Want the best of both worlds? Mix half hot and half cold water. Seriously, game changer.
Step-by-Step Guide to Making Dumpling Wrappers
Let’s get to the heart of this—making the dough. Here’s a detailed breakdown:
Step 1: Measure and Mix the Flour
Pour 2 cups of flour into a large mixing bowl. Add the salt if using. Mix it up with your hand or a spoon to distribute evenly.
Consistency is everything here. If you’re doubling or tripling the recipe, make sure your ratios stay the same.
Step 2: Add Water Gradually
Start pouring the water (¾ cup warm water) into the flour while stirring with a chopstick or fork. Don’t dump it all in—add gradually to avoid sticky messes.
Once it starts clumping, use your hands to bring the dough together into a shaggy ball.
Step 3: Knead the Dough Thoroughly
Transfer the dough to a lightly floured surface. Knead it for 10 minutes until it becomes smooth and elastic.
If it’s too sticky, sprinkle in more flour a little at a time. Too dry? Add a tiny splash of water.
Patience is key here. Good kneading builds gluten, which is the secret to strong, pliable wrappers.
Step 4: Let the Dough Rest
Once kneaded, shape the dough into a ball and cover it with a damp cloth or plastic wrap. Let it rest at room temperature for 30–60 minutes.
Resting relaxes the gluten, making it easier to roll out. Don’t skip this step—it’s non-negotiable if you want silky dough.
Step 5: Divide and Roll the Dough
Cut your dough into quarters. Roll each piece into a log about 1-inch in diameter. Slice the log into 10–12 pieces.
Roll each piece into a small ball—these are your future wrappers. Keep the rest covered while working to prevent drying.
Step 6: Flatten into Circles
Lightly flour your surface and rolling pin. Take one dough ball and flatten it into a disc, then roll from the center out, rotating it to keep it circular.
Aim for about 3 to 4 inches in diameter. The edges should be thinner than the center. This makes for easier pleating and even cooking.
Step 7: Store or Use Immediately
Dust each wrapper lightly with cornstarch and stack them, or lay them flat on a tray. Cover with a damp cloth if you’re not using them immediately.
Use within a couple of hours, or move on to storage—more on that next.
How to Roll Out Dumpling Wrappers Like a Pro
Getting that perfect thin-yet-strong wrapper takes a little practice—but once you’ve got it, it’s like riding a bike. Here’s a method used by dumpling masters:
- Lightly flour your rolling surface to prevent sticking, but don’t overdo it or the dough will dry out.
- Take one dough ball, flatten it slightly with your palm.
- Using a small rolling pin, roll from the edge toward the center while rotating the wrapper with your other hand.
- Keep the center slightly thicker than the edges—this helps support the filling while the thinner edges seal easily.
A proper wrapper should be 3 to 4 inches in diameter, semi-translucent when held up to light, and pliable without tearing. It might take a few tries, but once you get into the rhythm, it becomes second nature.
If you’re in a hurry or want perfect uniformity, you can also use a tortilla press or pasta machine. But hey, hand-rolled has its own rustic charm, right?
Tips for Preventing Stickiness and Tearing
Sticky wrappers are the worst. They clump together, tear when you try to separate them, and generally make life harder. Here’s how to avoid that:
- Dust generously with cornstarch or flour between each wrapper before stacking.
- Keep rolled wrappers covered with a damp towel while working to prevent them from drying out and cracking.
- Avoid over-kneading—too much gluten makes the dough too tight, which can cause tears.
- Don’t roll too thin. While thin is good, paper-thin can backfire by ripping during folding or cooking.
If your wrappers are sticking, don’t panic—just sprinkle more starch, gently pull them apart, and try again.
How to Store Homemade Dumpling Wrappers
If you’ve made a big batch (smart move!), you’ll want to store them properly so they don’t dry out or stick together.
Short-term (up to a few hours):
- Place wrappers on a tray lined with parchment paper.
- Cover with a slightly damp kitchen towel.
- Use them the same day for best results.
Stacking method:
- Dust each wrapper with cornstarch or flour.
- Stack them neatly.
- Wrap the stack tightly in plastic wrap or place in a zip-top bag.
- Store in the fridge for up to 2 days.
Fresh is always best, but these steps help keep your wrappers soft and workable for a little longer.
Freezing Instructions for Later Use
Yes, dumpling wrappers freeze beautifully—but only if you freeze them correctly.
Here’s how to freeze homemade dumpling wrappers:
- Lay each wrapper flat with a dusting of cornstarch between them.
- Stack and wrap them tightly in plastic wrap.
- Place the wrapped stack inside an airtight freezer bag.
- Squeeze out the air, seal it, and label the date.
They’ll keep for up to 3 months in the freezer. When ready to use, let them thaw in the fridge overnight. Don’t microwave to defrost—it’ll make them rubbery or overly soft.
Bonus tip: You can also freeze rolled-out dough balls and roll them fresh after defrosting. It takes up less space and keeps the dough fresher.
Common Mistakes to Avoid When Making Dumpling Wrappers
Making dumpling wrappers seems easy, but there are a few traps that even seasoned cooks fall into. Here’s what to steer clear of:
- Using too much water – This leads to sticky, hard-to-work-with dough.
- Skipping the rest period – Makes rolling harder and dough less elastic.
- Rolling too thick – Results in undercooked dumplings and a chewy texture.
- Rolling too thin – Causes tears during folding or cooking.
- Not sealing properly – Leads to fillings leaking out during cooking.
One more mistake? Using cold dough straight from the fridge. Let it sit for 10-15 minutes before working with it to loosen up.
Avoid these, and you’re already halfway to dumpling mastery.
Using Your Dumpling Wrappers – Cooking Methods
So you’ve made your wrappers—now what? Time to turn them into delicious dumplings! But before that, you need to know how you’ll be cooking them. Different cooking methods affect the wrapper’s texture and structure.
Boiling
- Best for: Juicy pork or shrimp dumplings
- Texture: Soft, silky, and slightly chewy
- How to do it: Drop dumplings into boiling salted water. Stir gently to avoid sticking. Cook until they float, plus 2–3 minutes.
Steaming
- Best for: Delicate fillings like vegetables or dim sum
- Texture: Light, soft, and tender
- How to do it: Line your steamer basket with parchment or cabbage leaves. Steam for 8–10 minutes until wrappers turn translucent.
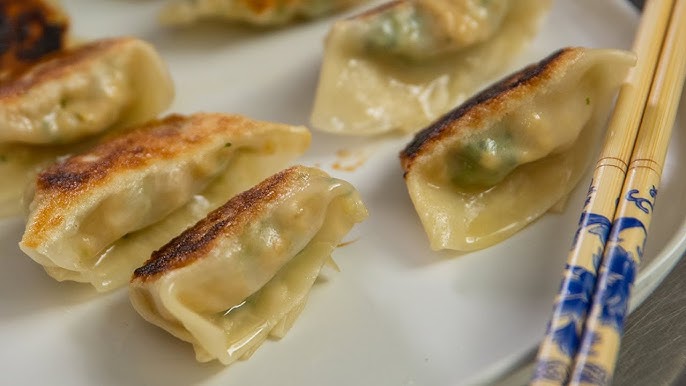
Pan-Frying (Potstickers)
- Best for: Pork, chicken, or beef fillings
- Texture: Crispy bottoms with tender tops
- How to do it: Fry dumplings in oil until bottoms are golden. Add water, cover, and steam until cooked through. Uncover to crisp them up again.
Each method brings out different qualities in your homemade wrappers, so try them all to find your favorite.
FAQs about Dumpling Wrapper Recipe
1. Can I use all-purpose flour for dumpling wrappers?
Yes, all-purpose flour is the standard choice for dumpling wrappers. It has the right amount of protein to give you a chewy yet pliable texture. Just make sure to knead it well and let it rest.
2. How thin should dumpling wrappers be?
Aim for about 1mm thick. They should be thin enough to cook quickly but thick enough to hold the filling without tearing. The edges should be slightly thinner than the center to help with folding and sealing.
3. Can I make wrappers in advance?
Yes! You can make them a day ahead and store them in the fridge or freeze them for up to 3 months. Just remember to dust with cornstarch and keep them wrapped tightly.
4. How do I make gluten-free dumpling wrappers?
Use a mix of rice flour, tapioca starch, and xanthan gum for elasticity. The dough is more delicate and sticky, so handle with care and keep everything well-dusted.
5. What’s the best way to roll wrappers uniformly?
Use a small rolling pin and rotate the dough as you roll outward from the center. For perfect circles, a cookie cutter can help, but hand-rolled has more character and charm.
Conclusion
Making homemade dumpling wrappers might sound intimidating at first, but once you’ve done it, there’s no going back. The texture, the freshness, the sheer satisfaction—you just can’t beat it. With just flour, water, and a bit of time, you can create something that’s way better than anything from a plastic packet.
From mixing the dough to rolling and storing, this guide has walked you through every step. And the best part? You can customize it any way you want. Want to add spinach juice for green wrappers? Go for it. Need gluten-free? There’s a method for that too.
So next time you’re planning a dumpling night, skip the store and roll your own. Trust me—your taste buds will thank you.


