Dill Pickle Relish Recipe: There’s something undeniably nostalgic about the sharp, tangy bite of dill pickle relish. Whether you’ve had it smeared on a grilled hot dog at a summer barbecue or tucked into a classic tuna salad, dill pickle relish is a pantry staple that adds crunch, acidity, and just the right pop of flavor. But here’s the thing—have you ever thought about making your own?
Crafting dill pickle relish at home is not only satisfying, but it also lets you control the ingredients and fine-tune the taste to match your preference. Want it spicier? Toss in some red pepper flakes. Prefer it slightly sweet? Adjust the sugar. Homemade relish allows for all that and more.
In this guide, we’re walking through exactly how to make dill pickle relish from scratch. No shortcuts, no unnecessary ingredients—just real, simple, and delicious relish you’ll want to slather on everything.
Benefits of Homemade Dill Pickle Relish
So why not just grab a jar from the store shelf and call it a day? That’s a fair question, but the truth is, store-bought relish is often packed with preservatives, high-fructose corn syrup, and flavorings you don’t really need. When you make it yourself, here’s what you get:
- Healthier alternative: You decide how much sugar and salt go in. No hidden chemicals.
- Tailor-made taste: Love garlic? Add more. Want it sweeter or tarter? You’re the boss.
- Budget-friendly: Especially if cucumbers are in season or growing in your backyard.
- Freshness: Homemade relish tastes crisp, vibrant, and alive compared to jarred versions that sit for months.
Plus, it’s a great way to use up an abundant cucumber harvest or avoid food waste. And if you love giving homemade gifts—hello, relish jars with cute labels!
List of Ingredients You’ll Need
Making dill pickle relish doesn’t require a long list of ingredients. In fact, most of these are pantry staples. Here’s what you’ll need:
- Cucumbers – The star of the show. Use firm, unwaxed pickling cucumbers if possible. Avoid the large, seedy kind.
- Onions – White or yellow onions work best. They add bite and sweetness.
- Fresh dill – You can also use dried dill weed if that’s what you have on hand, but fresh gives the best flavor.
- White vinegar – Standard distilled vinegar works great. Apple cider vinegar can also be used for a slightly fruitier twist.
- Granulated sugar – Helps balance the acidity.
- Pickling salt or kosher salt – Avoid iodized salt as it can discolor the relish.
- Turmeric (optional) – Adds a golden hue and earthy undertone.
- Mustard seeds, celery seeds, red pepper flakes (optional) – For added flavor complexity.
These simple ingredients come together beautifully to create a relish that’s tangy, crunchy, and full of dill goodness.
Kitchen Tools & Equipment
Before you get started, make sure your kitchen is stocked with the right tools. Here’s what you’ll need:
- Sharp knife and chopping board – Precision matters when chopping cucumbers and onions.
- Food processor – This saves time and ensures even texture. A box grater can also do the trick.
- Colander – Essential for draining the salted cucumber mixture.
- Large pot or saucepan – For cooking the relish down.
- Measuring cups and spoons – Accuracy counts, especially when it comes to vinegar and salt.
- Mason jars with lids – For storing your finished relish.
- Canning tools (optional but helpful) – If you plan to preserve your relish for long-term use.
Being prepared makes the process smooth and enjoyable.
Preparing Your Ingredients
Before diving into the cooking process, prep your ingredients properly. Here’s how:
- Wash your cucumbers thoroughly – Even if they’re organic, give them a good scrub to remove dirt and wax.
- Trim the ends – Especially the blossom end, which contains enzymes that can make your relish mushy.
- Chop or process the cucumbers – You want a fine, even consistency—think small, uniform bits rather than chunky pieces.
- Dice the onions – Use a food processor or sharp knife to finely mince them.
- Mince the dill – Fresh dill can be chopped with a knife or scissors. Remove thick stems.
- Measure out vinegar, sugar, and salt – Having everything ready makes the cooking part much easier.
Pro tip: Keep everything consistent in size for even cooking and texture.
Step-by-Step Guide to Making Dill Pickle Relish
Let’s roll up our sleeves and start making this beautiful, briny condiment from scratch.
Step 1: Chop the Cucumbers and Onions
Whether using a food processor or doing it by hand, the goal is uniform pieces—small but not mush. Think the size of commercial relish. Combine the chopped cucumbers and onions in a large bowl.
Step 2: Salt the Mixture and Let It Sit
Add about ¼ cup of pickling salt to the mixture. Stir it well. This step draws out moisture and intensifies flavor. Cover the bowl and let it sit for 2 hours. Place a plate on top if needed to weigh it down slightly.
Step 3: Drain Excess Liquid
After the 2 hours, pour the mixture into a colander and press it gently to remove excess liquid. You want it moist but not soaking wet. Too much liquid can dilute the flavor later.
Step 4: Simmer with Vinegar, Sugar, and Spices
Transfer the drained mixture to a large saucepan. Add the vinegar, sugar, dill, turmeric, and any other spices you’re using. Bring to a gentle simmer over medium heat. Stir occasionally to prevent sticking.
Step 5: Let It Thicken and Develop Flavor
Simmer for 10–15 minutes until the relish thickens slightly. The cucumbers should retain a bit of crunch. Taste and adjust salt or sugar if needed.
Step 6: Jar the Relish
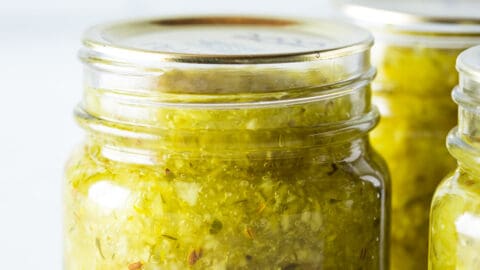
Spoon the hot relish into sterilized jars, leaving about ½ inch of headspace. Wipe the rims clean and seal with lids. If canning, proceed to the water bath method. Otherwise, let cool and refrigerate.
Fermented vs. Quick-Pickle Relish
When making dill pickle relish at home, you’ve got two main options: the quick-pickle method (which we’ve covered above) or the fermented version. While both are delicious, they’re quite different in taste, texture, and process.
Quick-Pickle Relish
This method uses vinegar to preserve the relish. It’s fast, safe, and perfect if you want relish in a day or two. It gives a bright, tangy flavor and is shelf-stable (if canned properly). Great for beginners or anyone short on time.
Fermented Relish
Fermented relish is made without vinegar. Instead, it relies on salt and natural bacteria (lactic acid) to ferment the cucumbers. This process can take a week or more but results in a more complex, probiotic-rich relish. The flavor is tangier, funkier, and slightly effervescent.
To make it:
- Mix chopped cucumbers, onions, dill, and salt in a jar.
- Add water to cover.
- Weigh it down with a fermentation weight.
- Cover loosely and let sit at room temperature for 5–10 days.
- Once sour enough, move to the fridge.
Fermented relish requires more care (and patience), but the payoff in flavor and gut-friendly probiotics is worth it.
Storing Your Dill Pickle Relish
Once you’ve made your relish, storage is key to keeping it fresh and flavorful.
Refrigerator Storage
If you’re not canning it, simply jar the relish and store it in the refrigerator. It will last for 3–4 weeks easily. Make sure to use clean utensils each time you scoop some out to prevent contamination.
Pantry Storage (Canned)
If you’ve canned your relish using a water bath method, you can store the sealed jars in a cool, dark place like your pantry for up to 12 months. Always check seals before using—if the lid pops, toss it.
Freezing?
Not recommended. Freezing can ruin the texture, making the relish watery and mushy when thawed.
Pro Tip: Label your jars with the date so you know when you made them. Use the oldest ones first to keep your stash rotating.
Canning Tips for Long-Term Storage
Want to make a big batch and enjoy it all year long? Canning is the way to go. Here’s a safe and simple method using water bath canning:
Step-by-Step Canning Process:
- Sterilize your jars – Boil them for 10 minutes or run through a dishwasher cycle.
- Fill the jars – While the relish is still hot, spoon it into jars, leaving ½ inch headspace.
- Wipe rims and seal – Use a clean, damp cloth to wipe the jar rims. Add lids and screw on the bands just finger-tight.
- Process in water bath – Submerge jars in boiling water for 10 minutes (adjust for altitude).
- Cool and store – Remove jars carefully and let them cool undisturbed. You’ll hear a popping sound as the jars seal.
Safety Note:
Always double-check guidelines from sources like the National Center for Home Food Preservation. If anything looks or smells off—don’t risk it. Safety first.
Troubleshooting Common Mistakes
So, something went wrong? Don’t worry—it happens to the best of us. Let’s fix it.
1. Relish is too watery
- You likely didn’t drain the cucumber/onion mixture well enough after salting.
- Next time, press it firmly in a colander or cheesecloth to remove as much liquid as possible.
2. Too salty or too sweet
- Always taste during cooking. You can balance too much salt with a bit more sugar (and vice versa).
- Remember, flavors intensify after cooling, so don’t go overboard.
3. Mushy texture
- Overcooking can lead to limp relish. You want to simmer gently, not boil hard.
- Use fresh, firm cucumbers. Avoid overripe or waxy varieties.
4. Lids didn’t seal
- This happens if the jars weren’t hot enough or not processed long enough.
- Refrigerate unsealed jars and use them within a few weeks.
Fixes are simple once you know what to look for, and each batch gets better!
How to Customize Your Dill Pickle Relish
Want to make your own signature relish? Customization is where the fun begins. Here are some ways to tweak the base recipe and make it yours:
Spicy Variation
- Add finely diced jalapeños or a pinch of red pepper flakes.
- Toss in horseradish for a kick!
Garlic Lovers’ Relish
- Add minced garlic cloves to the vinegar mixture while simmering.
- Roast the garlic beforehand for a mellow, sweet touch.
Mustard Relish
- Add yellow mustard seeds or ground mustard to the mix.
- Great on bratwurst or sausages.
Sweet Dill Relish
- Use more sugar and a touch of cinnamon or clove.
- A hybrid between sweet relish and dill—perfect for contrast!
Your creativity is the only limit. Test small batches until you find your perfect combo.
Nutritional Information
Homemade dill pickle relish can be a healthier condiment when compared to store-bought options. Here’s a general idea of the nutritional value per tablespoon:
| Nutrient | Amount |
|---|---|
| Calories | 10–15 kcal |
| Carbs | 2–3g |
| Sugar | 1–2g |
| Sodium | 100–150mg |
| Fat | 0g |
| Fiber | <1g |
Low-Sugar or Keto Option:
- Skip the sugar or use erythritol or monk fruit sweetener instead.
- Still tangy, still delicious—just lower in carbs.
Be mindful of portion size if you’re watching sodium intake.
Serving Ideas and Pairings
Dill pickle relish is far more versatile than people give it credit for. Here are just a few ideas to spark your culinary creativity:
Classic Uses
- Hot dogs and sausages – A summer BBQ essential.
- Burgers – Add it to mayo or ketchup for an extra zing.
- Tuna or egg salad – Gives creamy dishes a crunchy, tangy lift.
Creative Dishes
- Deviled eggs – Mix into the yolk filling.
- Potato salad – Brightens up heavier, mayo-based recipes.
- Sandwich spreads – Stir into cream cheese or Greek yogurt.
- Salad dressings – Combine with olive oil and lemon juice for a dill vinaigrette.
Dill relish doesn’t just sit on the side—it becomes the star with the right pairing.
Tips for Making in Bulk
Planning to make a big batch? Smart move—dill pickle relish keeps well and makes an excellent gift. Here’s how to do it without the headache:
Scale with Care
- Multiply ingredients precisely.
- Use a kitchen scale for best results, especially for large amounts of cucumbers.
Prep in Stages
- Chop all cucumbers one day, salt overnight, and cook the next.
- Keeps you from feeling overwhelmed.
Batch Canning
- Process jars in batches using a large water bath canner.
- Keep relish hot in a slow cooker while filling jars to maintain temperature.
Label & Organize
- Mark jars with flavor (spicy, garlic, sweet), date, and batch number.
- Great for gifting or farmer’s market sales.
Making relish in bulk is easier than you think—just stay organized and give yourself plenty of time.
FAQs about Dill Pickle Relish Recipe
1. How long does homemade relish last?
If refrigerated, it lasts about 3–4 weeks. Canned properly, it can last up to 1 year in the pantry.
2. Can I freeze pickle relish?
Technically yes, but it will lose its crunch. Not recommended unless you’re okay with a softer texture.
3. Is it safe to can pickle relish at home?
Absolutely, as long as you use proper water bath canning techniques and maintain the correct vinegar-to-water ratio.
4. Can I use zucchini instead of cucumbers?
Yes! Zucchini works well as a cucumber substitute. Just be sure to salt and drain it thoroughly to avoid sogginess.
5. What’s the difference between dill relish and sweet relish?
Dill relish is tangy and herbaceous, while sweet relish includes more sugar and sometimes spices like cinnamon or clove.
Conclusion
Dill pickle relish might seem like a humble condiment, but when made from scratch, it becomes something truly special. From the crisp cucumbers and aromatic dill to the perfect balance of vinegar and sweetness, homemade relish brings flavor to a whole new level. It’s easy, fun, and adaptable—plus, it’s one of those kitchen projects that rewards you for months to come.
So the next time you’re grilling burgers, mixing a potato salad, or looking to add something zesty to your sandwich—reach for your own homemade dill relish. Trust me, once you’ve made it yourself, you’ll never want to go back to the store-bought stuff.


