Crème Brûlée Recipe: Crème Brûlée is one of those luxurious desserts that instantly makes you feel like you’re dining in a fine French restaurant. But guess what? You don’t need to be a trained chef to make it at home. With a few simple ingredients and a little bit of patience, this classic custard dessert with a crisp caramelized sugar top can become your signature show-stopper. This isn’t just a recipe—it’s an experience, a perfect balance between creamy custard and a satisfying sugar crunch.
Whether you’re making this for a date night, a family dinner, or just treating yourself (because why not?), Crème Brûlée is a surefire hit. Ready to crack into that golden sugar top? Let’s dive into everything you need to know to make this dessert absolutely flawless.
Why You’ll Love This Crème Brûlée Recipe
There’s a reason Crème Brûlée has stood the test of time—it’s elegant, decadent, and surprisingly simple when broken down into steps. What sets this particular recipe apart is its focus on technique and precision, so you never have to worry about curdled eggs or soupy custard.
Here’s why this recipe works so well:
- Foolproof steps: Each part of the process is broken down in a way that’s easy to follow, even if it’s your first time.
- Restaurant-quality results: You’ll end up with a dessert that tastes like it came from a fine bistro.
- Simple ingredients: No hard-to-find stuff here—just real, fresh ingredients that you probably already have.
- Customizable flavor: Once you’ve nailed the classic, the sky’s the limit—lavender, chocolate, citrus, even espresso!
Still intimidated? Don’t be. This recipe was made for home cooks like you who want to impress without the stress.
A Brief History of Crème Brûlée
Before we whip up a batch, let’s take a quick culinary detour.
Crème Brûlée, which translates to “burnt cream,” is a dessert with roots that stretch across Europe. Although it’s most famously associated with French cuisine, there’s still some friendly debate between France, England, and Spain about who made it first. The earliest known reference dates back to 1691 in a French cookbook, but the English have their own version called “Trinity Cream,” and Spain has “Crema Catalana.”
Whichever country invented it, we’re just thankful someone did. This dessert has made its mark globally, from Michelin-starred menus to cozy home kitchens.
The Science Behind the Silky Texture
Crème Brûlée’s texture is its true star—smooth, creamy, almost like velvet on the tongue. So what makes it so perfect?
The secret lies in tempering the eggs and baking low and slow in a water bath. Eggs are sensitive; if they’re cooked too fast or at too high a temperature, they’ll scramble. By gradually introducing hot cream into the yolks, we prevent this from happening. Then, baking them gently in a water bath ensures even heat distribution, which helps set the custard without curdling it.
It’s chemistry in action—but don’t worry, you don’t need to be a scientist. Just follow the steps, and that spoonful of bliss will be your reward.
List of Ingredients You’ll Need
Making Crème Brûlée requires only a few key ingredients, but quality is everything. Go for the best you can find—trust me, it makes a huge difference.
Main Ingredients
- 2 cups (500 ml) heavy cream – The base of the custard. Full-fat only!
- 1 whole vanilla bean (or 1 tbsp pure vanilla extract)
- 5 large egg yolks
- 1/2 cup (100g) granulated sugar – For the custard
- 4 tbsp granulated sugar – For the caramelized topping
- Pinch of salt – Optional, enhances the flavor
Optional Add-ins for Extra Flavor
Want to level up? Try mixing in:
- Espresso or instant coffee (for a mocha twist)
- Citrus zest (like orange or lemon)
- Lavender buds (a floral note that pairs beautifully)
- Chocolate chips (melted into the cream)
These aren’t necessary, but they’re fun once you’ve mastered the classic.
Kitchen Tools You’ll Need
To get that perfect silky custard and crispy sugar crust, you’ll need a few tools:
- Ramekins – 4 to 6 small ramekins (4 oz or 6 oz)
- Baking dish – For the water bath
- Whisk
- Mixing bowls
- Fine mesh strainer
- Kitchen torch – For caramelizing the sugar (a broiler works too)
- Measuring cups and spoons
- Saucepan
Having the right tools not only makes the job easier—it also ensures better results. Trust your gear!
How to Choose the Right Cream and Vanilla
Let’s talk quality for a sec. Crème Brûlée lives and dies by the richness of its cream and the depth of its vanilla. Go for:
- Heavy cream with at least 36% fat. No substitutions like half-and-half.
- Real vanilla beans if possible. The flecks look beautiful, and the flavor is unmatched.
If you can’t find a vanilla bean, opt for pure vanilla extract, not imitation. You can even use vanilla bean paste for that speckled look.
Want to go even more gourmet? Try infusing the cream with fresh herbs or spices (like cardamom or cinnamon) for a unique twist.
Step-by-Step Guide to Making Crème Brûlée
Now let’s walk through the process together, one step at a time. Don’t rush it. Pour yourself a cup of coffee, relax, and let’s make some magic.
Step 1: Preheat and Prepare
Begin by preheating your oven to 325°F (160°C). Arrange four to six ramekins in a deep baking dish. This setup will allow you to create the essential water bath later. Set aside while preparing the custard.
Step 2: Heat the Cream
In a saucepan, combine heavy cream with a split vanilla bean or vanilla extract. Heat gently over medium heat until the cream is steaming but not boiling. Let it sit for a few minutes so the vanilla fully infuses its flavor.
Step 3: Whisk the Egg Yolks and Sugar
In a mixing bowl, whisk together egg yolks and granulated sugar until the mixture becomes pale and slightly thickened. This forms the rich base of your custard.
Step 4: Temper the Eggs
Slowly pour a small amount of the warm cream into the egg mixture while whisking constantly. This “tempers” the eggs, preventing them from scrambling. Gradually add the remaining cream until fully combined.
Step 5: Combine and Strain the Mixture
For the smoothest texture, strain the custard through a fine mesh sieve into a clean bowl. This removes any cooked egg bits and ensures a silky finish.
Step 6: Fill the Ramekins
Carefully pour the custard mixture into the prepared ramekins, filling them nearly to the top.
Step 7: Bake in a Water Bath
Pour hot water into the baking dish until it reaches halfway up the sides of the ramekins. Bake for 35–45 minutes, or until the custards are set but still slightly jiggly in the center.
Step 8: Chill and Set
Remove ramekins from the water bath and cool to room temperature. Then refrigerate for at least 2 hours, or overnight for best texture.
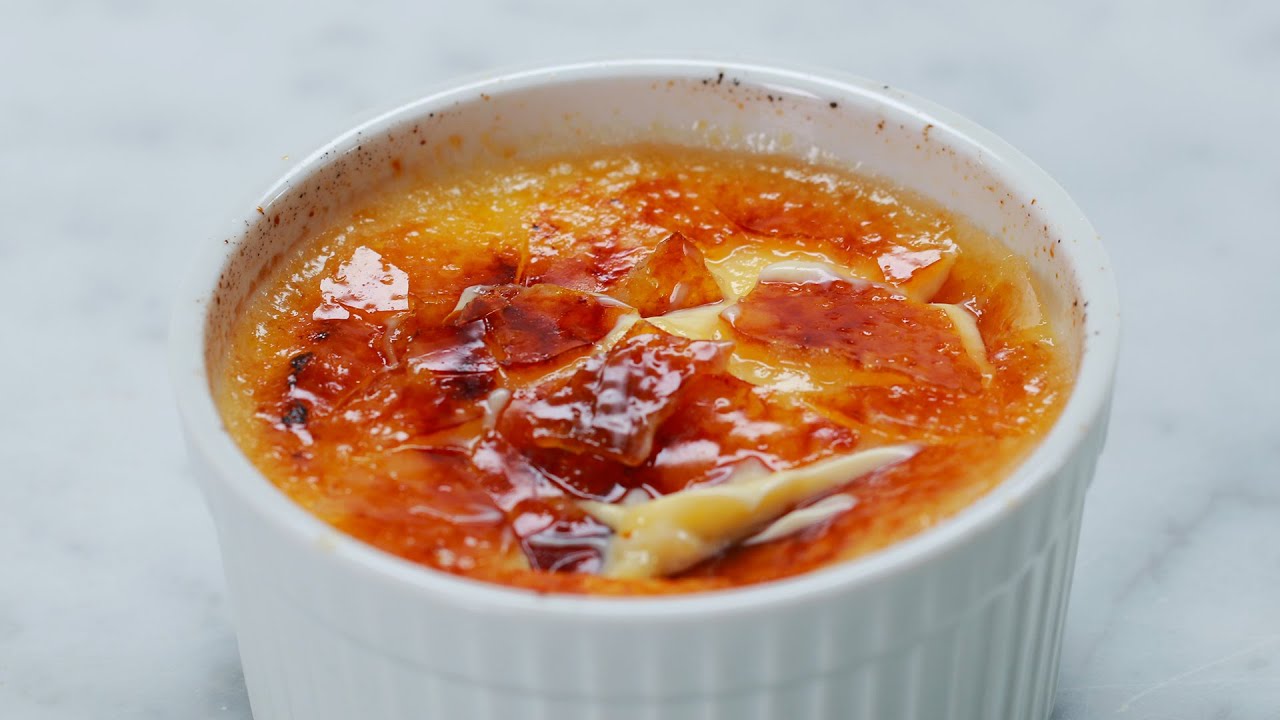
Step 9: Caramelize the Sugar Topping
Right before serving, sprinkle a thin, even layer of sugar on each custard. Use a kitchen torch to melt and caramelize the sugar until crisp and golden. Enjoy the signature crack with your first spoonful!
How to Get the Perfect Sugar Crust
A great Crème Brûlée is defined by that crack—a thin, glass-like sugar layer you can tap with a spoon.
Here are a few tips to nail it every time:
- Use fine white sugar (not raw or coarse) for an even melt.
- Apply an even layer—too thick and it won’t crack; too thin and it burns quickly.
- Torch in a steady circular motion, not just one spot.
- Let it cool for 2 minutes before serving for the sugar to harden.
And yes—it’s 100% okay to take a video of the first crack. It’s practically a rule.
Flavor Variations to Try
Once you’ve mastered the basics, it’s time to experiment:
- Lavender Honey Crème Brûlée – Infuse the cream with dried lavender buds.
- Espresso Crème Brûlée – Add 1 tsp instant espresso to the cream.
- Citrus Brûlée – Mix in zest from an orange or lemon.
- Chocolate Crème Brûlée – Stir in 3 oz of melted dark chocolate into the hot cream.
- Bourbon Vanilla Crème Brûlée – Add a splash of bourbon for depth.
The base is your blank canvas—get creative and make it your own.
Serving Suggestions
When it comes to presentation, Crème Brûlée practically speaks for itself. But if you’re looking to make your dessert stand out even more, here are a few fun ways to dress it up:
- Fresh berries: A handful of raspberries, blueberries, or sliced strawberries on top offers a pop of color and a burst of freshness.
- Mint leaves: Just a sprig can make the whole dish look more elegant.
- Edible flowers: These elevate your Crème Brûlée to Instagram-worthy status.
- Dusting of powdered sugar: A light sprinkle can give a snowy contrast to the golden crust.
Serve it chilled with the crackly sugar topping freshly torched—never torch in advance, or it may turn soggy. You want that dramatic moment of cracking through the caramel right before the first bite. It’s a full experience: the crunch, the cream, the chill, the warmth of the sugar. Pure bliss.
Want to go even further? Pair it with:
- A shot of espresso or cappuccino
- A glass of dessert wine like Sauternes or Moscato
- A scoop of vanilla or berry sorbet for a temperature contrast
Whether it’s a date night or a dinner party, this dish will steal the spotlight.
How to Store Crème Brûlée
If you’re planning ahead or have leftovers (lucky you!), here’s how to store them right:
Before Caramelizing:
- Cover the custards tightly with plastic wrap.
- Store in the fridge for up to 3 days.
- Add sugar and torch just before serving.
After Caramelizing:
- It’s best to eat them fresh—sugar topping gets soggy in the fridge.
- If you must store them, keep uncovered for up to 2 hours at room temp or refrigerate for max 12 hours with sugar topping intact.
- Don’t freeze—custard doesn’t freeze well and the texture will break down.
Pro tip: Make the custard base ahead of time and keep it chilled, then torch fresh when you’re ready to serve. That way, you get the best of both worlds: convenience and crunch.
Common Mistakes to Avoid
Even though this recipe is pretty straightforward, there are a few common traps that can trip up beginners. Let’s make sure you don’t fall into them.
1. Scrambled Eggs in the Custard
Problem: You added hot cream too quickly during tempering.
Solution: Always pour it slowly while whisking constantly.
2. Grainy Texture
Problem: Overbaked custard or oven was too hot.
Solution: Bake at low temperature in a water bath and check early.
3. Watery Custard
Problem: Not baked long enough or undercooked.
Solution: The center should slightly jiggle, but not be sloshy.
4. Soggy Sugar Topping
Problem: Topped too early or stored too long.
Solution: Only torch right before serving.
5. Burnt Sugar Crust
Problem: Torching in one spot for too long.
Solution: Keep the flame moving in circles.
Bonus Tip: Always strain your custard before baking—it makes a noticeable difference in the final texture.
Avoid these pitfalls, and you’re golden. Literally.
Crème Brûlée vs. Other Custards
You might be wondering, “How is Crème Brûlée different from all the other custards out there?” Good question. Let’s break it down.
| Dessert | Texture | Cooking Method | Topping |
|---|---|---|---|
| Crème Brûlée | Silky, rich | Baked in water bath | Caramelized sugar crust |
| Flan | Jiggly, soft | Baked or steamed | Liquid caramel sauce |
| Pot de Crème | Dense, creamy | Chilled | Usually plain |
| Custard Pie | Firm | Baked in a crust | Sometimes nutmeg |
| Panna Cotta | Gelatin-based | Not baked | Fruit sauce or compote |
So Crème Brûlée is kind of the posh cousin of the custard family—smooth, rich, and always dressed up for a party with that signature sugar shell.
Nutritional Information
Let’s not pretend it’s diet food—but hey, it’s worth every bite. Here’s a rough breakdown per 4 oz serving (classic version, no toppings):
| Nutrient | Amount |
|---|---|
| Calories | 300–350 kcal |
| Total Fat | 28g |
| Saturated Fat | 17g |
| Cholesterol | 250mg |
| Sodium | 40mg |
| Carbohydrates | 20g |
| Sugars | 18g |
| Protein | 5g |
Keep in mind, these numbers can vary based on the size of ramekin and added flavors.
FAQs about Crème Brûlée Recipe
1. Can I make Crème Brûlée without a torch?
Yes! You can use your oven’s broiler. Just place the ramekins under a hot broiler for 1–2 minutes until the sugar caramelizes. Watch them closely to avoid burning.
2. Can I use milk instead of cream?
Not recommended. Milk doesn’t have enough fat to create that rich, velvety texture. Stick with heavy cream for the best results.
3. Why did my custard come out lumpy?
That’s usually due to overheating the eggs during tempering. Next time, pour the hot cream into the eggs very slowly, whisking constantly.
4. How far in advance can I make it?
You can make the custard up to 3 days in advance, just don’t torch the sugar until right before serving.
5. What can I do if I don’t have ramekins?
Use any small oven-safe dishes or even teacups. Just adjust the baking time slightly based on the size and depth.
Conclusion
There you have it—Crème Brûlée in all its golden, crackly, creamy glory. It’s not just a dessert; it’s a celebration in a dish. From its simple ingredients to its luxurious finish, it proves that elegance doesn’t have to be complicated.
Whether you’re looking to impress guests, spoil someone special, or just treat yourself (which you absolutely should), this recipe is a sure thing. Take your time, follow the steps, and don’t be afraid to make it your own with fun flavors or toppings.
The next time someone says “You made Crème Brûlée?!” just smile and say, “It’s easier than it looks.”


