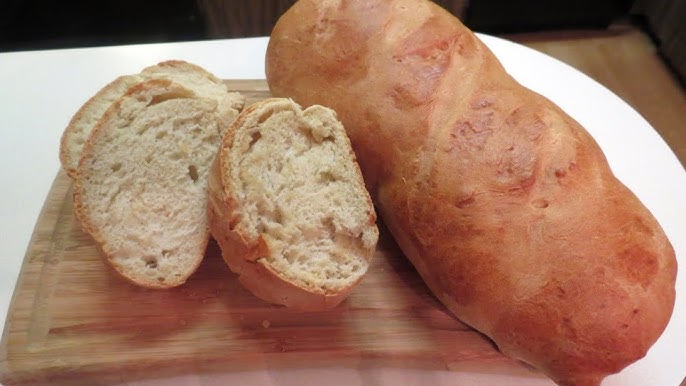
Crusty Italian Bread Recipe: If you’ve ever walked past a bakery and caught a whiff of freshly baked bread, you know the magic of a good crusty Italian loaf. It’s not just bread—it’s warmth, comfort, and tradition wrapped in a crackly crust. The best part? You don’t have to be an expert baker to make it yourself. In fact, with a little patience and the right steps, you can make crusty, bakery-style Italian bread right in your own kitchen.
This recipe is beginner-friendly but delivers professional-level results. From the crispy crust to the soft, chewy interior, every bite will taste like something straight out of a rustic Italian village bakery. Let’s dive in.
Why Everyone Loves Crusty Italian Bread
There’s something almost poetic about breaking open a warm loaf of Italian bread. That audible crunch followed by the tender, steamy inside? It’s irresistible. Whether you’re dipping it in olive oil, pairing it with pasta, or simply slathering on some butter—this bread is a universal favorite.
Why does everyone love it so much? Well, it’s versatile, for one. It pairs with almost every meal and works great for sandwiches, bruschetta, or simply on its own. The crust adds texture while the soft interior absorbs sauces and flavors like a sponge. It also has that homemade charm you just can’t replicate with store-bought loaves.
What Makes Italian Bread Different from Other Breads?
Italian bread has its own character. Unlike the dense structure of sourdough or the sweetness of brioche, Italian bread hits the sweet spot between lightness and chew. It often uses fewer ingredients, focusing on simplicity and quality.
Key differences include:
- Crust: Italian bread has a thinner, crispier crust than French bread.
- Shape: Typically round or oval.
- Texture: It’s chewy, airy, and slightly moist inside.
- Ingredients: Olive oil is often added for flavor and richness.
So, if you’re craving something wholesome and rustic, Italian bread delivers every time.
Ingredients You’ll Need
Making Italian bread isn’t about fancy ingredients—it’s about using simple components with care and attention. Here’s what you’ll need:
Flour Types and Recommendations
Use bread flour for best results. Its higher protein content gives the bread better structure and chewiness. However, if you only have all-purpose flour, that’ll work too—just know your bread may be slightly less chewy.
- 4 cups bread flour (or all-purpose)
- Optional: substitute ½ cup of flour with semolina for extra texture
Water: Temperature and Quality
Water activates your yeast, and its temperature matters.
- 1 ½ cups warm water (110°F/43°C)
- Too hot? You’ll kill the yeast. Too cold? It won’t activate.
Use filtered water if possible, especially if your tap water has a strong chemical taste.
Yeast: Active Dry vs Instant
Yeast is what makes your bread rise.
- 2 ¼ teaspoons (1 packet) active dry yeast or instant yeast
- Instant yeast is faster, but active dry gives a more traditional flavor and texture.
Sugar and Salt – Small but Mighty
- 1 tablespoon sugar (feeds the yeast and helps browning)
- 2 teaspoons salt (adds flavor and controls yeast growth)
Olive Oil – The Secret Ingredient
Not always used, but a touch of olive oil adds depth and softness to the crumb.
- 2 tablespoons extra virgin olive oil (optional but highly recommended)
Equipment Checklist
You don’t need a professional bakery setup to make this bread. Here’s what you’ll need:
- Large mixing bowl
- Wooden spoon or dough whisk
- Bench scraper (optional but handy)
- Clean kitchen towel or plastic wrap
- Baking sheet or pizza stone
- Parchment paper
- Sharp knife or lame for scoring
- Spray bottle for steam or a pan of water in the oven
- Wire rack for cooling
How to Prep Your Kitchen for Bread Making
Before you dive in, set yourself up for success. Bread making takes time, so it’s best to plan ahead. Clear a clean workspace. Make sure all your ingredients are measured out and at room temperature. Preheat your oven later in the process—don’t worry, we’ll walk you through exactly when.
Here are a few tips:
- Warm your bowl slightly with hot water to keep the dough cozy while it rises.
- Keep your room draft-free. Yeast prefers a warm, stable environment.
- Set aside 3–4 hours from start to finish (most of that is rising time).
Step-by-Step Guide to Making Crusty Italian Bread
Step 1: Activate the Yeast
First things first—let’s wake up that yeast. In a small bowl, combine the warm water (around 110°F) with the sugar and sprinkle the yeast over the top. Stir gently and let it sit for about 5–10 minutes until it becomes foamy. If nothing happens, your yeast might be dead. In that case, grab a fresh packet and start over.
Foamy yeast means your dough will rise properly. This is where the bread’s light and airy texture starts to take shape. You’re laying the foundation, so don’t skip this step or rush it.
Step 2: Mix the Dough
Once your yeast is foamy and ready to go, pour it into a large mixing bowl. Add about half of your flour and the salt. Begin stirring with a wooden spoon or dough whisk until it comes together like a thick batter. Now, add the olive oil (if using), and gradually mix in the remaining flour until a shaggy dough forms.
Your dough should be slightly sticky but not unmanageable. If it’s too dry, add a tablespoon of water. Too wet? Add a little more flour. Finding that balance is key to a beautiful dough that’s easy to knead and shapes up well.
Step 3: Knead Until Smooth
Here comes the workout! Lightly flour your work surface and turn the dough out. Knead it with your hands by pressing it forward with the heel of your palm, folding it over, turning it, and repeating. Continue this rhythm for about 8 to 10 minutes.
What you’re looking for is a smooth, elastic dough that bounces back when you poke it. This kneading process develops gluten—the protein that gives bread its stretch and chew. If your arms get tired, remember: each push brings you closer to that perfect crusty bite.
You can use a stand mixer with a dough hook here, but many bakers swear by the hands-on experience.
Step 4: First Rise (Proofing)
Once your dough is kneaded, place it into a lightly oiled bowl and cover it with a damp towel or plastic wrap. Let it sit in a warm, draft-free spot for 1 to 2 hours, or until it doubles in size.
This is where the magic starts. Yeast consumes the sugars and releases carbon dioxide, creating air pockets. You’ll notice the dough becomes puffier and soft to the touch.
If your house is cold, try placing the bowl in the oven with the light on (don’t turn the oven on!) or near a sunny window. Proofing is where patience pays off.
Step 5: Shape the Loaf
After the dough has doubled, gently punch it down to release the gas. Turn it out onto a lightly floured surface and knead for just a minute or two. Then shape it into a round boule or an oval loaf—whichever you prefer.
To do this, pull the sides of the dough into the center and flip it over so the seam is on the bottom. Use your hands to gently cup and rotate the dough, creating surface tension on top. This helps it rise evenly and form a nice dome.
Transfer your shaped dough onto a piece of parchment paper on a baking sheet or pizza peel.
Step 6: Second Rise
Cover the shaped loaf with a kitchen towel and let it rest again for 30 to 45 minutes. It should puff up slightly but doesn’t need to double like before.
This second rise helps the bread keep its shape in the oven. During this time, preheat your oven to 450°F (230°C). If you’re using a pizza stone or Dutch oven, place it in the oven now so it gets hot.
You can also set a shallow metal pan at the bottom of the oven for steam (more on that next).
Step 7: Preheat and Steam the Oven
To get that iconic crust, you need steam. As the oven preheats, place a metal pan or cast-iron skillet on the lower rack. When you’re ready to bake, pour about 1 cup of hot water into the pan to create steam. Be careful—steam burns are no joke!
Alternatively, use a spray bottle to mist the sides of the oven a few times during the first 10 minutes of baking. This steam keeps the crust soft at first so the bread can rise fully before hardening.
Step 8: Bake Until Golden and Crusty
Score the top of the loaf with a sharp knife or lame (a razor blade on a handle). This gives your bread room to expand and makes it look artisan-style. Make 1–3 slashes depending on your loaf size.
Place the loaf (still on parchment) onto your hot baking stone or tray. Bake for 30–35 minutes, or until the top is golden brown and it sounds hollow when tapped on the bottom.
If the crust is browning too quickly, tent it loosely with foil during the last 10 minutes. Let the loaf cool on a wire rack for at least 20 minutes before slicing. This sets the crumb and keeps it from getting gummy.
Baker’s Tips for a Crispier Crust
Want that extra crunch? Here’s how to level up your crust game:
- Don’t skip the steam. It’s non-negotiable for a true crusty finish.
- Let it cool uncovered. Trapping steam with a towel will soften the crust.
- Try a longer bake. If your crust isn’t quite crisp, give it 5 more minutes in the oven.
- Use a Dutch oven. Traps moisture and boosts oven spring for an ultra-crusty result.
- Spray water during the first 10 minutes. Just don’t overdo it.
Common Mistakes to Avoid
Even seasoned bakers mess up now and then. Here’s what to watch for:
- Water too hot or too cold – This messes with the yeast.
- Under-kneading – The dough won’t develop enough structure.
- Skipping the second rise – Your loaf may collapse or look flat.
- Not preheating the oven – Cold starts lead to dense bread.
- Slicing too soon – Let it rest, or the inside will be doughy.
Patience is just as important as technique in bread making. Respect the process.
How to Store Homemade Italian Bread
You’ve put in the work and now you’ve got a beautiful loaf of crusty Italian bread—but how do you keep it fresh?
Short-Term Storage (1–2 Days)
If you plan to eat it within a day or two, store your bread at room temperature in a paper bag or wrapped loosely in a clean kitchen towel. This helps the crust stay crisp while still protecting the bread from drying out completely.
Avoid plastic bags—they trap moisture, which softens the crust and can make the bread go moldy faster.
If the crust does get soft, don’t worry—you can always crisp it back up in the oven (we’ll show you how below).
Medium-Term Storage (Up to 5 Days)
You can keep Italian bread in a bread box or a cloth bag for up to 5 days. To preserve the crust, store it whole and only cut slices as needed. Each time you slice into it, you expose the interior to air, speeding up staleness.
If it’s starting to feel a bit dry, you can warm it in the oven at 350°F for about 5–7 minutes to bring it back to life.
Freezing and Reheating Tips
Sometimes, the best way to preserve bread is to freeze it. Here’s how to do it right:
Freezing the Whole Loaf
- Let the loaf cool completely after baking.
- Wrap it tightly in aluminum foil, then place it in a freezer-safe zip-top bag.
- Label it and freeze for up to 3 months.
When you’re ready to enjoy it:
- Remove the foil and bake it straight from frozen at 375°F for 15–20 minutes.
- It will come out warm and crusty, almost like the day you baked it.
Freezing Slices
- Slice the cooled bread.
- Lay the slices flat on a baking sheet and freeze until solid.
- Transfer them to a freezer bag.
To reheat, just pop a frozen slice in the toaster or a toaster oven. This is perfect for morning toast or sandwiches.
Creative Ways to Serve Italian Bread
Sure, you can enjoy it with butter, but why stop there? Italian bread is like a blank canvas—it’s made to soak up flavors and deliver bold, rustic bites.
Classic Ideas:
- Dipped in olive oil and balsamic vinegar with cracked black pepper
- Bruschetta with tomatoes, garlic, basil, and a drizzle of olive oil
- Garlic bread with a mix of butter, garlic, parsley, and Parmesan
- Panini with mozzarella, pesto, and grilled veggies
More Unique Uses:
- Bread salad (Panzanella) with tomatoes, cucumbers, onions, and vinaigrette
- Croutons for soup or Caesar salad
- Bread pudding—sweet or savory
- Soup bowl—hollow it out and serve soup inside (hello, rustic charm!)
Once you start experimenting, you’ll never run out of ways to use this crusty loaf.
Pairing Ideas: What to Eat With Crusty Italian Bread
Italian bread complements almost anything, but here are some epic pairings:
- Hearty soups: Think minestrone, tomato basil, or lentil soup.
- Pasta dishes: Lasagna, spaghetti Bolognese, or creamy Alfredo.
- Cheese and charcuterie boards: Add salami, prosciutto, olives, and sharp cheeses.
- Eggplant Parmesan or chicken cacciatore for a full-on Italian feast.
Bread this good doesn’t play a side role—it completes the meal.
Troubleshooting: Why Didn’t My Bread Rise?
You followed the steps but your dough didn’t puff up. Don’t panic. Here are some reasons your bread didn’t rise, and what you can do next time:
1. Old or Dead Yeast
Always check the expiration date. If your yeast doesn’t foam during activation, it’s no good.
2. Water Temperature Issues
If the water was too hot, it could’ve killed the yeast. Too cold, and the yeast may have never activated.
3. Room Temperature Was Too Cold
Cold environments slow down fermentation. Try proofing in a warm (but not hot) spot like the inside of a turned-off oven with the light on.
4. Dough Was Over-Kneaded or Under-Kneaded
Not kneading enough doesn’t develop the gluten structure. Over-kneading with a mixer can break down the structure.
5. You Skipped the Second Rise
It’s essential for developing proper height and shape. Skipping it can result in flat loaves.
Try again, tweak your process, and remember—bread baking is as much about feel as it is about following directions.
FAQs about Crusty Italian Bread Recipe
1. Can I use whole wheat flour instead of white flour?
Yes, but use only 25–50% whole wheat flour or the bread may be too dense. You’ll likely need a bit more water too.
2. My crust turned out too hard—what did I do wrong?
Overbaking or lack of steam can result in an overly hard crust. Bake a few minutes less and make sure to add steam in the beginning.
3. How can I make my bread softer inside?
Add a little more olive oil or milk to the dough. Also, avoid over-flouring during kneading.
4. Is it okay to let the dough rise overnight?
Absolutely. You can do a cold rise in the fridge overnight for deeper flavor. Just let it come to room temp before baking.
5. Do I need a stand mixer to make this bread?
Nope! A wooden spoon and your hands are all you need. It’s old-school, but it works beautifully.
Conclusion
There’s nothing quite like pulling a fresh, golden loaf of crusty Italian bread from your oven. It fills your kitchen with warmth and your home with the smell of comfort. While baking bread from scratch might seem intimidating at first, it’s really just a series of small, manageable steps. And the payoff? Absolutely worth it.
With the right ingredients, a bit of patience, and a touch of love, you’ll have a loaf that rivals anything from an artisan bakery. Plus, once you’ve nailed this recipe, the sky’s the limit—try adding herbs, cheeses, or even olives next time.
Happy baking, and don’t forget: every great loaf starts with just flour, water, yeast, and you.


