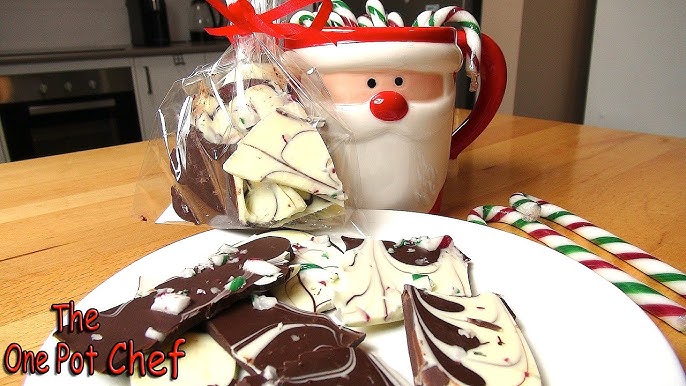
Christmas Bark Recipe: There’s something undeniably magical about the holiday season, and nothing brings that festive joy to your kitchen quite like making a batch of Christmas Bark. It’s quick, fun, and customizable, making it perfect for both holiday gifting and snacking.
This step-by-step guide will walk you through everything you need to know to create the most delicious, beautiful, and irresistible Christmas bark at home. Whether you’re a baking newbie or a seasoned pro, you’ll find this process both simple and enjoyable.
So roll up your sleeves, let’s get a little messy, and make some edible Christmas magic!
What is Christmas Bark?
Christmas bark is a festive, sweet treat typically made from a base of melted chocolate that’s poured onto a flat surface, then topped with a variety of delicious toppings—think crushed peppermint, nuts, dried fruit, candies, and festive sprinkles. After it sets, it’s broken into jagged, bark-like pieces.
The beauty of bark lies in its simplicity and versatility. You don’t need special baking skills or fancy tools. Plus, it’s endlessly customizable. Want to go classic with peppermint and dark chocolate? Or maybe add salty pretzels and caramel drizzle? You’re the boss of your bark. It’s perfect for holiday parties, cookie swaps, or packaged up in cute bags for gifts.
Why You’ll Love This Recipe
Let’s be real—you’re going to fall in love with making Christmas bark. Here’s why:
- No baking required: It’s a no-bake recipe. That means less hassle and no oven mitts.
- Kid-friendly: Kids can help spread toppings, break the bark, or just sneak a few bites.
- Perfect for gifting: Wrap it up with a ribbon and boom—instant homemade holiday gift.
- Quick to make: From start to finish, you’re done in under 30 minutes (plus cooling time).
- Totally customizable: Choose your favorite chocolates and toppings to suit your mood or theme.
This recipe fits perfectly into the hustle of the holiday season when time is short, but the desire to create something homemade and heartfelt is high.
Essential Tools You’ll Need
Don’t worry, nothing fancy here. You probably already have most of these tools in your kitchen:
- Baking sheet (rimmed is best)
- Parchment paper or wax paper
- Microwave-safe bowl or double boiler
- Rubber spatula or offset spatula
- Knife or your hands (for breaking bark)
- Measuring cups/spoons for toppings
That’s really it! Minimal tools = maximum joy.
List of Ingredients You’ll Need
Let’s break down everything you’ll need to make your Christmas bark delicious and festive.
Chocolate Base Options
You’ll need about 12 oz of chocolate total (for a standard baking sheet):
- Dark chocolate chips or bars
- Milk chocolate chips or bars
- White chocolate chips or melting wafers
- Candy melts (optional, for color)
Go for good quality chocolate—this is the star of your bark.
Topping Variations
Pick a combo or mix and match:
- Crushed candy canes
- Mini marshmallows
- Chopped nuts (almonds, pecans, pistachios)
- Dried cranberries or cherries
- Mini M&Ms or holiday sprinkles
- Crushed pretzels
- Caramel drizzle
- Toffee bits
Mix sweet and salty for the best flavor contrast!
Choosing the Right Chocolate for Bark
The foundation of good bark is great chocolate. Here’s how to choose:
- Dark chocolate: Bold, rich, and pairs well with fruity or nutty toppings.
- Milk chocolate: Sweeter and kid-friendly.
- White chocolate: Creamy and perfect for a snowy winter theme.
- Combination layers: Use dark on bottom, white on top for a marbled look.
Avoid baking chocolate chips with stabilizers—they don’t melt smoothly. Opt for chocolate bars or high-quality chips without added wax.
How to Melt Chocolate Properly
Melting chocolate the right way ensures a smooth finish and glossy shine.
Microwave Method
- Chop the chocolate into small pieces.
- Place in a microwave-safe bowl.
- Microwave in 20-30 second bursts, stirring each time, until smooth.
- Don’t overheat or it’ll seize—stir even if it looks partially melted.
Double Boiler Method
- Place a heatproof bowl over a pot with 1 inch of simmering water.
- Make sure the bottom of the bowl doesn’t touch the water.
- Stir gently until melted and smooth.
Add a teaspoon of coconut oil if you want an extra glossy finish!
Step-by-Step Guide to Making Christmas Bark
Here’s where the magic happens. Follow these steps carefully, and you’ll end up with the perfect holiday bark.
Step 1: Prepare the Baking Sheet
Start by lining a baking sheet with parchment paper or aluminum foil. This prevents the chocolate from sticking and makes cleanup effortless. Set it aside on a flat surface where it can cool undisturbed.
Step 2: Melt the Chocolate
Break your chocolate—dark, milk, or white—into small, even pieces for easier melting. You can melt it in a microwave-safe bowl in 20-second bursts, stirring between each, or use a double boiler over simmering water for gentler heat. Stir until smooth and glossy.
Step 3: Pour and Spread the Chocolate
Pour the melted chocolate onto the prepared baking sheet. Use a spatula to spread it evenly into a rectangle about ¼ inch thick. This is your delicious canvas.
Step 4: Add the Toppings
Quickly sprinkle festive toppings—crushed candy canes, dried cranberries, pretzels, nuts, or sprinkles—before the chocolate sets. Press them lightly so they stick.
Step 5: Let It Set
Transfer the tray to the fridge for 30–45 minutes or until completely hardened. Patience pays off here!
Step 6: Break Into Pieces
Once firm, remove from the fridge and break the bark into rustic pieces by hand. Store in an airtight container—or better yet, share as edible holiday gifts!
Creative Topping Ideas
If you’re feeling adventurous, the sky’s the limit when it comes to Christmas bark toppings. Here’s a categorized list to spark your imagination:
Sweet Options
- Crushed candy canes
- Mini marshmallows
- White chocolate drizzle
- Toffee bits
- Dried cranberries
- Chopped dried apricots
Salty Options
- Crushed pretzels
- Salted peanuts
- Sea salt flakes
- Popcorn
- Salted pistachios
Colorful & Festive Additions
- Holiday M&Ms (red & green)
- Edible glitter or shimmer dust
- Holiday sprinkles
- Colored candy melts drizzled on top
Combining sweet + salty elements adds that perfect flavor balance that keeps people reaching for more.
How to Store Christmas Bark
Proper storage helps keep your Christmas bark fresh and snappy.
Room Temperature Storage
- Store in an airtight container in a cool, dry place.
- Will last for up to 2 weeks at room temperature.
- Keep away from direct sunlight or warm spots in the kitchen.
Refrigerator Storage
- Ideal for warm homes or humid climates.
- Store in layers separated by parchment to prevent sticking.
- Lasts about 3 weeks in the fridge.
Freezer Storage Tips
- Christmas bark freezes surprisingly well.
- Wrap tightly in plastic wrap and store in a freezer-safe bag.
- Will keep for up to 2 months.
- Let it come to room temperature before serving for best taste and texture.
Make-Ahead Tips
Busy around the holidays? Make your bark ahead of time!
- Prep bark 1–2 weeks before your event or gifting deadline.
- Store it in a cool place or the fridge.
- For large batches, make and store layers separated by parchment paper in tins or airtight containers.
You can also pre-chop all your toppings and store them in jars or baggies, so all you need to do is melt, pour, and sprinkle.
Troubleshooting Common Bark Issues
Even with a simple recipe like this, sometimes things can go sideways. Here’s how to fix common issues:
Chocolate Bloom
- If your chocolate develops white streaks, that’s fat or sugar bloom—it’s safe to eat but doesn’t look great.
- Use good quality chocolate, avoid humidity, and don’t overheat your chocolate to prevent this.
Separation of Layers
- If your white and dark chocolate layers separate, it’s likely they set at different times.
- Let the base layer cool slightly but not set before adding the second layer to ensure bonding.
Melting Problems
- Chocolate won’t melt? You may have overheated it.
- Add a teaspoon of coconut oil or vegetable shortening and stir gently to revive it.
Patience is your best friend when it comes to chocolate. Slow and steady wins the bark race.
Christmas Bark Variations
Looking to switch things up? Try one of these delicious variations:
Peppermint Bark
- Dark or white chocolate base
- Topped with crushed candy canes
- Add a few drops of peppermint extract for a stronger flavor
White Chocolate Cranberry Bark
- White chocolate base
- Topped with dried cranberries, pistachios, and orange zest
- Drizzle with dark chocolate for contrast
Nutty Bark
- Milk chocolate base
- Loaded with almonds, hazelnuts, and cashews
- Sprinkle with sea salt to finish
You can get creative and make a “bark bar” at your holiday party where everyone makes their own batch.
Gifting Ideas Using Christmas Bark
This homemade treat is perfect for gifting—affordable, heartfelt, and delicious.
- Package in clear cellophane bags tied with festive ribbon
- Fill mason jars and top with a fabric lid cover
- Add to a holiday cookie tin with tissue paper
- Pair with a mug of cocoa mix or a bottle of wine for a DIY gift basket
Add a handwritten tag with the flavor name and ingredients, especially for those with allergies.
Fun Ways to Involve Kids
This is one of the most kid-friendly holiday recipes out there:
- Let kids pick and sprinkle their favorite toppings.
- Use cookie cutters to shape bark before it hardens slightly.
- Make “reindeer bark” or “elf bark” with themed toppings and colors.
- Create personalized bark for teachers, babysitters, or grandparents.
It’s messy, fun, and full of holiday cheer. Plus, kids love getting hands-on in the kitchen.
Nutritional Information
Here’s a general estimate for basic bark made with semi-sweet chocolate and candy toppings (per 1 oz piece):
| Nutrient | Amount |
|---|---|
| Calories | 150–180 |
| Sugar | 12–18g |
| Fat | 9–11g |
| Carbohydrates | 15–20g |
| Protein | 1–2g |
| Sodium | 20–50mg |
Note: Nutritional values vary based on toppings and type of chocolate used.
FAQs about Christmas Bark Recipe
1. Can I use candy melts instead of chocolate?
Yes! Candy melts are easier to work with and come in various colors, making them great for themed barks. Just note they don’t taste as rich as real chocolate.
2. How long does homemade bark last?
When stored properly in an airtight container, it lasts up to 2 weeks at room temp or 2 months in the freezer.
3. Can I make this dairy-free?
Absolutely. Use dairy-free chocolate (like Enjoy Life brand) and skip any toppings that contain milk or butter.
4. What’s the best way to cut bark cleanly?
Use a sharp knife warmed under hot water and wiped dry. For more rustic bark, just use your hands to snap it.
5. Can I double the recipe?
Yes! Just use a larger baking sheet or two smaller ones. You can also layer it thicker if you like chunkier bark.
Final Thoughts
Christmas bark is the ultimate holiday hack—no oven, no stress, and the result is a show-stopping treat that everyone loves. With just a few ingredients and a little creativity, you can whip up an impressive batch of festive goodness perfect for gifting, snacking, or sharing around a warm fireplace.
Whether you go with classic peppermint or create your own wild flavor combos, this Christmas bark recipe is sure to become a holiday tradition. So gather your chocolate, crank up the Christmas tunes, and let the festive fun begin!