Chocolate Covered Fruit Recipe: What happens when you pair juicy, fresh fruit with rich, velvety chocolate? You get pure magic. Whether you’re planning a romantic date night, putting together a party tray, or just craving something sweet, chocolate covered fruit is always a crowd-pleaser. It’s a balance of fresh and indulgent, healthy and decadent—kind of like wearing sweatpants with designer shoes. The best part? It’s ridiculously easy to make at home.
In this guide, I’m walking you through everything—from picking the right fruit to getting that glossy chocolate coating just right. Let’s get drippin’!
Why Chocolate Covered Fruit Is a Game-Changer
There are desserts, and then there are experiences. Chocolate covered fruit sits comfortably in the latter category. You’re not just munching on fruit—you’re elevating it. Think of it like dressing your strawberries in tuxedos. This treat isn’t just eye candy for dessert tables, it also gives your taste buds a party. The snap of hardened chocolate followed by the juicy burst of fruit? That’s textural harmony.
Beyond being delicious, it’s also versatile. Whether you love the rich depth of dark chocolate or the creamy sweetness of white chocolate, there’s a flavor combo waiting for you. Plus, they’re customizable—you can roll them in nuts, sprinkle with sea salt, or drizzle with more chocolate for an artsy finish. And yes, they’re Instagram-worthy too.
Benefits of Making It at Home
Sure, you can buy them in those fancy boxes, but homemade chocolate covered fruit hits different. Here’s why:
- You Control the Quality: Choose fresh, ripe fruits and high-quality chocolate.
- It’s Cost Effective: Store-bought versions are overpriced, especially during holidays.
- Customizable: Want sugar-free? Vegan? Extra sprinkles? Go for it!
- Fun Activity: A great project with kids, partners, or solo with a podcast in the background.
- Healthier Option: When made with dark chocolate and fresh fruits, it’s a guilt-free indulgence.
Homemade treats also have that “I made this” charm that turns a simple dessert into a thoughtful gesture. Perfect for gifting, celebrating, or just treating yourself like royalty on a Tuesday night.
List of Ingredients You’ll Need
Let’s dive into what you’ll need to make your own chocolate dipped paradise.
Fresh Fruits
Go for a colorful variety! Here are some classics and a few fun choices:
- Strawberries (a must-have)
- Bananas (slice and freeze before dipping)
- Apples (dip slices and eat quickly to avoid browning)
- Pineapple (sweet and tangy—so good!)
- Oranges (segments dipped halfway are gorgeous)
- Cherries (leave the stem on for easy dipping)
- Kiwi (slice thick and chill before dipping)
- Grapes (dip whole and chill for mini dessert bites)
Types of Chocolate
Pick according to taste or health preferences:
- Dark Chocolate (70% or higher) – rich and bittersweet
- Milk Chocolate – creamy and smooth
- White Chocolate – sweet and buttery
- Vegan Chocolate Chips or Bars – for plant-based options
Optional Toppings
Take it up a notch with these extras:
- Chopped almonds, peanuts, or pistachios
- Crushed pretzels or cookies
- Sea salt flakes
- Shredded coconut
- Sprinkles
- Mini chocolate chips
- Edible gold dust (fancy!)
Pro tip: Use parchment paper or a silicone mat to set the dipped fruit and avoid sticking.
Kitchen Tools You’ll Need
Don’t worry—you won’t need a chef’s kitchen for this. Basic tools will do the trick:
- A microwave-safe bowl or double boiler
- Parchment paper or silicone baking mat
- Baking sheet or tray
- Toothpicks or skewers (optional but helpful)
- Fork or dipping tool (for small fruits)
- Cooling rack (optional but helps airflow)
- Small bowls for toppings
These everyday tools make the dipping process cleaner and more efficient. If you’re gifting them, consider some cupcake liners or treat bags for packaging.
Choosing the Right Chocolate
Let’s be honest—chocolate makes or breaks this dessert. The better your chocolate, the better your final result. Here’s what you need to know to make the best choice.
Dark vs Milk vs White Chocolate
Each type of chocolate brings something different to the party.
- Dark Chocolate: Ideal for those who prefer a rich, slightly bitter flavor. It pairs beautifully with sweet fruits like strawberries or bananas. Plus, it contains antioxidants and less sugar—so it’s kinda healthy, right?
- Milk Chocolate: Creamier and sweeter. This is the classic crowd-pleaser and perfect if you want a more indulgent treat. Apples and grapes taste incredible when paired with milk chocolate.
- White Chocolate: Not technically chocolate (since it doesn’t contain cocoa solids), but still delicious. It’s super sweet and looks elegant, especially when used as a drizzle.
Want to make it healthier? Go with high-quality dark chocolate that’s at least 70% cocoa. Vegan or dairy-free? No problem—there are tons of plant-based chocolate options out there that melt like a dream.
Melting Quality
Skip the chocolate chips meant for cookies—they contain stabilizers that prevent smooth melting. Instead, go for:
- Couverture chocolate (professional-grade with extra cocoa butter for smooth dipping)
- Chocolate bars (chop them up before melting)
- Melting wafers (especially if you’re in a hurry)
Avoid waxy or low-quality chocolates, especially those that taste artificial. They’ll ruin the texture and flavor.
Best Fruits for Chocolate Dipping
Not all fruits are created equal when it comes to dipping. Some hold up better than others. Here’s your best bet:
Berries
- Strawberries: The gold standard. Their natural sweetness and firmness make them perfect for dipping.
- Raspberries & Blackberries: Tricky due to their delicate structure but doable with care.
- Blueberries: Great for mini bites—dip them on toothpicks or in clusters.
Citrus Fruits
- Orange segments: Sweet and tangy. Try to remove excess juice before dipping.
- Tangerines & Clementines: Easy to peel and segment—great for quick snacks.
Stone Fruits
- Cherries: Leave the stem on for easy dipping. They look gorgeous too!
- Plums, Peaches, Nectarines: Slice them and chill before dipping to keep the texture firm.
Tropical Options
- Pineapple chunks: Sweet and tangy—an absolute flavor bomb when dipped.
- Kiwi slices: A little messy but oh-so-delicious.
- Mango slices: Exotic and luscious—dip halfway for a pretty presentation.
Pro Tip: Always choose firm, ripe fruit. Overripe or mushy fruits fall apart when dipped in warm chocolate.
Prepping Your Fruit
Before you even think about melting chocolate, your fruit has to be prepped properly. This step makes or breaks the final result.
Washing and Drying
Sounds basic, but it’s critical.
- Rinse all your fruits thoroughly to remove any residue or dirt.
- Dry them completely. Chocolate and water are enemies—any moisture will cause the chocolate to seize (turn into a grainy mess).
- Use paper towels or a clean dishcloth to pat them dry, and let them air dry for a few minutes if needed.
Cutting Techniques
Depending on the fruit, you may want to slice or leave whole:
- Strawberries: Leave whole with the stems on for easy grabbing.
- Bananas, Kiwis, Mangoes: Slice thick, around ½ inch, and chill them before dipping.
- Apples: Slice and dip immediately to avoid browning.
Dealing With Moisture
Here’s a quick hack: After drying, lay the fruits on a paper towel-lined tray for 10-15 minutes. This helps wick away any extra moisture before dipping.
Want to get fancy? Insert skewers or toothpicks into smaller fruits like grapes or banana slices for easier dipping and less mess.
How to Melt Chocolate Perfectly
You’ve prepped the fruit—now it’s time for the melty goodness. Melting chocolate might seem easy, but a few missteps can ruin it. Here are two reliable methods:
Double Boiler Method (Most Reliable)
- Fill a pot with 1–2 inches of water and bring it to a simmer.
- Place a heat-safe bowl on top (make sure it doesn’t touch the water).
- Add chopped chocolate to the bowl and stir continuously until smooth and glossy.
- Remove from heat immediately once melted.
Microwave Method (Quick Option)
- Place chopped chocolate or melting wafers in a microwave-safe bowl.
- Heat in 30-second intervals, stirring in between, until melted.
- Be careful not to overheat—it can burn quickly.
Common Mistakes to Avoid
- Adding water: Even a drop can make your chocolate seize.
- Overheating: Chocolate burns easily. Stop melting once most of it is smooth, and stir to finish the job.
- Skipping stirring: Stir often to ensure even melting.
Bonus Tip: If your melted chocolate is too thick, add a teaspoon of coconut oil or vegetable oil to thin it out.
Step-by-Step Guide: How to Make Chocolate Covered Fruit
Now comes the fun part. Follow this simple step-by-step guide and you’ll be dipping like a pro.
Step 1: Prep the Fruit
Choose fresh, firm fruits like strawberries, bananas, pineapple chunks, or orange slices. Wash and dry them completely—any moisture can prevent the chocolate from sticking. If using cut fruit, pat each piece dry with paper towels.
Step 2: Melt the Chocolate
Chop your chocolate (dark, milk, or white) into small pieces. Melt it slowly in a double boiler or microwave in 20-second intervals, stirring between each, until smooth and glossy. Avoid overheating to prevent clumping.
Step 3: Dip the Fruit
Hold the fruit by the stem, skewer, or fork and dip it halfway or fully into the melted chocolate. Gently shake off excess chocolate for a clean coating.
Step 4: Let It Set
Place the dipped fruit on parchment paper. Allow it to set at room temperature for 30 minutes, or refrigerate for 15 minutes for faster results.
Step 5: Add Toppings (Optional)
Before the chocolate hardens completely, sprinkle with nuts, shredded coconut, or drizzle with contrasting chocolate for a gourmet finish. Sweet, simple, and stunning!
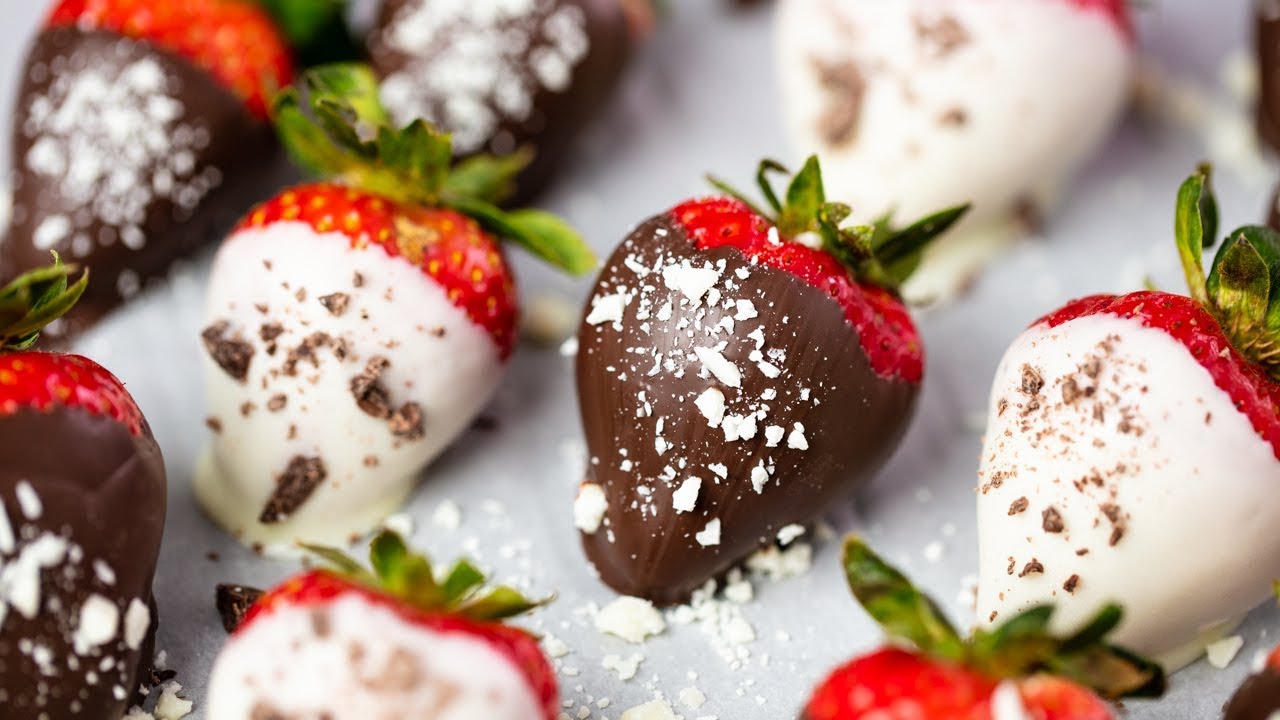
Decorating Ideas and Toppings
This is where you can let your creativity shine. Adding toppings isn’t just about flavor—it’s about presentation. Whether you’re going for a classic look or something festive for a special occasion, there are tons of ways to dress up your chocolate-covered fruit.
Popular Topping Ideas:
- Crushed Nuts: Almonds, walnuts, peanuts, pistachios—anything crunchy adds a nice contrast to the silky chocolate.
- Sprinkles: Great for birthdays, holidays, or just to make things more colorful.
- Sea Salt: A pinch of flaky sea salt on dark chocolate gives that sweet-and-salty magic.
- Toasted Coconut: Adds a tropical twist and crunchy texture.
- Crushed Cookies: Oreo crumbs or graham crackers are always a hit.
- Mini Chocolate Chips: Double the chocolate? Yes, please.
- Drizzles: Melt white or dark chocolate separately and drizzle over the top for a swirled, professional look.
How to Apply Toppings:
- Dip your fruit into the chocolate.
- While the coating is still wet, roll or sprinkle on the topping of your choice.
- For drizzles, wait until the first chocolate layer sets, then use a spoon or piping bag to drizzle on a second type of melted chocolate.
Want to go fancy? Try edible glitter, gold leaf, or themed sprinkles for holidays and special events. Presentation makes a huge difference—especially if you’re gifting these little beauties.
Cooling and Storing Tips
You’ve dipped, decorated, and now it’s time to let them rest. Don’t mess this part up—storage is key to keeping them fresh and tasty.
Let Them Set Properly
- If you’re not in a rush, let them harden at room temperature for about 30–60 minutes.
- For quicker results, refrigerate them for 15–20 minutes.
- Don’t move them too soon or you risk smudging the chocolate.
Storage Tips
- Store in a single layer in an airtight container.
- Place parchment paper between layers if you need to stack them.
- Keep refrigerated if you’re using soft fruits like bananas or berries. Otherwise, room temperature is fine for a few hours.
How Long Do They Last?
- Best enjoyed within 24–48 hours.
- Some fruits like strawberries and bananas can get mushy after a day or two.
- Apples, pineapples, and firmer fruits last a bit longer.
Avoid freezing them—the chocolate will likely crack or develop a weird texture once thawed. If you must make them in advance, prepare the day before and refrigerate.
Serving Suggestions
Now that you’ve got a tray of glossy, mouth-watering chocolate-covered fruit, how do you serve it up? Here are some creative ideas that go beyond just placing them on a plate.
Party Platters
- Arrange on a platter with a mix of dipped and fresh fruits for contrast.
- Use cupcake liners to separate different types or toppings.
- Add cheeses, nuts, and crackers for an upscale dessert board.
Gift Ideas
- Place dipped fruits in decorative boxes or jars.
- Wrap individually in cellophane for party favors or wedding treats.
- Add a handwritten tag for a personal touch—perfect for Valentine’s Day, birthdays, or thank-you gifts.
Romantic Desserts
- Serve with champagne or wine.
- Add a dollop of whipped cream or scoop of vanilla ice cream.
- Light a candle, queue up a playlist, and you’ve got yourself a 5-star date night.
Chocolate-covered fruit isn’t just a dessert—it’s a whole mood.
Healthier Chocolate Covered Fruit Options
You don’t have to sacrifice your diet to indulge. With a few tweaks, you can make this treat as clean or guilt-free as you want.
Use Dark Chocolate
- Choose chocolate with at least 70% cocoa for antioxidants and lower sugar.
- Skip the milk chocolate or use in moderation.
Go Vegan
- Use dairy-free chocolate chips or bars.
- Make sure your toppings (like sprinkles or marshmallows) are vegan-friendly.
Skip the Extras
- Stick with the classic chocolate-dipped fruit without added sugar or toppings.
- Let the natural sweetness of the fruit shine through.
Add Superfoods
- Sprinkle on chia seeds, hemp hearts, or crushed goji berries for a health boost.
- Try cacao nibs instead of regular chocolate chips for crunch and antioxidants.
Healthy doesn’t have to be boring—especially when chocolate is involved.
Common Mistakes to Avoid
Even the simplest recipes can go sideways. Here are some rookie mistakes to steer clear of:
- Not Drying the Fruit Properly
Water ruins melted chocolate. Always pat your fruit completely dry before dipping. - Using Low-Quality Chocolate
Bargain chocolate may seem tempting, but the taste and texture won’t be worth it. - Overheating the Chocolate
Chocolate can burn fast—stir frequently and melt it low and slow. - Dipping Warm Fruit
This makes the chocolate slide right off. Chill fruit in the fridge before dipping. - Storing in a Humid Place
Moisture causes the chocolate to sweat or become sticky. Keep them cool and dry.
Avoiding these common slip-ups can make the difference between a Pinterest fail and a dessert masterpiece.
Cleaning Up Tips
You had fun making them, but now there’s melted chocolate everywhere. No worries—cleaning up doesn’t have to be a drag.
Tips for Easy Cleanup:
- Use parchment paper or a silicone mat from the start—no sticky mess.
- Soak bowls and utensils in warm, soapy water right away.
- Wipe chocolate off counters before it hardens.
- Keep a damp cloth handy during prep to clean hands or surfaces as you go.
- If using a double boiler, let it cool before washing to avoid warping or burns.
A little prep and quick action go a long way when cleaning up a sweet mess.
FAQs about Chocolate Covered Fruit Recipe
1. Can I use frozen fruit for chocolate dipping?
Frozen fruit releases water as it thaws, which makes the chocolate seize and slide off. Always use fresh, firm fruit for best results.
2. What chocolate works best for dipping?
Couverture chocolate or high-quality baking chocolate is ideal. Avoid chocolate chips meant for cookies, as they don’t melt smoothly.
3. How do I stop my chocolate from cracking?
Make sure the fruit is at room temperature when dipping. Cold fruit causes the chocolate to harden too quickly and crack.
4. Can I make chocolate covered fruit ahead of time?
Yes! Make them the day before and store in the fridge. Just be sure to keep them in a single layer to prevent sticking or smudging.
5. What’s the best way to thin chocolate if it’s too thick?
Add 1–2 teaspoons of coconut oil or vegetable oil while melting. It will smooth out the consistency and give a nice glossy finish.
Conclusion
Chocolate covered fruit is that sweet spot between indulgent and healthy, simple and impressive. Whether you’re making them for a special occasion or just because you had a chocolate craving, this treat never disappoints. With the right ingredients, a bit of prep, and a dash of creativity, you can whip up a batch of glossy, delicious dipped fruit in no time.
You now have all the tools and tips you need—from choosing the best chocolate to storing your creations. So go ahead, dip into something delicious and treat yourself (and maybe a lucky someone else) to a dessert that looks fancy but is totally doable at home.


