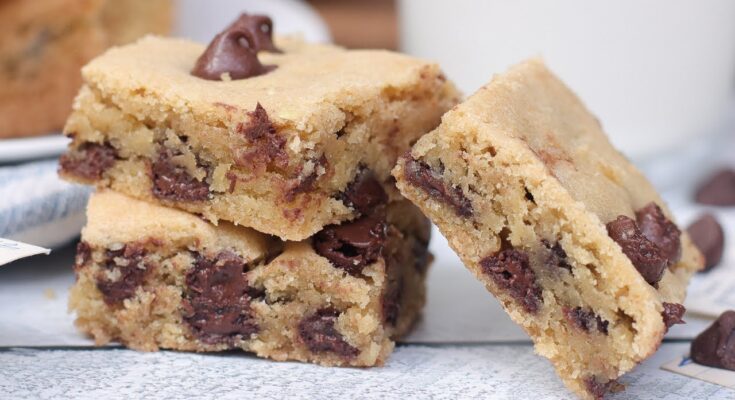
Chocolate Chip Cookie Bar Recipe: Let’s be real—there’s something magical about a fresh batch of warm, gooey chocolate chip cookies. But what if we told you there’s an easier, faster way to get all that cookie goodness in less time and with less effort? Enter: Chocolate Chip Cookie Bars.
These cookie bars are your shortcut to dessert heaven. No need to scoop out dough or swap trays in and out of the oven. You mix, spread, bake, and boom—you’ve got thick, chewy, chocolate-studded bars that’ll have everyone coming back for seconds (and thirds).
Whether you’re baking for a party, prepping for a bake sale, or just craving something sweet, this recipe is your new go-to. Ready to become a cookie bar master? Let’s get started!
Ingredients You’ll Need
Great recipes start with simple, quality ingredients. Here’s your shopping list for the ultimate chocolate chip cookie bars:
Dry Ingredients
- 2 ¼ cups all-purpose flour – Gives the bars structure and chewiness.
- 1 tsp baking soda – Helps the bars rise slightly and get that perfect texture.
- ½ tsp salt – Balances the sweetness.
Wet Ingredients
- 1 cup (2 sticks) unsalted butter, melted and cooled – Melted butter leads to a denser, chewier bar.
- 1 cup packed brown sugar – Adds moisture and rich molasses flavor.
- ½ cup granulated sugar – Gives a little crispness to the edges.
- 2 large eggs – Helps bind the dough and adds richness.
- 2 tsp pure vanilla extract – Enhances the chocolate flavor.
Add-ins
- 2 cups semi-sweet chocolate chips – The star of the show.
- Optional: ½ cup chopped walnuts or pecans – Adds a nice crunch.
- Optional: ½ cup white chocolate or butterscotch chips – For variety and extra sweetness.
Keep your ingredients at room temperature for best results, especially the eggs and butter. This makes mixing easier and ensures even baking.
Tools and Equipment Needed
Before diving into baking, let’s talk about the gear you’ll need. Trust me, having the right tools makes everything smoother:
- Large mixing bowl – To combine all your ingredients in one go.
- Medium bowl – For whisking the dry stuff.
- Measuring cups and spoons – Accuracy matters in baking!
- Whisk or electric hand mixer – Makes creaming butter and sugar a breeze.
- Spatula or wooden spoon – Ideal for folding in chocolate chips.
- 9×13 inch baking pan – The classic size for bars. Glass or metal both work.
- Parchment paper or cooking spray – Prevents sticking and makes cleanup easier.
- Cooling rack – Helps your bars cool evenly without getting soggy bottoms.
Bonus tip: A bench scraper or sharp knife will make cutting perfect squares so much easier!
Prep Work Before You Start
A little prep goes a long way in baking. Here’s what you need to do before mixing begins:
- Preheat your oven to 350°F (175°C). Always bake in a fully preheated oven!
- Line your baking pan with parchment paper or lightly grease it. This prevents sticking and helps you lift the bars out effortlessly.
- Measure out all your ingredients. Precision matters—baking is more science than art.
- Melt the butter in a microwave or saucepan, and let it cool slightly. You want it warm but not hot, or it could cook the eggs.
Now that everything’s ready, let’s get mixing!
Step-by-Step Guide to Making Chocolate Chip Cookie Bars
This is the heart of the recipe. Follow each step carefully, and you’ll be rewarded with chewy, golden-brown bars of perfection.
Step 1: Melt and Cool the Butter
Start by melting your butter completely—either in the microwave (about 45 seconds) or on the stovetop. Let it sit for 5–10 minutes so it’s not hot to the touch. This is key: hot butter can scramble your eggs, and nobody wants that.
Step 2: Mix the Wet Ingredients
In a large mixing bowl, whisk the cooled melted butter with brown sugar and white sugar until smooth and glossy. This helps dissolve the sugar for a better texture. Add in the eggs and vanilla extract, and whisk until everything is fully combined and creamy.
Step 3: Combine the Dry Ingredients
In a separate bowl, whisk together the flour, baking soda, and salt. This ensures even distribution of the leavening agents so you don’t get weird pockets of baking soda.
Step 4: Mix Wet and Dry Together
Add the dry ingredients into the wet, a little at a time. Use a spatula or wooden spoon here instead of a mixer to avoid overmixing. You want to stop as soon as no flour streaks remain. The dough will be thick—don’t worry, that’s exactly what you want.
Step 5: Fold in the Chocolate Chips
Pour in your chocolate chips (and nuts or other add-ins if using), and fold them gently into the dough. Make sure they’re evenly distributed so every bite gets that gooey, chocolatey goodness.
Step 6: Spread Dough in the Pan Evenly
Dump the dough into your prepared pan and spread it out evenly using a spatula or clean hands. Press it into the corners to ensure uniform thickness. Uneven dough = uneven baking.
Step 7: Bake to Golden Perfection
Slide the pan into your preheated oven and bake for 25–30 minutes. You’re looking for golden edges and a slightly underbaked center—it’ll continue to set as it cools. If the top starts browning too quickly, cover it loosely with foil.
Step 8: Cooling and Cutting
Let the bars cool completely in the pan—this takes about 1 hour. It’s hard to wait, but cutting them too soon will make them fall apart. Once cooled, lift them out using the parchment paper and slice into squares.
Tips for the Best Cookie Bars
Want your cookie bars to turn out bakery-perfect every single time? These tried-and-true tips will help you level up your baking game.
Don’t Overmix the Dough
This one’s huge. Once you combine the dry and wet ingredients, mix just until combined. Overmixing activates the gluten in the flour, which leads to tough, dense bars instead of soft and chewy ones. Think gentle folding, not aggressive stirring.
Use Quality Ingredients
When it comes to a simple recipe like this, the quality of your ingredients really shines through. Use real vanilla extract, good quality chocolate chips, and fresh flour and baking soda. You’ll taste the difference.
Room Temperature Ingredients
Especially the eggs! Cold eggs can cause the melted butter to seize and create an uneven dough. Let them sit out for 15-20 minutes before starting.
Don’t Overbake
This might be the #1 reason cookie bars end up dry. They should still look a little soft in the middle when you take them out of the oven. As they cool, they’ll firm up but stay moist and gooey inside.
Cool Completely Before Cutting
We know, it’s hard to wait. But cooling lets the bars firm up, so they cut cleanly and don’t fall apart. Trust the process.
With these simple tips, your cookie bars will go from “yum” to “WOW, did you buy these at a bakery?”
Customization Ideas
Once you’ve mastered the classic recipe, it’s time to get creative. Here’s how you can take your chocolate chip cookie bars to the next level:
Flavor Add-ins
- White chocolate & macadamia nuts – Sweet, buttery, and crunchy.
- Peanut butter swirl – Drop spoonfuls of peanut butter on top before baking, then swirl with a knife.
- M&M’s or candy pieces – Add color and a festive crunch.
- Toffee bits or caramel chunks – Add a rich, buttery sweetness.
Make It Gluten-Free
Swap the regular flour with a gluten-free all-purpose blend (like Bob’s Red Mill or King Arthur). Just make sure it contains xanthan gum or a similar binder to hold things together.
Make It Vegan
No dairy? No problem. Use these substitutions:
- Butter → Vegan butter or coconut oil
- Eggs → Flax eggs (1 tbsp ground flax + 3 tbsp water per egg)
- Chocolate chips → Dairy-free chips like Enjoy Life
The texture might be slightly different, but the flavor is still top-tier.
Holiday Versions
- Pumpkin spice in fall
- Crushed peppermint at Christmas
- Sprinkles and pastel M&M’s for Easter
Cookie bars are like a blank canvas—don’t be afraid to get creative and make them your own!
Storage and Shelf Life
So, you’ve baked a big batch of cookie bars—how do you keep them fresh and tasty? Here’s how:
Room Temperature Storage
- Store in an airtight container at room temp for up to 5 days.
- Place parchment paper between layers to prevent sticking.
- Keep out of direct sunlight or heat to avoid melting the chocolate.
Refrigeration
You can refrigerate them if your kitchen runs warm. Just keep them tightly sealed and bring to room temperature (or microwave for 10-15 seconds) before serving.
Freezing for Later
Want to prep ahead or save leftovers?
- Let bars cool completely.
- Cut into squares.
- Wrap each bar in plastic wrap and place in a freezer-safe zip-top bag or container.
- Freeze for up to 3 months.
To thaw, just leave them on the counter for 1–2 hours, or microwave on low for 20–30 seconds for that fresh-from-the-oven warmth.
Pro tip: Frozen cookie bars make amazing last-minute desserts when guests show up unexpectedly!
Common Mistakes to Avoid
Even the simplest recipes have a few pitfalls. Avoid these rookie mistakes to guarantee sweet success every time:
Overbaking
We’ve said it before, and we’ll say it again: overbaking = dry, crumbly cookie bars. Always check early and use visual cues. If the center looks set and the edges are golden brown, it’s time to pull them out.
Wrong Pan Size
Using a smaller pan (like 8×8) makes the bars thicker and may result in underbaked centers. Too big of a pan and your bars will be thin and crispy. Stick with a 9×13 inch pan for perfect results.
Skipping the Cooling Step
We get it—you’re excited. But cutting too soon ruins the structure and makes the bars fall apart. Cool completely to get clean, professional-looking squares.
Measuring Ingredients Incorrectly
Baking is science, and accuracy matters. Always:
- Spoon and level your flour (don’t scoop directly with the cup).
- Use real measuring spoons—not the eyeball method.
- Double-check conversions if adjusting the recipe.
Using Cold Ingredients
Melted butter + cold eggs = curdled mess. Room temp ingredients blend better and create a smoother batter.
Avoiding these little mistakes will give you more consistent, bakery-quality results every single time.
Why This Recipe Works Every Time
So what’s the secret sauce that makes these cookie bars a no-fail favorite?
- Perfect Ratio of Ingredients: The balance of brown to white sugar, melted butter, and eggs gives these bars that iconic chewy center with crisp edges.
- Simple, Straightforward Process: No stand mixer or fancy techniques needed. Just mix, spread, and bake.
- Customizable Base: The classic version is delicious on its own, but it also works as a foundation for dozens of flavor combos.
- Time-Saving: Skip the dough scooping and batch baking. One pan, one bake, and you’re done.
- Crowd-Pleaser: Whether it’s a family dinner, potluck, or bake sale, these bars get rave reviews every time.
If you’re looking for a foolproof dessert that’s easy to whip up and impossible to mess up, this is it.
Pairing and Serving Suggestions
Once your chocolate chip cookie bars are cooled and cut, the fun doesn’t stop there. Here are some ways to serve them up like a pro and take your dessert game to the next level.
Serve Warm with Ice Cream
This is hands-down the most indulgent way to enjoy these bars. Heat a square in the microwave for 10–15 seconds and top it with a big scoop of vanilla bean ice cream. Add a drizzle of hot fudge or salted caramel, and you’ve got an instant dessert that tastes like it came from a fancy restaurant.
Stack ‘Em High for a Dessert Tower
Hosting a party or holiday dinner? Stack the bars on a tiered tray or dessert platter with alternating layers of parchment or doilies. Add fresh berries or mint sprigs for a touch of color.
Lunchbox Treats or On-the-Go Snacks
Cut the bars into smaller squares or even mini bites, wrap individually in parchment, and toss into lunchboxes or picnic baskets. They hold up well, don’t melt easily, and are kid-approved!
Holiday or Seasonal Trays
These bars are super adaptable. Add seasonal sprinkles, themed candy, or food coloring to fit any occasion:
- Red & green M&Ms for Christmas
- Candy corn for Halloween
- Heart-shaped candies for Valentine’s Day
Put them on a platter with brownies and blondies for a “cookie bar trio” your guests will rave about.
Dip in Coffee or Milk
Just like a good cookie, these bars are perfect for dunking. A warm, gooey bar dipped into hot coffee or cold milk? Absolute heaven.
No matter how you serve them, these cookie bars are guaranteed to disappear quickly!
Nutrition Breakdown (Per Bar)
Let’s take a quick look at the nutrition of a single chocolate chip cookie bar (based on cutting a 9×13 pan into 24 equal squares). Keep in mind, this is just an estimate—it can vary depending on the ingredients and add-ins you choose.
| Nutrient | Amount (Approx.) |
|---|---|
| Calories | 210–240 kcal |
| Total Fat | 11–13g |
| Saturated Fat | 6g |
| Carbohydrates | 28–30g |
| Sugar | 18–20g |
| Protein | 2–3g |
| Sodium | 120–150mg |
If you want to lighten them up, you can try using less sugar, applesauce in place of some butter, or reduced sugar chocolate chips. But hey, it’s dessert—sometimes you just gotta enjoy it as is.
FAQs about Chocolate Chip Cookie Bar Recipe
1. Can I double the recipe?
Yes! You can double the recipe and bake it in a half-sheet pan (18×13 inches). Just keep an eye on the baking time—it may take a bit longer, around 30–35 minutes. Make sure the center is set before pulling it out.
2. What kind of chocolate chips work best?
Semi-sweet chips are the classic go-to, but you can also use milk chocolate for a sweeter bite or dark chocolate for a richer flavor. Want a mix? Use a combo of all three!
3. Can I make this in a different-sized pan?
Absolutely. An 8×8 inch pan will yield thicker bars (bake 35–40 minutes), while a 10×10 pan gives you medium-thickness bars. You can also use a muffin tin to create cookie bar “cups.”
4. How do I make them extra gooey?
Bake them just a few minutes less (around 23–24 minutes) and let them cool for only 20 minutes before cutting in. This gives you a warm, gooey center with just enough structure.
5. Can kids help with this recipe?
Totally! This recipe is super kid-friendly. Let them stir, dump in the chocolate chips, or press the dough into the pan. It’s a fun way to get little hands involved in the kitchen.
Conclusion
There you have it—the ultimate chocolate chip cookie bar recipe, broken down step-by-step so anyone (yes, even total beginners) can bake it like a boss. Whether you stick to the classic version or go wild with your own mix-ins, these bars never fail to impress. They’re thick, chewy, packed with melty chocolate, and so easy to throw together, you might find yourself making them a little too often (if that’s even a thing).
So, next time you’re craving something sweet or need a quick dessert for guests, skip the cookie scoop and grab a 9×13 pan. These cookie bars will become your new signature treat.


