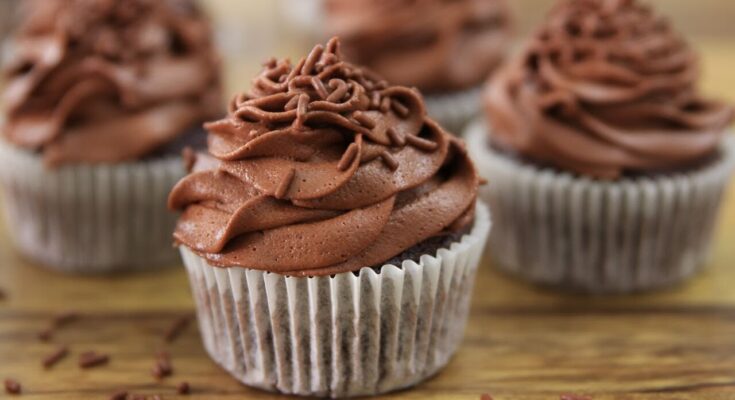
Chocolate Buttercream Recipe: Ever tried to frost a cake and ended up with a runny mess or a gritty paste? Yeah, we’ve all been there. But trust me, a good chocolate buttercream frosting is like the little black dress of baking—it never goes out of style. It’s creamy, rich, and full of deep chocolate flavor that pairs perfectly with everything from vanilla cupcakes to bold chocolate layer cakes. Whether you’re baking for a birthday, a wedding, or just because it’s Tuesday and you need some chocolate, this chocolate buttercream will not let you down.
What makes this recipe stand out is its simplicity and versatility. It’s not one of those overly complicated, chef-level recipes that require a double boiler and candy thermometer. Nope. This is the kind of buttercream anyone can make and master, whether you’re new to baking or you’ve been doing it for years. Ready to dive in?
Ingredients You’ll Need
Alright, let’s talk ingredients. The beauty of buttercream is that it doesn’t require anything fancy. You probably already have most of these in your pantry.
Here’s your shopping list:
- 1 cup (2 sticks) unsalted butter, softened to room temperature
- 3 ½ cups powdered sugar, sifted
- ½ cup unsweetened cocoa powder, sifted
- 2 teaspoons vanilla extract
- 2–4 tablespoons heavy cream (or milk, but cream makes it richer)
- ⅛ teaspoon salt
Let’s break it down a bit so you know why each one matters.
- Unsalted butter is the star. It gives structure and that rich, creamy base. Room temperature is key—cold butter won’t whip right.
- Powdered sugar sweetens and stabilizes the frosting. Sifting it helps prevent lumps.
- Cocoa powder brings the chocolate. Go for Dutch-processed if you want a smoother, deeper flavor.
- Vanilla extract rounds everything out and enhances the chocolate.
- Heavy cream controls the consistency—add a little at a time.
- Salt may seem small, but it balances all that sweetness beautifully.
Don’t substitute margarine or skip the sifting unless you want a gritty, sad frosting. Trust me on this one.
Tools and Equipment
Good news: you don’t need a ton of fancy tools to pull this off. But there are a few things that’ll make your life easier and your buttercream smoother.
Must-Have Tools:
- Electric hand mixer or stand mixer with paddle or whisk attachment
- Large mixing bowl (preferably metal or glass)
- Rubber spatula
- Measuring cups and spoons
- Sifter or fine mesh strainer
Optional but Helpful:
- Offset spatula (for frosting)
- Piping bag and tips
- Kitchen scale (for precise measurements)
- Bench scraper (for clean cake sides)
Using the right tools not only saves time but ensures your buttercream turns out dreamy every time. And if you don’t have a stand mixer? A hand mixer works just fine. You’ll just get a bit more of an arm workout.
Step-by-Step Guide to Make Chocolate Buttercream
Let’s get to the heart of it: how to actually make this chocolatey magic happen. Here’s a foolproof step-by-step guide.
Step 1: Softening the Butter
Take your butter out at least 30–60 minutes before you start. It should be soft but not melting. Press your finger into it—it should leave a dent easily. If you’re in a rush, cut it into cubes and microwave it in 5-second bursts (be careful not to melt it!).
Why this matters: Soft butter is essential for smooth creaming. Too cold and it’ll clump. Too warm and it’ll melt into an oily mess.
Step 2: Sifting the Powdered Sugar and Cocoa Powder
Sift them separately or together into a large bowl. Yes, it’s an extra step, but this ensures no lumps and gives your buttercream that silky texture we all love.
Bonus tip: If your cocoa powder is especially clumpy, press it through a fine mesh strainer with the back of a spoon.
Step 3: Creaming the Butter
Using your mixer, beat the softened butter on medium-high speed for 3–5 minutes until it’s pale, fluffy, and smooth. This step is all about incorporating air for that light, whipped texture.
Don’t rush it. Undermixed butter = dense frosting.
Step 4: Adding the Cocoa Powder and Powdered Sugar Gradually
Turn the mixer to low and add the cocoa powder and powdered sugar ½ cup at a time. Mix after each addition until just combined to avoid a powder explosion. Once everything’s added, turn the mixer to medium-high and beat for another 2–3 minutes.
At this point, the frosting might look stiff or dry. Don’t worry—that’s where the cream comes in.
Step 5: Incorporating the Vanilla Extract and Salt
Add your vanilla and salt. Mix again until well blended. Vanilla deepens the chocolate flavor, and salt balances the sweetness.
Think of it like adding a pinch of magic—it takes the flavor from good to “OMG, what’s in this?”
Step 6: Adjusting the Consistency with Heavy Cream
Now, slowly add 1 tablespoon of heavy cream at a time until your desired consistency is reached. For spreading, you want it a bit thicker. For piping, it should be silky but firm enough to hold shape.
Be cautious—not too much cream or it will get runny fast. You can always add more powdered sugar to thicken if needed.
Step 7: Final Whip for Perfect Fluffiness
Once everything is in, give it one final whip for 2–3 minutes on high. This final mix adds volume, airiness, and makes your buttercream look professionally done.
Done right, it’ll be smooth, spreadable, and hold its shape like a dream.
Tips for Success
Want your chocolate buttercream to be perfect every single time? Here are some tried-and-true tips that professional bakers swear by (and that home bakers should definitely know too).
1. Don’t Skip the Sifting
It might seem like a hassle, but skipping this step often leads to lumps. Sift your powdered sugar and cocoa powder thoroughly for that silky-smooth finish. If you’re skipping the sifting, you’ll be fighting little sugar clumps all the way to your cake.
2. Use Room Temperature Ingredients
Cold butter or cream won’t blend properly and could cause separation or a broken buttercream. Always let your ingredients sit out for a while before starting. You want them soft but not melted.
3. Mix Until It’s Pale and Fluffy
The longer you beat the butter and then the full mix at the end, the lighter your buttercream becomes. This aeration gives you that whipped, cloud-like texture that spreads beautifully.
4. Go Slow with the Cream
It’s tempting to add all your cream at once, especially if the mix looks dry. But go slow—tablespoon by tablespoon. You want control over the texture, especially if you’re planning to pipe designs.
5. Taste as You Go
Everyone’s preference for chocolate intensity or sweetness is different. Don’t be afraid to adjust the cocoa or sugar to suit your taste. Want it darker? Add more cocoa. Too sweet? Add a pinch more salt.
These little tweaks are what turn a good buttercream into your buttercream.
Variations and Add-Ins
Once you’ve mastered the classic chocolate buttercream, you can easily experiment with fun flavor twists. Let’s turn up the creativity dial!
1. Espresso Chocolate Buttercream
Add 1–2 teaspoons of instant espresso powder or finely brewed espresso (be careful with the liquid content). The coffee enhances the chocolate flavor and gives your buttercream a sophisticated, slightly bitter edge. Great for adult cakes or mocha cupcakes.
2. Nutella Chocolate Buttercream
Swap out ¼ cup of butter for ¼ cup of Nutella. This adds a nutty, chocolate-hazelnut twist that’s amazing with vanilla or banana cake. It’s also great for sandwiching cookies.
3. Spicy Mexican Chocolate Buttercream
Add ½ teaspoon cinnamon and a pinch of cayenne pepper to the mix. It gives a warm, spicy note that pairs beautifully with dark chocolate cakes or even chili-infused brownies. It’s unexpected—but in the best way.
You could even stir in crushed Oreos, mint extract, or orange zest if you’re feeling bold. The sky’s the limit here.
Common Mistakes to Avoid
Even the best bakers slip up sometimes. Here are some common pitfalls you’ll want to dodge when making chocolate buttercream.
1. Using Cold Butter
We’ve said it before, but it’s worth repeating: Cold butter won’t cream properly. You’ll end up with a chunky, uneven texture. Always soften your butter fully before starting.
2. Adding All the Sugar at Once
Dumping in your powdered sugar all at once is a one-way ticket to mess-ville. The sugar will puff into the air (and your face) and be much harder to mix evenly. Add it gradually, and mix slowly.
3. Not Tasting as You Go
This is your frosting—make sure it tastes like something you want to eat by the spoonful. If it’s too sweet, a pinch of salt or a little more cocoa powder can save the day.
4. Overmixing After Adding Cream
Too much mixing after the cream is added can make the frosting too soft. Mix until it’s just right—light, fluffy, and smooth.
How to Use Chocolate Buttercream
You’ve made this glorious, rich chocolate buttercream… now what? Don’t just let it sit in a bowl—get creative with how you use it!
1. Frosting Cakes and Cupcakes
This is the obvious one. This buttercream is perfect for spreading on layer cakes or swirling high onto cupcakes. It holds its shape well for piping too, especially if you’ve nailed the consistency.
2. Filling Between Cake Layers
Use it as a filling for cakes, sandwiching it between layers of vanilla, chocolate, or even red velvet. Want to get fancy? Add fresh berries or a layer of ganache between the buttercream.
3. Dipping or Sandwiching Cookies
Try it as a sandwich filling between two chocolate chip cookies or pipe a dollop onto graham crackers for an easy treat. It’s versatile enough to elevate even the simplest dessert.
How to Store Chocolate Buttercream
You’ve made a big batch—awesome. Now, let’s talk storage so your frosting stays fresh and delicious.
Room Temperature
Chocolate buttercream can be stored at room temperature for up to 2 days if your kitchen is cool (around 70°F/21°C). Keep it in an airtight container to avoid drying out.
Refrigeration
If you’re storing it longer, place it in an airtight container and refrigerate for up to a week. Let it come to room temperature before using it again, then re-whip it for a few minutes to bring back the fluffiness.
Freezing
Yes, you can freeze chocolate buttercream! Freeze it in a sealed container for up to 3 months. When ready to use, thaw it overnight in the fridge, then bring it to room temp and re-whip.
Re-whipping Buttercream After Storage
Let’s say you refrigerated or froze your buttercream. It’s going to look a bit stiff, maybe even separated. Don’t worry—it’s totally fixable.
Here’s how to revive it:
- Let it sit at room temperature until soft.
- Beat it on medium-high for 3–5 minutes.
- Add a splash of cream if needed to get it back to silky perfection.
Boom. Like brand new.
Troubleshooting Guide
Too Sweet?
- Add a pinch more salt or a bit of unsweetened cocoa powder.
Too Stiff?
- Add 1 teaspoon of cream or milk at a time and beat until soft.
Too Runny?
- Chill it for 15–20 minutes and re-whip.
- Add more sifted powdered sugar a little at a time.
Grainy Texture?
- This usually means sugar or cocoa wasn’t sifted or the butter was too cold. Try re-whipping it after warming it slightly.
Chocolate Type Alternatives
Cocoa powder is the star in this recipe, but what if you want to experiment with other types of chocolate?
1. Dark Chocolate (Melted)
Melted dark chocolate adds richness and silkiness. Start with 4–6 ounces of cooled melted chocolate added after you cream the butter.
2. Milk Chocolate
Want something a bit sweeter and creamier? Melted milk chocolate will make your buttercream taste like a chocolate bar. Be sure to balance the sweetness by reducing powdered sugar slightly.
3. Semi-Sweet or Bittersweet Chocolate
These are great middle-ground options if you don’t want it too bitter or too sweet. Just melt, cool, and blend in.
Nutrition Information
Let’s be real: buttercream isn’t health food. But a little indulgence is good for the soul.
| Nutrient | Per 2 Tbsp (approx.) |
|---|---|
| Calories | 210 |
| Fat | 14g |
| Saturated Fat | 9g |
| Sugar | 21g |
| Carbohydrates | 23g |
| Protein | 1g |
| Sodium | 30mg |
Allergens: Contains dairy (butter, cream). Make dairy-free substitutions if needed.
FAQs about Chocolate Buttercream Recipe
1. Can I use salted butter instead of unsalted?
Yes, but skip the added salt in the recipe to avoid it being too salty. Adjust to taste.
2. How long can chocolate buttercream sit out?
It can sit at room temperature for up to 2 days. Just keep it covered and away from heat.
3. Can I pipe this buttercream?
Absolutely. This recipe holds its shape well, making it great for piping rosettes, borders, or cupcake swirls.
4. Is it good for layered cakes?
Yes! It’s sturdy enough for stacking and soft enough to spread easily between layers.
5. How much does one batch yield?
Roughly 3 to 4 cups of frosting—enough for 24 cupcakes or a two-layer 8-inch cake.
Conclusion
There you have it—your full-proof, step-by-step guide to making the most delicious, rich, and fluffy chocolate buttercream frosting ever. Whether you’re layering a three-tiered cake or just want a bowl of something sweet to dip strawberries into, this buttercream has got your back. It’s quick, customizable, and will instantly elevate any dessert you pair it with.
So go ahead, grab those beaters and start whipping. Once you taste this homemade chocolate buttercream, there’s no going back to store-bought frosting again.


