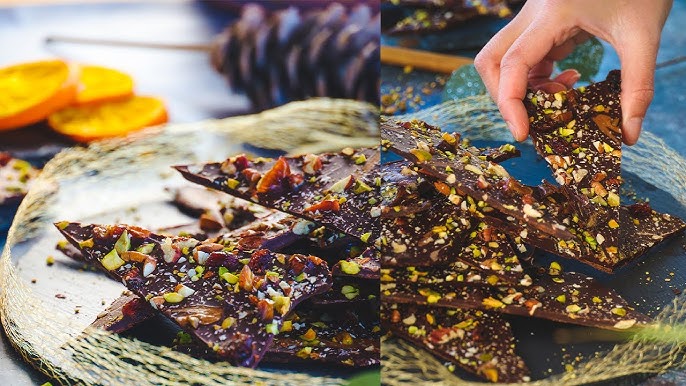
Chocolate Bark Recipe: Chocolate bark is one of those magical, foolproof desserts that look like they took hours to make—but in reality, they come together in just minutes. If you’ve never made it before, you’re in for a treat (literally). It’s a slab of melted chocolate, spread thin, and topped with anything your heart desires—nuts, dried fruit, pretzels, candies, seeds, or a sprinkle of sea salt. Once it sets, you break it into rustic, jagged pieces that are as pretty as they are delicious.
This recipe is perfect for any skill level. Whether you’re a seasoned baker or someone who’s never melted chocolate before, you’ll find this process incredibly satisfying. Plus, it’s a fantastic project to do with kids or as a homemade gift for the holidays. Think of chocolate bark as a blank canvas—you can decorate it however you like.
Benefits of Making Chocolate Bark at Home
Why bother making chocolate bark yourself when you can easily buy it? Well, for starters, the homemade version tastes better—because it’s made with love and personalized to your taste. Here are a few benefits that’ll convince you:
- Custom Flavors: You’re not stuck with store-bought combinations. Love pistachios and cranberries? Go for it. Want a spicy kick with chili flakes and sea salt? No one’s stopping you.
- Healthier Ingredients: When you make your own, you can skip the preservatives, artificial flavors, and excess sugar. Use organic or dark chocolate, throw in some superfoods like chia seeds or goji berries, and you’ve got a healthy(ish) indulgence.
- Budget-Friendly: A few bars of chocolate and some pantry toppings are all you need. It’s way more affordable than those fancy gourmet bark packs at specialty stores.
- Perfect for Gifts: Wrap up a few pieces in a clear bag with a ribbon, and you’ve got a thoughtful homemade gift that feels special and luxurious.
Making your own chocolate bark gives you total control, and that’s always a sweet deal.
Types of Chocolate You Can Use
Not all chocolate is created equal, and the type you use can completely change the flavor and texture of your bark. Here’s a quick rundown:
Dark Chocolate
Perfect for those who love a rich, slightly bitter taste. Look for chocolate that’s at least 60-70% cocoa for that intense flavor. It pairs wonderfully with sweet toppings like dried cherries or sea salt caramel.
Milk Chocolate
Sweeter and creamier, milk chocolate is a classic choice that most people love. It goes well with crunchy toppings like pretzels or roasted almonds.
White Chocolate
Technically not true chocolate (it doesn’t contain cocoa solids), but still a delicious option. It’s creamy and sweet, and acts as a blank canvas for colorful toppings like freeze-dried strawberries or matcha powder.
Vegan or Sugar-Free Chocolate
If you’re following a specific diet, there are plenty of dairy-free and low-sugar chocolate bars on the market. Just make sure it melts well—check the ingredients to avoid chalky texture.
You can even mix two types—swirl dark and white chocolate together for a marble effect that looks stunning and tastes divine.
List of Ingredients You’ll Need
The beauty of chocolate bark is that you don’t need a long list of ingredients. Here’s a basic list to get you started:
Base Ingredients
- Chocolate (dark, milk, white, or a combo) – Use high-quality chocolate bars or baking chips
- Toppings – Choose 3 to 5 of your favorites:
- Nuts (almonds, pistachios, pecans, walnuts)
- Seeds (pumpkin seeds, sunflower seeds, chia)
- Dried fruits (cranberries, apricots, raisins, mango)
- Crushed candies (peppermint, toffee, candy canes)
- Pretzels, cookies, or granola
- Shredded coconut or cocoa nibs
Optional Extras
- Sea salt flakes for a salty-sweet finish
- Spices like cinnamon, nutmeg, or chili powder
- Vanilla or almond extract
- Edible glitter or gold leaf for a festive touch
You can keep it simple or go wild—it’s all up to your taste buds.
Equipment You’ll Need
Don’t worry—no fancy gadgets required here. Just a few basic kitchen tools:
- Baking sheet or tray – Preferably with a rim so nothing spills
- Parchment paper or silicone mat – To prevent sticking
- Double boiler or microwave-safe bowl – For melting your chocolate
- Spatula or offset knife – For spreading the chocolate
- Knife or hands – For breaking the bark once it sets
If you’re planning to make bark often (and you will once you taste it), invest in a silicone mat. It’s reusable, easy to clean, and keeps your bark from sticking.
Prepping Your Ingredients
Before you even think about melting that chocolate, prep everything else. Trust me—it makes the whole process smoother.
- Chop your toppings into bite-sized pieces so they’re easier to eat and stick better to the chocolate.
- Toast your nuts and seeds in a dry pan or oven for a few minutes. It brings out their natural oils and deepens the flavor.
- Get your tray ready by lining it with parchment paper. This step is crucial—you don’t want your bark sticking to the tray like glue.
- Arrange your toppings in bowls so you can sprinkle them quickly while the chocolate is still melty.
Once everything’s prepped, the actual assembly takes just minutes.
Step-by-Step Guide to Making Chocolate Bark
Now comes the fun part—putting it all together! Here’s a simple, foolproof process for making perfect chocolate bark every time.
Step 1: Melting the Chocolate
Chop your favorite chocolate—dark, milk, or white—into small pieces for even melting. Use a double boiler or microwave in 20-second bursts, stirring between each, until silky smooth. Avoid overheating or the chocolate will seize.
Step 2: Pouring and Spreading the Chocolate
Line a baking sheet with parchment paper. Pour the melted chocolate onto it and spread evenly using a spatula to about ¼ inch thick. The smoother, the better—it’ll make for clean, crisp pieces later.
Step 3: Adding the Toppings
While still warm, sprinkle on your choice of toppings: nuts, dried fruits, crushed candy canes, or sea salt. Gently press them into the chocolate so they stick.
Step 4: Letting It Set
Refrigerate for 30–45 minutes or until firm.
Step 5: Breaking into Pieces
Once hardened, remove from the fridge and break into rustic chunks. Store in an airtight container—simple, elegant, and irresistibly sweet!
Flavor Variations You’ll Love
One of the coolest things about chocolate bark? The endless flavor combinations. Here are some crave-worthy ideas to try:
Peppermint Chocolate Bark
- Use dark or white chocolate as your base.
- Top with crushed peppermint candies or candy canes.
- Optional: Add a few drops of peppermint extract to the chocolate before pouring.
Tropical Fruit & Coconut Bark
- Use white chocolate as the base.
- Add dried mango, pineapple, banana chips, and toasted coconut flakes.
- Sprinkle with sea salt for contrast.
Spicy Chili Chocolate Bark
- Use dark chocolate with 70% or more cocoa.
- Add a pinch of cayenne or chili powder while melting.
- Top with crushed red pepper flakes, pistachios, and a drizzle of honey.
Pistachio & Cranberry Bark
- Use milk or dark chocolate.
- Top with chopped pistachios, dried cranberries, and a few sea salt flakes.
You can even go savory-sweet by adding things like bacon bits or crushed pretzels. Just keep experimenting until you find your favorite combo!
Tips for Perfect Chocolate Bark Every Time
Want to make bark like a pro? Follow these tips to level up your results:
- Use high-quality chocolate. Skip candy melts or low-grade chips—they often contain waxes or stabilizers that affect texture and flavor.
- Temper your chocolate if you want a glossy finish and crisp snap. (Optional, but great for presentation.)
- Don’t overheat the chocolate. Whether using a microwave or double boiler, stop heating once most of it is melted—residual heat will melt the rest.
- Avoid moisture. Water can cause chocolate to seize. Make sure bowls, spatulas, and hands are dry.
- Press toppings lightly. Just enough to set them in place without pushing through the chocolate.
Consistency comes with practice, but these small tricks make a huge difference.
How to Store Chocolate Bark
Chocolate bark is surprisingly easy to store and has a great shelf life—if you don’t eat it all first.
- Room Temperature: Store in an airtight container in a cool, dry place. Avoid direct sunlight or heat sources.
- Refrigerator: If your kitchen is warm, refrigerate the bark to prevent melting. Just make sure it’s sealed well to prevent absorbing fridge odors.
- Freezer: Yes, you can freeze bark! Place pieces in a single layer on a baking sheet, freeze for an hour, then transfer to a freezer bag. It lasts for up to 3 months.
Always separate layers of bark with parchment paper to prevent sticking.
How Long Does Chocolate Bark Last?
The shelf life depends on your ingredients, but here’s a general guide:
- Room temperature: 2-3 weeks
- Fridge: Up to 1 month
- Freezer: 2-3 months
If you used dried fruits, nuts, or spices, they’ll stay good longer than fresh or perishable ingredients. Just check for changes in smell, texture, or appearance before eating older batches.
Gifting Chocolate Bark
Homemade chocolate bark makes a perfect gift. It’s easy to make in bulk and looks gorgeous with minimal effort.
- Wrap individual pieces in cellophane bags and tie with a ribbon.
- Use kraft boxes or mason jars for a rustic, homemade vibe.
- Add custom labels or tags with flavor names and ingredients (especially helpful for allergies).
Perfect for:
- Holiday gifts
- Party favors
- Teacher appreciation
- Hostess gifts
- Valentine’s Day treats
People love receiving something edible and made with care—it shows thought and effort.
Is Chocolate Bark Healthy?
Okay, let’s be real—chocolate bark isn’t a superfood, but it’s not junk food either. It totally depends on how you make it. If you’re using dark chocolate with a high cocoa content (think 70% and above), and topping it with nuts, seeds, and dried fruit, you’re actually creating a sweet treat that has some decent nutritional value.
Dark chocolate is loaded with antioxidants, particularly flavonoids, which can help reduce inflammation and improve heart health. Nuts like almonds and pistachios bring healthy fats, protein, and fiber to the table. Seeds like chia and pumpkin add a dose of omega-3s and minerals. And dried fruits? They’re full of natural sugars, vitamins, and a bit of fiber too.
Want to make it even healthier?
- Use unsweetened coconut flakes instead of sweetened ones.
- Skip sugary candies and go for superfoods like goji berries or cacao nibs.
- Use vegan or sugar-free chocolate for dietary preferences.
Of course, moderation is key. Even the healthiest version of chocolate bark is still a treat—but one you can feel a lot better about than store-bought candy loaded with mystery ingredients.
Mistakes to Avoid When Making Chocolate Bark
Even though chocolate bark is easy, a few rookie mistakes can mess up your masterpiece. Here’s what to watch out for:
1. Overheating the Chocolate
We’ve said it before, but it bears repeating: chocolate is delicate. If you heat it too fast or too hot, it will seize or burn. Always melt slowly, and stop once most of it is melted—residual heat will finish the job.
2. Not Using Quality Chocolate
This is one recipe where the quality of your chocolate really shines. Cheap chocolate has added fats and less cocoa, which means it won’t taste as good or melt as nicely. Splurge on the good stuff—you won’t regret it.
3. Overloading with Toppings
We get it—there are SO many tasty options. But if you pile on too much, your bark won’t hold together, and the toppings might fall off after it sets. Less is more. Choose 3-5 toppings max for the best texture and flavor.
4. Not Letting It Set Properly
Don’t rush the setting process. If you try to break it before it’s fully hardened, you’ll end up with a gooey mess. Let it chill in the fridge or at room temperature until it’s completely firm.
5. Skipping the Lining
Don’t forget to line your tray! If you pour melted chocolate directly onto a pan without parchment paper or a silicone mat, it will stick—and trust us, prying it off is NOT fun.
Avoid these pitfalls, and your chocolate bark will turn out amazing every single time.
FAQs about Chocolate Bark Recipe
1. Can I make chocolate bark without parchment paper?
Yes, but it’s not ideal. Parchment paper or a silicone baking mat prevents sticking and makes cleanup easy. If you skip it, the chocolate might bond with the tray, and you’ll struggle to remove it cleanly.
2. What are the best toppings for chocolate bark?
It depends on your taste! Popular options include nuts (like almonds or pistachios), dried fruit (cranberries, mango, apricots), pretzels, candy canes, shredded coconut, and seeds. Get creative, but don’t overload the chocolate.
3. Can I use compound chocolate or candy melts?
You can, but the texture and taste won’t be as rich or smooth as real chocolate. Compound chocolate is easier to melt and doesn’t need tempering, but if you’re after gourmet flavor, stick with high-quality bars or baking chocolate.
4. How do I prevent my toppings from falling off?
Press them lightly into the melted chocolate immediately after sprinkling. Timing is key—do it while the chocolate is still warm and glossy. Once it hardens, toppings will stay in place.
5. Can kids help make chocolate bark?
Absolutely! This is one of the best kitchen activities for kids. It’s safe, fun, and customizable. They can choose toppings, help with sprinkling, and even break the bark into pieces once it sets. Just handle the melting part yourself for safety.
Conclusion
Chocolate bark is one of those rare desserts that checks all the boxes—easy, quick, customizable, and insanely delicious. Whether you’re whipping up a batch for a cozy movie night or crafting gorgeous gifts for the holidays, this simple treat never disappoints. With just a few ingredients and a little creativity, you can create an endless variety of flavors and textures that look as good as they taste.
The best part? There’s no baking involved, no fancy tools required, and the process is so fun you’ll wonder why you haven’t been making chocolate bark your whole life. From nutty and crunchy to fruity and festive, the combinations are limitless—and once you make it yourself, store-bought bark will never compare.
So go ahead, melt some chocolate, raid your pantry, and make a batch (or three). Your sweet tooth will thank you.