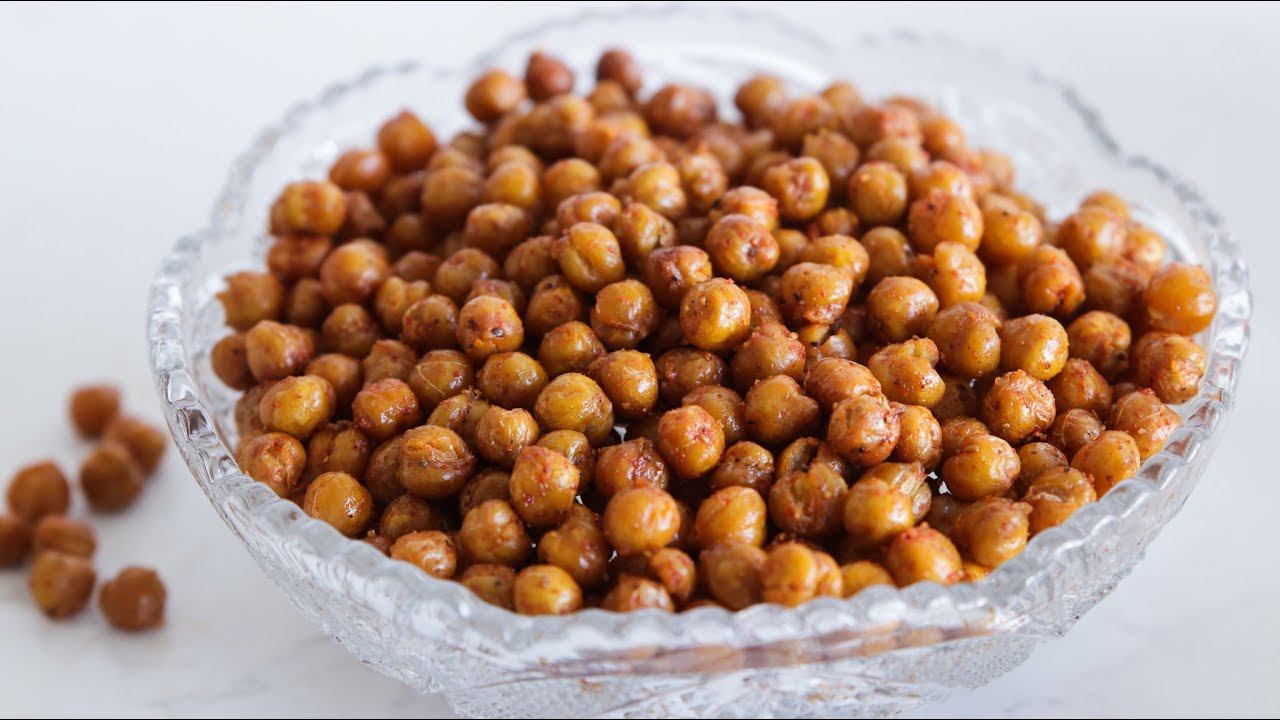
Chickpeas Recipe: If you’re searching for a hearty, healthy, and absolutely delicious recipe that fits just about any diet, look no further than chickpeas. Also known as garbanzo beans, chickpeas are a pantry superhero—they’re affordable, protein-rich, and incredibly versatile. This step-by-step guide will walk you through how to make a mouthwatering chickpea dish that’s perfect for weeknight dinners, meal prep, or impressing guests.
Whether you’re a beginner in the kitchen or a seasoned cook looking for a quick go-to meal, this guide will help you make the best chickpeas of your life. Think creamy texture, rich spices, and that perfect balance of flavor that makes you go back for seconds (or thirds). Ready to get cooking?
Why You’ll Love This Chickpeas Recipe
Let’s be honest—beans aren’t always the most exciting ingredient on the shelf. But chickpeas? They’re the game-changer. This chickpeas recipe is a total win for several reasons:
- Fast and flexible: You can whip this up in under 30 minutes (especially with canned chickpeas).
- Budget-friendly: A cheap meal that feels gourmet? Sign us up.
- Meal-prep heaven: Chickpeas hold up beautifully in the fridge and freezer.
- Nutrient-dense: Packed with fiber, protein, and essential minerals.
- Customizable: You can adjust the spice level, toss in veggies, or make it creamy with coconut milk.
This isn’t your average boring bean dish. With a few pantry staples and some easy techniques, you’ll turn humble chickpeas into a bold and comforting meal. Perfect for busy weeknights, lazy Sundays, or feeding a crowd.
Health Benefits of Chickpeas
Chickpeas don’t just taste amazing—they’re also loaded with health perks:
- High in protein: Great for vegetarians, vegans, and anyone cutting back on meat.
- Full of fiber: Keeps you full longer and supports digestive health.
- Rich in vitamins and minerals: Iron, magnesium, folate, and zinc to name a few.
- Supports heart health: Chickpeas may help lower LDL cholesterol and improve overall cardiovascular health.
- Controls blood sugar: Their low glycemic index means slower sugar absorption.
If you’re looking to eat healthier without sacrificing flavor, chickpeas are the way to go. And this recipe makes them shine.
Types of Chickpeas You Can Use
Chickpeas come in two main types for home cooking: dried and canned. Let’s break down the pros and cons.
Dried Chickpeas
- Pros: Cheaper in bulk, no preservatives, better texture and taste when freshly cooked.
- Cons: Need soaking (overnight or quick soak) and take longer to cook.
Canned Chickpeas
- Pros: Super convenient, ready to use, still taste great.
- Cons: Slightly more expensive per serving, sometimes contain added salt or preservatives.
Both work perfectly for this recipe, but if you want that next-level flavor and texture, cooking dried chickpeas from scratch is worth it.
Ingredients You’ll Need
Ready to gather your ingredients? Here’s everything you need to create this flavorful chickpea masterpiece.
Basic Ingredients
- 2 cups cooked chickpeas (or 1 can, drained and rinsed)
- 1 medium onion, finely chopped
- 3 cloves garlic, minced
- 1-inch piece of ginger, grated
- 2 tablespoons olive oil
- 1 teaspoon cumin seeds
- 1 teaspoon ground coriander
- 1/2 teaspoon turmeric powder
- 1/2 teaspoon paprika or chili powder
- 1/2 teaspoon garam masala (optional but amazing)
- Salt and pepper, to taste
- 1 large tomato, chopped (or 1/2 cup canned crushed tomatoes)
- 1/2 cup water or vegetable broth
- Fresh cilantro, for garnish
- Lemon wedges, for serving
Optional Flavor Boosters
- Coconut milk – for a creamy twist
- Spinach or kale – to sneak in greens
- Lemon zest – adds brightness
- Crumbled feta or yogurt (if not vegan) – balances spice with creaminess
Don’t worry if you don’t have everything—this recipe is forgiving and adaptable.
Kitchen Tools You’ll Need
You don’t need anything fancy to make this recipe shine. Just grab:
- Medium to large non-stick skillet or sauté pan
- Wooden spoon or spatula
- Cutting board and knife
- Grater for ginger (optional but helpful)
- Measuring spoons and cups
Got a Dutch oven or heavy-bottomed pan? Even better—these hold heat well and cook evenly.
Preparing Chickpeas: Soaking and Cooking Tips
If you’re using dried chickpeas, preparation is key. Here’s how to handle them like a pro.
Soaking Dried Chickpeas
Soaking softens the chickpeas and reduces cooking time:
- Overnight Soak: Place 1 cup dried chickpeas in a large bowl. Cover with 3 cups water. Let sit overnight.
- Quick Soak: Boil chickpeas in water for 5 minutes, turn off heat, and soak for 1 hour.
Always rinse chickpeas before and after soaking.
Cooking Chickpeas from Scratch
- Drain soaked chickpeas.
- Place in a pot with water (3:1 water to chickpeas).
- Add a pinch of salt and a bay leaf (optional).
- Simmer for 1 to 1.5 hours, until tender but not mushy.
Let them cool before using in the recipe. You can even make a big batch and freeze the rest for later!
Step-by-Step Guide to Making Chickpeas
Let’s get to the main event—cooking up this flavorful chickpeas recipe! Follow these steps for the best results.
Step 1: Prepping the Chickpeas
If using dried chickpeas, soak them overnight in plenty of water to soften. Drain and rinse before cooking. If using canned chickpeas, simply rinse and drain to remove excess sodium.
Step 2: Sautéing Aromatics
In a large pot or skillet, heat olive oil over medium heat. Add chopped onions, minced garlic, and a bit of grated ginger. Cook until the onions turn translucent and fragrant—this forms the flavorful base of your dish.
Step 3: Spicing It Up
Sprinkle in cumin, turmeric, paprika, and a pinch of chili powder. Stir for 30 seconds to bloom the spices, releasing their deep aroma and color.
Step 4: Simmering to Perfection
Add the chickpeas along with chopped tomatoes or a bit of tomato paste. Pour in some vegetable broth or water and let it simmer for 20–25 minutes until thickened and the flavors blend beautifully.
Step 5: Final Adjustments and Garnish
Season with salt and pepper, drizzle with lemon juice, and garnish with fresh cilantro or parsley. Serve warm with rice, flatbread, or as a hearty side dish—simple, nutritious, and full of comfort.
Flavor Variations You Can Try
Chickpeas are like a blank canvas—they soak up whatever flavor you throw their way. Here are a few easy twists to keep things exciting.
Spicy Chickpeas
Craving a kick? Add:
- 1 teaspoon cayenne pepper or red chili flakes
- A chopped green chili sautéed with the onions
- Smoked paprika for heat and depth
Pair with a cooling side like cucumber raita or mint yogurt sauce.
Coconut Curry Chickpeas
Transform your dish into a creamy curry by adding:
- ½ to 1 cup full-fat coconut milk after adding chickpeas
- 1 teaspoon curry powder or Thai red curry paste
- A touch of brown sugar to balance the spice
Serve with jasmine rice for a tropical twist.
Lemon-Herb Chickpeas
Go light and Mediterranean with:
- Zest and juice of 1 lemon
- 1 teaspoon dried oregano or thyme
- Crumbled feta and olives for topping (optional)
This version tastes amazing cold as a salad too!
How to Store Leftover Chickpeas
Got leftovers? Lucky you—this dish tastes even better the next day!
- Refrigerate: Let the chickpeas cool, then store them in an airtight container for up to 5 days.
- Freeze: Portion into freezer-safe bags or containers and freeze for up to 3 months. Label with the date so you don’t forget.
Tip: Freeze in individual servings to make meal prep easier.
When reheating, you might need to add a splash of water or broth to loosen the sauce. The flavor will be more intense (and usually better) after resting.
How to Reheat Chickpeas Properly
You want your chickpeas warm and flavorful—not mushy or dry. Here’s how to bring them back to life:
Stovetop Method (Best for taste & texture)
- Place in a skillet over medium heat.
- Add a splash of water or broth.
- Stir occasionally until heated through (5–7 minutes).
Microwave Method (Fastest)
- Place in a microwave-safe bowl.
- Cover with a lid or plate (to avoid splatters).
- Microwave on high in 30-second bursts, stirring in between.
Avoid overheating, especially in the microwave—it can dry out the sauce or make the chickpeas rubbery.
What to Serve with Chickpeas
This dish is super versatile and goes with just about anything. Here are some delicious serving suggestions:
- Steamed rice – Basmati or jasmine rice is perfect for soaking up the sauce.
- Naan or pita bread – Scoop it up and enjoy every bite.
- Roasted veggies – Cauliflower, carrots, or zucchini pair beautifully.
- Quinoa or couscous – A protein-rich option for a complete meal.
- Simple salad – A side of greens adds freshness and crunch.
You can also toss chickpeas over pasta, mash them into wraps, or pile them onto toast for a savory breakfast.
Vegan and Gluten-Free Options
Good news—this recipe is naturally vegan and gluten-free! But if you’re adding extras, here’s what to keep in mind:
Vegan-Friendly Tips
- Use coconut milk or plant-based yogurt for creaminess.
- Skip dairy-based garnishes like feta.
- Add nutritional yeast for a cheesy flavor without the cheese.
Gluten-Free Tips
- Double-check canned chickpeas and spices for hidden gluten.
- Serve with gluten-free grains like rice, quinoa, or GF flatbreads.
This dish fits a wide range of dietary needs without sacrificing an ounce of flavor.
Tips for Cooking Chickpeas Like a Pro
Want to take your chickpea game to the next level? These pro tips will help:
- Toast your spices – Always toast spices in oil before adding liquids. It brings out their full flavor.
- Don’t skip aromatics – Garlic, ginger, and onion are the holy trinity of flavor.
- Let them rest – Like a good stew, chickpeas taste better after sitting for a bit.
- Use broth instead of water – Adds depth and richness to your sauce.
- Batch cook dried chickpeas – Store them in the freezer for fast meals later.
- Balance your dish – A splash of lemon or vinegar at the end brightens everything up.
- Customize as you go – Adjust spices to your liking. Taste constantly and trust your instincts.
FAQs about Chickpeas Recipe
1. What if I forgot to soak the chickpeas?
No worries! Use the quick soak method: boil chickpeas for 5 minutes, turn off the heat, and soak for 1 hour. Or, use canned chickpeas as a convenient alternative.
2. Can I freeze cooked chickpeas?
Absolutely! Cooked chickpeas freeze well. Just cool them completely, portion into freezer bags or containers, and freeze for up to 3 months.
3. How long do chickpeas last in the fridge?
Cooked or prepared chickpeas can be refrigerated in an airtight container for 4–5 days. Reheat with a splash of water or broth to bring them back to life.
4. What dishes can I make with leftover chickpeas?
Tons! Try chickpea salad, hummus, wraps, chickpea burgers, stir-fries, or even toss them into pasta or soups. They’re incredibly versatile.
5. Can I use chickpea flour instead?
Chickpea flour is great—but it’s used differently. It’s perfect for making socca (flatbread), pancakes, fritters, or thickeners, but not a direct substitute in this cooked chickpea recipe.
Conclusion
There you have it—a complete, foolproof, step-by-step guide to making the most flavorful chickpeas you’ve ever tasted. Whether you’re cooking from scratch or using canned beans for convenience, this dish is nourishing, satisfying, and totally customizable to your taste.
It’s perfect for weeknight dinners, lunchboxes, potlucks, or when you just want something hearty and healthy without spending hours in the kitchen. Plus, it’s budget-friendly, meal-prep friendly, and guaranteed to please vegans and meat-lovers alike.
So grab those chickpeas, fire up the stove, and let your kitchen fill with the warm, spicy aromas of something truly delicious.