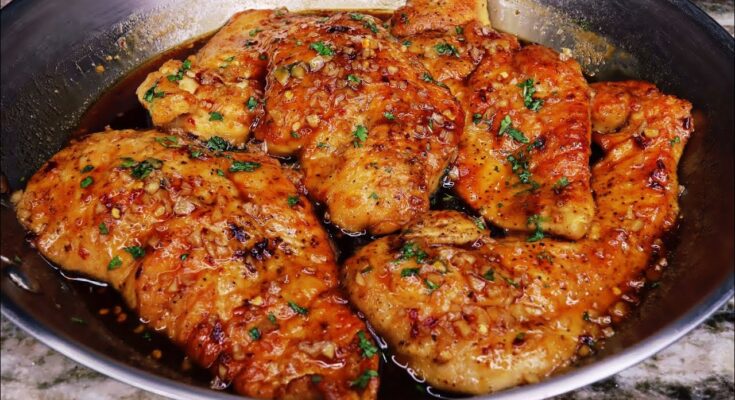
Chicken Breast Meat Recipe: Chicken breast is one of those go-to ingredients that almost everyone has in their fridge or freezer. It’s lean, packed with protein, and crazy versatile—you can grill it, bake it, fry it, or shred it for salads, wraps, or pasta dishes. But let’s be honest, chicken breast also has a bad rep for being dry and bland when cooked wrong. That’s exactly why this guide exists.
Whether you’re cooking for the first time or want to master your weeknight dinners, this step-by-step chicken breast recipe guide is your best bet. We’re diving deep into the ingredients, prep tips, cooking methods, and all the little chef secrets that’ll have you making juicy, flavorful chicken breasts every single time. From the pan to the plate, we’ve got you covered.
List of Ingredients You’ll Need
Getting the ingredients right is half the battle. You don’t need a pantry full of exotic spices—just some basics that are probably already in your kitchen. Here’s a list of essentials, along with optional add-ons if you want to go gourmet.
Main Ingredients
- 2 boneless, skinless chicken breasts
- 2 tablespoons olive oil or any neutral oil (like avocado or canola)
- Salt (kosher or sea salt preferred)
- Freshly ground black pepper
Optional Flavor Boosters
- Garlic powder or fresh minced garlic
- Onion powder
- Smoked paprika
- Italian seasoning or dried herbs (thyme, rosemary, oregano)
- Lemon juice or zest
- Soy sauce or Worcestershire for depth
- Chili flakes or cayenne pepper for heat
Marinade Base (Optional but Recommended)
- 1/4 cup olive oil
- Juice of 1 lemon
- 1 tablespoon Dijon mustard or yogurt
- 2 garlic cloves, minced
- Salt and pepper to taste
Kitchen Equipment
- Cutting board and sharp knife
- Meat mallet or rolling pin (for pounding)
- Non-stick skillet, oven-safe dish, or grill
- Tongs or spatula
- Instant-read meat thermometer
- Ziplock bags or glass bowl for marinating
Having these ingredients and tools ready before you start cooking can make the whole process a breeze. The best part? Most of them are pantry staples.
Choosing the Right Chicken Breast
Not all chicken breasts are created equal. You want to start with quality meat if you expect quality results. Let’s talk about what to look for when picking your chicken.
Boneless vs. Bone-In
Boneless chicken breasts are the easiest to work with. They cook faster and are ideal for quick meals. Bone-in breasts can be juicier and more flavorful, but they take longer to cook and need more care.
Organic or Free-Range Options
Organic, hormone-free, and antibiotic-free chicken is worth the investment. Not only is it more ethically raised, but the taste and texture are often noticeably better.
How to Check Freshness
Always check:
- Color: Should be pink, not gray
- Smell: Should have no odor or only a very mild raw smell
- Texture: Should feel firm, not slimy
If it fails any of those tests, don’t risk it. Always cook fresh for best results, but frozen is fine too—just make sure it’s completely thawed before cooking.
Prepping the Chicken Breast
Proper prep is the secret to perfectly cooked chicken. This step is often rushed, but it sets the tone for your entire dish.
Trimming
Use a sharp knife to trim off any excess fat, tendons, or that white strip of connective tissue (the tendon). Leaving it on can make the chicken chewy.
Pounding for Even Thickness
Here’s a trick every chef uses: Place your chicken breast between two pieces of plastic wrap or in a ziplock bag, then pound it with a meat mallet or rolling pin. Aim for even thickness (about ¾ inch) so it cooks evenly. No one wants a half-raw, half-dry chicken breast.
Washing Chicken: Yes or No?
This is controversial. According to the USDA, washing raw chicken is unnecessary and potentially dangerous—it can spread bacteria around your kitchen. Just pat it dry with paper towels instead.
Marinade Options for Maximum Flavor
Marinating chicken breast can take it from “meh” to mouthwatering. If you’ve ever wondered why restaurant chicken tastes better—it’s likely because they marinate it for hours beforehand. Marinades not only infuse flavor but also help keep the chicken moist and tender.
Basic Marinade Components
A good marinade needs four key parts:
- Fat – usually an oil like olive oil or yogurt. Helps carry flavor and keep meat juicy.
- Acid – lemon juice, vinegar, or yogurt. This breaks down proteins for tenderness.
- Salt – helps flavor penetrate deep into the meat.
- Flavorings – herbs, garlic, spices, soy sauce, mustard, honey, etc.
Popular Marinade Combos
1. Olive Oil & Herb Marinade
- 1/4 cup olive oil
- 2 garlic cloves (minced)
- 1 tsp dried oregano
- 1/2 tsp salt
- Juice of 1 lemon
2. Spicy Yogurt Marinade
- 1/2 cup plain Greek yogurt
- 1 tbsp chili powder
- 1 tsp cumin
- 1 tsp garlic powder
- Salt & pepper to taste
3. Lemon-Garlic Marinade
- Juice and zest of 1 lemon
- 2 tbsp olive oil
- 2 cloves garlic, minced
- 1 tsp thyme
- Dash of cayenne
Marinade Tips
- Marinate for at least 30 minutes, but 2–4 hours is ideal.
- Refrigerate while marinating.
- Don’t reuse marinade unless you boil it first.
- Pat the chicken dry before cooking to help it sear better.
Trust me, once you start marinating your chicken, you’ll never go back to plain salt and pepper.
Dry Rub Seasoning Options
Short on time or don’t want the mess of a marinade? A dry rub is your best friend. It’s quick, flavorful, and still delivers a delicious crust.
What Is a Dry Rub?
A dry rub is a blend of spices and herbs that coat the surface of the chicken. It enhances flavor and creates a tasty outer layer when cooked.
Basic Dry Rub Recipe
- 1 tsp salt
- 1 tsp paprika
- 1/2 tsp garlic powder
- 1/2 tsp onion powder
- 1/4 tsp black pepper
Other Dry Rub Variations
Cajun-Style Rub
- 1 tsp cayenne
- 1 tsp smoked paprika
- 1/2 tsp thyme
- 1/2 tsp oregano
- 1/2 tsp black pepper
Lemon-Pepper Rub
- 1 tsp lemon zest (dried or fresh)
- 1/2 tsp cracked black pepper
- 1/2 tsp garlic powder
- Pinch of sea salt
Tips for Applying Rubs
- Pat the chicken dry with paper towels.
- Use your hands to massage the rub into all sides.
- Let it sit at room temperature for 15–20 minutes before cooking for deeper flavor.
Whether you go the dry or wet route, seasoning is key. Undersalted chicken is like unsweetened chocolate—it just doesn’t work.
Cooking Methods: Which One to Choose?
How you cook your chicken breast makes a huge difference in the final result. Each method has its perks, depending on what you’re craving.
1. Pan-Searing
Best for: A quick meal with a flavorful crust
Time: 8–12 minutes
Texture: Crispy on the outside, juicy inside
2. Baking in the Oven
Best for: Cooking in bulk or when multitasking
Time: 20–30 minutes at 400°F (200°C)
Texture: Evenly cooked, less crispy
3. Grilling
Best for: BBQ lovers or smoky flavors
Time: 6–8 minutes per side
Texture: Charred outside, juicy inside
4. Sous Vide
Best for: Perfect doneness, maximum juiciness
Time: 1–2 hours at 140°F (60°C)
Texture: Tender and juicy
How to Choose?
- If you want a fast weeknight dinner → Pan-searing
- If you’re meal-prepping for the week → Baking
- If you’re entertaining outdoors → Grilling
- If you’re a perfectionist → Sous vide
Now let’s walk through how to cook chicken breast step-by-step using the most common methods.
Step-by-Step: Pan-Seared Chicken Breast Recipe
Pan-searing is my go-to method when I want flavorful chicken with that golden, crispy exterior. Here’s how to do it like a pro:
Step 1: Preheat the Skillet
Use a cast iron or heavy-bottomed skillet. Heat it over medium-high heat for about 3–5 minutes until it’s hot enough that water sizzles.
Step 2: Add Oil and Chicken
Add 1–2 tablespoons of oil. Place the chicken breasts in the pan smooth side down. You should hear a sizzle!
Step 3: Sear Both Sides
Sear for about 5–6 minutes without touching. Flip and cook the other side for another 5–6 minutes. Use tongs, not a fork, to keep juices in.
Step 4: Lower Heat & Cook Through
If the outside browns too fast, lower the heat to medium. You can cover the pan loosely with a lid to help the inside cook evenly.
Step 5: Check Internal Temperature
Use a meat thermometer. You’re aiming for 165°F (74°C) in the thickest part. If you don’t have a thermometer, cut into the thickest part—the juices should run clear.
Step 6: Rest Before Slicing
Remove from pan and let it rest for 5–10 minutes on a plate. This helps redistribute juices and prevents dryness.
Step-by-Step: Oven-Baked Chicken Breast Recipe
Oven-baking is foolproof and perfect for batch cooking. Here’s your step-by-step:
Step 1: Preheat the Oven
Set your oven to 400°F (200°C). A hot oven ensures the chicken cooks fast without drying out.
Step 2: Prep the Chicken
Place seasoned or marinated chicken breasts in a greased or parchment-lined baking dish. Don’t overcrowd the pan.
Step 3: Add Moisture
Add a few lemon slices, a drizzle of oil, or a splash of chicken broth to keep the meat moist while baking.
Step 4: Bake
Cook for 20–25 minutes, depending on thickness. Use a meat thermometer to check for 165°F (74°C) internal temp.
Step 5: Let It Rest
Remove from the oven, cover loosely with foil, and rest for 5–10 minutes before slicing.
Baking is especially great for making multiple servings at once without babysitting the stove.
Step-by-Step: Grilled Chicken Breast Recipe
There’s just something magical about grilled chicken—the smoky aroma, the seared grill marks, and that juicy bite. Grilling is ideal when you’re aiming for bold flavors and a charred finish. Here’s how to master it.
Step 1: Preheat the Grill
Whether you’re using a gas or charcoal grill, make sure it’s properly preheated. You want the temperature to be medium-high, around 375–450°F (190–230°C). Let it heat for at least 10–15 minutes before cooking.
Step 2: Oil the Grates
This prevents sticking and helps get those beautiful grill marks. Dip a folded paper towel in a little oil, grab it with tongs, and rub it across the hot grates.
Step 3: Season the Chicken
Use a dry rub or marinate your chicken beforehand. Pat the chicken dry so it sears well on the grill. Remember: moisture is the enemy of browning.
Step 4: Grill the Chicken
Place the chicken breasts on the grill, smooth side down. Cook for 5–7 minutes on the first side without moving them—this helps get that golden crust. Flip and cook for another 5–6 minutes.
If the chicken is thick, consider indirect heat or finishing it on a cooler part of the grill. You can also close the lid for more even cooking.
Step 5: Check Temperature
Use a thermometer to ensure the internal temperature hits 165°F (74°C). It’s the only way to guarantee it’s cooked perfectly.
Step 6: Rest and Serve
Let your grilled chicken rest for 5–10 minutes. Then slice it against the grain for maximum tenderness.
Grilled chicken breast is perfect for BBQ nights, summer salads, or slicing into sandwiches. The flavor is unbeatable when done right.
Step-by-Step: Sous Vide Chicken Breast
Sous vide might sound fancy, but it’s one of the most foolproof ways to get ultra-juicy, never-overcooked chicken every single time. It’s especially great if you’re meal-prepping or chasing perfection.
Step 1: Prep the Chicken
Season your chicken breasts as you like—simple salt and pepper or with herbs, lemon slices, and garlic. Place them in a vacuum-seal bag or a ziplock bag using the water displacement method.
Step 2: Set Up the Sous Vide
Set your sous vide precision cooker to 140°F (60°C) for tender, juicy chicken. Lower the bag into the preheated water bath.
Step 3: Cook
Let it cook for 1.5 to 2 hours. The beauty of sous vide is that time isn’t as strict—it won’t overcook!
Step 4: Sear to Finish
Once done, take the chicken out of the bag and pat it dry thoroughly. Heat a skillet with a little oil and sear both sides for 1–2 minutes until golden brown. This gives you the crispy outside that sous vide alone can’t.
Step 5: Rest and Slice
As with all methods, let it rest before slicing. You’ll be blown away by how tender it is—like cutting through butter.
Sous vide may take more time, but it’s hands-down the most reliable method for perfect chicken breasts every time.
Checking for Doneness Without Overcooking
Overcooked chicken breast? We’ve all been there. Dry, chewy, and flavorless. But undercooked? That’s a food safety risk. Here’s how to get it just right every time.
Use a Meat Thermometer (Highly Recommended!)
- Insert into the thickest part of the breast
- Target temp: 165°F (74°C)
- Pull at 160°F (71°C) and let it rest—it will rise to 165°F as it rests
Visual Cues
- Juices should run clear, not pink
- Inside should be white or slightly opaque, never raw or translucent
Touch Test
- Press the center of the breast with your finger or tongs
- It should feel firm but still springy—not mushy (undercooked) or rock hard (overcooked)
Mastering doneness is the difference between just eating and actually enjoying your meal.
Slicing and Serving Suggestions
You didn’t do all that hard work just to mess up the final step. Slicing and serving your chicken breast properly makes a huge difference in taste and presentation.
How to Slice Chicken Breast
- Let it rest 5–10 minutes
- Use a sharp knife
- Slice against the grain for maximum tenderness
- Cut into even strips or cubes depending on how you’re serving it
Serving Ideas
- Sliced over salad with vinaigrette and veggies
- In a wrap or sandwich with lettuce and aioli
- With sides like roasted potatoes, rice, or steamed veggies
- Tossed in pasta with creamy or tomato-based sauces
- As part of a meal prep bowl with grains, greens, and dressing
You can transform plain chicken breast into a restaurant-worthy dish just by how you serve it. Presentation matters!
Storage and Reheating Tips
Cooked chicken breast stores really well, making it ideal for meal prep. But you have to store and reheat it the right way to keep it from drying out.
Storage Guidelines
- Store in an airtight container
- Keep in the fridge for up to 4 days
- Freeze for up to 3 months (slice or shred first for easy use later)
Best Ways to Reheat
- Microwave: Add a damp paper towel over the chicken to retain moisture. Use 30-second bursts.
- Oven: Wrap in foil and bake at 325°F (160°C) until heated through.
- Stovetop: Reheat in a covered skillet with a splash of broth or water.
What to Avoid
- Don’t reheat multiple times
- Don’t microwave uncovered—this dries it out
- Don’t skip resting after reheating
Proper reheating = juicy leftovers. Trust the process.
Mistakes to Avoid When Cooking Chicken Breast
Even the most well-intentioned cook can end up with rubbery, dry, or flavorless chicken breast. The good news? These issues are totally avoidable once you know what to watch for. Here are the most common mistakes people make—and how to sidestep them every time.
1. Overcooking the Chicken
This is the number one reason your chicken turns out dry. Chicken breast is lean, so it doesn’t have much fat to keep it moist. Overcooking pulls out all the moisture and leaves you with chewy meat.
Fix it:
Use a meat thermometer. Don’t guess. Once it hits 160°F (71°C), pull it off the heat and let it rest. The carryover heat will bring it to the safe 165°F.
2. Skipping the Resting Period
Cutting into chicken right after it’s done cooking is a rookie move. Resting allows the juices to redistribute throughout the meat instead of running out all over your cutting board.
Fix it:
Always rest your chicken for 5–10 minutes before slicing.
3. Not Seasoning Enough
Underseasoned chicken is just boring. Salt is your friend—it enhances the natural flavor of the meat. And herbs and spices add depth and personality.
Fix it:
Season both sides generously. If you’re marinating, let it sit long enough to actually soak up the flavor—at least 30 minutes, ideally a few hours.
4. Cooking Cold Chicken
Throwing cold chicken straight from the fridge into a hot pan or oven? Big mistake. It cooks unevenly and often results in dry or raw spots.
Fix it:
Let the chicken sit at room temperature for about 15–20 minutes before cooking. This promotes even cooking.
5. Using the Wrong Cooking Method
Chicken breast isn’t one-size-fits-all. The wrong method can mean either an underwhelming or completely ruined dish.
Fix it:
Match the cooking method to your goal. Want speed? Go with pan-searing. Want hands-off meal prep? Bake it. Want restaurant-level tenderness? Try sous vide.
Avoid these common pitfalls, and you’ll elevate your chicken breast game from forgettable to fantastic.
Healthy Chicken Breast Meal Ideas
Chicken breast is a blank canvas for healthy meals. It’s low in fat, high in protein, and works well in just about any dish. Whether you’re meal prepping or just trying to eat clean, here are some easy and delicious ideas.
1. Low-Carb Chicken Meal Prep Bowl
- Grilled chicken breast (sliced)
- Cauliflower rice
- Roasted broccoli or asparagus
- Avocado slices
- Drizzle of olive oil and lemon juice
This is a keto-friendly, high-protein meal that keeps you full without the carb crash.
2. Chicken & Veggie Stir-Fry
- Thinly sliced chicken breast
- Bell peppers, carrots, broccoli
- Garlic and ginger
- Low-sodium soy sauce or coconut aminos
- Serve over brown rice or quinoa
Quick, colorful, and perfect for weeknights. Use sesame oil for added flavor.
3. Grilled Chicken Salad
- Mixed greens (spinach, arugula, romaine)
- Grilled or baked chicken breast (sliced)
- Cherry tomatoes, cucumber, red onion
- Feta cheese or goat cheese
- Olive oil and balsamic vinaigrette
It’s fresh, filling, and easy to toss together for lunch or dinner.
4. Chicken Wraps
- Whole grain or low-carb wrap
- Shredded or sliced chicken breast
- Hummus or Greek yogurt spread
- Lettuce, tomato, and red onion
- Optional: hot sauce or tzatziki
Perfect for grab-and-go meals and school or work lunches.
5. Protein-Packed Chicken Pasta
- Whole wheat pasta or chickpea pasta
- Diced cooked chicken breast
- Spinach, mushrooms, and tomatoes
- Olive oil and garlic
- Sprinkle of Parmesan cheese
Comfort food with a healthy twist. Great for feeding the whole family.
With just a little planning, chicken breast can become the foundation of a week’s worth of satisfying and nutritious meals.
FAQs about Chicken Breast Meat Recipe
1. How long should I marinate chicken breast?
For best results, marinate for at least 30 minutes, but ideally 2–4 hours. Some marinades can be left overnight, but anything with high acid (like lemon juice or vinegar) shouldn’t exceed 8 hours, or the chicken can get mushy.
2. Can I freeze cooked chicken breast?
Yes! Let the chicken cool completely, then wrap tightly in foil or place in an airtight container or freezer bag. It’ll keep in the freezer for up to 3 months. For best texture, thaw overnight in the fridge before reheating.
3. Why is my chicken always dry?
It’s likely being overcooked. Use a meat thermometer and remove the chicken when it hits 160°F (71°C), then rest it. Also, avoid reheating in the microwave without moisture.
4. What’s the best oil to use for cooking chicken?
Use neutral oils with a high smoke point like avocado oil, grapeseed oil, or light olive oil. Avoid butter or extra virgin olive oil for high-heat cooking, as they burn easily.
5. How do I cook chicken breast for meal prep?
Baking or sous vide are best for meal prep. Cook several breasts at once, slice or shred, and portion into containers with different veggies, grains, or sauces for variety throughout the week.
Conclusion
Cooking chicken breast doesn’t have to be a gamble. Once you understand the fundamentals—seasoning, cooking method, internal temperature, and resting—you’re well on your way to making perfect chicken every time. Whether you’re pan-searing it on a busy weeknight, baking it for meal prep, or grilling it on the weekend, you now have all the tools to get it right.
Try different marinades. Experiment with spices. Switch up your sides. Chicken breast might be basic, but the ways to make it exciting are endless.
And remember: great cooking isn’t just about following recipes—it’s about building confidence. The more you cook chicken breast, the better you’ll get at knowing what works for your taste and lifestyle.
So grab that cutting board, turn up the heat, and make something amazing tonight. You’ve got this.


