Caramels Recipe: Is there anything more satisfying than biting into a soft, buttery piece of homemade caramel? Probably not. Making caramels at home isn’t just fun—it’s downright magical. You start with just a few humble ingredients, and through the alchemy of heat and timing, you end up with golden, chewy squares of joy. Whether you’re a seasoned home baker or just starting out, this step-by-step caramel recipe will guide you through everything—from ingredients to wrapping—so your homemade caramels turn out perfect every single time.
Why Homemade Caramels Are Better Than Store-Bought
You might be wondering, “Why go through all this trouble when I can buy a bag of caramels from the store?” Great question. The truth is, homemade caramels blow store-bought ones out of the water. First, you get complete control over the ingredients—no preservatives, no artificial flavors, just pure, creamy caramel goodness. Plus, the texture is unbeatable: soft, chewy, and never waxy.
When you make caramels at home, you can tailor them exactly how you like them. Want them softer? No problem. Prefer a salty edge? Sprinkle on some flaky sea salt. Feeling adventurous? Infuse them with bourbon or espresso. The possibilities are endless, and the reward is well worth the effort.
What Makes a Perfect Caramel?
A perfect caramel walks a fine line between soft and firm, rich and sweet, chewy and melt-in-your-mouth. It’s not just about cooking sugar—it’s about balance. The right caramel is smooth, glossy, and sets up just enough to hold its shape while still yielding softly to your bite.
Several factors play a role here: the ratio of sugar to cream, the cooking temperature, and even the type of pan you use. Use a thermometer, keep a close eye on the mixture, and don’t rush the process. Caramel making is a bit of a dance—but once you’ve learned the steps, you’ll be whipping up perfect batches in no time.
Types of Caramels You Can Make at Home
Let’s break down a few popular variations you can try:
Soft Caramels
These are the melt-in-your-mouth type that are easy to bite into and perfect for wrapping individually.
Salted Caramels
Add a pinch of sea salt at the end for a beautiful contrast to the sweetness. Salted caramels have become a gourmet staple for a reason.
Chewy Caramels
Cook your sugar a bit higher to get that dense, satisfying chew that stretches slightly when you pull it apart.
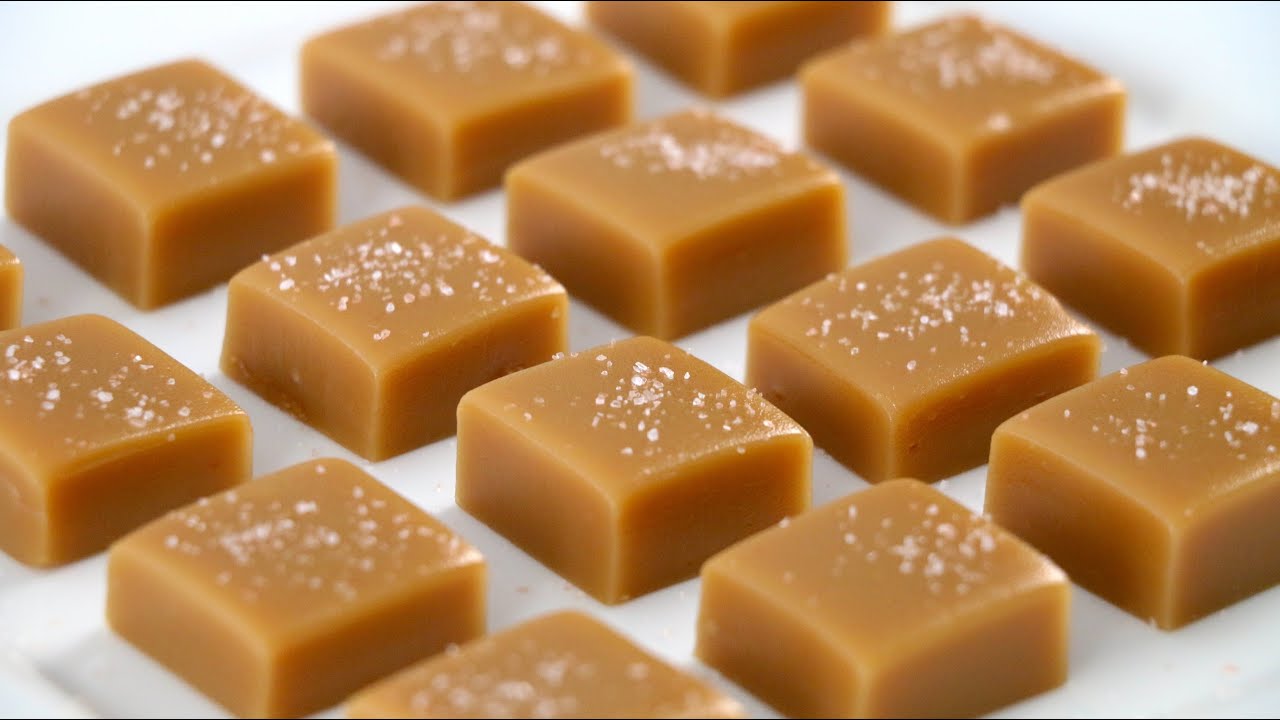
Caramel Squares
These are classic, simple caramels cut into uniform pieces, perfect for gifting or snacking.
Each variation uses the same core recipe but tweaks either the final temperature or adds an extra ingredient to shift the texture and flavor.
Essential Tools You’ll Need
Before we get into the nitty-gritty, make sure your kitchen is prepped. Here’s what you’ll need:
Candy Thermometer
Non-negotiable. Sugar temperatures determine everything when making candy.
Heavy-Bottomed Saucepan
You want even heat distribution to avoid scorching your sugar.
Parchment Paper & Baking Dish
Lining your dish with parchment makes it easier to lift and cut the caramels once they’ve set.
Other helpful tools:
- Silicone spatula
- Sharp knife or bench scraper
- Wax paper (for wrapping)
- Kitchen scale (optional, but great for accuracy)
List of Ingredients You’ll Need
Core Ingredients
- 2 cups granulated sugar
- 1 cup light corn syrup
- 1/2 cup water
- 1 cup heavy cream
- 1 cup unsalted butter (cut into pieces)
- 1 teaspoon vanilla extract
- 1/2 teaspoon sea salt (plus more for topping, optional)
Optional Add-Ins and Flavors
- Sea salt flakes
- Espresso powder
- Bourbon or rum (1–2 tablespoons)
- Chili flakes or cinnamon
- Dark chocolate drizzle
These additions can turn a simple caramel into a signature treat, perfect for gifting or just treating yourself to something fancy.
Understanding Sugar Temperatures
If you’re new to candy making, you might be surprised at how critical temperature is. Here’s why:
The Soft Ball Stage (235–245°F / 113–118°C)
This is the magic range for chewy caramels. At this stage, a drop of sugar in cold water forms a soft, malleable ball.
How to Test Without a Thermometer
If you don’t have a thermometer, try the cold water method: drop a small spoonful of the caramel into a bowl of ice water and check the texture. It should form a soft ball that you can squish with your fingers.
Still, a thermometer is the best way to go—precision is key.
Step-by-Step Guide to Making Caramels
Let’s get cooking. Here’s your foolproof, step-by-step guide:
Step 1: Prepare the Pan
Line an 8×8-inch or 9×9-inch baking dish with parchment paper, leaving a couple of inches over the edge to make lifting easier later. Lightly grease the paper with butter or non-stick spray.
Step 2: Combine Sugar, Corn Syrup, and Water
In your saucepan, combine the granulated sugar, corn syrup, and water. Stir until the sugar is dissolved, but don’t stir once it starts to boil.
Bring it to a boil over medium-high heat and let it cook until it reaches a light amber color—this will take 10–15 minutes. Keep a close eye; sugar can go from golden to burnt in seconds.
Step 3: Cook Until Golden
Once your mixture is a lovely golden hue (around 320°F / 160°C), remove it briefly from heat.
Step 4: Add Cream, Butter, and Vanilla
Now, carefully (and we mean carefully) add the heavy cream and butter to your golden sugar syrup. The mixture will bubble up violently—this is totally normal. It’s just the hot sugar reacting to the cooler cream and butter. Stir slowly and steadily until everything is fully incorporated and the bubbling subsides.
Once it’s mixed well, add the vanilla extract and stir again. At this point, your kitchen will start to smell like a dream—warm, sweet, and buttery.
Pro tip: Make sure your cream and butter are at room temperature to reduce the intensity of the bubbling and avoid splatters. Safety first!
Step 5: Bring to Final Temperature
Now return the pot to medium heat. Attach your candy thermometer and keep stirring gently as the mixture cooks again. You’re aiming for the soft ball stage—between 240°F to 245°F (115°C to 118°C).
At this stage, the texture of your finished caramels will be soft and chewy but firm enough to hold their shape. If you want slightly firmer caramels, let it go up to 248°F (120°C), but no higher unless you’re making something harder.
Stir continuously and patiently—this step can take 10–15 minutes. The mixture should be thick and golden brown. Keep a steady pace to avoid burning the bottom.
Step 6: Pour and Let Set
Once you hit your desired temperature, remove the pot from the heat immediately. Pour the hot caramel mixture into your prepared pan. Use a silicone spatula to scrape every last drop (you worked hard for this!).
Optional: At this point, you can sprinkle the top with flaky sea salt for that sweet-salty punch.
Now, let the caramel sit at room temperature for 4–5 hours, or until fully set. You can speed up the process a bit in the fridge, but be cautious—the caramel might become too firm if left in there too long.
Step 7: Cut and Wrap
Once the caramel has set, lift it out of the pan using the parchment paper overhang. Place it on a cutting board and use a sharp, greased knife to cut it into even squares or rectangles.
To wrap them (especially if you’re gifting), cut wax paper into small rectangles and wrap each caramel like a little present. Twist the ends to secure.
Not only does this keep them from sticking together, but it also adds a charming, homemade touch that people absolutely love.
Pro Tips for Perfect Caramels Every Time
Want to make caramels like a seasoned pro? Keep these expert tips in your back pocket:
- Never leave the pot unattended. Caramel can go from perfect to burnt in the blink of an eye.
- Use a heavy-bottomed saucepan. This ensures even heat distribution and minimizes the risk of scorching.
- Don’t rush the temperature. Cooking too fast can lead to grainy or uneven caramels.
- Grease your tools. Knives, spatulas, spoons—everything that touches caramel should be greased lightly to prevent sticking.
- Add a flavor twist. Stir in a tablespoon of bourbon, espresso, or even lavender extract for something unique.
Common Mistakes and How to Avoid Them
Let’s face it: even the best recipes can go sideways. Here are some common caramel-making mishaps and how to dodge them:
- Grainy texture? That’s crystallized sugar. Make sure the sugar is fully dissolved before boiling and avoid stirring once it starts boiling.
- Caramel too hard? You likely overcooked it. Next time, stop cooking at 240°F–245°F.
- Caramel too soft or runny? That means it wasn’t cooked long enough or to a high enough temperature.
- Burnt flavor? You let the sugar go too far. Watch the color closely and use a thermometer.
- Sticking to the pan? Grease everything and use parchment paper every time.
How to Store Your Homemade Caramels
Storage is key to keeping your caramels fresh and delicious:
- Room Temperature: Store wrapped caramels in an airtight container for up to 2 weeks.
- Refrigerator: They’ll last up to a month in the fridge, but let them sit out for 15–20 minutes before eating for best texture.
- Freezer: Yes, you can freeze them! Wrap tightly and freeze for up to 3 months. Defrost at room temp overnight before enjoying.
Flavor Variations to Try
Once you’ve nailed the basic caramel, go wild with these flavor twists:
Chocolate Caramels
Stir in 1/2 cup of chopped dark chocolate after adding the cream and butter for a rich, cocoa kick.
Bourbon Caramels
Add 1–2 tablespoons of bourbon along with the vanilla extract. The alcohol cooks off, leaving behind warm, smoky notes.
Sea Salt Caramels
The classic. Just sprinkle flaky sea salt on top after pouring the caramel into the pan.
Espresso Caramels
Mix in 1–2 teaspoons of instant espresso powder for a sophisticated coffee-caramel treat.
Chili Chocolate Caramels
Add a pinch of chili powder and drizzle with melted dark chocolate after they’re cut for a sweet and spicy finish.
Creative Ways to Use Homemade Caramels
Don’t just eat them straight—though that’s perfectly valid! Here are some fun ideas:
- Melt into caramel sauce and drizzle over ice cream or pancakes.
- Stuff inside cookies before baking for a gooey surprise.
- Chop and add to brownie batter for caramel-studded bars.
- Dip in melted chocolate and top with crushed nuts for gourmet treats.
- Use as party favors or holiday gifts in mason jars or gift boxes.
Homemade caramels are incredibly versatile, and they add that gourmet touch to nearly any dessert.
FAQs about Caramels Recipe
1. Can I make caramels without corn syrup?
Yes! You can substitute honey or golden syrup, but the texture may vary slightly. Corn syrup helps prevent crystallization, so be extra cautious if skipping it.
2. Why did my caramel separate?
This usually happens if the temperature changes too drastically or if you added the cream too quickly. Add ingredients slowly and stir consistently.
3. Can I use non-dairy milk or butter?
You can try coconut cream and plant-based butter, but the results might be less creamy and more oily. Test in small batches first.
4. How do I clean the pot after making caramel?
Fill the pan with water and bring it to a boil. The caramel residue will melt away, making cleanup easy.
5. How do I know when caramel is ready to cut?
It should be fully set and firm but still give slightly to the touch. If your knife sticks, grease it and try again.
Conclusion
Making homemade caramels may feel a little intimidating at first, but once you try it, you’ll be hooked. The smell, the process, and—of course—the final result are all deeply satisfying. Whether you’re keeping them all for yourself (no judgment) or sharing with friends and family, these caramels are bound to bring smiles.
So grab your ingredients, fire up the stove, and prepare to impress with rich, buttery caramels made with love. You’ve got this!