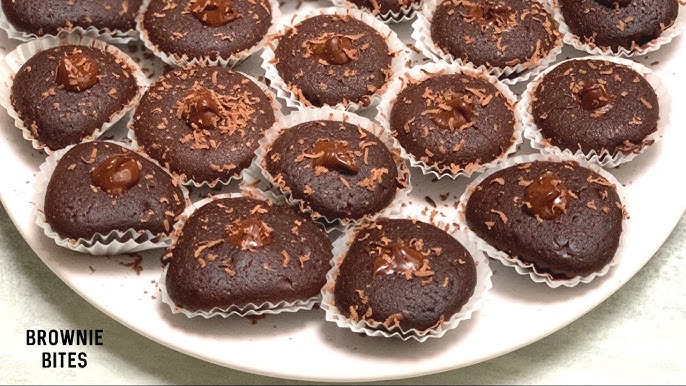
Brownie Bites Recipe: There’s something irresistibly charming about bite-sized desserts. And when it comes to classic sweet treats, brownie bites take the crown. These little gems pack all the rich, fudgy goodness of a full-sized brownie into a single, poppable piece. Whether you’re baking for a party, prepping school snacks, or just indulging in a personal treat, brownie bites are fast, flexible, and fabulous.
What makes them so appealing? For one, they’re portion-controlled—sort of. (Let’s be real, stopping at one is nearly impossible.) They’re also easier to serve, store, and share than traditional brownies. No need to slice or plate. Just grab and go.
In this guide, you’ll learn exactly how to make brownie bites from scratch—step by step. We’ll cover everything: ingredients, techniques, tools, tips, and even storage. Let’s bake!
Ingredients You’ll Need
Every great recipe starts with the right ingredients. Brownie bites are no exception. While you might already have most of these items in your pantry, the quality and proportions matter a lot.
Basic Dry Ingredients:
- All-purpose flour – ½ cup
- Unsweetened cocoa powder – ⅓ cup (preferably Dutch-processed for deeper flavor)
- Salt – ¼ tsp
- Baking powder – ¼ tsp (optional, depending on desired texture)
Wet Ingredients:
- Unsalted butter – ½ cup (1 stick), melted and slightly cooled
- Granulated sugar – ¾ cup
- Brown sugar – ¼ cup (for added chewiness and moisture)
- Eggs – 2 large
- Vanilla extract – 1 tsp
Optional Add-ins and Toppings:
- Chocolate chips or chunks – ½ cup
- Chopped walnuts or pecans – ⅓ cup
- Mini marshmallows – for rocky road versions
- Sea salt flakes – for a gourmet finish
Kitchen Tools You’ll Need:
- Mixing bowls (1 large, 1 medium)
- Whisk or electric hand mixer
- Rubber spatula
- Mini muffin tin (24-count recommended)
- Non-stick spray or mini cupcake liners
- Cooling rack
- Measuring cups and spoons
Keep in mind that ingredient quality can make or break a brownie bite. Always use fresh eggs, good cocoa powder, and pure vanilla extract—not the imitation kind. Now that we’ve covered the basics, let’s look at what makes brownie bites different from regular brownies.
What Makes Brownie Bites Different from Regular Brownies?
Sure, brownie bites are essentially mini brownies—but don’t let their size fool you. They have a few key differences that make them stand out.
1. Size and Shape
Brownie bites are made in a mini muffin tin, which gives them their rounded edges and perfect poppable size. This results in a higher crust-to-center ratio, so you get that chewy edge and fudgy center in every bite.
2. Baking Time
Due to their smaller size, brownie bites bake faster—typically 12 to 15 minutes—versus 25 to 35 minutes for a traditional pan of brownies. This makes them great for quick dessert prep or last-minute party contributions.
3. Texture
Because of their shape and individual baking, brownie bites often have a more intense, fudgy texture in the middle with slightly crispy edges. It’s a perfect contrast that you don’t always get with large brownies unless you fight for the corner piece.
4. Serving and Presentation
There’s no slicing required. Just pop them out of the tin, and they’re ready to go. They’re cleaner to eat, which makes them ideal for events, bake sales, lunchboxes, or gifting.
So yes, while the ingredients might be similar, the experience of eating (and baking) brownie bites is totally next-level.
Choosing the Right Chocolate for Your Brownie Bites
Chocolate is the soul of any brownie. Choosing the right type determines how decadent and rich your brownie bites turn out.
Cocoa Powder vs. Melted Chocolate
- Cocoa powder gives brownies a lighter texture with deep chocolate flavor. Dutch-processed cocoa is smoother and darker, while natural cocoa is more acidic and sharp.
- Melted chocolate (semisweet or bittersweet) adds moisture and fudginess. Many recipes use both for the ultimate flavor bomb.
Which One to Use?
For brownie bites, you can use either, but combining both yields the best results. In our recipe, we lean on cocoa powder for its simplicity, but feel free to toss in a few chocolate chips or chunks to balance it out.
Best Chocolate Brands for Baking:
- Ghirardelli
- Valrhona
- Lindt
- Hershey’s Special Dark (budget-friendly)
- Guittard
If you’re using cocoa powder, ensure it’s unsweetened. Avoid drinking cocoa mix—it won’t work the same.
The Importance of Measuring Ingredients Accurately
Baking is a science. Unlike cooking, you can’t just eyeball ingredients and hope for the best—especially with brownie bites.
Why Accuracy Matters:
- Too much flour? Dry and cakey bites.
- Too little sugar? Bitter, bland flavor.
- Overdo the eggs? Rubbery texture.
Tips for Accurate Measuring:
- Use the scoop and level method for dry ingredients: spoon flour into the measuring cup, then level with a knife.
- Always use liquid measuring cups for liquids.
- Crack eggs into a separate bowl first to avoid shells.
- Weighing ingredients with a kitchen scale gives the most precise results.
Consistency is key if you want your brownie bites to turn out perfect every single time.
Prepping Your Kitchen Before You Start
There’s nothing worse than realizing halfway through a recipe that you forgot to preheat the oven—or worse, you’re out of eggs. Prepping ahead of time keeps things smooth.
To-Do Before Mixing:
- Preheat the oven to 350°F (175°C) – This gives your oven time to heat evenly.
- Grease your mini muffin tin – Use non-stick spray or line with mini cupcake liners.
- Measure out all ingredients – Set them in the order you’ll use them.
- Melt the butter – Then let it cool slightly to avoid scrambling the eggs.
- Place mixing tools and bowls nearby – Less back and forth means a faster bake.
This simple prep can save you stress and help ensure you don’t miss a step during the fun part—mixing and baking!
Step-by-Step Guide to Making Brownie Bites
Alright, it’s time to roll up your sleeves and get baking. Follow this step-by-step process to create the perfect brownie bites every time. No fancy skills required—just a little attention to detail.
Step 1: Mix Dry Ingredients
In a medium bowl, whisk together the flour, cocoa powder, salt, and baking powder (if using). This helps evenly distribute the ingredients and prevents lumps. Sifting the cocoa powder is a great tip if you want to avoid dry clumps in the batter later.
Pro tip: Use a fine-mesh sieve if your cocoa powder is particularly clumpy. It might seem like an extra step, but it’ll make your batter smoother and easier to mix.
Step 2: Cream the Butter and Sugars
In a large bowl, pour in your melted (and slightly cooled) butter, granulated sugar, and brown sugar. Use a whisk or hand mixer on medium speed to blend until smooth and glossy. This should take about 2–3 minutes.
Why both sugars?
- Granulated sugar gives structure and sweetness.
- Brown sugar adds moisture and a chewy texture thanks to its molasses content.
Step 3: Add the Eggs and Vanilla
Crack in the eggs one at a time, whisking after each addition. Add the vanilla extract and mix until the batter is thick and creamy. Don’t skip on the mixing time here—this step helps trap air, which contributes to a fudgier texture in the final bites.
Make sure the eggs are room temperature. Cold eggs can re-solidify the butter and mess up your batter consistency.
Step 4: Combine Wet and Dry Ingredients
Slowly fold the dry mixture into the wet mixture using a rubber spatula or wooden spoon. Stir gently until everything is just combined.
Don’t overmix—this is key. Overworking the batter activates gluten in the flour, which can lead to dense, rubbery bites. You want everything to be incorporated but still soft and rich.
Step 5: Add Mix-ins (Optional)
This is the fun part! If you’re adding extras like chocolate chips, nuts, or mini marshmallows, fold them in now.
Great add-in ideas:
- ½ cup dark or semisweet chocolate chips for extra gooeyness
- ⅓ cup chopped walnuts or pecans for a crunchy texture
- A swirl of peanut butter or caramel on top before baking for gourmet flair
Step 6: Fill the Muffin Tin
Using a small cookie scoop or tablespoon, fill each cup in the mini muffin tin about ¾ full. The batter will rise slightly, but you don’t want it to overflow.
If you’re using liners, the cleanup will be a breeze. Without liners, make sure to grease thoroughly.
Step 7: Bake
Pop the tray into the preheated oven (350°F / 175°C) and bake for 12–15 minutes. Start checking at the 12-minute mark.
How to know they’re done?
Insert a toothpick in the center of one bite—it should come out with a few moist crumbs (not wet batter). If it’s completely clean, they may be a little overbaked.
Remember: they’ll continue to set slightly as they cool, so don’t panic if they seem a bit soft at first.
Cooling and Removing Brownie Bites from the Pan
Once the bites are out of the oven, let them cool in the pan for about 5 minutes. This allows them to firm up and makes removal easier.
Then, gently remove each bite using a small offset spatula or butter knife. If you used cupcake liners, they should pop out easily. Place them on a wire rack to cool completely.
Tips to Avoid Sticking:
- Make sure you greased the tin well before baking.
- Don’t try to remove them too early—hot brownie bites are delicate.
- If they’re stuck, give the pan a gentle twist to loosen them.
Once cooled, they’re ready to eat, decorate, or store for later!
How to Store Brownie Bites Properly
Brownie bites don’t usually last long (they’re that good!), but if you need to store them, here’s how to keep them fresh and delicious.
Room Temperature:
- Store in an airtight container
- Keep at room temp for up to 4 days
- Add a slice of bread in the container to keep them soft (trust me—it works!)
Freezer:
- Wrap individually in plastic wrap or store in freezer bags
- Freeze for up to 3 months
- To thaw, leave them at room temperature for 1–2 hours, or warm in the microwave for 10–15 seconds
Reheating:
- Microwave for a quick warm-up (8–10 seconds is usually enough)
- Avoid overheating—they’ll dry out
Creative Add-Ins for Custom Brownie Bites
Want to spice things up? Brownie bites are super customizable. Mix and match flavors to suit any craving or occasion.
Popular Add-In Ideas:
- Chocolate chips (white, dark, milk)
- Chopped nuts (almonds, walnuts, pecans)
- Mini M&Ms for color and crunch
- Crushed Oreos for a cookies & cream vibe
- Toffee bits for a caramelized crunch
Flavor Swirls:
- Peanut butter
- Nutella
- Caramel sauce
- Raspberry jam
- Cream cheese
Add a teaspoon on top of each cup before baking, then swirl with a toothpick for a bakery-style finish.
Decorating Ideas for Brownie Bites
Who says brownie bites have to be basic? Dress them up with some fun, festive toppings.
Simple Decoration Ideas:
- Dust with powdered sugar or cocoa powder
- Drizzle with chocolate or caramel sauce
- Add a dollop of frosting or whipped cream
- Sprinkle with crushed candy canes (for holidays)
- Top with a raspberry or sliced strawberry for freshness
These little touches can turn an everyday brownie bite into an elegant dessert.
Serving Suggestions for Brownie Bites
One of the best parts of making brownie bites is how incredibly versatile they are when it comes to serving. These mini treats can be dressed up for elegant occasions or kept simple for everyday snacking.
For Parties and Gatherings:
- Arrange them neatly on a three-tier dessert stand for visual appeal.
- Pair with a coffee or tea bar—they go perfectly with lattes or espresso.
- Make a brownie bite charcuterie board with strawberries, mini cookies, and chocolates.
As Gifting Ideas:
- Stack them in a clear cellophane bag, tie with a ribbon, and add a custom tag.
- Place them in a decorative tin for holidays, birthdays, or hostess gifts.
- Include them in a bake sale box alongside cookies and bars.
Pairing Ideas:
- With ice cream: Warm brownie bites served over a scoop of vanilla ice cream? Heavenly.
- With wine: Yes, dessert wine like port or a rich cabernet pairs beautifully with chocolate.
- With coffee: Classic combo. Serve warm brownie bites with a shot of espresso or mocha.
Whether you’re hosting or gifting, brownie bites are guaranteed to be a crowd-pleaser. They’re easy to transport, mess-free to eat, and universally loved.
Common Mistakes to Avoid
Even though brownie bites are fairly simple to make, a few common mistakes can throw things off. Here’s how to steer clear of baking blunders:
1. Overmixing the Batter:
Too much mixing activates the gluten in the flour, leading to tough, dry bites. Mix just until ingredients are combined. You want to keep that batter rich and tender.
2. Overbaking or Underbaking:
Because they’re small, brownie bites can go from gooey to overcooked fast. Set a timer and start checking at 12 minutes. A few moist crumbs on the toothpick is what you want—not dry and clean.
3. Using the Wrong Pan:
Brownie bites need a mini muffin tin, not a regular muffin tray. Using a larger size will throw off your bake time and texture.
4. Forgetting to Grease the Tin:
Unless you’re using liners, a non-stick spray is a must. Otherwise, your perfect bites will stick and crumble as you try to remove them.
5. Not Cooling Properly:
Trying to remove them while hot can lead to a mess. Let them rest in the pan for 5–10 minutes, then gently transfer to a rack to cool fully.
Avoid these pitfalls, and your brownie bites will turn out consistently amazing.
Healthier Alternatives for Guilt-Free Brownie Bites
Trying to cut back on sugar or dairy? No worries. You can still enjoy brownie bites with a few smart swaps.
Ingredient Swaps:
- Butter → Greek yogurt or coconut oil (for lower fat or dairy-free)
- Sugar → Coconut sugar, honey, or maple syrup (for natural sweetness)
- Flour → Almond flour or oat flour (for gluten-free options)
- Eggs → Flax eggs (1 tbsp ground flax + 3 tbsp water = 1 egg)
Tips for Success:
- If reducing sugar, remember it affects texture too. Don’t cut more than 25% unless you’re adjusting other ingredients.
- Use dark cocoa powder for a richer chocolate flavor without added sugar.
- Try adding grated zucchini or black beans (yes, really!) for moisture without affecting taste.
These swaps can make your brownie bites more nutritious without sacrificing flavor. You may even surprise yourself with how good they turn out!
Kids-Friendly Brownie Bites Recipe Tips
If you’re baking with kids, brownie bites are a fantastic, hands-on activity. They’re small, fast, and fun to decorate—perfect for little helpers.
How to Make It Fun:
- Let kids stir in the chocolate chips or nuts.
- Give them their own mini muffin tray to fill.
- Set up a decorating station with sprinkles, mini candies, and frosting.
Safety First:
- Always supervise when using the oven or handling melted butter.
- Pre-measure ingredients into small bowls so kids can just dump and mix.
- Use kid-safe tools—like silicone spatulas and plastic measuring cups.
Kid-Approved Add-Ins:
- Mini M&Ms
- Marshmallows
- Sprinkles
- Crushed cookies
Bonus: These mini brownies are great for lunchboxes or after-school snacks. Make a big batch and freeze for quick treats during the week.
FAQs about Brownie Bites Recipe
1. Can I make brownie bites without a mini muffin pan?
Yes, you can use a regular muffin tin, but the texture and baking time will be different. You could also try using silicone molds or even shape the batter into mini scoops on a baking tray (though the shape won’t be as defined).
2. How do I make my brownie bites more fudgy?
Use less flour, more brown sugar, and don’t overbake. Adding a bit of melted chocolate or using Dutch-processed cocoa helps intensify the fudginess too.
3. What’s the shelf life of brownie bites?
Stored at room temperature in an airtight container, they’ll stay fresh for 3–4 days. In the freezer, they last up to 3 months.
4. Can I double the recipe for a party?
Absolutely! Just double all the ingredients and bake in batches. Keep a close eye on bake times since oven loads can affect heat distribution.
5. What’s the best way to prevent brownie bites from sticking?
Use a non-stick spray or line your mini muffin tin with mini cupcake liners. If you go without liners, let them cool slightly before attempting to remove them.
Conclusion
Brownie bites are the kind of dessert that checks all the boxes—easy to make, incredibly satisfying, endlessly customizable, and just plain fun. Whether you’re baking for yourself, your family, or a crowd, these little bites of chocolatey heaven always hit the spot.
We’ve covered everything from ingredients and techniques to storage and creative twists. Now it’s your turn to get in the kitchen and make them your own. And don’t forget to enjoy the process—after all, baking should be just as joyful as eating.
So, what are you waiting for? Preheat that oven and let the brownie magic begin.