Apple Jelly Recipe: Apple jelly is more than just a sweet spread — it’s a nostalgic, golden treat that brings the flavors of fall into your kitchen any time of year. Whether slathered on warm toast or used as a glaze for meats, this crystal-clear preserve offers a perfect balance of sweet and tart. In this complete guide, you’ll learn exactly how to make apple jelly from scratch, including the ingredients, tools, and professional tricks to get that perfect set every time. Let’s roll up our sleeves and dive right in.
Why Homemade Apple Jelly is Worth It
Ever tasted store-bought apple jelly and thought, “Hmm… this tastes like sugar with a whisper of apple”? That’s because most commercial brands use artificial flavoring, added corn syrup, and preservatives. When you make apple jelly at home, you’re in full control. Real apples. Real sugar. Real flavor.
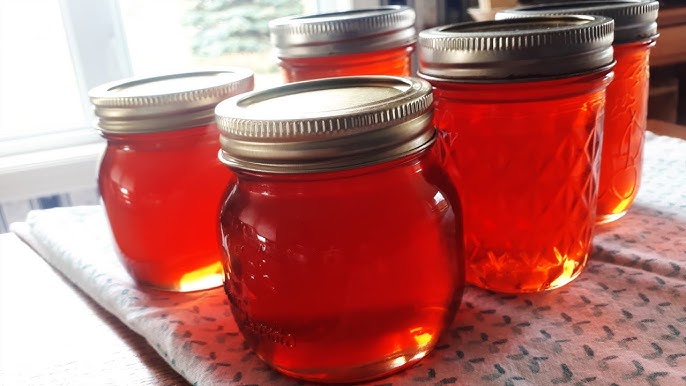
Homemade apple jelly isn’t just more flavorful—it’s healthier and more rewarding. You get to choose the apple varieties, adjust the sweetness, and avoid unnecessary additives. Plus, there’s something deeply satisfying about seeing those jars line up on your shelf, sparkling in the light, filled with the fruits of your labor. Think of it as preserving sunshine in a jar!
What is Apple Jelly?
Apple jelly is a clear, firm spread made from apple juice, sugar, and sometimes pectin and lemon juice. Unlike apple jam or apple butter, which includes the pulp, apple jelly is made solely from the strained juice of apples, giving it that signature transparent appearance and delicate flavor.
It’s a staple in canning households and has been loved for generations for its versatility and subtle taste. Whether you’re topping pancakes, pairing it with cheese, or using it in desserts, this jelly is a star performer.
Benefits of Making Your Own Jelly
Making your own apple jelly isn’t just about better flavor — it’s also about personalization and sustainability. Here are some awesome benefits:
- Customization: Control sugar levels, add herbs, spices, or citrus.
- Preservative-Free: No artificial additives or high-fructose corn syrup.
- Economical: Great way to use up excess apples or windfalls.
- Satisfying Hobby: Canning and preserving connect you with old traditions.
- Gift-Worthy: Beautifully jarred jelly makes for thoughtful, homemade gifts.
If you’re into clean eating, sustainability, and saving money, this recipe checks all the boxes.
Types of Apples Best for Jelly
Not all apples are created equal — especially when making jelly.
Sweet vs. Tart Apples
Tart apples like Granny Smith contain more natural pectin, which helps the jelly set naturally without added pectin. Sweet apples, on the other hand, contribute to the rich flavor but may need added pectin or lemon juice.
Best Varieties for Flavor and Pectin
- Granny Smith: Tart and high in pectin—perfect for setting.
- Fuji: Sweet and juicy, great flavor booster.
- Jonathan or Jonagold: Nice balance of sweet and tart.
- McIntosh: Soft and aromatic—pairs well with firmer apples.
- Cortland: Mild flavor but great for mixing.
For the best results, use a mix of sweet and tart apples for balanced flavor and a natural set.
List of Ingredients You’ll Need
Ready to gather your ingredients? Here’s everything you’ll need:
Basic Ingredients:
- Fresh apples – About 6 lbs (a mix of sweet and tart is ideal)
- Water – Enough to just cover the apples while simmering (about 6 cups)
- Granulated sugar – Typically ¾ to 1 cup per cup of juice extracted
- Lemon juice – Optional, but helps with acidity and setting
- Powdered or liquid pectin – Optional, especially if apples are low in pectin
Optional Flavor Add-ins:
- Cinnamon sticks
- Fresh ginger
- Mint leaves
- Cloves or star anise
Pro Tip: If you’re using underripe apples, you may not need commercial pectin because they’re naturally high in it.
Tools & Equipment Required
You don’t need fancy gadgets, but having the right tools will make your life easier:
- Large stockpot or Dutch oven
- Knife and cutting board
- Jelly bag or cheesecloth
- Measuring cups and spoons
- Candy or jelly thermometer
- Canning jars with lids and bands
- Funnel and ladle
- Water bath canner or large pot for processing
Having everything prepped and ready will save you time and reduce stress.
Preparation: Getting Your Apples Ready
Before you start making jelly, the first step is to prep your apples. Don’t peel them! The skins, cores, and seeds contain a lot of natural pectin.
Here’s how to prep them:
- Wash thoroughly to remove dirt and pesticide residue.
- Cut into chunks – Leave skins, cores, and seeds intact.
- Remove obvious bruises or rot, but don’t worry about perfection.
- Weigh or measure your apple chunks – about 6 lbs will yield roughly 4 cups of juice.
Prepping apples this way helps extract the maximum amount of juice and pectin during cooking.
How to Extract Apple Juice
You’ve got your apples chopped and ready. Now let’s get the juice!
Traditional Stovetop Method
- Place apples in a large pot.
- Add enough water to just cover the fruit.
- Bring to a boil, then reduce to a simmer.
- Simmer for 30–40 minutes, until apples are soft and mushy.
- Stir occasionally to release more juice.
Using a Jelly Bag
After simmering:
- Pour the mixture through a jelly bag or cheesecloth into a bowl.
- Let it drip overnight if possible. Don’t squeeze the bag—it will make the jelly cloudy.
- You’ll end up with beautifully clear apple juice, ready for jelly making.
This process is slow but crucial for clarity and texture.
Step-by-Step Guide to Making Apple Jelly
Now that you have your apple juice ready, it’s time to dive into the actual jelly-making process. Don’t worry — it’s easier than you think. Just follow these steps carefully, and you’ll end up with perfect apple jelly every time.
Step 1: Measure Juice and Sugar Ratio
First things first — measure the amount of apple juice you’ve extracted. For every 1 cup of juice, you’ll typically need ¾ to 1 cup of sugar, depending on how sweet you want your jelly.
If your apples are already sweet, go for the lower sugar amount. If they’re tart, the higher sugar ratio balances the flavor.
Optional: Add 1 tablespoon of lemon juice per cup of juice. This boosts acidity and helps the jelly set better, especially if you’re skipping added pectin.
Step 2: Bring to a Boil
Pour the apple juice into a large pot and add the sugar. Stir until it dissolves completely. Turn the heat to high and bring the mixture to a full rolling boil — the kind that doesn’t stop bubbling when stirred.
This is where the magic starts. If you’re using commercial pectin, follow the package instructions — usually, you add pectin first, then boil, then add sugar and boil again.
Step 3: Test for Gel Stage
There are a few ways to check if your jelly has reached the gel stage (220°F / 104°C):
- Thermometer Method: Use a candy thermometer to track temperature.
- Spoon Test: Dip a cold metal spoon into the jelly, lift it out, and turn it sideways. If the drops run together and form a sheet, it’s ready.
- Freezer Plate Test: Place a small plate in the freezer for 10 mins. Drop some jelly on it, wait a few seconds, and run your finger through. If it wrinkles, you’ve hit the set point.
If it’s not ready, continue boiling and test again in 5-minute intervals.
Step 4: Skim Foam and Add Optional Flavors
As the jelly cooks, a white foam might rise to the top. Skim this off with a spoon for a clearer jelly.
Now is also the time to add optional flavors:
- 1 cinnamon stick for a cozy spice
- A sprig of mint for a refreshing twist
- A sliver of ginger for a warm kick
Let the flavors infuse for a few minutes, then remove before jarring.
Step 5: Jar and Seal
Once your jelly has reached the gel stage:
- Remove from heat.
- Carefully ladle the hot jelly into sterilized jars, leaving about ¼-inch headspace.
- Wipe the rims clean with a damp cloth.
- Apply lids and screw bands on fingertip-tight.
- Process in a water bath canner for 5–10 minutes (adjust for altitude).
Let jars cool undisturbed for 12–24 hours. Check the seals by pressing the center of the lid. If it doesn’t pop back, it’s sealed.
How to Check the Jelly Set Point
Even if you followed all the steps, jelly can be a bit unpredictable. To be 100% sure your apple jelly has set properly, here are three quick ways to double-check:
1. Spoon or Sheet Test
Dip a cool metal spoon into the jelly and hold it sideways. When the jelly starts to flow off in a sheet or blob instead of separate drops, it’s ready.
2. Freezer Test
Drop a teaspoon of jelly onto a chilled plate. Wait 30 seconds, then press your finger through the jelly. If it wrinkles and holds shape, you nailed it.
3. Temperature Method
Use a candy thermometer to check if the mixture hits 220°F (104°C) at sea level. Adjust by 2°F for every 1000 feet above sea level.
If your jelly is too runny, don’t worry—we’ll cover fixes in a bit.
Canning and Preserving Apple Jelly
Canning your apple jelly not only extends its shelf life but also keeps it safe and shelf-stable for a year or more.
Water Bath Canning Process
Here’s how to can apple jelly the safe and easy way:
- Sterilize your jars and lids in boiling water.
- Fill jars with hot jelly, leaving ¼-inch headspace.
- Wipe rims and apply lids and bands.
- Place jars into a boiling water bath canner.
- Process for 5–10 minutes based on your altitude.
- Remove and let cool. Check seals after 24 hours.
Storage Tips
- Store sealed jars in a cool, dark place.
- Refrigerate after opening.
- Use within 12 months for best flavor.
Properly sealed jelly doesn’t require refrigeration until opened, making it perfect for gifting or stocking up your pantry.
Common Mistakes to Avoid
Even seasoned jelly-makers make mistakes sometimes. Here are the most common ones and how to avoid them:
- Squeezing the jelly bag – This makes your jelly cloudy.
- Skipping lemon juice – Low acidity can cause poor set and spoilage.
- Overcooking – Can result in jelly that’s too firm or rubbery.
- Using overripe apples – They contain less pectin.
- Incorrect sugar ratio – Jelly may not set or may crystallize.
Take your time and follow each step carefully, and you’ll minimize issues.
How to Fix Runny or Overly Thick Apple Jelly
Did your jelly not set right? Don’t panic — it’s fixable!
If It’s Too Runny:
- Pour jelly back into a pot.
- Bring to a boil.
- Add more pectin or boil longer until the gel stage is reached.
- Re-can following the usual process.
If It’s Too Thick:
This is trickier, but you can:
- Gently reheat with added juice or water to loosen.
- Use it as a glaze for meats or fruit topping.
Sometimes the best “mistakes” turn into amazing creations.
Creative Variations to Try
Plain apple jelly is already delicious, but why stop there? Get creative in your kitchen by infusing your jelly with exciting flavors that elevate it from basic to unforgettable. These variations can transform your jelly into gourmet-level spreads that pair beautifully with cheeses, meats, or even cocktails.
Apple-Cinnamon Jelly
Add 1–2 cinnamon sticks during the juice boiling process. The warm, spicy note of cinnamon complements apple perfectly, making it ideal for fall or holiday gifting. Remove the cinnamon sticks before jarring.
Apple-Mint Jelly
A refreshing twist! Add a small bunch of fresh mint leaves to the juice and steep for 10 minutes before boiling. Strain out the mint, then proceed with the recipe. It’s especially great with lamb or poultry.
Spiced Apple Jelly
Looking for something bold? Try adding:
- 1 cinnamon stick
- 2 cloves
- 1 star anise
- A small piece of fresh ginger
Infuse the spices in the juice for about 15 minutes before making the jelly. Strain well to avoid cloudy results. This version pairs perfectly with roasted meats or can be used as a unique sandwich spread.
Cider Apple Jelly
Replace water with fresh apple cider for a deeper, richer apple flavor. Just be sure it’s unsweetened to maintain control over your sugar ratios.
The beauty of apple jelly lies in its versatility — it’s like a blank canvas. So don’t be afraid to experiment!
Serving Ideas and Pairings
Apple jelly isn’t just for toast (though it’s awesome there). Its subtle sweetness and clean finish make it an incredibly versatile condiment. Here are some fun ways to enjoy it:
On Breakfast Items
- Spread on warm buttered toast
- Drizzled over pancakes or waffles
- Stirred into oatmeal or yogurt
With Cheese & Crackers
- Pairs beautifully with sharp cheddar, brie, or goat cheese
- Add to a charcuterie board for a pop of sweetness
As a Glaze
- Brush over roasted chicken, pork, or ham
- Mix with Dijon mustard for a sweet-savory marinade
In Baking
- Use as a filling in thumbprint cookies
- Glaze fruit tarts or cakes
- Swirl into muffin batter
Apple jelly is a quiet kitchen hero. Once you start thinking beyond breakfast, you’ll find yourself reaching for that jar way more often.
Health Considerations
While apple jelly isn’t exactly a superfood, it does have a few perks when made at home.
What’s Inside Homemade Jelly:
- Real fruit juice
- Natural sugar (no high-fructose corn syrup)
- No preservatives
- Optional low-sugar alternatives
However, like any jam or jelly, it’s still a treat that’s best enjoyed in moderation. If you’re watching your sugar intake, consider using a low-sugar pectin and reducing the sweetener accordingly.
Healthier Tweaks:
- Use honey or maple syrup instead of sugar (requires special pectin)
- Use organic apples to avoid pesticide residue
- Skip added colors or flavors
If you’re making it for kids or people with dietary concerns, those small adjustments can make a big difference.
Storing and Shelf Life
Proper storage ensures your hard work lasts as long as possible.
Unopened Jars:
- Store in a cool, dark pantry
- Best used within 12–18 months
- Discard if seals are broken or if jelly looks moldy or smells off
After Opening:
- Keep in the refrigerator
- Use within 3–4 weeks
Always use clean utensils to scoop out jelly to avoid contamination. If you notice cloudiness, off smells, or mold — toss it. Better safe than sorry.
FAQs about Apple Jelly Recipe
Why didn’t my jelly set?
You may not have boiled it long enough, or the apples lacked pectin. Reboil with added pectin or lemon juice.
Why is my jelly cloudy?
Cloudiness usually comes from squeezing the jelly bag or not straining the juice well. It’s safe to eat, just not as pretty.
Can I make jelly without pectin?
Yes! Apples naturally contain pectin, especially underripe ones. Just make sure to boil until it reaches the gel point.
Can I use apple juice from the store?
Technically yes, but avoid juice with added sugars or preservatives. Fresh-pressed juice or cider gives the best flavor.
My jelly is too sweet—can I fix it?
Not after it’s made, but next time use a lower sugar ratio or try a low-sugar pectin for better control.
Conclusion
Making apple jelly at home isn’t just about creating a tasty spread—it’s about crafting a product that reflects care, tradition, and creativity. From picking the perfect apples to watching the jelly glisten in its jar, every step offers a bit of magic. And the best part? It’s surprisingly simple once you know how.
With this guide, you’ve learned everything from apple selection to storage, troubleshooting, and fun flavor twists. Now it’s your turn. Grab some apples, roll up your sleeves, and enjoy the sweet satisfaction of homemade apple jelly.


