Turkey Rub Recipe: There’s nothing quite like the aroma of a perfectly seasoned turkey wafting through your home on a special day. Whether it’s Thanksgiving, Christmas, or just a weekend family feast, getting that seasoning right makes all the difference. This isn’t just any turkey rub recipe—it’s your go-to guide for making an unforgettable bird. From selecting the right spices to applying them like a pro, we’re breaking it down step by step.
Let’s dive in and turn your turkey into a showstopper!
Why You Need a Turkey Rub
Let’s be honest—turkey can sometimes be… bland. It’s a lean meat, which makes it easy to overcook and dry out if you’re not careful. That’s where a good rub comes in. A turkey rub doesn’t just add flavor; it transforms the bird from basic to bursting with personality. Think of the rub as a spice-powered makeover—dry herbs, spices, and seasonings that work together to add layers of flavor to every bite.
Without a rub, the seasoning only stays on the surface. But when you use a thoughtfully crafted rub, the flavor penetrates the skin and seeps into the meat, especially when combined with a bit of oil or butter. It also helps create that coveted crispy, golden skin we all fight over at the dinner table.
And here’s the best part—rub recipes are super customizable. You can go bold with spicy Cajun flavors or keep it classic with garlic, thyme, and rosemary. There’s a rub for every palette.
Difference Between a Dry Rub and a Wet Rub
Before we move on, let’s clear up some confusion: dry rubs and wet rubs are not the same thing.
- Dry Rub: This is a mix of dried spices and herbs. No liquids are added, which makes it perfect for rubbing directly onto the surface of your turkey. The texture of the dry rub helps draw out moisture and forms a crust when roasted, which enhances the flavor.
- Wet Rub (Paste): This combines the same dried ingredients with a bit of liquid—think olive oil, vinegar, or mustard. It’s easier to stick to the meat and helps keep it moist, especially useful for leaner turkeys.
Both have their merits. Dry rubs give a beautiful, crusty texture, while wet rubs allow for deeper flavor penetration. For the purpose of this guide, we’ll focus on a dry rub—simple, quick, and powerfully flavorful.
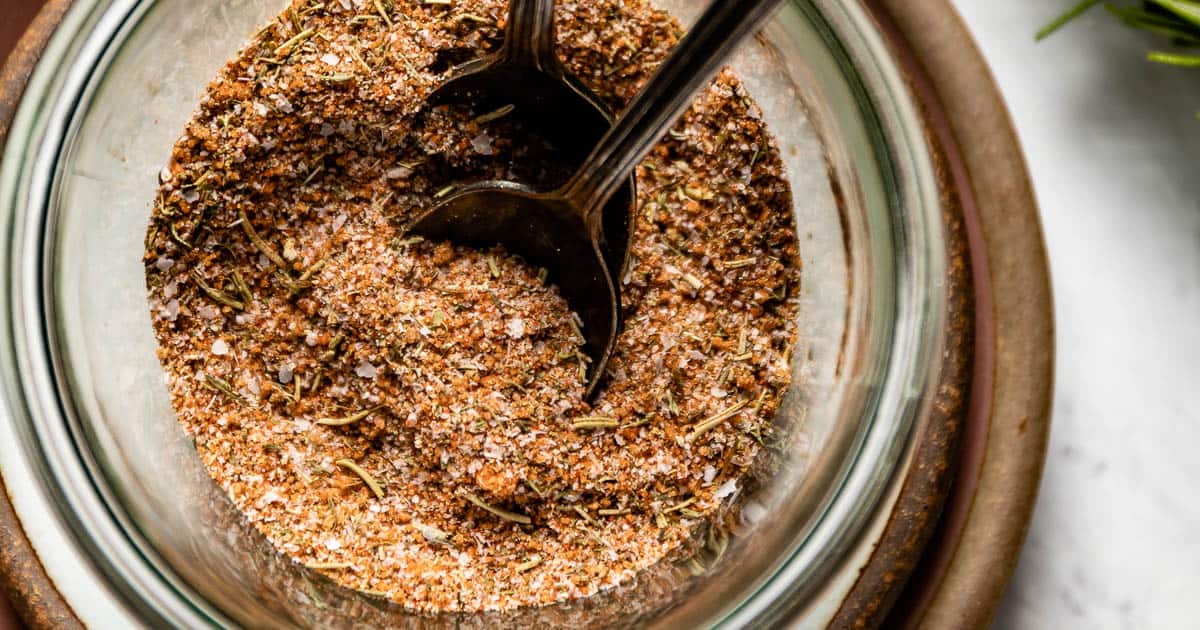
Ingredients You’ll Need
Common Herbs and Spices
Here’s the heart of your rub. These spices are pantry staples, and each one plays a role in making your turkey unforgettable:
- Salt: Essential for enhancing flavor and drawing moisture out of the skin.
- Black Pepper: Adds depth and a mild kick.
- Paprika: For a smoky, slightly sweet aroma and beautiful color.
- Garlic Powder: Rich, umami flavor that’s impossible to skip.
- Onion Powder: Rounds out the garlic and adds depth.
- Dried Thyme: Earthy, herbal notes.
- Dried Rosemary: Aromatic and slightly piney.
- Sage: A must-have for holiday turkeys—warm and comforting.
- Brown Sugar (optional): Balances savory with a touch of sweet.
- Cayenne Pepper (optional): For those who like a little heat.
These ingredients can be adjusted depending on your taste preferences, but this list is a great starting point for the perfect all-purpose turkey rub.
Optional Add-ins for Custom Flavor
Want to make it your own? Try these extras:
- Lemon Zest: Adds brightness and freshness.
- Smoked Paprika: For deeper smoky flavor.
- Ground Mustard: Subtle tanginess.
- Cinnamon or Nutmeg: A holiday twist.
- Chili Powder: A punch of spice and complexity.
This is where your creativity shines. Don’t be afraid to experiment—you might just invent the next great family tradition.
Tools Required for Mixing and Application
The great thing about turkey rubs is that you don’t need fancy tools. Here’s what will come in handy:
- Mixing Bowl: Medium-sized for easy stirring.
- Measuring Spoons: Accuracy is key.
- Whisk or Spoon: To mix the spices evenly.
- Gloves (optional): Keeps your hands clean while rubbing.
- Basting Brush (if using oil or butter): Helps with even application.
That’s it—simple tools, powerful flavor. Now let’s move on to making the rub and transforming your turkey.
Step-by-Step Guide to Making the Perfect Turkey Rub
Step 1 – Choose Your Base Flavor Profile
Decide whether you want a savory herb rub, a smoky BBQ blend, or a sweet and spicy twist. Each flavor direction changes the entire character of your turkey, so pick your vibe before mixing.
Step 2 – Mix the Ingredients
In a bowl, combine 2 tablespoons brown sugar, 1 tablespoon salt, 1 teaspoon black pepper, 1 teaspoon paprika, 1 teaspoon garlic powder, 1 teaspoon onion powder, and ½ teaspoon thyme or rosemary. Adjust to your taste—add chili flakes for heat or lemon zest for brightness.
Step 3 – Prepping the Turkey
Pat the turkey dry with paper towels to help the rub stick evenly.
Step 4 – Applying the Rub
Rub generously over the entire bird—inside, outside, and under the skin—for maximum flavor infusion.
Step 5 – Letting the Flavors Marinate
Cover and refrigerate for at least 2 hours, or overnight. This resting time allows the spices to penetrate deeply, ensuring a flavorful, golden, and aromatic roast turkey.
Cooking Tips for a Flavorful Turkey
Roasting vs. Smoking vs. Grilling
How you cook your turkey affects how the rub works its magic. Here’s a quick breakdown:
Roasting:
- Best For: Traditional presentation and juicy texture.
- Temp & Time: 325°F for about 15 minutes per pound.
- Rub Effect: Creates a crusty outer layer with well-penetrated flavor.
- Pro Tip: Baste sparingly. Too much basting can wash off the rub.
Smoking:
- Best For: Deep, smoky flavor and dramatic presentation.
- Temp & Time: 225–250°F for 30–40 minutes per pound.
- Rub Effect: Smoke infuses the rub, enhancing depth.
- Pro Tip: Use wood that complements your rub—apple for sweet rubs, hickory for spicy.
Grilling:
- Best For: Smaller turkeys or turkey parts.
- Temp & Time: Indirect heat at 350°F, cook to internal temp of 165°F.
- Rub Effect: Grilling caramelizes sugars in the rub.
- Pro Tip: Keep the grill covered to prevent drying out the meat.
Each method works well, but make sure your rub matches the cooking style. Sweet rubs love grilling and smoking, while herby rubs shine in the oven.
How Long to Cook a Turkey After Rubbing
Once your turkey is seasoned and ready to go, the big question is: how long does it need to cook? The answer depends on your turkey’s weight and the cooking method you’re using. However, no matter how you cook it, the most important rule is to cook until the internal temperature reaches 165°F (75°C) in the thickest part of the breast and 175°F (80°C) in the thigh.
General Roasting Time Chart (Unstuffed Turkey):
| Turkey Weight | Cooking Time at 325°F |
|---|---|
| 10-12 lbs | 2.5 to 3 hours |
| 12-14 lbs | 3 to 3.75 hours |
| 14-16 lbs | 3.75 to 4.5 hours |
| 16-18 lbs | 4.5 to 5 hours |
| 18-20 lbs | 5 to 5.5 hours |
Tips to Keep in Mind:
- Don’t rely on time alone. Always use a meat thermometer.
- Let it rest! After cooking, tent the turkey with foil and rest for 20–30 minutes. This helps redistribute the juices and makes for a more tender bird.
- If you’re stuffing the turkey, add an extra 30–45 minutes of cook time and make sure the stuffing also reaches 165°F internally.
Using a rub doesn’t change the cook time drastically, but if you’ve included sugars or oil in your rub, be cautious—those can brown faster, so tent the bird with foil if the skin starts to darken too quickly.
Temperature Guidelines
Cooking temperature is more than just a number—it’s the key to food safety and perfect texture.
Here’s a quick cheat sheet:
- Whole Turkey: 325°F (standard oven temperature)
- Breast: 165°F internal temp
- Thigh: 175°F internal temp
- Stuffing (if applicable): 165°F internal temp
Important Tools:
- Meat Thermometer: Preferably digital and instant-read.
- Oven Thermometer: Not all ovens are calibrated correctly. Make sure yours is accurate.
Quick Tip: Insert your meat thermometer into the thickest part of the breast without touching bone. For the thigh, aim near but not on the bone. If you’re not sure, check in a few places.
Never guess with poultry—undercooked turkey is a health risk, and overcooked turkey is a dry disappointment. The thermometer is your best friend here.
Storing and Reusing Turkey Rub
Best Storage Methods
Whether you’ve made a big batch or have leftovers, storing your turkey rub correctly ensures it stays fresh and flavorful for months.
How to Store Your Rub:
- Airtight Containers: Mason jars, spice jars, or sealable plastic containers work great.
- Cool, Dark Place: Keep it in a cabinet or pantry away from direct sunlight and heat.
- Avoid Moisture: Always use dry utensils when scooping your rub to prevent clumping or mold growth.
Shelf Life: Most spice rubs last up to 6 months, though they start to lose potency after 3 months. To test if it’s still good, take a sniff—if the aroma is weak, it’s time to make a fresh batch.
If you’re a fan of turkey or plan on grilling chicken or pork often, consider making a double or triple batch to have ready-to-go flavor bombs any time you cook.
How Long Can You Store a Homemade Rub?
If stored properly, a homemade dry rub can maintain peak freshness for about 3 to 6 months. After that, the individual spices begin to lose their flavor potency.
Here are a few guidelines:
- Use Whole Spices: Grinding them fresh (e.g., black pepper or coriander) adds more shelf life and punch.
- Date Your Jars: Add a label with the date you made the rub to track freshness.
- Avoid Contamination: Keep it sealed and dry. One splash of water or steam from a pot can ruin an entire batch.
Pro Tip: Make rubs in small batches if you don’t cook with them often. It’s better to make fresh blends than to use a stale mix that won’t deliver the flavor kick you’re expecting.
Bonus Tips for Maximum Flavor
Combining Rubs with Marinades or Brines
Want to take your turkey to the next level? Try pairing your dry rub with a marinade or brine. This combo adds flavor on the inside and outside.
What’s the Difference?
- Brine: A saltwater solution that hydrates and seasons the meat. Best for lean meats like turkey.
- Marinade: A liquid mixture that usually includes acid (like vinegar or citrus), oil, and spices. Helps tenderize and infuse flavor.
How to Combine with a Rub:
- Brine First: Soak your turkey in brine for 12–24 hours.
- Rinse and Dry: Rinse off the brine and pat the turkey completely dry.
- Rub it Down: Apply the dry rub and let it sit in the fridge for a few hours before cooking.
Just be cautious—don’t go overboard with salt in your rub if you’ve brined the bird. Taste your rub before applying it to avoid over-salting.
This method gives you a turkey that’s juicy on the inside and perfectly seasoned on the outside. Flavor explosion guaranteed.
Rubbing Under the Skin vs. On the Skin
This is one of the most debated techniques in turkey prep: should you apply the rub just on the outside, or should you also go under the skin?
Short Answer: Do both.
Here’s why it makes a big difference:
On the Skin:
- Forms a crust during cooking.
- Enhances aroma and surface flavor.
- Gives you that golden, Instagram-worthy look.
Under the Skin:
- Delivers flavor directly to the meat.
- Especially effective for large birds with thick skin.
- Keeps the meat juicy and tender.
How to Do It:
- Gently separate the skin from the breast and thighs with your fingers or a spoon.
- Be careful not to tear the skin.
- Rub a good amount of seasoning underneath, spreading it evenly.
For even better results, combine your rub with butter or olive oil before applying it under the skin. This adds moisture and acts as a carrier for the spices, helping them penetrate more deeply.
Pro Tip: Avoid overstuffing the skin. Too much rub can clump and prevent even cooking. A thin, even layer is all you need.
Common Mistakes to Avoid
Even seasoned cooks (pun intended) can mess up turkey rubs. Here are the most common pitfalls and how to avoid them:
Over-salting the Rub
Salt is essential, but too much can ruin the flavor and dry out your turkey. If you’re brining, reduce the salt in your rub. Always taste the mix before applying it.
Using Wet Skin
Moisture is the enemy of crispy skin. If you skip patting the turkey dry, your rub won’t stick, and the bird might steam rather than roast. Use plenty of paper towels.
Not Letting It Marinate
Applying the rub and throwing the turkey straight into the oven is a missed opportunity. Let it sit for at least a few hours—overnight is best.
Uneven Application
Slapping the rub on in patches? That leads to uneven flavor. Massage it in thoroughly, including under the wings, in the crevices, and under the skin.
Cooking Too Hot or Too Long
Even with the best rub, an overcooked bird is still dry. Stick to temperature guidelines and use a meat thermometer for best results.
Avoid these mistakes, and your turkey will be the talk of the table.
Flavor Variations You Should Try
If you’re ready to go beyond the basics, here are some fun and flavorful rub variations to spice things up:
Spicy Cajun Turkey Rub
- Paprika, cayenne, thyme, oregano, garlic powder, onion powder, and black pepper.
- Perfect for fans of bold Southern flavors.
- Pairs beautifully with deep frying or smoking.
Sweet and Smoky Rub
- Brown sugar, smoked paprika, cinnamon, chili powder, and garlic powder.
- Adds a BBQ-style flavor that’s great for grilling or roasting.
- Balances sweetness with subtle heat.
Mediterranean-Inspired Rub
- Dried oregano, basil, garlic powder, lemon zest, rosemary, and black pepper.
- Light and herbaceous. Ideal for a summer turkey roast or for turkey breast fillets.
Each of these rubs brings a different vibe to your turkey, so experiment and find your family’s favorite.
Turkey Rubs for Special Diets
Cooking for someone with dietary restrictions? You can still serve a killer turkey with these easy rub modifications:
Gluten-Free Turkey Rub
- Most spices are naturally gluten-free, but watch for hidden gluten in pre-packaged blends.
- Stick to single-ingredient spices and mix your own.
Low-Sodium Alternatives
- Use herbs like thyme, rosemary, and oregano to build flavor without relying on salt.
- Try potassium-based salt substitutes if necessary.
Keto-Friendly Turkey Rub
- Avoid sugars like brown sugar or honey powder.
- Use spices like paprika, cumin, and garlic powder for rich flavor without the carbs.
Always read labels and tailor your rub to your guests’ dietary needs. With the right blend, no one will miss a thing.
FAQs about Turkey Rub Recipe
1. Can I use a turkey rub on other meats?
Absolutely! Turkey rubs work great on chicken, pork, and even beef. Just adjust the salt and spice levels depending on the meat.
2. How far in advance should I apply the rub?
Ideally, apply your rub 12–24 hours before cooking. Letting it marinate overnight enhances the flavor significantly.
3. Is it okay to rub the turkey and freeze it?
Yes! You can rub the turkey and freeze it. Just wrap it tightly and thaw in the refrigerator before cooking.
4. Can I combine a rub with butter or oil?
Definitely. Mixing your rub with butter or oil helps it stick and adds moisture, especially when applied under the skin.
5. Do I need to baste my turkey after rubbing it?
It’s optional. Basting can help keep the turkey moist, but over-basting might wash off your rub. If you baste, do it gently and infrequently.
Conclusion
By understanding your flavor preferences, choosing the right ingredients, and applying the rub with care, you’re guaranteed to impress your guests—even if it’s your first time cooking a turkey. Don’t be afraid to experiment, tweak, and make the recipe your own.
This guide isn’t just a recipe—it’s your passport to mastering turkey prep for life. So go ahead, grab those spices, and get rubbing. Your best turkey yet is just a sprinkle away.