Salted Caramel Recipe: Salted caramel is like a culinary love story. It marries the rich sweetness of traditional caramel with a bold, savory kiss of sea salt. That contrast—the smooth, buttery warmth offset by a salty tang—triggers our taste buds in the best way possible. It’s that delicate dance between sugar and salt that makes it so irresistible. Whether drizzled over vanilla ice cream, swirled into brownies, or sipped in a latte, salted caramel transforms ordinary treats into indulgent masterpieces.
But there’s more to its popularity than just flavor. Salted caramel offers a kind of nostalgia. It’s that melt-in-your-mouth warmth that reminds you of cozy evenings, fall baking, and home-cooked goodness. At the same time, it’s modern—showing up in trendy coffee shops and gourmet dessert menus. This dual appeal has turned it into a staple ingredient, whether you’re a seasoned chef or a home baker experimenting in the kitchen.
Creating it from scratch can seem intimidating, especially with sugar’s reputation for burning quickly. But with the right steps and a bit of patience, anyone can master this luxurious sauce. Let’s dive into how you can create a silky, perfectly balanced salted caramel sauce in your very own kitchen.
Ingredients You’ll Need
Essential Ingredients List
To whip up a perfect batch of salted caramel, you only need a handful of basic ingredients. Each plays a crucial role in flavor and texture. Here’s what you’ll need:
- Granulated sugar – 1 cup (200g)
- Unsalted butter – 6 tablespoons (85g), cut into pieces
- Heavy cream – 1/2 cup (120ml), at room temperature
- Sea salt – 1 to 1.5 teaspoons (adjust to taste)
That’s it. Just four simple ingredients. But don’t let the short list fool you—when handled right, this combination creates a deeply flavorful, rich caramel sauce that will elevate any dessert.
Let’s break down why each ingredient matters:
- Granulated sugar: This is the base. As it melts, it caramelizes, forming the sweet, golden-brown flavor.
- Butter: Adds richness and helps create a creamy texture.
- Heavy cream: This transforms the melted sugar and butter into a pourable, smooth sauce.
- Sea salt: The star of the show. It adds that perfect punch and cuts through the sweetness for a complex flavor profile.
Notes on Ingredient Quality
Quality matters here—big time. Since there are so few ingredients, each one shines through. Use pure heavy cream (not milk or half-and-half), and opt for high-quality butter with a high fat content. European-style butters are an excellent choice for deeper flavor. As for the salt, flaky sea salt or kosher salt delivers the best contrast. Avoid table salt, which can be too harsh and make the sauce taste metallic or overly salty.
Optional Add-ins and Flavor Variations
Once you’ve mastered the classic, you can start experimenting. Here are some fun ways to mix it up:
- Vanilla extract (1 tsp): Adds warmth and complexity.
- Bourbon or whiskey (1–2 tsp): Adds depth and a slight kick.
- Espresso powder (1/2 tsp): Intensifies the richness—perfect for coffee lovers.
- Cinnamon or nutmeg (a pinch): Great for fall-inspired caramel.
These add-ins should be stirred in at the very end after the sauce is off the heat, allowing them to blend into the mixture without altering the caramelization process.
Kitchen Tools & Equipment
Must-Have Tools for Perfect Caramel
To make caramel safely and efficiently, it helps to have the right tools on hand. Here’s a quick checklist of what you’ll need:
- Heavy-bottomed saucepan (preferably stainless steel): Prevents hot spots and burns.
- Wooden spoon or heatproof silicone spatula: For stirring.
- Measuring cups and spoons: Precision is key.
- Candy thermometer (optional): For beginners, it can help avoid overcooking.
- Oven mitts: Sugar gets hot—protect your hands.
Having everything ready before you start ensures a smooth cooking process. Caramel moves fast, and you won’t have time to dig through a drawer for your spatula mid-recipe.
Safety Tips When Working with Hot Sugar
Caramel is simple—but also dangerous if not handled properly. Here are essential safety tips:
- Never walk away while heating sugar. It goes from golden to burnt in seconds.
- Keep a bowl of cold water nearby in case of burns.
- Avoid touching or tasting hot caramel—it sticks and burns skin badly.
- Use long-handled tools to keep your hands away from splattering sugar.
With these precautions in mind, you’ll be ready to cook with confidence.
Step-by-Step Guide to Making Salted Caramel
Step 1: Gather Your Ingredients and Tools
Before you begin, have everything ready — caramel moves fast! You’ll need 1 cup of granulated sugar, 6 tablespoons of unsalted butter (cut into cubes), ½ cup of heavy cream, and 1 teaspoon of sea salt. Also, grab a heavy-bottomed saucepan, a heatproof whisk or spatula, and a glass jar for storing your caramel. Once the sugar starts melting, there’s no time to scramble for ingredients.
Step 2: Heat the Sugar
Place the sugar in your saucepan over medium heat. Stir constantly with a heatproof whisk or wooden spoon as it begins to clump, then slowly melt into a golden-brown liquid. Be patient — it will take about 5–7 minutes. Watch closely; caramel can go from perfect to burnt in seconds. When all the sugar has melted and turned a deep amber color, you’re ready for the next step.
Step 3: Add the Butter
Carefully add the cubed butter to the melted sugar. The mixture will bubble up vigorously — that’s normal! Stir until the butter is completely melted and combined with the caramelized sugar. This step adds richness and smoothness to the caramel.
Step 4: Slowly Pour in the Cream
While stirring, slowly pour in the heavy cream in a thin, steady stream. The caramel will bubble again, so go slowly to prevent splattering. Keep stirring until everything blends into a silky, glossy sauce. Let it simmer for about 1 minute, then remove from heat.
Step 5: Add the Salt and Let It Cool
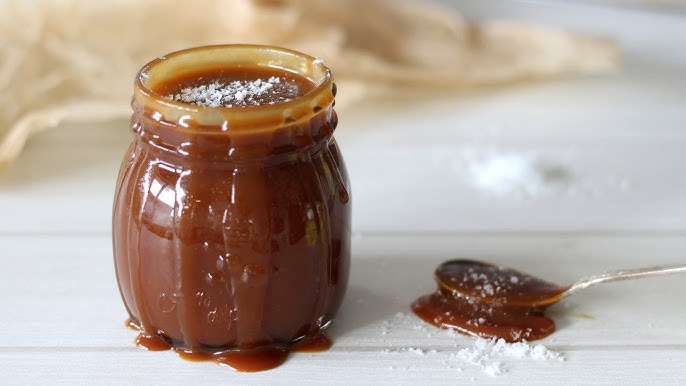
Stir in the sea salt while the caramel is still warm, adjusting to your taste — a little salt enhances the sweetness, while more gives that bold salted kick. Allow the caramel to cool for 10–15 minutes before transferring it to a jar. As it cools, it will thicken into that perfect, spoon-worthy texture.
Use your salted caramel over ice cream, cakes, coffee, or straight off the spoon (no judgment here). Sweet, buttery, and irresistibly rich — it’s pure gold in liquid form.
Tips for Perfecting Your Salted Caramel
Troubleshooting Common Mistakes
Even experienced cooks can mess up caramel. Here are a few common pitfalls and how to avoid them:
Burnt Sugar
- Problem: Sugar turns too dark and tastes bitter.
- Solution: Watch the color closely. Remove from heat as soon as it’s amber. Use a thermometer if needed.
Crystallization
- Problem: Sugar clumps up and turns grainy instead of melting.
- Solution: Don’t stir sugar in the early stage. Use a wet pastry brush to wipe down sugar crystals on the sides of the pan.
Separated Caramel
- Problem: Butter and sugar won’t mix or look greasy.
- Solution: Stir constantly and reheat gently while whisking to bring it back together.
Too Thick or Too Runny
- Problem: Final texture isn’t right.
- Solution: Adjust with a tablespoon of cream if it’s too thick, or cook slightly longer for thicker sauce.
Making caramel is part science, part art. Don’t be discouraged if the first batch isn’t perfect. With practice, you’ll develop the intuition to know exactly when it’s ready.
Storage and Shelf Life
How to Store Salted Caramel
Once your caramel has cooled, transfer it to an airtight container or glass jar with a secure lid. Mason jars work beautifully for this. The sauce will continue to thicken as it cools, especially if stored in the fridge. That’s completely normal—and even preferred for a luxurious, spoonable texture.
Here’s the best way to store it:
- Room temperature: You can keep freshly made salted caramel at room temperature for up to 1 day, especially if your kitchen is cool. This is ideal if you plan to use it quickly or drizzle it on something warm, like fresh-baked cookies.
- Refrigerator: For longer storage, place it in the fridge. It will keep for up to 2 weeks. Before using, simply warm it slightly in the microwave or on the stove. It softens quickly, so don’t overheat.
- Freezer: Salted caramel freezes beautifully. You can store it for up to 3 months in a freezer-safe container. Just thaw it overnight in the fridge and reheat gently before use.
Quick tip: Always use a clean spoon when scooping caramel out of the jar. This prevents contamination and extends its shelf life.
Shelf Life and Freezing Tips
Want to make a large batch in advance? You absolutely can! Here are a few things to keep in mind:
- Label and date your jars before refrigerating or freezing them. Caramel may look the same after a month, but the flavor and texture can subtly change.
- Avoid repeated reheating. If you need only a small amount, spoon some into a separate bowl to warm instead of reheating the whole jar each time.
- Texture fix: If your caramel is too thick after chilling or freezing, whisk in a tablespoon of warm cream or butter after reheating to restore the original smoothness.
Properly stored caramel not only saves time but ensures you always have this decadent sauce on hand for desserts, drinks, and everything in between.
Ways to Use Salted Caramel
Dessert Ideas Featuring Salted Caramel
Salted caramel is like the finishing touch that turns any dessert from good to unforgettable. Here are some mouth-watering ideas:
- Drizzle over ice cream – Classic, right? A scoop of vanilla with a ribbon of salted caramel is a heavenly combo.
- Layer in brownies – Swirl caramel into brownie batter before baking for gooey pockets of flavor.
- Salted caramel cheesecake – Pour it on top or use it as a middle layer.
- Caramel popcorn – Toss fresh popcorn in salted caramel for a gourmet movie night snack.
- Chocolate tarts – Add a layer of salted caramel under the ganache.
You can even use it as a dip for apple slices, cookies, or marshmallows. It’s one of those sauces that works with everything sweet—and even some savory items.
Breakfast and Beverage Pairings
Who says caramel is just for dessert? Here are a few ways to sweeten up your mornings or coffee breaks:
- Pancakes or waffles – Replace maple syrup with warm salted caramel for an indulgent treat.
- Oatmeal topping – A small drizzle over steel-cut oats with sliced bananas or pecans is divine.
- Lattes and hot chocolate – Stir a spoonful into your morning coffee or hot cocoa. You just made a homemade caramel latte!
- Milkshakes or smoothies – Blend it in or drizzle on top for extra decadence.
- French toast – Replace powdered sugar with caramel and crushed nuts for an elevated brunch.
With its rich, buttery flavor and balanced saltiness, this sauce brings a luxurious twist to even the simplest dishes.
Nutritional Information
Calories and Nutrients Breakdown
Let’s be honest—salted caramel is not exactly a health food. But it’s all about enjoying it in moderation. Here’s a general nutritional breakdown per 1 tablespoon (roughly 20g):
| Nutrient | Amount |
|---|---|
| Calories | ~100–120 kcal |
| Total Fat | ~6–8g |
| Saturated Fat | ~4–5g |
| Carbohydrates | ~14–16g |
| Sugars | ~14g |
| Protein | ~0g |
| Sodium (from salt) | ~80–120mg |
The values may vary depending on how much salt and butter you use, but this gives you a ballpark idea. It’s a rich, high-energy topping meant for treats, not for daily consumption.
Healthier Alternatives and Swaps
If you want to indulge but with fewer calories or less sugar, here are a few ideas:
- Use coconut milk or cream instead of heavy cream for a dairy-free version.
- Swap granulated sugar with coconut sugar for a deeper, molasses-like flavor and slightly lower glycemic index.
- Use plant-based butter for a vegan version.
- Reduce the sugar slightly to cut sweetness, but note that this may affect texture.
Making a lighter version means the sauce may not be as thick or glossy, but you’ll still get that delicious sweet-salty flavor in a more health-conscious form.
FAQs about Salted Caramel Recipe
Can I make salted caramel without cream?
Yes, though the texture will be different. You can use alternatives like coconut cream, evaporated milk, or even Greek yogurt (added off-heat) to create a similar effect.
Why did my caramel turn grainy?
This usually happens if the sugar crystallized. Prevent it by avoiding stirring early on and using a clean, dry pan.
Is there a vegan version of salted caramel?
Absolutely. Use coconut milk and vegan butter instead of cream and dairy butter. The taste will have a slight coconut undertone, but it’s delicious.
Can I double the recipe?
Yes, just use a larger pan and be extra careful with heat distribution. Stir constantly and keep an eye on the color.
How long does homemade salted caramel last?
Up to 2 weeks in the refrigerator, and up to 3 months if frozen properly. Always store in an airtight container and reheat gently before use.
Conclusion
Salted caramel isn’t just a trend—it’s a timeless flavor that brings a rich, luxurious twist to nearly any dessert or drink. With just four basic ingredients and a few careful steps, you can make a batch of golden, gooey caramel right in your own kitchen. Whether you’re pouring it over ice cream, stirring it into coffee, or gifting it in cute little jars, one thing’s for sure: homemade salted caramel is the kind of indulgence that never goes out of style.
The best part? Once you master this simple recipe, the possibilities are endless. From holiday treats to everyday indulgences, this sauce adds a gourmet touch with minimal effort. So grab your saucepan and get ready to impress your taste buds—and everyone else’s too.


