Olympic Chocolate Muffin Recipe: There’s something magical about biting into a freshly baked chocolate muffin. Now imagine that muffin packed with a rich, velvety chocolate flavor, a perfectly soft and fluffy texture, and a golden top worthy of a gold medal. That’s what we call the Olympic Chocolate Muffin — a recipe designed to impress, energize, and satisfy at the highest level. Whether you’re baking for a crowd, preparing treats for an event, or just indulging in a sweet craving, this muffin recipe delivers every time.
Forget those store-bought muffins filled with preservatives and questionable ingredients. When you bake these muffins at home, you control the flavor, the quality, and the presentation. Ready to go for gold in your kitchen? Let’s dive into the ingredients, the step-by-step instructions, and everything else you need to make the best chocolate muffins you’ve ever had.
What Makes It “Olympic”?
You might be wondering — what’s so “Olympic” about these muffins? The answer lies in the power-packed ingredients and their show-stopping presentation. These muffins are made with rich dark chocolate, premium cocoa powder, and a blend of wholesome and indulgent ingredients that deliver a burst of energy. Just like an athlete needs the right fuel to perform, these muffins are designed to deliver on taste, texture, and nutrition.
Think of them as the gold-standard of chocolate muffins. The kind you’d proudly serve at a celebration or competition. They’re moist, fluffy, rich, and have a bold chocolate flavor that’s not too sweet, making them perfect for both kids and adults.
The Popularity of Chocolate Muffins in Competitive Events
Chocolate muffins aren’t just comfort food — they’re also common at sports events, bake-offs, and fundraising sales. Why? Because they’re universally loved, easy to transport, and can be made in bulk. Whether it’s a school competition, a charity race, or an Olympic viewing party, these muffins fit right in. Add a few gold sprinkles or chocolate medals on top and boom — you’ve got a themed dessert that everyone will talk about.
Ingredients You’ll Need
Basic Pantry Essentials
Before you even touch your muffin tray, gather the following pantry staples:
- All-purpose flour – 2 cups (240g)
- Baking powder – 2 tsp
- Baking soda – ½ tsp
- Salt – ½ tsp
- Granulated sugar – ¾ cup (150g)
- Brown sugar – ¼ cup (50g)
These ingredients form the base of the muffin, creating a soft and tender crumb with just the right lift. Using both white and brown sugar ensures a balance of sweetness and moisture. Don’t skip the salt—it enhances the chocolate flavor significantly.
Premium Ingredients for That Olympic Touch
What sets these muffins apart are the high-quality, indulgent ingredients that elevate the experience:
- Unsweetened cocoa powder – ½ cup (50g), preferably Dutch-processed
- Dark chocolate chips or chunks – 1 cup (170g)
- Whole milk or buttermilk – 1 cup (240ml)
- Vegetable oil or melted butter – ½ cup (120ml)
- Large eggs – 2
- Vanilla extract – 2 tsp
- Espresso powder (optional) – 1 tsp to enhance the chocolate flavor
Using good cocoa and real dark chocolate makes all the difference. If you’re aiming for that Olympic-level taste, skip the cheap chocolate chips and go for quality bars you can chop yourself.
Optional Add-Ins and Toppings
Want to add your own twist? Consider these additions:
- Chopped walnuts or pecans
- White chocolate chunks
- Mini marshmallows
- Gold dust or sprinkles (for presentation)
You can even fold in some protein powder or flaxseed if you want a slightly healthier version. These optional add-ins let you personalize the recipe depending on who you’re baking for.
Tools and Equipment Required
Kitchen Tools Checklist
To avoid last-minute surprises, make sure you’ve got these tools on hand:
- Mixing bowls (one large, one medium)
- Measuring cups and spoons
- Whisk and rubber spatula
- 12-cup muffin tin
- Paper liners or non-stick spray
- Ice cream scoop (for even batter portions)
- Oven thermometer (optional but helpful)
Having the right equipment can be the difference between a baking win and a disaster. Don’t underestimate the power of simple tools like a good whisk or a reliable muffin tray.
Tips for Using the Right Equipment
- Metal muffin tins usually conduct heat better than silicone.
- Using liners makes cleanup easier and helps the muffins release without sticking.
- An ice cream scoop gives you consistent muffin sizes, so they all bake evenly.
- Double-check your oven temperature — many ovens run hot or cold, and muffins are sensitive to temperature changes.
Preparation Tips Before You Start
Measuring Accurately for Best Results
Accuracy is everything in baking. Use dry measuring cups for flour and sugar and liquid measuring cups for milk or oil. Level off dry ingredients with the back of a knife. When measuring flour, spoon it into the cup instead of scooping directly — that avoids packing in too much flour, which can make your muffins dry.
Preparing Your Muffin Tray
Lightly spray your muffin tray with oil or use cupcake liners. If you skip the liners, make sure to grease each cup thoroughly. If your tray only holds 6 muffins and the batter makes 12, don’t leave the empty slots bare — fill them halfway with water to ensure even heat distribution.
Preheating the Oven – Why It’s Crucial
Never skip preheating your oven. You want that blast of heat the moment your muffins go in—it’s what helps them rise and form that beautiful dome. Preheat to 375°F (190°C) and double-check with a thermometer if possible. A cold oven equals flat muffins and sad bakers.
Step-by-Step Guide to Making Olympic Chocolate Muffins
Step 1: Mixing Dry Ingredients
Start by whisking together all your dry ingredients in a large mixing bowl. This includes the flour, cocoa powder, baking powder, baking soda, salt, and both sugars. Mixing these thoroughly ensures that the leavening agents and cocoa are evenly distributed throughout the flour, preventing any bitter clumps or uneven rising.
Take a few extra moments to sift the cocoa powder if it’s lumpy—this small step can drastically improve the texture of your muffins. If you’re using espresso powder, mix it in with the dry ingredients at this stage to enhance the depth of chocolate flavor. Remember, the better you combine these ingredients now, the smoother your final batter will be.
Once combined, set the bowl aside. You’ve just built the base of your Olympic muffin mix, and the foundation is everything.
Step 2: Whisking the Wet Ingredients
In a separate bowl, whisk together the eggs, milk (or buttermilk), vanilla extract, and oil or melted butter. These wet ingredients are what give your muffins their signature moisture and richness. Make sure the eggs are at room temperature—they blend better and help trap air in the batter, making the muffins fluffier.
If using melted butter, let it cool slightly before adding it to the eggs to prevent cooking them. Mix until everything is fully combined and slightly frothy. This frothiness helps incorporate air, which contributes to a lighter muffin texture.
This is also the moment to taste-test the vanilla mixture. A fragrant, slightly sweet aroma means you’re on the right track.
Step 3: Combining Wet and Dry Mixtures
Pour the wet mixture slowly into the dry ingredients. Use a spatula or wooden spoon to fold the mixtures together gently. The key here is not to overmix. Overmixing can activate the gluten in the flour, resulting in dense, chewy muffins instead of light, fluffy ones.
Fold the batter just until you no longer see streaks of flour. A few lumps are perfectly fine—that’s normal for muffin batter. If you’re adding any extras like nuts, marshmallows, or white chocolate chunks, toss them in at this stage.
Pro Tip: If you want your chocolate chips to stay evenly distributed and not sink to the bottom, toss them in a tablespoon of flour before adding them to the batter.
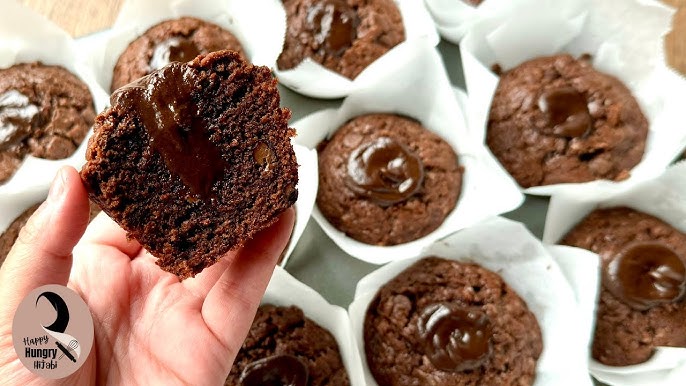
Step 4: Folding in the Chocolate
Now it’s time for the star of the show—the chocolate! Gently fold in your dark chocolate chips or chopped chocolate. If you’re going for a gooey, molten center, consider pressing a few extra chunks into the center of each muffin cup after pouring the batter.
Chocolate not only adds richness but also provides that indulgent, melt-in-your-mouth moment when you bite into the muffin. Using a mix of chocolate chips and chopped chocolate chunks can give you different textures—some bites will be fudgy, others melty. It’s a win-win.
Don’t be shy here—Olympic muffins are meant to be bold, rich, and unforgettable.
Step 5: Filling the Muffin Tray
Using a spoon or an ice cream scoop, fill each muffin cup about ¾ full. This ensures they’ll rise nicely without overflowing. If you want them to have that classic dome shape, slightly overfill the center of each cup.
Optional: Sprinkle a few extra chocolate chips on top of each muffin before baking. Not only does this look great, but it gives that bakery-style finish everyone loves.
Place the tray in the center rack of your preheated oven. That positioning ensures even heat distribution and optimal rise.
Expert Baking Tips for Perfect Muffins
Avoiding Dense Muffins
Nobody wants a dense, rubbery muffin. To avoid that, the most important rule is this: do not overmix your batter. Stirring too aggressively activates the gluten, which leads to chewiness rather than fluffiness.
Also, make sure your leavening agents are fresh. Baking powder and baking soda lose their effectiveness over time. Test them before baking—add a little baking powder to warm water or baking soda to vinegar. If it fizzes, it’s still good.
Another tip is to avoid using too much liquid or fat. While it may seem like more oil equals more moisture, it can weigh down the batter. Stick to the recipe proportions and use room-temperature ingredients to ensure the best texture.
Getting That Perfect Dome Top
That iconic muffin top isn’t just for looks—it’s a sign of a well-risen, properly baked muffin. The secret lies in oven temperature manipulation. Preheat your oven to 425°F (218°C), then reduce it to 375°F (190°C) after placing the muffins inside. The initial high heat helps the tops rise quickly, while the lower heat ensures they bake through evenly.
Don’t open the oven during the first 10-12 minutes of baking. Heat loss at this point can cause the muffins to collapse.
Lastly, don’t forget to let the batter rest for 10–15 minutes before scooping it into the tray. This resting period hydrates the flour and gives the baking powder time to activate.
Nutrition Facts (Per Muffin)
Caloric Breakdown
Let’s break down what you’re consuming per muffin (based on standard ingredients and portion sizes):
| Nutrient | Per Muffin (Est.) |
|---|---|
| Calories | 280–320 kcal |
| Carbohydrates | 35–40g |
| Sugar | 18–22g |
| Fat | 14–18g |
| Saturated Fat | 5–7g |
| Protein | 4–5g |
| Fiber | 2–3g |
| Sodium | 150–200mg |
These muffins are indulgent but not overly heavy. If you want to make them slightly healthier, consider reducing the sugar by 25% or swapping the oil for unsweetened applesauce.
Healthier Substitutes for a Guilt-Free Treat
- Swap all-purpose flour for whole wheat flour or oat flour (50% for balance).
- Use Greek yogurt in place of some oil for added protein.
- Add mashed banana or applesauce to reduce sugar.
- Replace regular chocolate chips with dark chocolate (70% cocoa or more).
These changes not only cut down on calories and sugar but also add nutrients like fiber, protein, and antioxidants.
Variations of the Olympic Chocolate Muffin
Double Chocolate Delight
If you’re the kind of person who believes there’s no such thing as too much chocolate, then the double chocolate variation is calling your name. This version adds a luxurious twist to the original by incorporating melted chocolate directly into the batter. Along with the cocoa powder and chocolate chips, melt ½ cup of semi-sweet or dark chocolate and fold it in during the wet ingredient stage.
The result? Ultra-rich, decadent muffins that feel more like a dessert than a breakfast item. They’re gooey on the inside, crackly on top, and deeply satisfying. You can even dust them with powdered sugar or top with a ganache glaze if you’re going all out.
Ideal for special occasions like birthdays, Valentine’s Day, or post-game celebrations when only the most indulgent treat will do.
Mocha Muffin Madness
Calling all coffee lovers! The mocha muffin variation adds a touch of caffeine and complexity by blending coffee or espresso into the recipe. Replace half the milk with freshly brewed, cooled espresso or strong coffee. You can also toss in a tablespoon of instant espresso powder along with the cocoa.
The coffee intensifies the chocolate flavor and gives the muffin a subtle bitterness that balances the sweetness. It’s perfect for a breakfast treat or a midday pick-me-up. Pair it with a cappuccino or iced latte for the ultimate coffeehouse vibe at home.
Optional add-in: chopped chocolate-covered espresso beans for a surprise crunch in every bite.
Protein-Packed Power Muffins
Looking for a post-workout snack or a healthier treat for your kids? Try the protein-powered version of the Olympic muffin. This variation swaps some of the flour for protein powder (preferably chocolate or vanilla flavor) and includes Greek yogurt in place of some oil or butter.
You can also add ground flaxseeds, chia seeds, or nut butter to increase the fiber and healthy fats. These muffins are not only filling but also perfect for keeping your energy levels steady throughout the day.
Tip: If using whey protein, reduce the baking time slightly and avoid overmixing—it tends to dry out baked goods quickly.
Serving Suggestions
Best Drinks to Pair With
A muffin this good deserves an equally great beverage pairing. Depending on the time of day and your flavor preferences, try these drinks with your Olympic chocolate muffins:
- Morning pairings: Black coffee, cappuccino, chai latte
- Afternoon treats: Iced mocha, matcha latte, chocolate milk
- Evening indulgences: Hot cocoa, dessert wine, warm almond milk
The rich chocolate flavor pairs well with both bitter and sweet drinks, offering a delightful contrast that enhances the experience.
Pro Tip: Serve the muffins slightly warm and cut in half with a small pat of butter or a drizzle of honey for a next-level treat.
Presentation for Events or Parties
If you’re serving these muffins at an event or party, it’s worth taking the presentation up a notch:
- Top with gold sprinkles or edible glitter to fit the Olympic theme.
- Use custom muffin liners in bold colors like gold, silver, or bronze.
- Serve on a tiered tray with mini flags, toothpick toppers, or sports-themed décor.
- Offer different variations like mocha or protein muffins to cater to all tastes.
Whether it’s a bake sale, sports event, or Sunday brunch, these muffins will be the star of the table.
Storage and Shelf Life
Storing at Room Temperature vs. Freezing
Freshly baked muffins are best enjoyed warm, but if you have leftovers (lucky you!), proper storage is key. At room temperature, these muffins stay fresh for up to 3 days when stored in an airtight container. To keep them ultra-moist, place a paper towel at the bottom and top of the container to absorb any excess moisture.
For longer storage, freezing is your best option. Wrap each muffin individually in plastic wrap and store them in a zip-top freezer bag. They’ll keep well for up to 3 months without losing flavor or texture.
How to Reheat Without Drying Out
No one wants a dry muffin, especially after you’ve gone to all that effort. Here’s how to reheat your Olympic chocolate muffins:
- Microwave method: Wrap in a damp paper towel and heat for 15–20 seconds.
- Oven method: Bake at 300°F (150°C) for 5–8 minutes until warm.
- Air fryer method: Heat at 320°F (160°C) for 3–4 minutes.
Avoid overheating—chocolate dries out fast. And always reheat only what you’ll eat immediately to preserve quality.
Troubleshooting Common Muffin Mistakes
Why Are My Muffins Flat?
Flat muffins are often the result of one of the following issues:
- Underfilled muffin cups – aim for ¾ full.
- Oven not hot enough – start at 425°F, then reduce after 5 minutes.
- Expired baking powder or soda – test freshness before using.
- Overmixed batter – leads to deflated muffins with no rise.
Stick to the step-by-step method and measure accurately to avoid these pitfalls.
Why Are They Too Dry or Wet?
Dry muffins usually come from:
- Overbaking
- Too much flour (always spoon and level, don’t scoop)
- Not enough fat or sugar
Wet or soggy muffins could be due to:
- Undercooking
- Too much liquid in the batter
- Adding too many moist add-ins like fruit or yogurt
A little adjustment can go a long way. If your muffins aren’t perfect the first time, don’t stress—just tweak and try again.
Kid-Friendly Version of the Recipe
Reducing Sugar and Chocolate
To make these muffins more suitable for little ones:
- Cut the sugar by 30%
- Use mini chocolate chips or reduce the amount
- Substitute cocoa powder with carob powder for a less intense flavor
You can also replace some oil with mashed banana or applesauce for added nutrients and natural sweetness.
Fun Shapes and Mini Muffins
Kids love anything mini or fun-shaped. Try:
- Mini muffin tins – reduce baking time to 10–12 minutes
- Silicone molds in fun shapes like stars or hearts
- Add sprinkles or colored sugar on top before baking
These tweaks make your muffins more appealing to children and more portion-controlled for parents.
Gluten-Free and Vegan Adaptations
Replacing Eggs and Milk
Creating a version of Olympic chocolate muffins that’s both gluten-free and vegan is easier than you might think. Start with the egg replacements—here are some tried-and-true options:
- Flax egg: Mix 1 tablespoon ground flaxseed with 2.5 tablespoons of water for each egg. Let sit for 5 minutes to gel.
- Chia egg: Same as flaxseed but using chia seeds.
- Unsweetened applesauce: ¼ cup per egg.
- Mashed banana: ¼ cup per egg—great for adding natural sweetness.
As for the milk, you’ve got several excellent dairy-free options:
- Oat milk – Creamy and neutral in flavor.
- Almond milk – Light and subtly nutty.
- Soy milk – Rich in protein, great for baking.
These substitutions don’t just help vegans—they’re perfect for anyone with food allergies or dietary restrictions.
Best Gluten-Free Flour Options
Swapping out all-purpose flour doesn’t mean sacrificing flavor or texture. Some of the best gluten-free alternatives for muffins include:
- 1:1 Gluten-Free Baking Flour – Most convenient and closest to traditional flour.
- Oat Flour – Adds moisture and subtle sweetness.
- Almond Flour – Rich, nutty flavor but best used in combination with other flours.
- Coconut Flour – Very absorbent—only use a little and combine with others.
Pro Tip: Always add a binding agent like xanthan gum or guar gum (¼ tsp per cup of GF flour) unless your flour blend already includes it.
The result? Muffins that are just as moist, fluffy, and chocolaty as the classic version—without the gluten or animal products.
Why Homemade Beats Store-Bought Muffins
Ingredient Control
When you bake at home, you decide what goes into your food. No hidden preservatives, artificial flavors, or unhealthy fats. You can opt for:
- Organic, non-GMO ingredients
- Lower sugar content
- Higher-quality chocolate
- Add-ins tailored to your taste or dietary needs
That kind of control gives you peace of mind—especially if you’re baking for kids or anyone with allergies.
Cost and Taste Comparison
Let’s face it: store-bought muffins are expensive and rarely taste fresh. Here’s how homemade stacks up:
| Aspect | Store-Bought | Homemade |
|---|---|---|
| Cost per muffin | $2.50–$4.00 | Under $1.00 |
| Flavor | Artificial, overly sweet | Rich, customizable |
| Texture | Dense or dry | Moist, fluffy |
| Shelf life | Longer (with preservatives) | Shorter but fresher |
| Nutrition | Unknown | Full transparency |
Once you’ve tasted your own Olympic chocolate muffins, trust us—you’ll never go back.
FAQs about Olympic Chocolate Muffin Recipe
1. Can I Use Cocoa Powder Instead of Melted Chocolate?
Yes! This recipe is designed with cocoa powder in mind. However, adding a bit of melted chocolate (about ½ cup) will enhance richness and add extra depth. Use both for the ultimate chocolate flavor.
2. How Do I Make My Muffins Extra Moist?
Use oil or a mix of oil and yogurt/applesauce instead of only butter. Also, don’t overbake—start checking for doneness at the 18-minute mark. Adding brown sugar helps retain moisture too.
3. Can I Prepare the Batter in Advance?
Yes, but it’s best to bake it within 24 hours. Store the batter in the fridge and allow it to sit at room temperature for 20 minutes before baking. For best results, mix dry and wet ingredients separately and combine just before baking.
4. What’s the Best Type of Chocolate to Use?
High-quality dark chocolate (60%–70% cacao) is ideal. You can also use semi-sweet or milk chocolate if you prefer a sweeter muffin. Avoid waxy, cheap chips—they won’t melt well or taste as rich.
5. How Can I Make Jumbo-Sized Muffins?
Use a jumbo muffin tin and increase baking time to 25–28 minutes. Fill each cup almost to the top and lower the oven temperature slightly to ensure even baking (around 350°F/175°C).
Conclusion
There you have it—your complete, no-fail guide to creating the ultimate Olympic Chocolate Muffins. Whether you’re baking for a sports-themed event, treating yourself on a cozy Sunday, or whipping up snacks for the kids, these muffins deliver every time.
They’re rich without being too heavy, moist without being soggy, and endlessly customizable. You’ve got options for doubling the chocolate, adding coffee, boosting the protein, or even going full vegan and gluten-free.
Remember: great muffins start with quality ingredients, accurate measurements, and a little bit of baking love. Don’t be afraid to experiment. And once you find your perfect combination, it’ll be a recipe you turn to again and again.
So go ahead—lace up that apron, fire up the oven, and bake your way to muffin gold!


