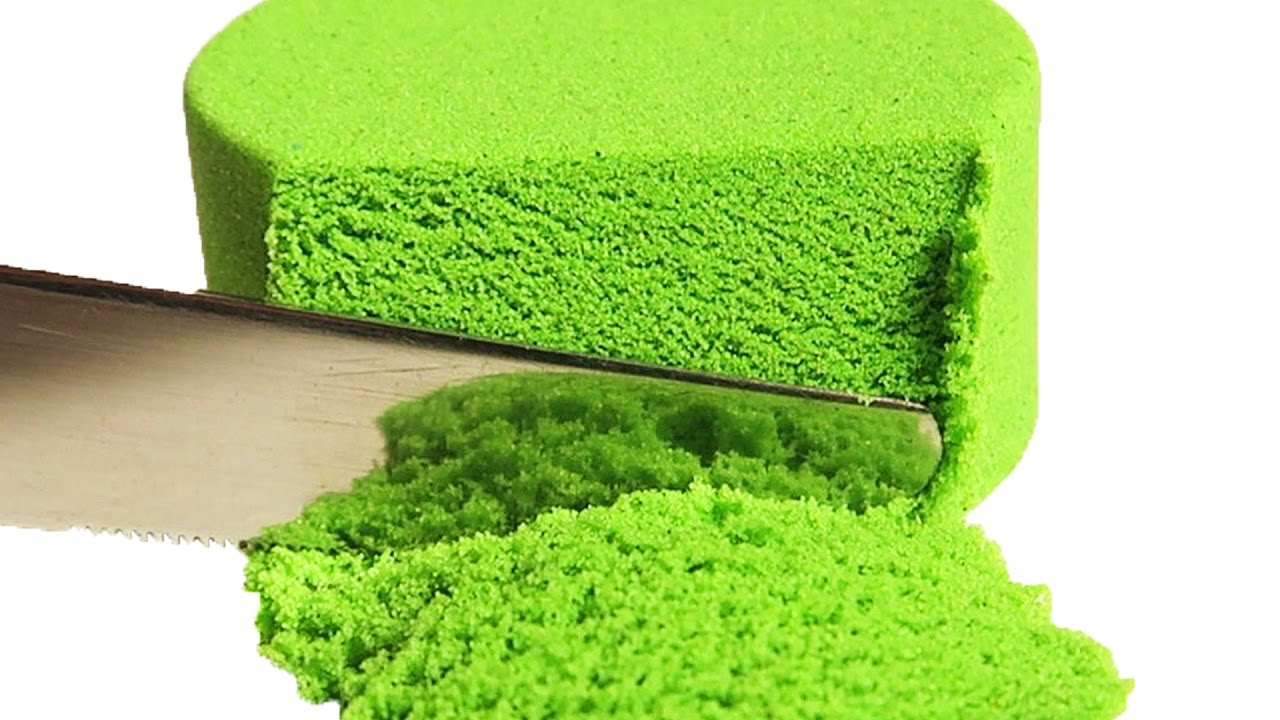
Kinetic Sand Recipe: Kinetic sand is one of those magical substances that feels like a mix between wet sand and playdough. It’s moldable, squishy, and never dries out the way regular clay does. Kids can build castles, towers, or even small sculptures with it, and then watch them crumble in slow motion when pulled apart. Unlike beach sand that sticks everywhere, kinetic sand has a silky texture and clumps together neatly, making it a parent-friendly play material.
The secret behind kinetic sand lies in its special coating. Store-bought versions usually contain real sand coated with silicone oil, giving it a soft, flowing effect. The good news? You don’t have to buy expensive branded packs. With a few household items, you can make your own batch at home that works just as well.
Why Kids and Adults Love It
For kids, kinetic sand is pure entertainment. They get to scoop, squeeze, and mold it into endless shapes without needing water or complicated tools. It sparks creativity, keeps little hands busy, and provides hours of fun. Parents love it too because it’s less messy than regular sand and can be cleaned up quickly.
For adults, it doubles as a stress-relief toy. Running your fingers through kinetic sand is oddly satisfying and soothing, almost like squeezing a stress ball but with more texture. Many people keep a small container on their work desk to play with during breaks—it’s like mindfulness in a sandbox.
Benefits of Making Kinetic Sand at Home
Sure, you can buy kinetic sand at a store, but making it at home has its own perks:
- Cost-Effective – Store-bought kinetic sand can be pricey. Homemade versions use inexpensive ingredients you may already have.
- Customizable – You can add colors, scents, or even glitter to make your sand unique.
- Safe for Kids – When you make it yourself, you know exactly what’s in it, which is important for younger children who love exploring with their hands.
- Fun Family Activity – The process of making it can be just as enjoyable as playing with it.
In short, making DIY kinetic sand is budget-friendly, customizable, and fun—a triple win for parents and kids.
Ingredients You’ll Need
Basic Ingredients for DIY Kinetic Sand
To make kinetic sand at home, you’ll only need a few simple ingredients. Most of them can be found in your pantry or local store. Here’s a common recipe:
- 5 cups of play sand (clean, fine sand works best)
- 1½ cups of cornstarch (acts as a thickening agent)
- 1 cup of water (to moisten and bind)
- 2 tablespoons of dish soap or hand soap (helps create the silky texture)
This is the foundation of your homemade kinetic sand. The cornstarch makes the sand hold together, while the soap adds a smooth, moldable quality.
Optional Add-Ins for Creativity
If you want to take your kinetic sand to the next level, you can mix in:
- Food coloring or liquid watercolors – to create vibrant colors.
- Essential oils – lavender, lemon, or peppermint can add a calming scent.
- Glitter – for sparkly, magical-looking sand.
- Glow powder – to make glow-in-the-dark kinetic sand.
These extras aren’t necessary, but they add a fun twist and make your sand more appealing for play or themed projects.
Choosing Safe and Non-Toxic Materials
Since kinetic sand is mainly for children, safety is important. Always use non-toxic food-grade coloring and avoid scented oils that may cause irritation. If you’re unsure about an ingredient, do a quick test on a small batch before letting kids handle it. For very young children, stick to edible-safe recipes just in case they decide to taste it.
Tools and Equipment Required
Mixing Bowls and Containers
You’ll need at least one large mixing bowl to combine the sand, starch, and soap. A wide bowl works better than a deep one because it’s easier to mix without spilling. If you’re making different colored batches, separate bowls are useful for each color.
Measuring Cups and Spoons
Precise measurement ensures your sand has the right consistency. Too much water makes it soggy, while too little keeps it crumbly. Use standard measuring cups and spoons rather than guessing.
Storage Tips to Keep Sand Fresh
Kinetic sand doesn’t dry out completely, but it can collect dust or lose its smoothness if left uncovered. Store your finished sand in:
- An airtight plastic container
- A zip-seal bag
- A storage bin with a lid (great if you made a large batch for kids’ play tables)
Proper storage not only keeps it fresh but also makes cleanup easier.
Step-by-Step Guide to Making Kinetic Sand
Step 1 – Preparing the Base Sand
Start with clean, fine-grain sand. If you’re using natural sand, make sure to wash and dry it thoroughly to remove dirt and small debris. Store-bought play sand is usually the easiest option since it’s already safe for kids. Spread the sand out on a tray and check for lumps before use.
Step 2 – Mixing the Binding Agent
In a separate bowl, combine cornstarch, water, and dish soap. Stir until you get a smooth, slightly thick liquid. This mixture is what gives your kinetic sand that moldable, flowing texture.
Step 3 – Combining Sand and Binder
Slowly pour the liquid mixture into the sand while stirring continuously. Use your hands (wear gloves if you prefer) to knead the mixture until it’s evenly coated. The goal is to get a dough-like sand that sticks together when pressed but crumbles gently when pulled apart.
Step 4 – Adjusting Texture and Consistency
If your sand feels too dry, add a few teaspoons of water. If it’s too sticky, sprinkle in more sand or cornstarch until it balances out. Take your time with this step—the texture is what makes kinetic sand so fun.
Step 5 – Adding Color, Scents, or Glitter
Once you’ve got the perfect base texture, you can add extra ingredients like food coloring, glitter, or essential oils. Mix well to distribute evenly. Keep in mind that adding liquid coloring may require a bit more cornstarch to keep the sand from getting soggy.
Congratulations—you’ve just made your first batch of DIY kinetic sand!
Different Variations of Kinetic Sand
Colored Kinetic Sand
Adding color to your kinetic sand can make playtime even more exciting. Use liquid food coloring or powdered pigments to create bright, eye-catching shades. For pastel colors, use just a drop or two of dye, while for bold colors, add more until you reach the desired intensity.
Scented Kinetic Sand
To make playtime a sensory experience, try adding essential oils. Lavender is calming, lemon is refreshing, and peppermint adds a cool touch. Just remember to use only a few drops—too much oil can make the sand greasy.
Glow-in-the-Dark Kinetic Sand
Want to wow your kids? Add glow-in-the-dark powder or neon pigments to your sand. Charge it under a bright light, and when the lights go off, your sand will glow like magic.
Tips for Playing with Kinetic Sand
Indoor Play Ideas
Kinetic sand is one of the best mess-free indoor play materials. You don’t need a big setup; just place it in a storage bin or tray, and let kids use cookie cutters, plastic spoons, or molds. They can build castles, press handprints, or cut shapes with toy knives. Parents often find that giving kids a few kitchen tools, like measuring cups or silicone molds, adds more fun to playtime.
Another great idea is to create themed sensory bins. For example, you could make an “ocean” bin by adding seashells, toy fish, and blue-colored sand. Or, try a “construction site” bin with toy trucks and brown sand. These setups encourage imaginative play and storytelling, keeping children entertained for hours indoors.
Outdoor Play Activities
If you prefer to minimize mess inside the house, take kinetic sand play outdoors. It’s perfect for the backyard, patio, or even a sandbox. Outdoors, kids can make bigger creations, such as sand castles or pretend landscapes with toy animals.
You can also combine kinetic sand with water play. While it doesn’t mix the same way as beach sand, kids enjoy experimenting by dropping small sand shapes into water trays. Another fun outdoor idea is a “treasure hunt.” Hide small toys or gems in the sand and let kids dig them out—it’s like having their own mini excavation adventure.
Cleaning Up After Play
One of the biggest advantages of kinetic sand is its easy cleanup. Unlike regular sand, it clumps together, so you can scoop it up with your hands or a dustpan. To keep things simple indoors, place a plastic sheet, tray, or play mat under the sand area. When kids are done, fold it up and pour the leftover sand into a container. For outdoor play, a quick sweep with a broom or shake-off of mats does the trick.
Storage and Shelf Life
How to Store Kinetic Sand
The key to keeping kinetic sand fresh is airtight storage. Use plastic containers with lids, zip-seal bags, or glass jars if you prefer a sustainable option. If you’ve made different colors or types, keep them in separate containers to avoid mixing. Storing them properly helps maintain the smooth, moldable texture for weeks or even months.
A pro tip is to label containers with the date you made them. This way, you’ll know how long each batch has lasted and when it’s time for a new one.
Signs It’s Time to Make a New Batch
Even though kinetic sand doesn’t dry out completely, it can lose quality over time. Here are some signs that you should make a new batch:
- The sand feels too dry, even after adjusting with water.
- It has a strange smell (especially if you used natural oils or scents).
- It looks dirty or has collected too much dust.
- It’s no longer sticking together properly.
On average, homemade kinetic sand lasts about 2–3 months with proper care. If you’re making it for classroom or frequent play use, you may need to refresh it sooner.
Safety Considerations
Child Safety Tips
When making kinetic sand at home, always prioritize safety. Here are a few guidelines:
- Non-toxic ingredients only – Avoid chemicals or strong essential oils.
- Supervise younger kids – While the sand is safe to touch, it’s not meant to be eaten. Always supervise toddlers during play.
- Watch for allergies – If your child has sensitive skin, skip strong dyes or fragrances.
For extra caution, stick to recipes made with food-grade materials for younger kids. That way, even if they accidentally put some in their mouth, it won’t be harmful.
Keeping Play Areas Clean
To keep play stress-free, set clear boundaries for where kinetic sand can be used. A play tray, mat, or plastic bin works well indoors. Encourage kids to wash their hands before and after playing. This not only keeps the sand clean but also prevents it from spreading around the house.
Educational Benefits of Kinetic Sand
Sensory Development for Kids
Kinetic sand isn’t just fun—it’s educational too. Playing with it engages a child’s sense of touch, sight, and even smell if scented. It helps improve fine motor skills, like gripping, squeezing, and molding, which are essential for handwriting and daily activities.
The texture of kinetic sand is especially beneficial for children with sensory processing challenges. It provides a soothing, repetitive experience that can help calm anxiety or hyperactivity. Teachers often use it in classrooms for sensory breaks, helping kids focus better afterward.
Stress Relief for Adults
Believe it or not, kinetic sand isn’t just for children. Adults can also benefit from its calming properties. The simple act of squeezing, molding, and letting the sand flow through your fingers can reduce stress and promote relaxation.
Many workplaces now encourage stress-relief toys at desks, and kinetic sand is quickly becoming a favorite. It offers a quiet, mess-free way to relax during breaks without drawing too much attention. Some people even compare it to meditation because of its repetitive and soothing nature.
Common Mistakes and How to Fix Them
Too Sticky Sand
If your kinetic sand feels sticky or clumpy, you’ve likely added too much water or soap. To fix it, sprinkle in extra play sand or cornstarch and knead until it balances out. The texture should be moldable but not wet.
Too Dry Sand
On the other hand, if the sand crumbles too easily and won’t hold shape, it’s too dry. Add a teaspoon of water at a time, kneading thoroughly before adding more. Avoid pouring in too much liquid at once—you’ll risk making it soggy.
Not Holding Shape
Sometimes, homemade kinetic sand doesn’t hold shapes as well as store-bought versions. This usually happens if the binder isn’t mixed evenly. Make sure to stir the cornstarch-water mixture thoroughly before adding it to the sand. If needed, add a few extra drops of dish soap to improve texture.
With a little adjusting, you can bring your kinetic sand back to the perfect consistency without starting over.
Fun DIY Kinetic Sand Projects
Making Sand Castles at Home
One of the most popular activities with kinetic sand is castle building. The sand’s moldable texture makes it perfect for creating towers, walls, and moats—without needing water like at the beach. You can use plastic molds, cookie cutters, or even small containers from your kitchen (like yogurt cups) to shape the sand.
Kids can create an entire mini kingdom complete with bridges, roads, and tiny toy figures. For older children, you can challenge them to design a detailed castle with multiple towers and patterns carved into the walls using plastic knives or sculpting tools.
What’s great is that when the castle collapses, kids can start again—endless fun without running out of materials. It’s also a fantastic rainy-day activity that brings the beach indoors.
Themed Play Kits (Ocean, Desert, etc.)
Kinetic sand really shines when used in themed play kits. You can set up small play stations with different themes to spark imagination. For example:
- Ocean theme – Use blue kinetic sand, toy fish, shells, and seaweed decorations.
- Desert theme – Use brown or golden sand, toy camels, cacti figures, and mini pyramids.
- Construction site – Add toy trucks, diggers, and tiny traffic cones for a sandbox experience indoors.
- Fairy garden – Mix pastel-colored sand with tiny fairy figurines, flowers, and small wooden houses.
These kits not only provide fun but also encourage storytelling and creative thinking. Kids can role-play different scenarios, which helps with language development and problem-solving skills.
Store-Bought vs Homemade Kinetic Sand
Cost Comparison
Buying branded kinetic sand from the store can be expensive, especially if your child plays with it often. A small pack usually costs several dollars, and larger sets with molds can add up quickly.
On the other hand, homemade kinetic sand costs only a fraction. Most recipes use simple household items like play sand, cornstarch, and dish soap. Even if you need to buy the ingredients, a large homemade batch often costs less than a single small pack from the store.
For families or classrooms, DIY is the budget-friendly option that lets you create larger amounts without overspending.
Quality and Texture Differences
Store-bought kinetic sand does have one advantage—it’s often silkier and flows more smoothly because it uses silicone oil, something not typically found in homemade recipes. This makes it extra stretchy and less likely to dry out.
Homemade kinetic sand, while slightly different in texture, is still highly enjoyable. Plus, it gives you control over customization. Want rainbow colors, glitter, or scented sand? With DIY, the possibilities are endless.
Ultimately, if you want convenience and the “perfect” silky texture, store-bought is a good choice. But if you value affordability, creativity, and hands-on fun, homemade sand wins.
FAQs about Kinetic Sand Recipe
Can I Use Regular Sand?
Yes, you can use regular sand, but it’s best to wash and dry it thoroughly first. Play sand from craft or toy stores is cleaner and softer, making it the better choice for children. Beach sand often contains salt, dirt, and tiny shells, so it may not work as well.
Is Kinetic Sand Washable?
Kinetic sand itself doesn’t dissolve in water, but if it gets on clothes or carpets, it can usually be cleaned up easily. Simply let it dry and then vacuum or brush it away. Avoid soaking it in water because that can ruin the texture.
How Long Does Homemade Sand Last?
With proper storage in airtight containers, homemade kinetic sand can last 2–3 months. If it starts to smell strange, lose texture, or look dirty, it’s best to make a fresh batch.
Can I Add Essential Oils to My Sand?
Yes! A few drops of safe, child-friendly essential oils can add a pleasant scent. Lavender, lemon, or peppermint are popular choices. Just be sure not to add too much oil, or the sand may feel greasy.
Does Kinetic Sand Dry Out?
Unlike playdough, kinetic sand doesn’t completely dry out. However, homemade versions may lose some moisture over time. If that happens, simply add a few drops of water and knead it back to life.
Conclusion
The best part? You can customize it with colors, scents, or glitter to suit your family’s preferences. While store-bought sand has its perks, nothing beats the hands-on experience of making your own batch at home. It’s not just about the final product—it’s about the fun of creating something together.
So grab some sand, cornstarch, and a little imagination, and get started. Before you know it, you’ll have your very own kinetic sand ready for endless play.


