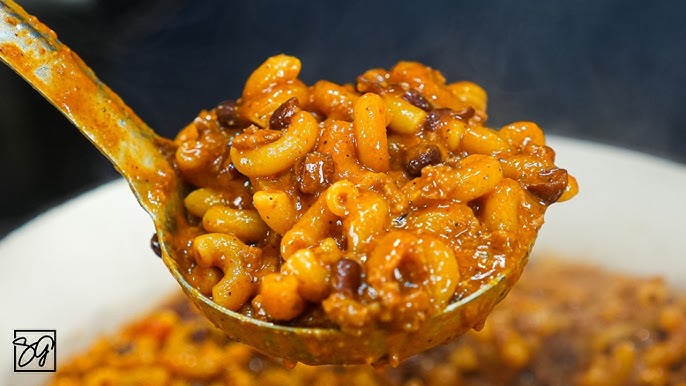
Hamburger Chili Recipe: There’s nothing quite like a steaming bowl of homemade chili to warm you up on a chilly evening. Among all chili variations, hamburger chili has earned a special place in kitchens everywhere. It’s hearty, flavorful, and doesn’t require fancy ingredients. The beauty of hamburger chili lies in its simplicity—it’s made with everyday items like ground beef, beans, tomatoes, onions, and spices. Yet, when combined and simmered together, they create a rich, savory dish that feels like comfort in a bowl.
Why is this recipe so popular? Because it’s versatile. You can serve it on its own with toppings like cheese and sour cream, ladle it over rice or pasta, or even spoon it onto hot dogs for a homemade chili dog. The possibilities are endless, which makes it a go-to recipe for busy weeknights, family gatherings, or even game day parties.
Another reason people love hamburger chili is that it’s budget-friendly. Unlike recipes that call for specialty cuts of meat, ground beef is affordable and widely available. Plus, you can stretch it further by adding beans, vegetables, or even a little extra broth to make a bigger batch. This is why so many families keep chili in their dinner rotation—it feeds a crowd without breaking the bank.
Whether you’re new to cooking or an experienced home chef, hamburger chili is one recipe you can always count on. The step-by-step guide below will walk you through everything from the ingredients you’ll need to the cooking process, ensuring that your chili turns out delicious every single time. By the end, you’ll not only know how to make it, but you’ll also understand how to tweak it to suit your taste buds perfectly.
Why Hamburger Chili is a Comfort Food Classic
Comfort food is more than just filling your stomach—it’s about creating memories, evoking emotions, and bringing people together. Hamburger chili checks all those boxes. For many, it’s a dish that reminds them of home, childhood, or even festive gatherings. The combination of tender ground beef, tangy tomatoes, hearty beans, and aromatic spices creates a flavor that feels both familiar and satisfying.
Another reason hamburger chili is such a beloved comfort food is its adaptability. Every household seems to have its own version, with slight tweaks in spices, ingredients, or cooking methods. Some families prefer a thick, meaty chili with minimal beans, while others go heavy on the beans and veggies for extra nutrition. No matter the variation, one thing remains the same: it brings warmth and happiness with every bite.
Chili also represents hospitality. Imagine serving a big pot of chili when friends or family come over. It’s not just food—it’s a way of saying, “You’re welcome here.” That’s why chili often shows up at potlucks, tailgating events, or neighborhood cookouts. It’s the kind of dish that encourages sharing, conversation, and togetherness.
Finally, let’s not forget the practicality. Comfort food often works because it’s easy to prepare, doesn’t require gourmet skills, and still tastes amazing. Hamburger chili is exactly that kind of dish. You don’t need fancy cooking techniques; you just need patience to let the flavors meld together. And once you taste the first spoonful, you’ll instantly understand why it’s a comfort food staple.
The Perfect Balance of Flavor and Texture
A great hamburger chili isn’t just about throwing ingredients into a pot—it’s about achieving balance. The ground beef provides a hearty, savory base, while the beans add creaminess and substance. Tomatoes bring acidity that cuts through the richness of the meat, and spices like chili powder, cumin, and paprika give it that signature depth of flavor. The secret lies in making sure none of these elements overpower the others.
Texture is just as important as flavor. You don’t want mushy beans or rubbery beef. Properly browned ground beef gives chili a satisfying bite, while slow simmering ensures the beans stay tender but not falling apart. Vegetables like onions and peppers should soften enough to blend into the chili but still retain a bit of texture. The result should be a spoonful that has layers of taste and mouthfeel, not just a soupy mixture.
Another trick to perfecting chili is seasoning in stages. Instead of dumping all the spices in at once, add some while browning the meat and then more while simmering. This builds depth and complexity, allowing the flavors to develop fully. And don’t forget the finishing touches—sometimes a splash of vinegar, a sprinkle of sugar, or a dash of hot sauce right before serving can elevate your chili from good to unforgettable.
When done right, hamburger chili strikes the ideal balance between hearty and flavorful, smooth and chunky, spicy and savory. It’s a dish that excites your taste buds while still feeling like a cozy hug in a bowl. That’s why mastering the balance of flavor and texture is the real secret to making the best chili you’ve ever had.
Ingredients You’ll Need
Before you start cooking, it’s important to gather everything you’ll need. The beauty of hamburger chili is that it’s made with simple, everyday ingredients that you may already have in your pantry or fridge. Let’s break it down into three categories: main ingredients, optional add-ons, and pantry staples.
Main Ingredients for Hamburger Chili
- Ground beef (80/20 works best for flavor)
- Canned kidney beans or black beans
- Canned diced tomatoes
- Tomato paste for richness
- Onion (yellow or white)
- Bell peppers (green or red)
- Garlic cloves
- Chili powder
- Ground cumin
- Paprika
- Salt and pepper
Optional Add-Ons for Extra Flavor
- Jalapeños for spice
- Corn kernels for sweetness
- Carrots or celery for extra nutrition
- Hot sauce for a fiery kick
- Worcestershire sauce for depth
Pantry Staples You Probably Already Have
- Olive oil or vegetable oil for sautéing
- Chicken or beef broth for liquid
- Sugar (to balance acidity from tomatoes)
- Bay leaves for slow simmering
By organizing your ingredients this way, you’ll save time in the kitchen and ensure that your chili has all the right components to deliver big, bold flavor.
Kitchen Tools Required
Cooking delicious chili doesn’t require a professional kitchen setup. However, having the right tools can make the process smoother and more enjoyable. Here’s a breakdown of what you’ll need:
Must-Have Cookware
- Large pot or Dutch oven – Essential for simmering chili without overcrowding.
- Wooden spoon or spatula – Perfect for stirring and scraping the bottom of the pot.
- Measuring cups and spoons – To get your seasonings just right.
Helpful Tools for Preparation
- Sharp knife and cutting board – For chopping onions, garlic, and peppers.
- Colander – Useful for draining beans and rinsing them if canned.
- Ladle – Makes serving chili easier and less messy.
These tools may seem basic, but they’re exactly what you need for a successful chili-making session. With everything ready, you’ll move smoothly from preparation to cooking without scrambling for equipment.
Preparing the Ingredients
Cooking a great chili starts long before you turn on the stove—it begins with how you prepare the ingredients. The way you chop your vegetables, brown your meat, and handle canned goods can completely change the final outcome. Preparation isn’t just about convenience; it’s about setting the stage for layers of flavor to develop.
Chopping Vegetables the Right Way
Onions, garlic, and bell peppers form the aromatic base of most chili recipes. Dice the onions finely so they cook down and blend seamlessly into the chili, creating sweetness and depth. Garlic should be minced rather than sliced to release more flavor into the pot. As for bell peppers, medium-sized chunks work best—they soften as the chili simmers but still hold some bite, adding texture.
Browning Ground Beef Perfectly
One of the most common mistakes in chili-making is rushing the browning process. When you brown ground beef, don’t overcrowd the pan. If the beef is packed too tightly, it will steam instead of sear, resulting in a dull flavor. Cook it in batches if needed, and don’t be afraid to let it sit for a minute before stirring—those browned bits on the bottom of the pan are pure flavor gold.
Prepping Beans and Tomatoes
If you’re using canned beans, drain and rinse them to remove excess sodium and liquid. This step keeps your chili from becoming too salty or watery. For tomatoes, canned diced tomatoes with juices work well, but if you want a fresher taste, you can chop up ripe tomatoes instead. Tomato paste is another ingredient that adds richness and helps thicken the chili.
When all your ingredients are chopped, drained, and ready, you’ll find that the cooking process flows much more smoothly. Preparation might feel like extra work at the beginning, but it guarantees a chili that tastes layered, balanced, and satisfying.
Step-by-Step Cooking Guide
Now comes the exciting part—bringing everything together in one pot to create a hearty, flavorful chili. Follow these steps carefully, and you’ll end up with a dish that’s rich, balanced, and impossible to resist.
Step 1 – Cook the Ground Beef
Heat a large pot or Dutch oven over medium-high heat. Add a drizzle of oil, then toss in the ground beef. Break it apart with a wooden spoon, cooking until it’s no longer pink. Season lightly with salt and pepper at this stage to start layering flavor. Remove excess grease if necessary, but leave a little behind to help sauté the vegetables.
Step 2 – Add Vegetables and Seasonings
Once the beef is browned, add your onions, garlic, and bell peppers. Cook until they soften, about 5–7 minutes. Stir in chili powder, cumin, paprika, and any other spices you’re using. Let the spices bloom in the hot oil and beef fat for maximum flavor—this is what transforms chili from bland to bold.
Step 3 – Stir in Beans and Tomatoes
Next, add your drained beans, diced tomatoes, and tomato paste. Stir everything together until the ingredients are well mixed. Pour in about a cup of beef or chicken broth to loosen the mixture and give it a soupier consistency that will thicken as it simmers.
Step 4 – Simmer for Rich Flavor
Bring the chili to a gentle boil, then reduce the heat to low and let it simmer uncovered for at least 30 minutes. Stir occasionally to prevent sticking. The longer you let it simmer, the better the flavors meld together. Some cooks even prefer to let it go for an hour or two for maximum richness.
Step 5 – Taste Test and Adjust Seasonings
Before serving, taste your chili and adjust as needed. If it’s too acidic, add a pinch of sugar. If it needs more heat, stir in hot sauce or chili flakes. If it’s too thick, splash in a little more broth. The beauty of chili is that it’s flexible—seasoning adjustments at the end ensure it’s tailored to your preferences.
Tips for Making the Best Hamburger Chili
Even though chili is a simple dish, small tweaks can make the difference between an average bowl and an outstanding one. Here are some practical tips to elevate your hamburger chili.
How to Adjust Heat Levels
Not everyone loves fiery food, but chili should still have a little kick. If you want mild chili, stick with basic chili powder and paprika. For medium heat, add fresh jalapeños or a dash of cayenne. If you’re a spice lover, go all-in with habaneros or chipotle peppers in adobo sauce. Remember, it’s easier to add spice than take it away, so start small and build up.
Thickening Your Chili Without Losing Flavor
If your chili turns out too watery, don’t panic. The easiest way to thicken it is to let it simmer uncovered a bit longer, which reduces excess liquid naturally. Another trick is to stir in a spoonful of cornmeal or masa harina (corn flour), which thickens while adding a subtle earthy flavor. Avoid adding flour or cornstarch—they can leave a pasty aftertaste.
Making Chili in Advance
Chili is one of those magical dishes that actually tastes better the next day. If you have time, make it ahead and refrigerate overnight. This allows the spices and ingredients to blend even more deeply, creating a richer, more cohesive flavor. When reheating, just add a splash of broth or water to refresh the consistency.
By following these tips, you’ll ensure that every pot of hamburger chili you make is flavorful, hearty, and exactly to your liking.
Variations of Hamburger Chili
The best thing about chili is that there’s no one “right” way to make it. Depending on your taste, dietary needs, or even the occasion, you can easily adjust the recipe. Here are a few variations to inspire you.
Classic Mild Chili
For those who prefer a gentler flavor, keep it simple with ground beef, beans, tomatoes, onions, and mild spices. This version is family-friendly and perfect for kids or anyone who doesn’t enjoy too much heat.
Spicy Kick Chili
Want to turn up the heat? Add fresh jalapeños, chipotle peppers, or even a splash of hot sauce. Using spicy sausage along with ground beef can also give your chili an extra punch. Garnish with sliced chili peppers for a bold presentation.
Healthy and Lean Version
If you’re looking for a lighter option, swap ground beef for lean ground turkey or chicken. Load up on vegetables like zucchini, carrots, or mushrooms, and use low-sodium beans and broth. This version is still hearty but cuts down on fat and calories.
No matter which variation you choose, the core of hamburger chili remains the same—rich, hearty, and comforting.
Serving Suggestions
A bowl of chili is satisfying on its own, but the right toppings and sides can take it to the next level. Here’s how to turn a simple dish into a complete meal.
Best Toppings for Hamburger Chili
- Shredded cheddar or Monterey Jack cheese
- Sour cream or Greek yogurt
- Fresh cilantro or green onions
- Sliced jalapeños for extra spice
- Crushed tortilla chips or cornbread crumbles for crunch
Perfect Side Dishes
Pair your chili with warm, buttery cornbread for the ultimate comfort food combo. Other great options include garlic bread, baked potatoes, or a crisp green salad to balance the richness.
Pairing Drinks with Chili
For beverages, you can’t go wrong with an ice-cold beer, especially lagers or pale ales that complement the spices. If you prefer non-alcoholic options, iced tea or sparkling water with lime is refreshing and cuts through the richness.
Serving chili is all about presentation and balance. With the right sides and toppings, you’ll turn a humble pot of chili into a feast everyone will remember.
Storage and Reheating
One of the best things about hamburger chili is that it stores and reheats beautifully. In fact, many people argue it tastes even better the next day. Proper storage techniques ensure your chili stays fresh, flavorful, and safe to eat.
How to Store Leftovers
Once your chili cools to room temperature, transfer it to airtight containers. Store it in the refrigerator for up to 4–5 days. Glass containers work best because they prevent stains and odors that sometimes cling to plastic. Always avoid leaving chili out on the counter for more than two hours to prevent bacterial growth.
Freezing Chili the Right Way
If you’ve made a big batch and want to save some for later, freezing is a fantastic option. Portion chili into freezer-safe bags or containers, leaving some space at the top for expansion. Flattening freezer bags before freezing makes them easier to stack and saves space. Chili can be frozen for up to 3 months without losing quality. When ready to use, thaw it overnight in the fridge.
Reheating Tips for Fresh Taste
Reheat chili gently on the stovetop over medium heat, stirring occasionally until warmed through. If it has thickened too much during storage, add a splash of broth or water to bring back its original consistency. Microwave reheating works too, but make sure to stir halfway to heat evenly. Avoid overheating, as it may dry out the beef or make the beans mushy.
By following these simple steps, you’ll always have a comforting bowl of chili ready, whether it’s fresh off the stove or pulled from the freezer on a busy night.
Nutritional Breakdown
Chili isn’t just delicious—it can also be quite nutritious, especially when made with quality ingredients and balanced portions. Let’s take a closer look at what a typical serving of hamburger chili offers.
Calories and Macronutrients
A standard one-cup serving of traditional hamburger chili contains approximately:
- Calories: 250–300
- Protein: 18–20 grams
- Carbohydrates: 20–25 grams
- Fat: 10–12 grams
- Fiber: 6–8 grams
The high protein content from ground beef and beans makes chili filling and satisfying, while the fiber from beans and vegetables supports digestion.
Health Benefits of Ingredients
- Ground beef – A great source of protein and iron, essential for energy and muscle function.
- Beans – Packed with plant-based protein, fiber, and minerals like potassium and magnesium.
- Tomatoes – Provide antioxidants such as lycopene, which support heart health.
- Spices – Chili powder, cumin, and paprika not only add flavor but also contain anti-inflammatory properties.
For a lighter version, substitute lean ground turkey or chicken, skip extra oil, and use low-sodium beans. This reduces fat and sodium while still delivering big flavor.
Overall, hamburger chili is a balanced meal that offers comfort without being overly indulgent, especially when made thoughtfully.
Common Mistakes to Avoid
Even though chili is a simple dish, a few common missteps can prevent it from reaching its full potential. By avoiding these mistakes, you’ll ensure your chili turns out perfect every time.
Overcooking the Meat
Ground beef should be browned until just cooked through before adding the other ingredients. Overcooking can make the beef tough and dry. Remember, it will continue cooking as the chili simmers, so there’s no need to overdo it early on.
Using Too Much Liquid
Chili should be hearty, not soupy. Adding too much broth or water dilutes the flavor and ruins the thick texture. Always start with less liquid—you can add more later if needed.
Forgetting to Taste Test
One of the biggest mistakes home cooks make is not tasting as they go. Chili develops flavor over time, but adjusting spices throughout the cooking process ensures balance. Don’t wait until the very end to realize it’s missing salt or heat.
Not Allowing Enough Simmering Time
Chili is not a quick dish—it needs time to meld flavors. Rushing the simmering process results in chili that tastes flat or unfinished. Aim for at least 30 minutes, but longer is always better.
Avoiding these pitfalls guarantees your chili will turn out rich, hearty, and bursting with flavor.
FAQs about Hamburger Chili Recipe
1. Can I make hamburger chili without beans?
Yes! Many traditional chili recipes skip the beans entirely, focusing instead on meat and spices. This variation is often called “Texas-style chili.”
2. Can I use fresh tomatoes instead of canned?
Absolutely. Fresh tomatoes give a lighter, fresher taste. Just be sure to peel and chop them before adding. You may need to cook longer to break them down.
3. What’s the best way to make chili spicier?
Add fresh chili peppers, cayenne powder, or chipotle peppers in adobo sauce. Start small and build up the heat gradually.
4. Can I cook chili in a slow cooker?
Yes. Brown the beef and sauté vegetables first, then transfer everything to a slow cooker. Cook on low for 6–8 hours or high for 3–4 hours.
5. How do I make chili vegetarian?
Simply omit the beef and add extra beans, lentils, or even crumbled tofu. Bulk it up with vegetables like zucchini, mushrooms, and carrots.
Conclusion
Hamburger chili is more than just a recipe—it’s a comforting tradition that brings people together. With its rich flavors, hearty texture, and endless variations, it’s no wonder this dish remains a family favorite. By carefully preparing ingredients, following the step-by-step guide, and avoiding common mistakes, you can master the art of making chili that tastes amazing every time.
Whether you like it mild and classic, fiery and bold, or light and healthy, this recipe is adaptable to your preferences. Don’t forget to add your favorite toppings and sides to turn a simple bowl into a complete meal. And the best part? Chili stores beautifully, making it perfect for meal prep, family dinners, or even last-minute gatherings.
So grab your pot, gather your ingredients, and get cooking—the ultimate comfort food awaits. Once you taste your homemade hamburger chili, you’ll never want to go back to canned or packaged versions again.


