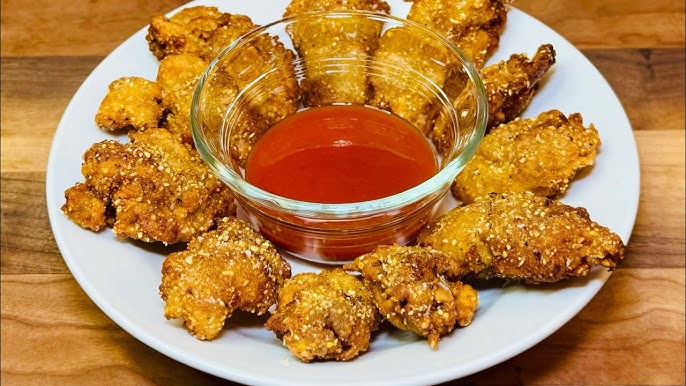
Fried Oyster Recipe: Fried oysters are a beloved staple of Southern cuisine, celebrated for their rich flavor, satisfying crunch, and cultural significance. In places like Louisiana, Mississippi, and the Carolinas, oysters aren’t just seafood—they’re a way of life. Especially during oyster season (fall through early spring), coastal communities come alive with festivals, seafood boils, and street vendors selling golden-brown oysters fresh from the fryer.
What makes fried oysters so irresistible? It’s the perfect contrast: the briny, juicy center of a freshly shucked oyster wrapped in a crispy, seasoned coating. One bite delivers layers of flavor and texture—from the delicate seafood taste to the satisfying crunch that makes your mouth water for more. They’re also incredibly versatile: served as appetizers, in po’ boys, over salads, or on their own with just a splash of hot sauce and lemon.
Historically, oysters were considered a cheap protein for working-class communities along the coast. But over the years, their popularity grew, turning fried oysters into a gourmet option featured in high-end restaurants and home kitchens alike. Whether you’re new to oysters or a seasoned seafood lover, this fried oyster recipe will guide you through creating an authentic, mouthwatering dish worthy of any occasion.
When and Where to Serve Fried Oysters
Fried oysters aren’t just for fancy dinners—they’re perfect for game days, family get-togethers, backyard barbecues, or a cozy Friday night treat. Serve them hot as an appetizer or as the main course paired with slaw and fries. They also make an epic addition to seafood platters or sandwiches like the iconic New Orleans-style oyster po’ boy.
This dish truly shines in casual settings where finger foods are welcome. Think: fish fry Fridays, tailgating parties, or Southern-style brunches. Wherever you serve them, make sure you’ve got enough to go around—because they disappear fast!
Ingredients You’ll Need
Before we dive into the cooking process, let’s break down all the ingredients you’ll need to fry oysters to perfection. Quality matters here, especially when it comes to the oysters themselves. Here’s everything you should gather.
Fresh Oysters: The Star of the Show
Freshness is everything when it comes to oysters. Look for oysters that are:
- Still in their shell (live oysters)
- Smell like the ocean (not fishy)
- Come from a trusted fish market or seafood supplier
If you don’t feel comfortable shucking them yourself, many seafood counters offer pre-shucked oysters. Just make sure they were shucked the same day or are stored on ice with a “shucked on” date.
For this recipe, you’ll need about 1 pint of shucked oysters (roughly 20–25 oysters). If you’re cooking for a crowd, feel free to double or triple the batch.
Essential Breading Ingredients
Here’s what you’ll need to get that iconic crispy coating:
- 1 cup all-purpose flour
- 1 cup cornmeal (for Southern-style crunch)
- 1/2 cup cornstarch (for extra crispiness)
- 2 large eggs
- 1/2 cup buttermilk or regular milk
The combination of flour, cornmeal, and cornstarch gives you the ideal texture—light, golden, and crunchy. The eggs and milk help bind the breading to the oysters and add richness.
Seasonings for That Signature Flavor
No bland oysters here! You’ll season both the flour mixture and the oysters themselves to bring out their natural brininess. Must-have seasonings include:
- 1 tsp paprika
- 1/2 tsp cayenne pepper (optional for heat)
- 1 tsp garlic powder
- 1 tsp onion powder
- Salt and pepper to taste
- Old Bay seasoning (optional, but highly recommended)
Want a spicy kick? Add a few dashes of hot sauce to the egg mixture. This infuses flavor deep into the breading.
Oils and Fats for Frying
Choose a high-smoke-point oil so your oysters fry without burning. The best options are:
- Peanut oil (traditional and flavorful)
- Canola oil (neutral and budget-friendly)
- Vegetable oil
You’ll need about 3 to 4 cups of oil, depending on the size of your skillet. Fill your pan at least 2 inches deep to ensure the oysters are fully submerged and cook evenly.
Optional Garnishes and Dipping Sauces
While fried oysters are delicious on their own, the right toppings and sauces can take them to the next level. Here are a few favorites:
- Fresh lemon wedges
- Chopped parsley
- Hot sauce or remoulade
- Tartar sauce
- Garlic aioli
- Cocktail sauce
Want to go Southern all the way? Serve them with coleslaw, hush puppies, or pickles on the side.
Tools and Equipment Needed
To fry oysters like a pro, having the right tools is just as important as the ingredients.
Must-Have Kitchen Tools
These essentials will make the process smoother and safer:
- Large mixing bowls (for dredging and breading)
- Tongs (for flipping and transferring)
- Wire rack and baking sheet (for draining and keeping oysters crispy)
- Paper towels (for blotting excess oil)
- Measuring cups and spoons
Having everything pre-measured and organized will help you move quickly once the oil is hot. Timing is crucial when frying!
Recommended Frying Gear
- Heavy-bottom skillet or Dutch oven: Retains heat and prevents splattering.
- Deep-fry thermometer: Keeps oil at the optimal 350–375°F (175–190°C).
- Spider strainer or slotted spoon: Ideal for lifting oysters out of the oil.
- Splatter screen: Optional but helpful for keeping your stovetop clean.
These tools not only make frying easier but also safer—especially when working with hot oil.
Preparing the Oysters
How to Clean and Shuck Oysters Properly
If you’re starting with live oysters, here’s how to clean and shuck them:
- Rinse oysters under cold water to remove any grit or sand.
- Use a stiff brush to scrub the shells.
- Wrap a towel around the oyster to protect your hand.
- Insert an oyster knife into the hinge and twist until it pops open.
- Slide the knife along the top to remove the shell, then cut underneath to release the oyster.
Always discard any oysters with broken shells or a strong odor. Fresh oysters should smell clean and salty, like the sea.
Making the Perfect Breading Mixture
Balancing Texture and Flavor
The breading is where the magic happens—it transforms slippery oysters into crunchy bites of heaven. A good breading mixture strikes the perfect balance between crispness and flavor. In Southern cuisine, a combo of cornmeal and flour is the go-to base. Cornmeal brings the crunch, while flour adds body and helps the coating stick better.
To build the ultimate breading station, you’ll need three bowls:
- Seasoned flour/cornmeal mixture – Combine your all-purpose flour, cornmeal, and seasonings (paprika, garlic powder, cayenne, salt, pepper).
- Egg wash – Beat two eggs with buttermilk and a few dashes of hot sauce.
- Dry finish – Some cooks like to double-dip. After the egg wash, you can re-coat the oyster in the flour mixture for extra crunch.
The order goes like this: dredge in flour → dip in egg wash → dredge again in flour (or seasoned cornmeal). Shake off the excess at each step to avoid clumping.
The texture is customizable too. Want a thicker crust? Double-dip or use panko breadcrumbs. Prefer something lighter? Stick to a single dredge in a well-seasoned flour-cornmeal blend.
Secrets to Getting That Crispy Crunch
The real secret? Keep everything cold—except the oil. Cold oysters, cold breading, and hot oil equal the crispiest results. If you’re working in batches, keep breaded oysters in the fridge until ready to fry.
Other tips:
- Let the coated oysters rest for 10–15 minutes before frying. This helps the breading adhere better.
- Add cornstarch to the flour mixture—it absorbs moisture and enhances crispness.
- Don’t overcrowd the pan. Fry in small batches to maintain the oil’s temperature and prevent soggy coating.
- Always drain on a wire rack instead of paper towels to maintain that crunchy exterior.
Step-by-Step Guide to Frying Oysters
Preheating Your Oil
Getting the oil to the right temperature is absolutely key. If it’s too hot, the oysters burn outside and stay raw inside. Too cold? You’ll get greasy, soggy oysters.
- Heat your oil to 350–375°F (175–190°C).
- Use a deep-fry thermometer to monitor the temperature accurately.
- Choose a deep, heavy-bottomed skillet or cast iron pan to retain steady heat.
- Once the oil hits the right temp, you’re ready to fry.
To test the oil without a thermometer, drop a small pinch of flour or breadcrumb into the oil. If it sizzles immediately, the oil is ready. If it sinks or doesn’t sizzle, give it more time.
Dipping and Breading the Oysters
Here’s the dipping order for a crispy, flavorful finish:
- Pat oysters dry with a paper towel to help the breading stick.
- Dredge in the flour/cornmeal mixture, coating evenly.
- Dip in the egg wash – let the excess drip off.
- Re-coat in dry mixture or seasoned panko for an extra crunch.
As you coat each oyster, place it on a wire rack or tray. Letting them rest helps the coating adhere better during frying.
Frying to Golden Perfection
Now the fun begins!
- Lower 4–5 oysters at a time into the hot oil using tongs or a spider strainer.
- Fry for 2–3 minutes, flipping halfway through. They should turn golden brown and crispy.
- Don’t overcrowd the pan—each oyster needs space to cook evenly.
- As they finish, remove and drain on a wire rack set over a baking sheet.
If you’re making a large batch, keep fried oysters warm in a 200°F (93°C) oven while finishing the rest.
Draining and Cooling
Skip the paper towels—use a cooling rack to drain excess oil. This keeps the oysters crunchy instead of soggy. Let them cool for just a minute or two before serving. They’re best hot, but you don’t want anyone burning their mouth!
Pro Tip: Sprinkle with a little flaky salt immediately after frying to enhance the flavor.
Serving Suggestions
Best Sides to Pair with Fried Oysters
What goes with fried oysters? A whole feast if you ask the South. Here are a few all-time favorite sides:
- Coleslaw – Creamy or vinegar-based, it adds a refreshing crunch.
- French fries or sweet potato fries – You can’t go wrong with crispy on crispy.
- Cornbread – Soft, buttery, and slightly sweet.
- Hush puppies – Deep-fried cornmeal dough balls that are a Southern staple.
- Grilled corn on the cob – Adds a smoky-sweet contrast.
- Pickles or pickled okra – The acid cuts through the richness perfectly.
Feeling fancy? Serve fried oysters over a light arugula salad with lemon vinaigrette for a gourmet twist.
Dipping Sauce Ideas
Sauces take your fried oysters from great to unforgettable. Try these delicious dipping options:
- Classic tartar sauce – Creamy and tangy with chopped pickles and capers.
- Spicy remoulade – A New Orleans favorite made with mayo, mustard, garlic, and Creole spices.
- Cocktail sauce – Tomato-based with horseradish and lemon juice for zing.
- Garlic aioli – Smooth, garlicky goodness.
- Hot sauce – Simple and bold. Try Crystal, Louisiana, or Tabasco.
- Sweet chili sauce – A fun Asian-inspired twist.
Pro Tip: Mix sour cream, lemon juice, dill, and garlic for a quick homemade sauce in under 5 minutes.
Storing and Reheating Fried Oysters
Proper Storage Methods
While fried oysters are best enjoyed fresh, you can store leftovers if needed:
- Let oysters cool completely before storing.
- Place in an airtight container lined with paper towels.
- Store in the refrigerator for up to 2 days.
Avoid stacking them, as this can make them soggy. If you must stack, separate layers with parchment paper.
Don’t freeze already-fried oysters—they’ll lose their texture. Instead, freeze unfried, breaded oysters on a tray, then transfer to a zip-lock bag. They’ll last up to 2 months in the freezer.
How to Reheat Without Losing Crispiness
The microwave is a no-go—it’ll ruin the texture. Instead, reheat fried oysters like this:
- Oven or toaster oven: Preheat to 375°F. Place oysters on a wire rack over a baking sheet. Heat for 8–10 minutes or until hot and crispy.
- Air fryer: 350°F for 5–6 minutes works wonders.
- Skillet: Reheat with a small amount of oil over medium heat, flipping once until warmed through.
Never reheat oysters more than once. For best taste and safety, enjoy them the same day.
Common Mistakes to Avoid
Overcrowding the Pan
One of the most common mistakes when frying oysters (or anything, really) is overcrowding the pan. When too many oysters are added at once, the oil temperature drops rapidly. This leads to:
- Greasy, soggy oysters
- Uneven cooking
- Longer frying times
Instead, fry in small batches—four to six oysters at a time depending on your pan size. Give each piece of seafood room to breathe and float freely. This allows the hot oil to circulate evenly, cooking each oyster to golden perfection.
After each batch, allow the oil to return to the proper temperature before adding more oysters. Keep a close eye on your thermometer and adjust the heat accordingly.
Using the Wrong Oil Temperature
If the oil isn’t hot enough, your oysters absorb more grease and come out limp and soggy. Too hot, and they burn before the inside is cooked.
Here’s how to avoid temperature mishaps:
- Use a deep-fry thermometer to maintain 350–375°F.
- Avoid turning the heat to high the whole time—medium to medium-high usually works better for temperature control.
- Test the oil with a small bit of breading or flour before frying. It should sizzle instantly and float.
Never guess the oil temp—it’s worth the extra effort to measure. The reward? Perfectly crispy oysters every time.
Other mistakes to steer clear of:
- Skipping the drying step – Wet oysters won’t hold onto breading well.
- Forgetting to season the flour – Bland breading equals bland oysters.
- Not draining on a rack – Paper towels make them steam and go soggy.
Mastering these simple tricks can take your fried oyster game from good to exceptional.
Variations of the Classic Fried Oyster Recipe
Cajun-Style Fried Oysters
Want to add bold Louisiana flavor to your oysters? Cajun-style is the way to go. Here’s how to bring the heat and depth:
- Use Cajun seasoning in your flour mix—think paprika, cayenne, oregano, thyme, garlic, and onion powders.
- Add a dash of hot sauce or Creole mustard to your egg wash.
- Serve with spicy remoulade or over a fluffy bed of red beans and rice.
You can also mix some chopped jalapeños or green onions into your breading mix for extra punch. Cajun fried oysters are spicy, bold, and totally addictive.
Japanese Kaki Fry
Fried oysters are also popular in Japanese cuisine, where they’re called Kaki Fry. The preparation is a little different but equally delicious:
- Use panko breadcrumbs instead of flour and cornmeal.
- Season lightly with salt and pepper—let the oyster’s flavor shine.
- Fry until golden brown and crispy.
- Serve with Japanese Worcestershire-style tonkatsu sauce or Kewpie mayo and shredded cabbage.
Kaki Fry is often served as part of a bento box or a side dish in Japanese izakayas (pubs). It’s a refined take on fried oysters with a crispier, airier crust.
Healthier Alternatives
Air-Fried Oysters
If you love the crunch but want to cut down on oil, air frying is a solid option. While the texture isn’t exactly the same as deep-fried, it comes pretty close—and way healthier.
Here’s how to do it:
- Preheat your air fryer to 400°F (200°C).
- Bread the oysters as usual.
- Lightly spray with cooking oil spray (avocado or canola works well).
- Cook for 6–8 minutes, flipping halfway through.
Air frying uses hot air to crisp up the coating with just a fraction of the oil. Great for weeknight meals when you want something tasty without feeling too heavy afterward.
Oven-Baked Oysters
Another oil-free method is baking. While you sacrifice a bit of crunch, it’s a convenient and guilt-free way to enjoy fried-style oysters.
Steps:
- Preheat oven to 425°F (220°C).
- Arrange breaded oysters on a parchment-lined baking sheet.
- Spray lightly with oil.
- Bake for 12–15 minutes until golden brown, flipping halfway.
For an extra crispy crust, place them under the broiler for the last 1–2 minutes. Serve immediately with your favorite dipping sauce.
Pro Tip: Baked oysters are excellent in tacos, wraps, or bowls with rice and veggies.
Nutritional Information
Calorie and Macronutrient Breakdown
Fried oysters, while indulgent, can be part of a balanced diet if you watch your portion size. Here’s an approximate breakdown for a standard serving of 6 fried oysters:
| Nutrient | Amount |
|---|---|
| Calories | 220–300 |
| Protein | 10–12g |
| Carbohydrates | 18–22g |
| Fat | 12–18g |
| Saturated Fat | 2–3g |
| Cholesterol | 70–90mg |
| Sodium | 400–600mg |
Values may vary based on oil type, breading thickness, and serving size.
Oysters themselves are naturally rich in:
- Zinc
- Iron
- Vitamin B12
- Omega-3 fatty acids
They’re also low in saturated fat before frying. If you’re health-conscious, consider the baked or air-fried versions for fewer calories and less oil absorption.
Are Fried Oysters Healthy?
Let’s be real—fried oysters aren’t exactly health food, but they aren’t junk either. It depends on how you cook them and how often you indulge.
Here are a few things to consider:
- Oysters are nutrient-dense and a great source of minerals.
- The oil and breading add calories and fat.
- Homemade versions are much healthier than restaurant-fried options.
- Pair them with salads or roasted veggies for a more balanced plate.
In moderation, fried oysters can absolutely fit into a healthy lifestyle—especially if you prepare them with better oils and lean toward lighter sides.
FAQs about Fried Oyster Recipe
Can you fry oysters without breading?
Yes, you can. Pan-frying oysters without breading (also called sautéed oysters) is a lighter option. Simply dredge them in a bit of flour or cornstarch and fry in butter or olive oil.
What’s the best oil for frying oysters?
Peanut oil is ideal due to its high smoke point and flavor, but canola, vegetable, or grapeseed oil also work well.
How do I make fried oysters less greasy?
Make sure your oil is hot enough (350–375°F), avoid overcrowding, and drain the oysters on a wire rack—not paper towels.
Can I use canned oysters?
Fresh is best, but you can use drained, canned oysters in a pinch. Just make sure they’re dry before breading, and expect a softer texture.
How long can I store leftover fried oysters?
Keep them refrigerated in an airtight container for up to 2 days. Reheat in the oven or air fryer for best results.
Conclusion
Fried oysters are more than just a dish—they’re an experience. Crispy, juicy, and packed with bold flavors, they bring the taste of the coast right to your kitchen. Whether you’re craving a Southern-style seafood platter, a spicy Cajun twist, or a lighter air-fried snack, you now have all the tools to make it happen.
From sourcing the freshest oysters to mastering the perfect fry technique, this guide walks you through every step of the journey. The next time you want to impress your guests or treat yourself to something special, remember this go-to fried oyster recipe.
So grab those oysters, heat that oil, and fry up some golden, crunchy goodness. You deserve it.