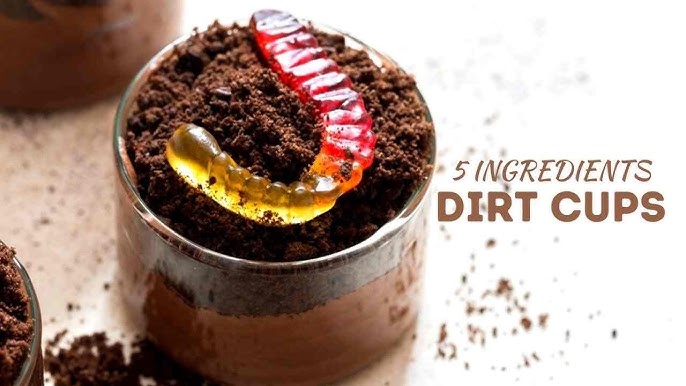
Dirt Cup Recipe: If you’ve never had a dirt cup before, get ready for a nostalgic trip back to childhood! A dirt cup is a playful, no-bake dessert that’s as fun to make as it is to eat. It’s made by layering crushed chocolate cookies (that resemble dirt), creamy pudding, and sweet toppings like gummy worms. It’s the kind of dessert that screams fun, and it’s perfect for both kids and adults alike.
This dessert doesn’t require baking or complex cooking skills, making it an ideal choice for quick treats, themed parties, or hands-on activities with the kids. The best part? You can easily personalize it with flavors, decorations, and even health-conscious ingredient swaps.
Dirt cups have been around for decades and are often found at birthday parties, Halloween celebrations, and family cookouts. They strike that perfect balance between creamy and crunchy, spooky and sweet—and honestly, they never go out of style.
Why Dirt Cups Are So Popular
So why exactly are dirt cups such a hit? First, they’re incredibly easy to make. You don’t need any fancy equipment or baking skills, which is a huge win for busy parents or anyone who wants a quick sweet fix. Everything comes together in layers, and the visual effect is so fun, especially for kids who get a kick out of “eating dirt.”
Second, they’re totally customizable. You can go traditional with chocolate pudding and Oreo cookies, or you can switch things up with different flavors, colors, and textures. Want to make it spooky for Halloween? Add candy eyeballs or crushed cookie “tombstones.” Need a healthier version? Swap in sugar-free pudding or dairy-free alternatives. The flexibility is endless.
Plus, it’s an interactive dessert. Kids love to help assemble dirt cups, making it a great activity for playdates or family cooking nights. The tactile experience of crushing cookies and layering ingredients adds to the fun, making this more than just a snack—it’s an experience.
Ingredients You’ll Need
Main Ingredients
Here’s a breakdown of the essential ingredients you’ll need to make classic dirt cups:
- Chocolate sandwich cookies (like Oreos): These will be crushed to resemble dirt.
- Instant chocolate pudding mix: Quick and easy, just add milk.
- Cold milk: Used to mix the pudding. Whole milk gives the creamiest results, but any milk works.
- Whipped topping (like Cool Whip): This makes the pudding lighter and fluffier.
- Gummy worms: A fun, wiggly topping that completes the “dirt” look.
- Plastic cups or jars: These are used for assembling and serving.
You can find all these ingredients at any grocery store, and most are super budget-friendly. The whole list is very pantry-accessible, so you may already have most of these at home.
Optional Add-Ons and Toppings
Want to take your dirt cups to the next level? Here are some optional add-ons that can make your dessert stand out:
- Candy eyes or bones (for Halloween themes)
- Crushed graham crackers for a “sand” look
- Mini marshmallows for texture
- Colored sprinkles to match a party theme
- Chopped nuts or toffee bits for a crunchy twist
You can mix and match these based on the occasion or dietary needs. These fun extras are perfect for themed celebrations or when you just want to get a little creative.
Ingredient Substitutes for Dietary Needs
Dirt cups are super easy to modify for dietary restrictions:
- Dairy-free: Use almond, oat, or soy milk and a dairy-free pudding mix. Swap whipped topping for a plant-based version.
- Gluten-free: Choose gluten-free chocolate cookies and double-check all labels.
- Sugar-free: Use sugar-free pudding mix and cookies made with sugar substitutes.
These tweaks won’t compromise flavor, and they allow everyone to enjoy this nostalgic treat. Just make sure you read labels carefully when swapping ingredients to ensure they’re fully allergy-friendly if needed.
Kitchen Tools You’ll Need
Must-Have Utensils
You don’t need a fully stocked kitchen to make dirt cups. Here are the essentials:
- Mixing bowl: For whisking the pudding mixture.
- Whisk or hand mixer: Makes the pudding smooth and lump-free.
- Rolling pin or food processor: For crushing the cookies.
- Spatula or spoon: For layering pudding and cookie crumbs.
- Clear cups or dessert jars: Presentation is everything! Clear containers let the layers show.
- Measuring cups: For accuracy with milk and mix ratios.
These are basic tools found in almost every kitchen, and they make the prep smooth and mess-free. If you’re making these with kids, using plastic cups and kid-safe tools (like silicone spatulas) is a great idea.
Kid-Friendly Tools for Safe Cooking
If you’re involving the kids, keep things safe and fun with:
- Plastic knives or spoons: For scooping and spreading without risk.
- Ziploc bags: For cookie crushing—kids can pound away with a rolling pin.
- Pre-measured ingredients: Helps minimize mess and confusion.
- Mini aprons and step stools: Because presentation matters, even when it’s just for fun!
Cooking together is a bonding experience, and dirt cups are the perfect entry-level recipe for little chefs.
Step-by-Step Guide to Making Dirt Cups
Step 1: Crush the Cookies
This is where the fun really begins! Crushing cookies might sound simple, but it’s a crucial step that gives dirt cups their iconic texture and appearance. Start by taking about 15–20 chocolate sandwich cookies (like Oreos) and placing them in a large Ziploc bag. Seal the bag tightly, making sure no air is left inside. Now comes the fun part—crush them!
You can use a rolling pin, meat mallet, or even the bottom of a sturdy cup. Just start pounding or rolling until the cookies are reduced to fine crumbs. You want a mixture of fine dust (for that realistic dirt texture) and a few chunkier bits (to add some crunch). If you’re short on time or making a large batch, throw the cookies in a food processor for a few quick pulses.
Pro Tip: Remove the cream filling before crushing if you prefer a less sweet or less sticky mixture. However, most people leave it in—it adds creaminess and flavor to the crumbs.
Once crushed, set the cookies aside in a bowl. You’ll be using them for layering soon.
Step 2: Make the Pudding Mixture
Now that your “dirt” is ready, it’s time to make the “mud” – the rich, chocolatey pudding layer. Grab your mixing bowl and combine:
- 2 boxes (3.9 oz each) of instant chocolate pudding mix
- 3 cups of cold milk
Whisk them together until the pudding thickens—this usually takes 2 to 3 minutes. You’ll notice it starts to look like a thick chocolate mousse. Make sure there are no lumps; a smooth texture is key here.
Once it’s set, fold in an entire tub (8 oz) of whipped topping like Cool Whip. This transforms the pudding into a lighter, fluffier mixture that’s easier to layer and gives your dirt cups a dreamy, cloud-like texture.
Optional: For an extra boost of flavor, stir in a teaspoon of vanilla extract or a pinch of salt to deepen the chocolate notes.
Set the mixture aside, or refrigerate it if you’re not ready to assemble just yet.
Step 3: Layer the Ingredients
Now for the most satisfying part—layering your dirt cups. This is where the magic happens and your dessert starts to look like, well, actual dirt!
Grab your clear plastic cups or mason jars. Start by spooning a generous layer of crushed cookies into the bottom of each cup. This forms the first “soil” layer.
Next, add a layer of your pudding mixture. Use a spoon or piping bag to make the layers neat and even. You can alternate pudding and crushed cookie layers depending on your cup size—2 or 3 layers of each usually work well.
Make sure to finish with a thick layer of crushed cookies on top. This gives it the authentic dirt look and sets the stage for the final decorations.
Presentation Tip: If you’re using clear cups, the alternating layers look amazing from the outside—like a layered edible garden!
Step 4: Add the Worms and Decorations
Time to get creative! Gummy worms are the classic dirt cup topping, and they bring that playful, “eww that’s gross!” factor that kids absolutely love.
Place 1–2 gummy worms on top of each cup, partially burying them in the cookie crumbs so they look like they’re peeking out from the “dirt.” Want to go extra? Here are a few more ideas:
- Candy eyes for a spooky vibe
- Gummy bugs or frogs for a nature theme
- Mini gravestones (made from cookies or chocolate) for Halloween
- Edible flowers or mint leaves for a garden-themed look
Don’t be afraid to mix and match. Whether it’s spooky or sweet, the toppings bring personality and charm to each cup.
Step 5: Chill and Serve
Once your dirt cups are fully assembled and decorated, they’re almost ready to eat—but not quite. Pop them in the fridge for at least 1 hour. This helps the pudding set firmly and allows the flavors to meld together beautifully.
You can make them up to a day in advance, which is perfect if you’re prepping for a party. Just be sure to cover each cup with plastic wrap or a lid to keep them fresh.
When it’s time to serve, hand out a spoon and let the fun begin. Dirt cups are best served cold, and they’re usually eaten straight from the cup. There’s no need to garnish with anything fancy—they’re already fun and delicious just the way they are.
Tips for the Perfect Dirt Cups
Presentation Ideas
Let’s face it: dirt cups are adorable and oddly elegant when styled right. Whether you’re serving them at a kid’s party or using them as a whimsical touch for a fancy event, here are some clever presentation tips:
- Mini mason jars: Perfect for rustic charm.
- Clear wine glasses: For a more upscale or adult version.
- Shot glasses: Great for party trays or tasting events.
- Themed labels or tags: Add fun messages like “Worm Habitat” or “Garden Goodies.”
- Edible spoons or candy sticks: Extra fun and zero waste!
Use what fits your event’s vibe, but always keep the layers visible—that’s what makes them eye-catching.
Common Mistakes to Avoid
Even with a no-bake recipe this simple, a few slip-ups can happen. Let’s make sure yours turn out perfect:
- Using warm milk for pudding: Always use cold milk, or your pudding won’t set.
- Over-mixing the pudding: It can become runny if you mix too long. Stop once it thickens.
- Not chilling long enough: The dessert needs time to firm up. One hour is the minimum.
- Crushing cookies too finely: You want a mix of textures—not just dust.
- Overloading on gummy worms: Too many toppings can make it look messy rather than cute.
Stick to these tips and your dirt cups will look and taste professional—every single time.
Fun Variations of Dirt Cup Recipes
Halloween-Themed Dirt Cups
Halloween and dirt cups go together like ghosts and pumpkins. This dessert practically begs to be turned into something spooky. With just a few simple tweaks, your standard dirt cup becomes the star of any Halloween spread.
Here’s how to make them scream-worthy:
- Graveyard Theme: Stick in a Milano cookie or graham cracker shaped like a tombstone. Use edible black gel or icing to write “RIP.”
- Candy Eyes: Scatter edible eyeballs throughout the top layer of “dirt” to make it look like something’s watching.
- Spooky Gummy Creatures: Replace worms with gummy spiders, snakes, or frogs.
- Bloody Touch: Drizzle red gel or strawberry syrup for a creepy, “freshly dug” effect.
Make the pudding layer dark by adding a little black food coloring or activated charcoal to deepen the chocolate color. This gives the whole cup a haunting vibe. You can also use orange-colored whipped topping or sprinkles to enhance the Halloween theme.
These spooky dirt cups are a hit with kids and make an awesome addition to Halloween parties, school treats, or October movie nights.
Vegan or Dairy-Free Versions
Want to make dirt cups that fit your dietary lifestyle? Good news: they’re easily adaptable. Whether you’re vegan, lactose-intolerant, or just looking to reduce your dairy intake, here’s how to do it:
- Dairy-Free Milk: Use almond, oat, soy, or coconut milk. Just make sure it’s unsweetened and cold for best results.
- Vegan Pudding Mix: Choose plant-based pudding mixes or make your own using cornstarch, cocoa powder, and non-dairy milk.
- Vegan Cookies: Brands like Newman’s Own or Glutino make vegan and gluten-free chocolate cookies.
- Coconut Whipped Topping: Many grocery stores carry non-dairy alternatives that taste just like Cool Whip.
Don’t forget about the toppings! There are now vegan gummy worms available, so you don’t have to skip the fun part. These versions taste just as good and are perfect for those who want to enjoy the dessert without compromise.
Dirt Cup Cake Jars
Want to elevate your dirt cup to something more sophisticated? Try making dirt cup cake jars—a hybrid dessert that combines layers of chocolate cake, pudding, and cookie crumbs in a jar. It’s like the gourmet cousin of the classic dirt cup.
Here’s how to do it:
- Bake a simple chocolate cake and crumble it into chunks.
- Alternate layers of cake, pudding, whipped topping, and crushed cookies in a mason jar.
- Top with gummy worms and sprinkles for that dirt cup look.
The result is a rich, decadent dessert with extra texture and flavor depth. Perfect for events, gifts, or even as a make-ahead dessert for holidays.
Pro Tip: These jars make excellent edible gifts. Tie a ribbon around the top and add a tag—it’s a personalized, delicious surprise.
Serving Suggestions
Best Occasions for Dirt Cups
Dirt cups are one of the most versatile desserts out there. Here are some great times to whip them up:
- Birthday Parties: Kids absolutely love them.
- Picnics and BBQs: Easy to transport and serve outdoors.
- Holiday Events: Halloween, Easter, even Christmas (use themed toppings).
- School Bake Sales: No baking required, and they’re budget-friendly.
- Family Movie Nights: Quick, fun, and easy to share.
Their single-serve nature also makes them ideal for buffets and potlucks. Plus, since they don’t require utensils for serving, they’re perfect for mess-free occasions.
Want to fancy them up? Serve them in glass dessert cups with a tiny spoon for dinner parties or adult get-togethers. Dirt cups might be kid-friendly, but adults love them too—especially when styled right!
Pairing Ideas
Although dirt cups are a stand-alone treat, you can totally create a dessert table or combo for extra flair. Here are some tasty pairings:
- Fresh Berries: Strawberries or raspberries add a fruity contrast.
- Hot Coffee or Espresso: Balances the sweetness with a little bitterness.
- Mini Cupcakes or Cake Pops: Match the theme or colors.
- Chocolate-Dipped Pretzels: Add a salty element to your dessert station.
If you’re going the party route, consider a full “garden theme” dessert bar with chocolate bark “trees,” edible flowers, and soil-themed cookies. Dirt cups are the centerpiece, but the possibilities are endless!
Storing and Making Ahead
Can You Make Dirt Cups in Advance?
Absolutely! In fact, making them ahead of time is encouraged. Preparing your dirt cups the night before not only saves time, but it also lets the pudding set nicely and allows all the layers to come together for a more cohesive flavor.
Here’s how to store them:
- Assemble the dirt cups completely.
- Cover each with plastic wrap or use cups with lids.
- Store in the fridge for up to 24–36 hours before serving.
If you’re using gummy candies, consider adding them just before serving so they don’t get soggy or sticky from moisture.
Planning for a party? Make a big batch the night before and keep them chilled. It’ll save you the last-minute stress while still impressing everyone with your dessert game.
How Long Do Dirt Cups Last in the Fridge?
Dirt cups are best enjoyed within 2 to 3 days of making them. After that, the cookie crumbs may start to get mushy, and the gummy worms can turn rubbery or sticky.
Here’s how to store them properly:
- Refrigerate immediately after assembling.
- Use airtight containers or wrap tightly to prevent fridge odors.
- Avoid stacking them to keep the decorations intact.
If you’re storing leftovers, keep in mind that while they may still taste fine after 2–3 days, the texture will be noticeably different. For best results, enjoy them fresh and chilled within the first 48 hours.
Making Dirt Cups with Kids
Safety Tips for Little Helpers
One of the best things about dirt cups is that they’re incredibly kid-friendly. No stove. No sharp tools. Just fun! That makes them the perfect dessert to make with your little ones, whether you’re baking novices or looking for an afternoon bonding activity.
But like any activity in the kitchen, there are still some safety tips to keep in mind:
- Supervise all mixing and handling, especially when using glass bowls or electric mixers.
- Use plastic or silicone utensils to prevent accidents.
- Let them use Ziploc bags and rolling pins to crush the cookies—it’s fun and mess-free!
- Pre-measure the ingredients to avoid confusion and spills.
- Keep a clean workspace to avoid slips or cross-contamination (especially with allergies).
The best part is that this dessert is buildable and forgiving, so even if the layers are a little messy, the final product still looks great and tastes delicious.
Making It a Learning Activity
Turning dirt cup creation into a learning experience is easier than you might think. This isn’t just a dessert—it’s an opportunity to teach essential skills in a hands-on way.
Here’s how to turn the process into educational fun:
- Math: Measuring ingredients helps reinforce counting and fractions.
- Science: Mixing pudding and watching it thicken teaches about chemical reactions.
- Art: Decorating and layering the cups is a creative outlet.
- Responsibility: Cleaning up afterward teaches accountability.
You can even read a book or story about gardens or bugs before making the dirt cups to tie it all together. It’s perfect for preschoolers, homeschoolers, or just a weekend craft and snack activity.
By the end, kids feel pride and excitement seeing (and eating) what they created—and they learn something too!
Nutritional Information
Calories and Macronutrients
Dirt cups may be fun and festive, but it’s good to know what’s inside them if you’re watching your intake. Here’s a general estimate for a standard dirt cup (based on a 6–8 oz serving):
| Nutrient | Amount (Approximate) |
|---|---|
| Calories | 250–350 |
| Total Fat | 12–15g |
| Carbohydrates | 35–45g |
| Sugars | 25–35g |
| Protein | 2–4g |
| Fiber | 1–2g |
Note: These numbers can vary based on your ingredients (e.g., low-fat pudding, sugar-free cookies, or vegan alternatives). If you’re prepping these for an event or school, consider printing a label with this info for guests who need to know.
Adjusting for Healthier Options
Want to make a “guilt-free” dirt cup? It’s totally doable. Here are some simple swaps to make your dessert lighter and more nutritious:
- Use low-fat or sugar-free pudding.
- Swap regular cookies for gluten-free or keto versions.
- Choose whipped toppings made from coconut or almond milk.
- Add a layer of chia pudding or Greek yogurt instead of just chocolate pudding.
- Mix in fresh fruit like banana slices or berries for natural sweetness.
These changes may slightly alter the flavor and texture, but they’re still incredibly tasty. Great for adults who want to indulge without the sugar overload, or kids with specific dietary needs.
FAQs about Dirt Cup Recipe
1. Can I make dirt cups with vanilla pudding instead of chocolate?
Yes! Vanilla pudding works great and lets you customize with food coloring or add fruity toppings like berries or sprinkles.
2. What’s the best way to crush cookies without a food processor?
Place cookies in a sealed plastic bag and roll over them with a rolling pin, wine bottle, or even a heavy book.
3. Are dirt cups gluten-free?
They can be! Just use gluten-free cookies and pudding. Always double-check labels for hidden gluten.
4. How far in advance can I make dirt cups?
You can make them 24–36 hours ahead. Store them covered in the fridge and add toppings right before serving.
5. Can I make a large dirt cup in a trifle dish instead of individual cups?
Definitely. Just layer everything in a large glass dish or trifle bowl and scoop out portions when serving.
Conclusion
Dirt cups aren’t just desserts—they’re edible memories waiting to happen. With layers of crunchy cookies, creamy pudding, and fun, wiggly worms, they turn a simple treat into a creative experience that both kids and adults adore.
From birthday parties to spooky Halloween bashes, from kid-friendly cooking sessions to grown-up garden parties, dirt cups are as flexible as they are fun. They’re incredibly easy to make, endlessly customizable, and impossible not to enjoy.
So whether you’re looking for a fast dessert, a themed party treat, or a way to spend quality time with your kids, dirt cups are a go-to that delivers every time.


