Danish Pastry Recipe: Few baked goods can match the elegance and indulgence of a Danish pastry. These flaky, buttery layers filled with cream, fruit, or chocolate are not only a delight to eat but also a joy to make at home.
Although they may look complicated, with the right ingredients, tools, and patience, you can create bakery-style Danish pastries right in your own kitchen.
This step-by-step guide will walk you through the entire process—from preparing the dough to shaping and baking—so you can master this timeless pastry.
What Makes Danish Pastries Special?
Danish pastries stand out because of their rich, flaky layers, which come from the process of laminating dough with butter. Unlike simple bread, Danish dough is similar to puff pastry but sweeter and softer, making it the perfect base for sweet fillings and toppings. Each bite offers a buttery crunch followed by a melt-in-your-mouth texture, creating a pastry that feels both light and indulgent.
The versatility of Danish pastries also makes them unique. They can be filled with fruit preserves, cream cheese, custard, nuts, or chocolate, and topped with a drizzle of glaze or powdered sugar. Whether enjoyed at breakfast, as an afternoon treat, or as part of a dessert spread, they’re guaranteed to impress.
A Brief History of Danish Pastries
Despite their name, Danish pastries actually originated from Vienna, Austria. In the mid-1800s, Austrian bakers introduced laminated dough to Denmark, where it was adapted and perfected by Danish bakers. Over time, the pastry became known worldwide as the “Danish,” even though its roots trace back to Austrian baking traditions. Today, Danish pastries are enjoyed globally, each culture putting its own spin on the classic recipe.
Why Homemade Danish Pastries Taste Better
There’s something magical about homemade Danish pastries. Unlike store-bought ones that often rely on preservatives or shortcuts, homemade versions are made with fresh, wholesome ingredients. You have complete control over the quality of butter, flour, and fillings, allowing you to create a pastry that’s truly artisanal.
Not only do homemade pastries taste fresher, but the process itself is incredibly rewarding. From folding the dough to seeing the golden, flaky layers emerge from the oven, every step adds to the experience. Once you try making them at home, you may never want to go back to buying them again.
Ingredients You’ll Need
Essential Ingredients for Danish Pastries
To create authentic Danish pastries, you’ll need a handful of key ingredients that form the foundation of the dough:
- All-purpose flour – Provides structure.
- Butter (unsalted, high-quality) – Essential for the flaky layers.
- Whole milk – Adds richness to the dough.
- Active dry yeast – Helps the dough rise.
- Granulated sugar – Sweetens the dough slightly.
- Eggs – Provide flavor, structure, and color.
- Salt – Balances the flavors.
These basic ingredients come together to form a rich, buttery dough that’s both soft and flaky.
Optional Ingredients for Extra Flavor
If you want to elevate your Danish pastries even further, consider adding:
- Vanilla extract or almond extract for enhanced flavor.
- Lemon zest or orange zest for a refreshing citrus twist.
- Ground cardamom or cinnamon for a warm, spiced touch.
- Powdered sugar glaze for a sweet finishing drizzle.
These additions aren’t essential, but they can transform a good pastry into a great one.
Substitutions for Dietary Preferences
Don’t worry if you have dietary restrictions—you can still enjoy Danish pastries with a few substitutions:
- Vegan butter instead of dairy butter.
- Plant-based milk such as almond, oat, or soy milk.
- Gluten-free flour blends for a gluten-free option (though texture may vary).
- Coconut sugar or honey as an alternative to refined sugar.
With these swaps, you can customize the recipe to suit nearly any diet while still enjoying delicious results.
Tools and Equipment Required
Must-Have Baking Tools
Making Danish pastries doesn’t require a professional bakery setup, but having the right tools makes the process easier:
- Mixing bowls (various sizes)
- Measuring cups and spoons
- Rolling pin (preferably heavy-duty)
- Sharp knife or pastry cutter
- Baking sheets lined with parchment paper
- Pastry brush for egg wash or glaze application
These essentials are enough to get you started on your pastry-making journey.
Helpful Gadgets to Make the Process Easier
If you want to take things up a notch, consider investing in:
- Stand mixer with a dough hook for effortless mixing.
- Dough scraper to handle sticky dough.
- Digital kitchen scale for precise ingredient measurements.
- Pastry wheel or pizza cutter for clean, uniform cuts.
These tools aren’t mandatory but can save time and improve consistency.
Preparing Your Kitchen for Success
Before you start, it’s a good idea to prepare your workspace. Danish pastry dough involves multiple folds, so you’ll need a clean, floured surface with enough space to roll out large sheets of dough. Keep your butter chilled until you’re ready to use it, and organize all your ingredients in advance. A little preparation goes a long way in ensuring smooth baking.
Step-by-Step Guide to Making Danish Pastries
Step 1 – Preparing the Dough
The dough is the heart of a Danish pastry, and getting it right sets the stage for perfect results. Begin by warming your milk slightly (not too hot, or it may kill the yeast). Add sugar and yeast, then let it sit for about 5–10 minutes until foamy. This step activates the yeast and ensures your dough will rise properly.
Next, whisk in the eggs, salt, and part of the flour until a sticky dough forms. Gradually add more flour until you achieve a soft, elastic consistency that’s not overly sticky. Knead the dough either by hand or with a stand mixer for about 8–10 minutes until smooth. Once kneaded, shape the dough into a ball, cover it with plastic wrap, and let it chill in the refrigerator for at least an hour. This resting period makes the dough easier to handle during the lamination process.
The key at this stage is patience—don’t rush the kneading or chilling, as both are essential for building the structure needed to support the buttery layers.
Step 2 – Making the Butter Layer
The butter layer is what gives Danish pastries their signature flaky texture. For best results, choose high-fat, unsalted butter—European-style butter works wonderfully because it has less water content.
To prepare, cut the butter into chunks and place it between two sheets of parchment paper. Using a rolling pin, pound and shape it into a flat rectangle about ½ inch thick. The goal is to make it pliable without melting it. The butter should be cold yet flexible, so it spreads evenly during lamination without breaking through the dough. If it feels too soft, chill it briefly in the fridge; if too hard, let it sit at room temperature for a few minutes.
This step may seem simple, but it’s crucial. Too soft, and the butter oozes out; too hard, and it cracks, ruining the layers. When done correctly, the butter layer acts like thin sheets of flavor between the dough, creating those airy, crisp layers we all love.
Step 3 – Laminating the Dough (Folding Process)
Lamination is the technique of folding butter into the dough to create multiple thin layers. This is the defining step of Danish pastry making, and it requires precision.
- Roll out your chilled dough into a large rectangle.
- Place the prepared butter block in the center.
- Fold the dough over the butter like an envelope, sealing the edges so no butter escapes.
- Roll it out again into a long rectangle, being careful not to let the butter break through.
- Fold it into thirds (like a letter). This is called a “turn.”
Chill the dough for at least 30 minutes, then repeat the rolling and folding process 2–3 more times. Each fold multiplies the layers, giving your pastry its puff and flakiness. After the final fold, let the dough rest in the fridge for at least an hour or even overnight.
This process requires patience, but the reward is worth it. Imagine slicing into your pastry later and seeing dozens of buttery layers baked to perfection—that’s the magic of lamination.
Step 4 – Cutting and Shaping Pastries
Once your dough is properly laminated and rested, it’s time to shape it into pastries. Roll the dough into a large rectangle about ¼ inch thick. Use a sharp knife or pastry cutter to cut it into squares or rectangles. From here, you can create various shapes:
- Classic pinwheels – Cut a square, slice diagonally from each corner toward the center, fold alternating corners inward, and press them down.
- Braided strips – Cut the dough into long strips and braid them for a beautiful, bakery-style presentation.
- Envelopes – Place filling in the center of a square, fold opposite corners over, and seal gently.
- Circles or ovals – Roll scraps into circles and add fillings in the middle for a simple yet elegant design.
Shaping is where you can get creative. Whether you prefer traditional styles or your own twist, the key is to keep the dough cold and handle it gently to maintain the layers.
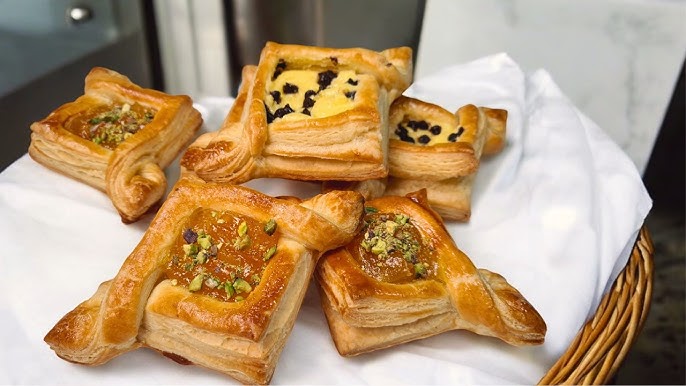
Step 5 – Adding Fillings and Toppings
Danish pastries are as much about the fillings as the dough. Once shaped, place your chosen filling in the center of each pastry. Some classic options include:
- Cream cheese mixture (cream cheese, sugar, and vanilla)
- Fruit preserves like raspberry, apricot, or strawberry
- Nut pastes such as almond or hazelnut
- Chocolate chips or ganache for a decadent touch
Don’t overfill, or the pastry may burst during baking. About 1–2 teaspoons of filling per pastry is usually enough.
For toppings, consider brushing the pastries with an egg wash (beaten egg with a little milk) before baking. This gives them a glossy, golden finish. After baking, drizzle with glaze made from powdered sugar and milk, or dust lightly with powdered sugar for a classic bakery look.
This step transforms your pastries from plain dough into irresistible treats bursting with flavor and beauty.
Step 6 – Proofing the Pastries
Proofing is the final rise before baking, and it’s essential for getting soft, airy layers. Place the shaped and filled pastries on a parchment-lined baking sheet, cover them loosely with a kitchen towel, and let them rise in a warm spot for 1–2 hours.
During proofing, the yeast becomes active again, creating air pockets that expand the dough. This step ensures your pastries are light instead of dense. You’ll know they’re ready when they look puffy and jiggle slightly if you shake the tray.
Avoid over-proofing, as this can cause the butter to melt out before baking, leaving you with greasy pastries. Under-proofing, on the other hand, results in dense layers. With practice, you’ll learn to recognize the perfect proofing stage.
Step 7 – Baking to Perfection
At last, it’s time to bake. Preheat your oven to 375°F (190°C). Bake the pastries for 15–20 minutes, depending on their size, until they’re puffed up and golden brown. The smell of butter and caramelized sugar will fill your kitchen, making the wait almost unbearable.
For an extra touch, rotate the trays halfway through baking to ensure even browning. Once out of the oven, let the pastries cool slightly before drizzling with glaze or dusting with powdered sugar.
The result? Golden, flaky pastries with irresistible fillings, the kind that make you feel like you’ve stepped into a European café. Enjoy them warm with coffee or tea, and you’ll understand why Danish pastries are beloved worldwide.
Popular Danish Pastry Fillings and Variations
Cream Cheese Filling
One of the most popular fillings is a sweet cream cheese blend. To make it, simply combine softened cream cheese, powdered sugar, an egg yolk, and a splash of vanilla. This rich, tangy filling balances the buttery dough perfectly. Some bakers even add lemon zest for a refreshing twist.
Fruit Preserves and Fresh Fruit
Jam-filled Danish pastries are classic for a reason. Raspberry, apricot, and strawberry preserves are especially popular. You can also use fresh fruit slices—like peaches, apples, or blueberries—placed on top of cream cheese or custard filling. This creates a colorful, fresh pastry that’s both beautiful and delicious.
Chocolate and Nut Variations
For chocolate lovers, sprinkle chocolate chips or spread a thin layer of Nutella before folding the dough. Nuts like almonds, hazelnuts, or pecans also pair beautifully with Danish pastries, especially when combined with a sweet glaze.
Savory Danish Pastries
Not all Danish pastries have to be sweet. Try filling them with cream cheese and herbs, spinach and feta, or ham and cheese for a savory twist. These make excellent breakfast pastries or appetizers.
Tips for Perfect Danish Pastries
How to Get Flaky Layers Every Time
The hallmark of a Danish pastry is its delicate, flaky texture. Achieving this requires careful attention to detail during each stage of preparation. First, always keep your butter and dough cold. Warm butter melts too quickly, seeping into the dough instead of creating distinct layers. That’s why chilling between folds and after shaping is non-negotiable. Second, roll the dough gently without pressing too hard—flattening the butter too aggressively can ruin the layering. Lastly, resist the temptation to rush proofing or baking. Allowing the dough enough time to rise ensures those signature airy pockets. Think of it as building a house of pastry: if the foundation isn’t steady, the whole structure collapses. With patience and precision, your pastries will puff beautifully, giving you that melt-in-your-mouth bite.
Common Mistakes and How to Avoid Them
Even experienced bakers sometimes stumble when making laminated dough. A few common pitfalls include:
- Butter leaking during lamination – This usually happens when the butter is too soft or unevenly distributed. Always check that your butter block and dough are at similar consistencies before folding.
- Dense or tough pastries – This can result from overworking the dough or skipping the proofing stage. Knead gently and give the dough enough time to rest.
- Uneven baking – Pastries too close together on the baking sheet may steam instead of crisp. Space them out to allow proper air circulation.
- Overfilling – While it’s tempting to add extra jam or cheese, too much filling can leak and burn. Stick to modest portions.
By being mindful of these mistakes, you’ll avoid frustration and produce pastries that not only look professional but taste divine.
Storing and Reheating Danish Pastries
Fresh Danish pastries are best enjoyed warm from the oven, but you can store and reheat them with great results. Place cooled pastries in an airtight container at room temperature for up to two days. For longer storage, freeze them individually wrapped in plastic and then placed in a freezer-safe bag.
To reheat, simply warm them in a preheated oven at 300°F (150°C) for about 8–10 minutes. Avoid microwaving, as it tends to make the pastry soggy instead of crisp. A quick oven refresh will bring back that buttery flakiness, making your pastries taste almost as good as freshly baked.
FAQs about Danish Pastry Recipe
Can I Make Danish Pastry Dough Ahead of Time?
Yes! In fact, Danish pastry dough benefits from resting. You can prepare the dough up to 24 hours in advance and keep it in the refrigerator until ready to laminate and shape. For longer storage, freeze the dough after lamination and thaw overnight in the fridge before using.
What’s the Best Flour for Danish Pastry Dough?
All-purpose flour works well for most home bakers. If you want a slightly chewier texture, you can mix in a little bread flour. The key is balance—too much protein makes the dough tough, while too little makes it fall apart.
Can I Freeze Danish Pastries?
Absolutely. You can freeze them either before or after baking. If freezing unbaked pastries, shape and fill them first, then freeze on a tray before transferring to a bag. When ready to bake, thaw, proof, and bake as usual. For baked pastries, simply reheat in the oven until crisp again.
How Long Do Danish Pastries Stay Fresh?
Danish pastries taste best the day they’re baked. At room temperature, they’ll stay fresh for 1–2 days. If frozen and reheated, they can last up to two months while still maintaining good flavor and texture.
What’s the Difference Between Danish Pastries and Croissants?
Both use laminated dough, but croissants are less sweet and more bread-like, while Danish pastries are richer and often filled with sweet or savory ingredients. Croissants are typically shaped into crescents, while Danish pastries come in a variety of creative designs.
Conclusion
Making Danish pastries at home may seem like a challenge, but once you break down the steps, it’s a rewarding and enjoyable process. From mixing the dough to folding butter layers, shaping, filling, and finally baking, each stage adds a touch of craftsmanship that results in a truly special treat. With patience, precision, and creativity, you can create pastries that rival any bakery’s offerings. Whether you prefer sweet fruit fillings, creamy cheese, or even savory twists, the possibilities are endless. So roll up your sleeves, keep your butter cold, and let your kitchen fill with the irresistible aroma of freshly baked Danish pastries—you’ll be amazed at what you can achieve.


