Crockpot Bread Recipe: There’s something magical about the smell of freshly baked bread filling your home. But what if you could enjoy that same aroma and taste without turning on your oven? That’s where crockpot bread comes into play. Baking bread in a slow cooker may sound unusual at first, but it’s quickly becoming a favorite among home bakers who love convenience and simplicity.
Using a crockpot to bake bread is like giving yourself a shortcut into the world of baking. You don’t need to worry about preheating the oven, monitoring temperatures too closely, or fussing with complex techniques. The slow cooker does most of the work for you, creating a warm, steamy environment that helps your dough rise and bake beautifully.
Not only does this method save energy, but it also makes bread baking more approachable for beginners. Even if you’ve never baked a loaf in your life, this recipe is simple enough for you to master. And the best part? The results are just as satisfying—soft, fluffy bread with a homemade taste that beats anything you’d pick up at the store.
In this guide, we’ll cover everything you need to know about making bread in a crockpot—from the ingredients you’ll need to the exact steps to follow, along with tips for success and creative variations you can try.
Why Use a Crockpot for Baking Bread
So why choose a crockpot instead of your regular oven? The answer lies in convenience and consistency. The slow cooker maintains a steady, moist environment that’s perfect for bread dough. Unlike an oven that can dry out the crust too quickly or burn if you’re not careful, the crockpot gently cooks the bread, making it forgiving even if you’re new to baking.
Another reason people love crockpot bread is how hands-off it is. Once you prepare the dough and set it in the cooker, you don’t have to babysit it. You can go about your day while the bread slowly rises and bakes in one go. Think of it as set-it-and-forget-it baking.
The slow cooker also eliminates the need for multiple steps like preheating, switching pans, or monitoring timers. Plus, it’s especially helpful in the summer months when you don’t want to heat up your kitchen with a hot oven.
And here’s the real secret: crockpot bread often comes out with a softer, moister texture compared to traditional oven-baked bread. For many people, that makes it an even better choice, especially if you prefer pillowy bread over crusty artisan loaves.
Benefits of Crockpot Bread Compared to Oven-Baked Bread
When you think about traditional bread baking, it often involves precise timing, controlled oven temperatures, and sometimes specialized tools like baking stones. Crockpot bread changes the game by making it easier and more approachable.
Here are a few standout benefits:
- Energy Efficient – A crockpot uses less electricity than running your oven for an hour or more.
- Beginner-Friendly – Even if you’re not confident in baking, the slow cooker reduces the risk of mistakes.
- No Preheating Required – Unlike an oven, which needs to heat up before baking, the crockpot is ready as soon as you plug it in.
- Gentle Baking Process – The moist environment ensures that your bread doesn’t dry out or burn, giving you consistently soft loaves.
- Year-Round Baking – No need to worry about overheating your kitchen; the slow cooker keeps things cool.
While oven-baked bread may still win when it comes to crusty, rustic loaves, crockpot bread is unbeatable for everyday sandwiches, snacks, or serving with soup and pasta. It’s a practical option that combines the joy of homemade bread with the convenience of modern cooking appliances.
Ingredients You’ll Need for Crockpot Bread
Now that you know why crockpot bread is worth trying, let’s talk about the essentials—ingredients. The beauty of this recipe is its simplicity. You don’t need anything fancy, and you might already have most of the items sitting in your pantry.
Basic Ingredients for Simple Crockpot Bread
To make a classic, no-fuss loaf of crockpot bread, gather the following:
- All-Purpose Flour (3 ½ cups) – The backbone of your bread. It provides structure and chew.
- Warm Water (1 ¼ cups) – Helps activate the yeast and binds the dough.
- Active Dry Yeast (2 ¼ teaspoons or 1 packet) – The magical ingredient that makes the dough rise.
- Sugar (1 tablespoon) – Feeds the yeast and adds a subtle sweetness.
- Salt (1 teaspoon) – Balances flavor and strengthens the dough.
- Olive Oil or Melted Butter (2 tablespoons) – Adds richness and keeps the bread soft.
These ingredients create a straightforward white bread that’s light, fluffy, and perfect for sandwiches or toasting.
Optional Ingredients for Flavor Variations
One of the best parts about crockpot bread is how versatile it can be. You can mix in extra ingredients to create unique flavors tailored to your taste:
- Herbs & Spices – Rosemary, thyme, garlic powder, or onion powder for savory notes.
- Cheese – Shredded cheddar, parmesan, or mozzarella for a cheesy loaf.
- Seeds & Nuts – Sunflower seeds, flaxseeds, or walnuts for added crunch.
- Sweet Additions – Cinnamon, nutmeg, raisins, or chocolate chips for a dessert-style bread.
Think of the basic dough as a blank canvas. You can adjust it based on whether you’re craving something savory or sweet.
Substitutions for Dietary Preferences (Gluten-Free, Vegan, etc.)
Don’t worry if you have dietary restrictions—crockpot bread is highly adaptable. Here are some common substitutions:
- Gluten-Free – Swap regular flour with a high-quality gluten-free flour blend. You may need to add xanthan gum for structure.
- Vegan – Replace butter with plant-based margarine or coconut oil. Sugar can be swapped with maple syrup or agave nectar.
- Low-Carb/Keto – Use almond flour or coconut flour, but keep in mind the texture will be denser.
By making small tweaks, you can enjoy homemade bread that suits your lifestyle without sacrificing taste or texture.
Tools and Equipment Required
While the ingredients are simple, the right equipment will make the process smooth and hassle-free.
Choosing the Right Crockpot Size
The size of your crockpot plays a big role in how your bread turns out. A 4 to 6-quart crockpot is ideal for most standard bread recipes. If your crockpot is too small, the dough won’t have enough room to expand, and if it’s too large, the loaf may spread out instead of rising tall.
Using a crockpot liner or parchment paper can also make cleanup easier and help lift the bread out without sticking.
Additional Tools to Make the Process Easier
Along with the crockpot itself, here are some helpful tools:
- Mixing Bowls – For combining your ingredients and kneading dough.
- Measuring Cups & Spoons – Accuracy is important in baking, so measure carefully.
- Wooden Spoon or Dough Hook – For mixing the dough.
- Kitchen Towel or Plastic Wrap – To cover your dough while it rises.
- Cooling Rack – To cool the bread evenly after baking.
These tools aren’t strictly necessary—you could technically make crockpot bread with just your hands and the cooker—but they’ll make the process much easier and less messy.
Step-by-Step Guide to Making Crockpot Bread
Now it’s time to bring everything together. Making crockpot bread involves a series of simple steps that anyone can follow.
Step 1 – Preparing Your Dough
Every great loaf starts with good dough. Begin by combining warm water, sugar, and yeast in a bowl. Let it sit for about 5–10 minutes until the yeast becomes foamy—this means it’s active and ready to work. Next, stir in flour, salt, and olive oil until a sticky dough forms.
If the dough feels too dry, add a little extra water, one tablespoon at a time. If it’s too wet, sprinkle in a bit more flour. The goal is a dough that’s soft but not overly sticky.
Once everything is mixed, you’re ready for the next step—kneading.
Step 2 – Kneading and Proofing the Dough
Kneading is where the magic begins. This process develops the gluten in your flour, which gives bread its chewy texture and structure. You don’t need to be an expert baker to knead dough—it’s simply a matter of stretching, folding, and pressing until the dough becomes smooth and elastic.
Start by lightly flouring a clean surface, then transfer your dough onto it. Using the heels of your hands, push the dough away from you, then fold it back over itself. Turn it slightly and repeat the process. Continue kneading for about 8–10 minutes. If the dough keeps sticking, dust your surface and hands with a little extra flour.
You’ll know your dough is ready when it feels soft, pliable, and slightly springy to the touch. Another test? Press your finger gently into the dough—if it slowly bounces back, you’ve kneaded enough.
After kneading, place the dough in a greased mixing bowl. Cover it with a clean kitchen towel or plastic wrap and let it proof (rise) for about 1–2 hours, or until it doubles in size. Proofing allows the yeast to release carbon dioxide, which makes the bread airy and light.
Pro tip: Place your bowl in a warm, draft-free area for the best results. If your kitchen is cold, you can set the bowl near your crockpot while it’s warming up, creating a cozy environment for the dough to rise.
Step 3 – Setting Up the Crockpot
Once your dough has risen, it’s time to get your crockpot ready. This step is crucial to making sure your bread cooks evenly and doesn’t stick.
Start by lining the crockpot with parchment paper. Cut a large enough piece so that it covers the bottom and sides, with some extra hanging over the edges. This not only prevents sticking but also makes it easy to lift the bread out when it’s done.
Next, gently punch down your dough to release excess air, then shape it into a round loaf. Place the dough in the center of your lined crockpot. Cover with the lid and set the cooker to HIGH.
Unlike an oven, there’s no need to preheat. Your crockpot will gradually warm up and create a humid, steamy environment that’s perfect for baking bread. Keep in mind that every slow cooker heats a little differently, so your cooking time may vary.
Typically, bread takes about 2 to 2 ½ hours on HIGH, but it’s always best to start checking around the 2-hour mark. You’re looking for bread that’s firm to the touch, with no wet or doughy spots on top.
Step 4 – Baking the Bread in the Crockpot
This is where patience pays off. As your bread bakes in the crockpot, your kitchen will start to fill with that irresistible aroma of fresh bread. Resist the temptation to lift the lid too often—every time you do, heat escapes, and that can affect the baking process.
During the first 90 minutes, the dough is still rising and cooking through. Around the 2-hour mark, check your bread. Gently press the top; if it feels set and springs back, it’s likely done. To be sure, you can insert a toothpick or skewer into the center—if it comes out clean, your bread is fully baked.
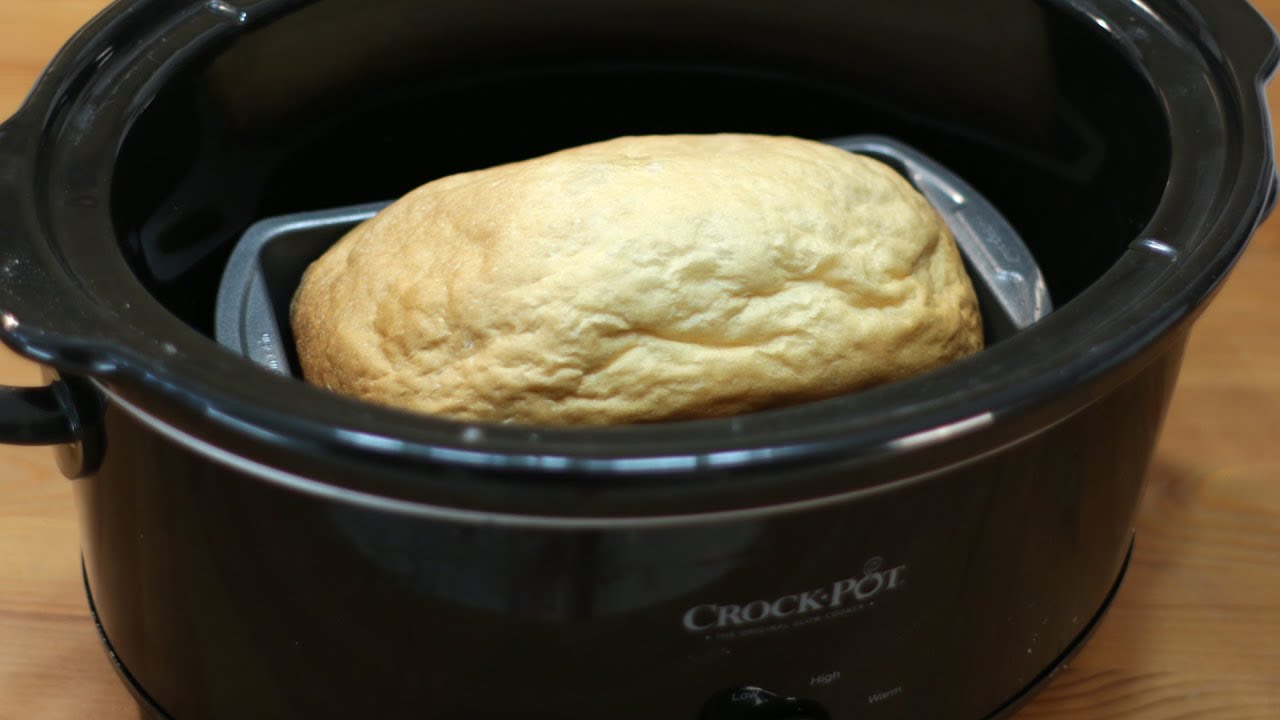
One thing to note: crockpot bread doesn’t develop a golden crust like oven-baked bread. Instead, the crust will be pale and soft. If you prefer a golden, slightly crisp top, you can remove the bread from the crockpot and place it under your oven’s broiler for 3–5 minutes. This quick step gives you the best of both worlds—a soft interior with a beautifully browned exterior.
Once finished, carefully lift the bread out using the parchment paper. Place it on a cooling rack and let it cool for at least 20–30 minutes before slicing. Cutting into hot bread too early can make it gummy inside, so let it rest.
Step 5 – Finishing Touches and Cooling
Cooling may seem like an afterthought, but it’s just as important as the baking itself. As the bread rests, it continues to set, making it easier to slice without squishing. The steam inside redistributes, giving you a more even texture.
Place your bread on a wire rack instead of leaving it in the crockpot or on a solid surface. This prevents condensation from forming underneath, which could make the bottom soggy.
Once cooled, you can slice the bread into thick slabs for sandwiches, thin slices for toast, or even tear it apart and enjoy it warm with butter. If you’ve added extra flavors like herbs, cheese, or cinnamon sugar, this is the moment when they really shine.
Some bakers also like to brush the top of their bread with melted butter or olive oil right after removing it from the crockpot. This not only enhances flavor but also helps soften the crust and gives it a beautiful sheen.
And just like that, you’ve made a fresh, homemade loaf of bread using nothing more than a crockpot!
Tips for Perfect Crockpot Bread Every Time
Now that you’ve mastered the basics, let’s talk about fine-tuning your process. Like any recipe, crockpot bread can vary depending on your ingredients, equipment, and environment. These tips will help you avoid common pitfalls and make your bread consistently delicious.
Common Mistakes to Avoid
- Overproofing – If you let your dough rise too long, it may collapse in the crockpot. Stick to 1–2 hours max.
- Lifting the Lid Too Often – Each time you check, steam and heat escape, slowing down the process. Be patient.
- Wrong Crockpot Size – Too small and the bread won’t rise properly; too large and it may spread out flat.
- Skipping Parchment Paper – Without it, you’ll struggle to get the bread out cleanly.
How to Get a Golden Crust
As mentioned earlier, crockpot bread tends to have a pale top. If you want that golden bakery-style crust, finish your bread in the oven:
- Preheat your broiler.
- Place the baked bread on a baking sheet.
- Broil for 3–5 minutes until golden brown.
For an extra touch, brush the top with butter, egg wash, or olive oil before broiling.
With these small adjustments, you’ll find that crockpot bread can rival oven-baked loaves in both taste and appearance.
Flavor Variations and Creative Ideas
One of the best things about crockpot bread is its versatility. Once you master the basic recipe, you can experiment with endless variations to match your mood, occasion, or meal. Think of the dough as a blank canvas—it’s up to you to add flavors, textures, and personal flair.
Garlic Herb Crockpot Bread
If you’re a fan of savory flavors, garlic herb bread is a must-try. Simply mix 2–3 teaspoons of dried herbs (like rosemary, thyme, oregano, or basil) into your dough along with 1–2 teaspoons of garlic powder. For an extra burst of flavor, brush the top of your bread with melted butter mixed with minced garlic just before broiling. This type of bread pairs perfectly with pasta dishes, soups, or as a side for grilled meats. It’s like having your favorite garlic bread from a restaurant but fresher and homemade.
Sweet Cinnamon Crockpot Bread
Want something for breakfast or dessert? Try cinnamon bread. Add 2–3 teaspoons of ground cinnamon and a few tablespoons of sugar to your dough. For a swirl effect, roll out your dough after the first rise, sprinkle it with cinnamon-sugar mixture, and then roll it back up before placing it in the crockpot. This creates gorgeous layers and a sweet, fragrant loaf. You can even drizzle icing on top once it’s cooled for a cinnamon-roll-inspired treat.
Whole Wheat and Multigrain Crockpot Bread
If you prefer healthier bread options, whole wheat and multigrain variations are fantastic. Swap half of the all-purpose flour with whole wheat flour for a denser, nutty loaf. For multigrain bread, mix in rolled oats, sunflower seeds, flaxseeds, or pumpkin seeds to add texture and nutritional value. These loaves are heartier and perfect for sandwiches or avocado toast.
The beauty of crockpot bread is that you can adapt it to suit any flavor profile. From cheesy, savory loaves to sweet, dessert-style breads, the possibilities are endless. Don’t be afraid to experiment—half the fun of baking is discovering new combinations that make your taste buds dance.
Storing and Reheating Crockpot Bread
Freshly baked bread is irresistible, but unless you’re feeding a big family, you probably won’t eat an entire loaf in one sitting. The good news is that crockpot bread stores well and reheats beautifully if you know the right techniques.
Best Storage Practices for Freshness
- Room Temperature – Store your bread in an airtight container or wrapped in foil for up to 2–3 days. Avoid storing it in the fridge, as refrigeration tends to dry bread out.
- Freezer Option – To keep bread longer, slice it and place the slices in a freezer-safe bag. You can freeze them for up to 3 months. This way, you can pull out a slice whenever you want without thawing the whole loaf.
- Bread Box – If you have one, a bread box is perfect for keeping bread fresh at room temperature while preventing it from getting soggy or too dry.
Reheating Methods Without Losing Texture
- Oven Method – Wrap the bread in foil and warm it in a 300°F oven for about 10 minutes. This revives the texture without making it tough.
- Microwave – Wrap a slice in a damp paper towel and heat for 15–20 seconds. Be careful not to overdo it, or the bread will turn rubbery.
- Toaster – For sliced bread, a toaster works wonders. It crisps the edges while keeping the inside soft.
By following these simple storage and reheating tips, you can enjoy your homemade crockpot bread for days without losing its delightful texture or flavor.
FAQs about Crockpot Bread Recipe
1. Can I bake any bread recipe in a crockpot?
Not every bread recipe works well in a slow cooker. Stick to simple yeast breads rather than delicate pastries or crusty artisan loaves. Crockpot bread is best for soft, fluffy varieties.
2. How do I know if my bread is fully cooked in the crockpot?
Check by inserting a toothpick or skewer into the center. If it comes out clean, the bread is done. You can also press the top—if it springs back, it’s ready.
3. Can I use instant yeast instead of active dry yeast?
Yes! Instant yeast works just fine and doesn’t require proofing in water first. Just mix it directly with the dry ingredients.
4. Why is my bread pale on top?
Crockpots don’t brown bread like ovens do. If you want a golden crust, place the loaf under the oven broiler for a few minutes after baking.
5. Can I double the recipe for a larger loaf?
It depends on your crockpot size. If it’s too small, the dough may overflow. For best results, bake in batches or use a larger slow cooker.
Conclusion
Making bread in a crockpot is a game-changer for anyone who loves fresh, homemade bread but doesn’t want the hassle of traditional baking. It’s simple, beginner-friendly, and incredibly rewarding. With just a few basic ingredients and a slow cooker, you can create soft, flavorful bread that’s perfect for everyday meals.
From classic white bread to creative variations like garlic herb, cinnamon swirl, or hearty multigrain, crockpot bread is as versatile as it is delicious. And with the right storage and reheating methods, you’ll be able to enjoy your loaf for days.
So next time you’re craving homemade bread but don’t want to fuss with your oven, give this crockpot bread recipe a try. You’ll be surprised at how easy it is—and how quickly it becomes a family favorite.


