Cream Cheese Mints Recipe: Cream cheese mints are soft, creamy, and melt-in-your-mouth little candies that are perfect for holidays, weddings, baby showers, or just a sweet treat at home. Unlike traditional hard mints, these are made with cream cheese, powdered sugar, and a touch of flavoring, giving them a smooth, fudge-like texture. They are often molded into cute shapes like hearts, flowers, or simple round patties, making them both delicious and visually appealing. If you’ve ever had those pastel-colored mints at a wedding reception, chances are they were cream cheese mints.
These mints strike the perfect balance between refreshing mint flavor and rich creaminess. The best part? They’re surprisingly easy to make with just a handful of ingredients. Whether you’re a beginner in the kitchen or a seasoned baker, this recipe will be your go-to for special occasions.
Why You’ll Love This Recipe
There’s something truly special about homemade cream cheese mints. They’re:
- Quick to prepare – No cooking or baking required.
- Customizable – You can play with flavors and colors to match any theme.
- Budget-friendly – Only a few ingredients are needed.
- Perfect for gifting – Pack them in a cute jar or box, and you have an instant homemade gift.
If you love simple, no-bake desserts that still wow your guests, cream cheese mints are going to be a favorite in your kitchen.
Ingredients You’ll Need
Core Ingredients for Cream Cheese Mints
To make the perfect batch of cream cheese mints, you’ll need just a few pantry staples:
- Cream cheese (softened) – The star of the recipe. Use full-fat cream cheese for the best texture.
- Butter (softened, optional) – Adds richness and helps smooth out the mixture.
- Powdered sugar – The base that gives the mints structure and sweetness.
- Mint extract – Peppermint extract is the most popular choice, but you can switch it up with spearmint or other flavors.
- Food coloring (optional) – For festive and themed mints.
This simple ingredient list makes the recipe accessible, yet the result is a professional-quality treat that looks and tastes amazing.
Optional Flavor Variations
While peppermint is traditional, you don’t have to limit yourself to just one flavor. Try:
- Spearmint extract for a milder, refreshing taste.
- Lemon or orange extract for fruity mints.
- Vanilla or almond extract for a dessert-like twist.
Each variation creates a completely new experience, and you can even make multiple flavors in one batch by dividing the dough and adding different extracts.
Tools and Equipment You’ll Need
You don’t need anything fancy for this recipe, but having the right tools makes the process easier:
- Mixing bowl and hand mixer (or stand mixer).
- Measuring cups and spoons.
- Silicone molds or small cookie cutters (optional).
- Baking sheet lined with parchment paper for drying.
If you want to keep it simple, you can always just roll the dough into small balls and flatten them with a fork.
Step-by-Step Guide to Making Cream Cheese Mints
Step 1 – Preparing the Cream Cheese Mixture
Start by beating the softened cream cheese until smooth and creamy. If you’re using butter, add it at this stage as well. Once smooth, gradually add powdered sugar, about one cup at a time, mixing until the dough becomes thick but still pliable. The consistency should be similar to playdough—soft, but not sticky.
If your dough feels too wet, add a bit more powdered sugar. On the other hand, if it feels crumbly, add just a teaspoon of cream cheese at a time until it comes together.
Step 2 – Adding Flavor and Color
Once the base mixture is ready, stir in your choice of extract. Start small—just a ½ teaspoon goes a long way. Taste as you go, because extracts can be strong. At this stage, you can also add food coloring. Divide the dough if you want multiple colors in one batch. Gel food coloring works best because it doesn’t water down the dough.
Knead the coloring into the dough with clean hands or a spatula until evenly distributed.
Step 3 – Shaping the Mints
Now comes the fun part: shaping your mints! There are several ways you can do this:
- Hand-rolled balls – Roll into small balls and press with a fork for a classic look.
- Silicone molds – Press dough into molds for fancy shapes like hearts, roses, or leaves.
- Cookie cutters – Roll dough flat and cut into mini shapes.
If the dough sticks, dust your hands or molds lightly with powdered sugar.
Step 4 – Drying and Storing the Mints
Place the shaped mints on a parchment-lined baking sheet and let them dry at room temperature for 12–24 hours. This helps them firm up and makes them easier to handle. Once dry, transfer to an airtight container and store in the refrigerator. They’ll last up to 2 weeks chilled, or you can freeze them for up to 2 months.
These steps guarantee you’ll have perfectly smooth, melt-in-your-mouth mints every time.
Expert Tips for Perfect Cream Cheese Mints
How to Prevent Sticky Dough
One of the most common issues people run into when making cream cheese mints is sticky dough. Since cream cheese contains moisture, the mixture can easily become too soft to handle. To prevent this, always start with softened—but not overly warm—cream cheese. If your kitchen is particularly hot, you may even want to chill your cream cheese for a few minutes before starting.
Another trick is to add the powdered sugar gradually. Dumping it all in at once often leads to clumps and uneven texture. By slowly mixing in the sugar, you allow it to absorb moisture evenly, creating a smooth dough. If the mixture is still sticky, don’t panic—just sprinkle in more powdered sugar, a tablespoon at a time, until it firms up. On the other hand, avoid going overboard, or your mints may turn out dry and crumbly. Striking this balance is the secret to achieving the perfect consistency.
Getting the Right Mint Texture
The ideal cream cheese mint should be soft, smooth, and melt-in-your-mouth without feeling gummy or grainy. To achieve this, make sure your powdered sugar is sifted before use. This eliminates lumps and gives the dough a silky texture.
When shaping your mints, don’t press them too thin. Keeping them slightly thick helps preserve that fudgy, creamy bite. Also, be patient during the drying stage. Letting them rest overnight ensures they hold their shape and have that delicate “snap” when you bite into them. If you’re short on time, you can refrigerate them to speed up the process, but air drying usually yields the best results.
Best Food Coloring Practices
If you want your mints to look as good as they taste, food coloring is your best friend. Gel-based colors are recommended because they provide vibrant shades without watering down the dough. Liquid food coloring can work in a pinch, but too much will make your dough sticky.
For pastel colors—like soft pink, mint green, or baby blue—just use the tiniest drop. For bold colors—like deep red or purple—you’ll need a bit more gel. Always knead the color in slowly, and if you’re making multiple colors, divide your dough beforehand. Wearing disposable gloves can also save your hands from turning rainbow-colored while kneading.
Serving and Storing Suggestions
How to Store Cream Cheese Mints
Storage is key to keeping your cream cheese mints fresh. Once they’ve dried and firmed up, transfer them into an airtight container. For short-term storage, keep them in the refrigerator, where they’ll stay good for up to two weeks. If you want to make them ahead for an event, freezing is an excellent option. Place them on a baking sheet in a single layer, freeze until firm, then transfer to a freezer-safe container or bag. They can be stored frozen for up to two months. To serve, simply thaw them in the fridge overnight.
When layering mints in a container, use parchment or wax paper between layers to prevent sticking. This also helps them maintain their shape, especially if you’ve used molds.
Serving Ideas for Parties, Weddings, and Holidays
Cream cheese mints are a versatile treat that fits nearly any occasion. For weddings, you can mold them into hearts, doves, or roses and color them to match the theme. Place them in decorative candy dishes, or package them in small favor bags tied with ribbon.
For baby showers, pastel-colored mints in shapes like baby bottles, rattles, or tiny feet are a huge hit. Around Christmas, red and green mints bring a festive touch, while Easter calls for light pastels shaped like eggs or flowers.
You can also serve them as after-dinner mints at holiday meals, or pair them with coffee or hot chocolate at parties. Their melt-in-your-mouth texture makes them a perfect light treat after a heavy meal. Presentation matters just as much as taste, so consider using tiered trays or candy jars to display them beautifully.
Flavor Variations to Try
Peppermint vs. Spearmint
Peppermint is the most common choice for cream cheese mints, delivering a cool, refreshing bite. It’s bold and instantly recognizable, making it perfect for weddings and holidays. Spearmint, on the other hand, is softer and sweeter with a less intense flavor. If you find peppermint too strong, spearmint is an excellent alternative.
Some people even like to mix the two extracts for a balanced flavor. Whether you go bold with peppermint or mellow with spearmint, both options pair beautifully with the creamy base of these mints.
Fruity Variations
If you’re not a fan of mint flavors, don’t worry—you can make fruity cream cheese mints instead. Lemon, orange, and raspberry extracts are popular choices. These fruity variations bring a refreshing twist, perfect for spring and summer events. You can also color them accordingly—yellow for lemon, orange for orange, and pink for raspberry—to make the flavors instantly recognizable.
For kids’ parties, you might even want to try bubblegum or cotton candy extract for a fun surprise. Fruity mints are versatile and add a playful vibe to the traditional recipe.
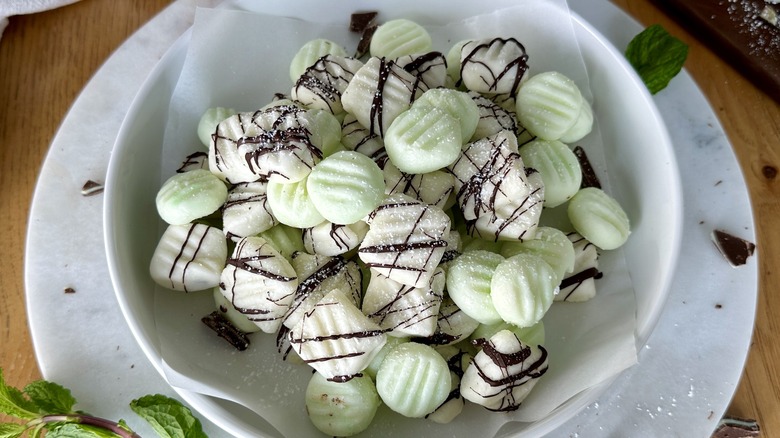
Chocolate-Dipped Mints
For a truly decadent twist, try dipping your cream cheese mints in melted chocolate. Dark chocolate pairs especially well with peppermint, creating a flavor similar to classic peppermint patties. Simply dip half of each mint in melted chocolate, let them set on parchment paper, and you’ll have a stunning and delicious upgrade.
You can also drizzle white or milk chocolate on top for a decorative touch. This variation is ideal for holidays, Valentine’s Day, or anytime you want to elevate your homemade candies into something extra special.
Common Mistakes to Avoid
Overmixing the Dough
When making cream cheese mints, less is more when it comes to mixing. Overmixing can cause the dough to become overly soft and sticky. The goal is to blend just until everything comes together into a smooth ball. If you’re using an electric mixer, keep it on low speed and stop as soon as the powdered sugar is fully incorporated.
Overworked dough can also trap too much air, which affects both the texture and drying process. Remember, this isn’t bread dough—you don’t need to knead for long. Gentle handling ensures the creamiest, melt-in-your-mouth result.
Adding Too Much Powdered Sugar
It’s tempting to keep adding powdered sugar when the dough feels sticky, but too much can ruin your mints. Excess sugar makes them dry, crumbly, and far too sweet. The key is to find that sweet spot where the dough is firm enough to shape but still soft enough to stay creamy. Always add sugar gradually and test the consistency as you go.
Not Letting Mints Dry Properly
Patience is everything with cream cheese mints. If you try to store or stack them too soon, they’ll stick together or lose their shape. Drying at room temperature for at least 12 hours ensures they’re firm and easy to handle. Rushing this step often leads to sticky mints that don’t hold up well.
If you live in a humid climate, you may need a full 24 hours. A little extra waiting time pays off with perfect results.
Nutritional Information
Calories and Serving Size
When it comes to homemade treats like cream cheese mints, it’s helpful to know what you’re enjoying. On average, one small cream cheese mint contains about 35–45 calories, depending on the size and exact amount of sugar used. A standard serving size is usually 2–3 mints, which adds up to roughly 100–130 calories. This makes them a relatively light indulgence compared to heavier desserts like cake or brownies.
They are also bite-sized, so it’s easy to control portions. If you’re planning them for a party, guests can enjoy a couple without feeling weighed down. Because they’re rich and flavorful, even a small serving feels satisfying.
Sugar Content and Health Considerations
The majority of calories in cream cheese mints come from powdered sugar. While delicious, this means they are high in sugar and best enjoyed in moderation. If you’re trying to cut down on sugar, you can experiment with sugar substitutes like powdered erythritol or a sugar-free powdered blend. These alternatives may slightly change the texture but can still deliver a tasty result.
Cream cheese itself adds a small amount of protein and fat, which helps balance the sweetness. However, these candies are not meant to be a health food—they’re a treat. The good news is that since they’re rich and creamy, you won’t feel the need to overindulge.
If you’re serving them at an event, it’s a good idea to label them for anyone with dietary restrictions, especially those avoiding dairy or sugar.
FAQs about Cream Cheese Mints Recipe
1. Can I freeze cream cheese mints?
Yes! These mints freeze beautifully. Place them in a single layer on a baking sheet to firm up, then transfer to an airtight container or freezer bag. They’ll last up to 2 months in the freezer. Thaw in the refrigerator before serving.
2. How far in advance can I make cream cheese mints?
You can make them up to two weeks in advance if you store them in the refrigerator. If you need them for a future event, freezing is the best option. Just be sure to dry them properly before storing.
3. Do cream cheese mints need to be refrigerated?
Yes, because they contain cream cheese, refrigeration is necessary to keep them fresh. They can sit at room temperature for a few hours while serving, but long-term storage should always be in the fridge.
4. Can I make these mints without mint extract?
Absolutely! You can use any extract you like—vanilla, almond, lemon, or even fruity flavors. This recipe is very versatile and works with a wide range of flavors.
5. Why are my cream cheese mints sticky?
Sticky mints usually mean the dough didn’t have enough powdered sugar, or they didn’t dry long enough. Add more powdered sugar gradually, and make sure to let them air dry at least 12–24 hours before storing.
Conclusion
By following this step-by-step guide—and keeping in mind the expert tips and common mistakes to avoid—you’ll be able to make a batch of cream cheese mints that look beautiful, taste amazing, and store well for weeks.
So the next time you want to impress guests with a homemade sweet, skip the store-bought candy and whip up these delightful little treats. They’re simple, elegant, and guaranteed to leave everyone asking for the recipe.


