Clarified Butter Recipe: Cooking is as much about technique as it is about ingredients, and clarified butter is one of those culinary secrets that can completely transform your dishes. This golden liquid has been treasured by chefs worldwide for its versatility, high smoke point, and rich flavor. If you’ve ever wondered how restaurants manage to cook steak with that perfect sear or sauté vegetables without burning the fat, clarified butter is often the hidden ingredient. Making it at home is surprisingly simple and requires very little effort. Let’s dive into a complete guide on how to make clarified butter from scratch, step by step.
What is Clarified Butter?
Clarified butter is essentially butter with the milk solids and water removed, leaving behind pure golden butterfat. Regular butter contains about 80% fat, 16-18% water, and a small amount of milk proteins. When you clarify it, you gently heat the butter until the water evaporates and the milk solids separate. What’s left is a clear, liquid fat that is more stable, lasts longer, and has a higher smoke point compared to regular butter.
This process not only changes the texture but also enhances the flavor. Clarified butter tastes slightly nuttier, richer, and more intense than plain butter. It has been used for centuries in European, Middle Eastern, and Indian cooking. In fact, it’s the base for “ghee,” a staple in Indian cuisine, though ghee involves cooking it a little longer for a deeper flavor.
Benefits of Using Clarified Butter in Cooking
So why go through the trouble of clarifying butter when you could just use it straight from the fridge? The answer lies in its unique qualities:
- Higher smoke point – Regular butter burns at around 350°F (175°C), while clarified butter can withstand temperatures up to 485°F (252°C). This makes it ideal for frying, sautéing, and searing.
- Longer shelf life – Without the milk solids and water, clarified butter doesn’t spoil as quickly. Stored properly, it can last for months without refrigeration.
- Dietary advantages – Many people with lactose intolerance can tolerate clarified butter since the milk proteins are removed.
- Enhanced flavor – Clarified butter provides a clean, buttery taste without the risk of bitterness from burnt milk solids.
It’s no wonder chefs swear by it, and once you try it at home, you’ll see why it’s worth the effort.
Ingredients You’ll Need
Essential Ingredients for Clarified Butter
The best part about clarified butter is its simplicity. You don’t need a long grocery list or any fancy additives. In fact, the ingredient list is as minimal as it gets:
- Unsalted butter – That’s it!
Using unsalted butter is crucial because it gives you complete control over the flavor and ensures there are no added salts or preservatives that might interfere with the clarification process. Salted butter can still be used in a pinch, but the end result may have a slightly different taste.
Choosing the Best Butter for Clarification
Not all butter is created equal. The quality of the butter you choose will directly impact the taste of your clarified butter. Here are a few tips for selecting the right butter:
- Go for high-fat European-style butter – European butters usually contain 82-85% butterfat compared to the 80% in standard butter. This means less water and more richness in your clarified butter.
- Organic and grass-fed butter – If available, grass-fed butter not only has a deeper yellow color but also contains higher levels of healthy fats like omega-3s and conjugated linoleic acid (CLA).
- Avoid cheap, overly processed butter – Lower-quality butter often has more water and additives, which won’t give you the same smooth results.
Think of clarified butter as an investment. Using a good-quality butter will yield a richer, silkier, and tastier final product.
Tools and Equipment Required
Kitchen Essentials for Making Clarified Butter
The process of clarifying butter doesn’t demand any special gadgets, but having the right tools on hand will make the process smooth and hassle-free. Here’s what you’ll need:
- A heavy-bottomed saucepan or skillet – A sturdy pan ensures even heat distribution and prevents the butter from burning.
- A spoon or ladle – For skimming off the foam that rises to the top.
- A fine-mesh strainer or cheesecloth – To filter out the milk solids from the golden butterfat.
- A heatproof glass jar or airtight container – For storing your clarified butter.
Optional Tools to Make the Process Easier
While the essentials are more than enough, a few optional tools can make the process easier and less messy:
- Fat separator – Helps separate the layers of fat and milk solids with minimal effort.
- Digital thermometer – Useful if you want to keep a close eye on the temperature and avoid overheating.
- Silicone spatula – Great for gently stirring and scraping down the sides without scratching your pan.
With just these simple tools, you’ll be ready to make clarified butter like a pro chef in your own kitchen.
Step-by-Step Guide to Making Clarified Butter
Step 1 – Preparing the Butter
Start by cutting your unsalted butter into smaller cubes or slices. This helps it melt evenly and prevents scorching. Place the butter in a clean, dry, heavy-bottomed saucepan. Always make sure your pan is completely dry because water droplets can cause splattering when the butter begins to melt.
Cutting the butter into chunks also reduces the risk of uneven heating. If you throw in an entire block of butter, the outside might start browning while the inside remains solid, which can interfere with the clarification process.
Think of this step as setting the stage for a smooth cooking performance—the better prepared your butter, the better your final clarified product will be.
Step 2 – Melting the Butter Slowly
When it comes to clarifying butter, patience is your best friend. Place the saucepan with the cubed butter over low to medium-low heat. Resist the temptation to crank up the heat—slow and steady wins this race. As the butter melts, you’ll notice it separates into three distinct layers:
- A foamy white layer on top (milk proteins).
- A golden yellow liquid in the middle (butterfat).
- A cloudy layer at the bottom (more milk solids and water).
The key here is to let the butter melt without stirring. Stirring can mix the milk solids back into the butterfat, making it harder to separate them later. Think of this step like watching a science experiment unfold—you’re allowing the natural components of butter to settle into their layers.
This process usually takes about 10–15 minutes, depending on how much butter you’re working with. Keep a close eye on the pan to make sure the butter doesn’t brown. If the milk solids at the bottom start to turn too dark, the butter will develop a nutty flavor, which is more like ghee than clarified butter.
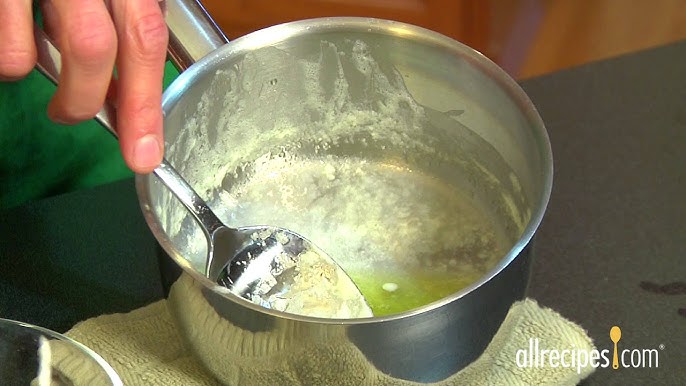
Step 3 – Separating the Milk Solids
Once the butter has fully melted, the top will be covered in a thin layer of white foam. This is the first batch of milk proteins rising to the surface. Use a spoon or small ladle to carefully skim this foam off. Don’t worry about removing every last bit—just take your time and get as much as you can.
Meanwhile, avoid disturbing the bottom layer of the pan where more milk solids have sunk. This is the sediment that needs to stay behind. Your goal is to isolate the clear, golden butterfat in the middle.
At this point, you’ll start to see the liquid butterfat becoming more transparent. This is a good sign—you’re getting closer to that beautiful clarified butter. Think of it as polishing a gem: the more carefully you remove the impurities, the clearer and brighter the end result will be.
Step 4 – Straining the Clarified Butter
Now comes the part where you transform that golden liquid into its purest form. Once you’ve skimmed off the foam and most of the milk solids, carefully pour the liquid butterfat through a fine-mesh strainer lined with cheesecloth (or even a coffee filter, if that’s all you have).
This step ensures any remaining milk solids are filtered out. Be gentle while pouring—tilt the pan slowly and stop pouring just before you reach the bottom sediment. This way, none of the unwanted particles sneak into your clarified butter.
What collects in your strainer or jar should be a clear, golden liquid that almost glows. This is the pure butterfat you’ve been working toward. Straining may seem like a small detail, but it’s the final polish that guarantees your clarified butter is smooth, clean, and ready for cooking.
Step 5 – Cooling and Storing Properly
Once strained, allow your clarified butter to cool slightly before transferring it to a clean, airtight glass jar or container. Never pour hot clarified butter directly into plastic—it can warp the container and affect the flavor.
Let it cool to room temperature, then seal it tightly with a lid. You can store it in:
- Room temperature (up to 2 weeks) – If kept in a cool, dark place away from sunlight.
- Refrigerator (up to 3 months) – Chilled clarified butter will solidify but remains easy to scoop.
- Freezer (up to 1 year) – For long-term storage, freeze in small portions so you can thaw only what you need.
The beauty of clarified butter is its durability. Without the milk solids and water, it’s far less prone to spoiling compared to regular butter. Each time you scoop it, you’ll be met with that smooth, rich texture and unmistakable golden color.
Tips for Perfect Clarified Butter Every Time
Common Mistakes to Avoid
Even though making clarified butter is simple, a few common slip-ups can spoil the batch. Here’s what to watch out for:
- Using salted butter – Salt alters the flavor and can leave behind unwanted residue. Stick with unsalted.
- Heating too quickly – High heat scorches the milk solids, giving the butter a burnt taste. Low and slow is the way to go.
- Stirring during melting – Stirring mixes milk solids back in, making it harder to separate. Keep hands off the spoon.
- Skipping the straining step – Even tiny milk solids can cause the butter to spoil faster. Always strain thoroughly.
- Improper storage – Storing in plastic or leaving it uncovered reduces shelf life and can absorb odors from your fridge.
Pro Tips from Chefs
Professional chefs rely on clarified butter for consistent results, and they’ve got a few tricks up their sleeves:
- Use high-quality butter for the richest flavor. Grass-fed is often their top pick.
- If you’re making a big batch, skim as you go while the butter is melting—it makes straining much easier later.
- For extra-clear clarified butter, run it through a double strain using cheesecloth twice.
- Want a deeper, nuttier flavor? Let the milk solids brown slightly before straining. This turns your clarified butter into ghee, which adds a whole new dimension of flavor.
By following these tips, you’ll be crafting clarified butter that rivals any professional kitchen.
Uses of Clarified Butter in Cooking
Everyday Cooking Applications
Clarified butter isn’t just for fancy restaurants—it can easily become a staple in your home kitchen too. Because it has a high smoke point, it’s perfect for cooking methods that require high heat, such as frying, roasting, or searing. Imagine searing a steak until it forms that beautiful golden crust without worrying about burnt butter—that’s the magic of clarified butter.
You can also use it for sautéing vegetables, frying eggs, or pan-frying fish where delicate flavors matter. Since clarified butter doesn’t burn as easily, your dishes stay clean-tasting with a smooth, buttery aroma. It’s also an excellent choice for making sauces like hollandaise or béarnaise, where you need pure, stable butterfat without the interference of milk solids.
Some people even drizzle clarified butter over popcorn instead of regular butter. It coats the kernels evenly and doesn’t make them soggy—just pure, rich flavor in every bite. Once you start using it, you’ll find countless ways to replace your regular cooking oils with clarified butter.
Traditional Recipes that Use Clarified Butter
Many traditional cuisines rely on clarified butter as a base. In French cooking, it’s the secret behind perfectly smooth sauces and pastries. In Indian cuisine, it’s used as ghee, giving curries, rice, and sweets a distinct nutty aroma and richness. Middle Eastern and North African kitchens use clarified butter for slow-cooked stews, breads, and desserts, where the butter enhances flavor without spoiling quickly.
So whether you’re making a buttery garlic naan, a flaky croissant, or even just scrambled eggs, clarified butter adds depth and elegance to simple and complex dishes alike.
Health Benefits of Clarified Butter
Nutritional Value of Clarified Butter
Clarified butter isn’t just delicious—it’s also nutrient-dense. It’s primarily made up of healthy fats, which provide long-lasting energy and help the body absorb fat-soluble vitamins like A, D, E, and K. A tablespoon of clarified butter offers about 120 calories, with zero carbohydrates and minimal protein, making it a pure fat source.
Additionally, clarified butter from grass-fed cows contains more omega-3 fatty acids and conjugated linoleic acid (CLA), which are believed to support heart health and reduce inflammation. It also provides a small but valuable source of butyrate, a short-chain fatty acid linked to improved gut health.
Why It’s Better Than Regular Butter in Some Recipes
Many people with mild lactose intolerance can enjoy clarified butter since the milk solids (which contain lactose and casein) are removed during the process. This makes it a suitable alternative for those sensitive to dairy.
It also supports healthier cooking habits because of its high smoke point. Oils that burn at lower temperatures release harmful free radicals, but clarified butter remains stable, making it a safer choice for frying and roasting.
So while it’s still calorie-dense and should be enjoyed in moderation, clarified butter can be part of a balanced diet and may even be a healthier choice than heavily processed vegetable oils.
Storage and Shelf Life of Clarified Butter
Proper Storage Methods
The longevity of clarified butter is one of its biggest advantages. Unlike regular butter, which goes rancid quickly because of its water and protein content, clarified butter is almost pure fat and much more stable.
Here’s how you can store it effectively:
- At room temperature – Store it in a clean glass jar with a tight-fitting lid in a cool, dark place. It will stay fresh for about 2 weeks.
- In the refrigerator – Keeps clarified butter solid and fresh for up to 3 months. Just scoop what you need and allow it to soften before use.
- In the freezer – For long-term storage, portion the butter into ice cube trays, freeze, then transfer to a freezer bag. This way, you can thaw small amounts as needed, and it can last up to 1 year.
How Long Clarified Butter Lasts
The shelf life depends on storage conditions. If stored properly in an airtight container, clarified butter can outlast regular butter by weeks, if not months. The absence of milk solids prevents bacterial growth and rancidity, giving it a much longer usable life.
One tip: Always use a clean, dry spoon when scooping clarified butter to avoid introducing moisture or contaminants. This small habit makes a big difference in keeping your butter fresh for longer.
Clarified Butter vs. Ghee
Key Differences Between the Two
Clarified butter and ghee are often confused, but while they share similarities, they’re not exactly the same. Both involve removing water and milk solids from butter, but the main difference lies in how far you take the cooking process.
- Clarified butter – Heated just enough to separate milk solids and water from the butterfat. The flavor is light, clean, and buttery.
- Ghee – Cooked longer until the milk solids caramelize slightly before being removed. This gives ghee a deeper, nuttier flavor and a darker color.
When to Use Each in Cooking
If you want a neutral, buttery flavor without overwhelming your dish, clarified butter is the way to go. It’s especially useful in French sauces, pan-frying, and baking where subtlety matters.
On the other hand, ghee shines in recipes that benefit from its stronger flavor, such as curries, spiced rice, or roasted vegetables. It can also be used as a spread, lending a rich, toasty taste that plain clarified butter doesn’t have.
Both have long shelf lives and high smoke points, so the choice really depends on the flavor profile you want in your cooking.
FAQs about Clarified Butter Recipe
Can I make clarified butter with salted butter?
Yes, but unsalted butter is recommended for a cleaner flavor and better control over seasoning.
What’s the difference between clarified butter and regular butter?
Clarified butter is pure butterfat with the water and milk solids removed, while regular butter still contains those components.
Does clarified butter need to be refrigerated?
Not always. It can be stored at room temperature for a short period, but refrigeration extends its shelf life significantly.
Can clarified butter go bad?
Yes, though it lasts much longer than regular butter. If it develops an off smell or taste, it’s time to discard it.
Is clarified butter healthier than vegetable oil?
In many cases, yes. It has a higher smoke point, contains beneficial nutrients, and is less processed than most refined vegetable oils.
Conclusion
Clarified butter may sound fancy, but it’s one of the simplest and most rewarding things you can make in your kitchen. With just one ingredient—unsalted butter—you can create a cooking fat that’s richer, cleaner, and more versatile than regular butter. Whether you’re frying, baking, or whipping up a sauce, clarified butter elevates the flavor and ensures consistent results.
It’s healthier for high-heat cooking, lasts longer in storage, and brings a depth of taste that can transform even basic dishes. And the best part? It only takes a little time and patience to prepare. Once you make your first batch, you’ll wonder how you ever cooked without it.


