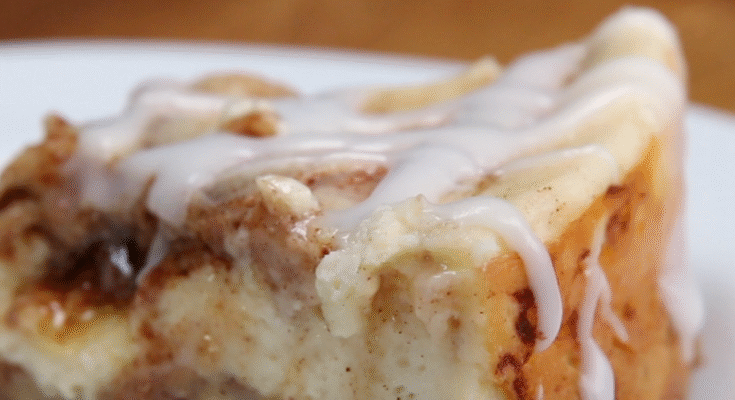
Cinnamon Roll Cheesecake Recipe: If you’ve ever stood in front of your oven torn between baking a creamy cheesecake or gooey cinnamon rolls, here’s a sweet solution: why not both? Enter the Cinnamon Roll Cheesecake — a dessert that brings together the rich, velvety texture of classic cheesecake and the sugary, spiced bliss of cinnamon rolls. This hybrid treat is not just a showstopper at parties or family gatherings, it’s the kind of dessert people dream about.
What makes this dessert extra special is the clever layering of cinnamon-sugar swirls within a luscious cheesecake batter, all nestled on a soft cinnamon roll crust. Each bite delivers that unmistakable cinnamon warmth and melt-in-your-mouth creaminess — it’s like a bakery-level treat right from your own kitchen.
Don’t worry if you’ve never made a cheesecake before. This recipe is totally beginner-friendly with step-by-step instructions that guide you through every swirl and sprinkle. So roll up your sleeves (and maybe loosen your belt), because we’re about to make the most drool-worthy cinnamon roll cheesecake you’ve ever had!
Ingredients You’ll Need
Making cinnamon roll cheesecake might sound fancy, but most of the ingredients are pantry staples or easy to grab at any grocery store. Let’s break it down by layers:
For the Cinnamon Roll Crust
- 1 can (8-count) refrigerated cinnamon rolls (with icing packet included)
- 1 tablespoon all-purpose flour (for dusting)
You can absolutely make homemade cinnamon rolls, but using the store-bought kind saves time and still delivers amazing flavor.
For the Cheesecake Filling
- 3 (8-ounce) packages cream cheese, softened to room temp
- 1 cup granulated sugar
- 1/2 cup sour cream
- 1 teaspoon vanilla extract
- 3 large eggs
- 2 tablespoons all-purpose flour
This filling is rich, creamy, and subtly sweet. The flour helps the cheesecake set up nicely while the sour cream adds a bit of tang that balances all the sugar.
For the Cinnamon Swirl
- 1/3 cup unsalted butter, melted
- 1/2 cup brown sugar, packed
- 1 tablespoon ground cinnamon
- 1/4 teaspoon nutmeg (optional but recommended for warmth)
This mixture gets spooned and swirled into the cheesecake batter to create that iconic cinnamon roll pattern.
For the Cream Cheese Frosting Topping
- 4 ounces cream cheese, softened
- 1 cup powdered sugar
- 2 tablespoons butter, softened
- 1 teaspoon vanilla extract
- 1–2 tablespoons milk (for consistency)
This frosting mimics the glaze that comes with cinnamon rolls but with a creamy twist. Perfect for topping your cheesecake once it’s cooled.
Equipment You’ll Need
Before you dive in, make sure your kitchen is stocked with these essential tools:
- 9-inch springform pan (a must for cheesecakes!)
- Mixing bowls (at least 2–3)
- Electric hand mixer or stand mixer
- Spatula
- Whisk
- Measuring cups and spoons
- Rolling pin (optional, for flattening cinnamon rolls)
- Cooling rack
- Aluminum foil
- Baking sheet (to catch drips in the oven)
- Toothpick or skewer (for swirling and checking doneness)
Pro tip: Lining the bottom of your springform pan with parchment paper helps prevent sticking and makes it easier to lift the cheesecake out later.
Step-by-Step Guide to Making Cinnamon Roll Cheesecake
Step 1: Preparing the Cinnamon Roll Crust
Let’s start with the base — the cinnamon roll crust. This step adds a buttery, sweet, and cinnamony foundation that replaces your standard graham cracker crust with something far more indulgent.
Start by preheating your oven to 325°F (163°C). Lightly grease a 9-inch springform pan and line the bottom with parchment paper to prevent sticking. Now, open the can of refrigerated cinnamon rolls and separate them. Place the rolls flat in the bottom of the pan and gently press them together to form one cohesive crust.
If you have a rolling pin, you can roll them out slightly to ensure they reach the edges and don’t leave gaps. Sprinkle a little flour on your hands or pin to avoid sticking. The idea is to form a smooth, even layer that covers the entire base.
Place the crust in the oven and pre-bake for 8–10 minutes. This step helps set the dough so it doesn’t get soggy under the cheesecake filling. Once baked, take it out and set it aside to cool slightly while you prepare the next layers.
The aroma alone at this stage will make your kitchen smell like a Cinnabon bakery!
Step 2: Making the Cinnamon Swirl Mixture
This is where the magic of the “cinnamon roll” flavor comes into play. The swirl isn’t just for looks — it adds flavor, texture, and those signature streaks of brown sugar-cinnamon goodness you expect in a roll.
In a small bowl, combine the melted butter, brown sugar, cinnamon, and nutmeg. Stir until it forms a thick, sugary paste. The nutmeg is optional but recommended for a warm, spiced undertone that deepens the flavor.
Keep this mixture close because you’ll be layering it in with the cheesecake batter in the next step. If it starts to solidify as it sits, just pop it in the microwave for 10 seconds to keep it spreadable.
This cinnamon swirl will be spooned between layers of cheesecake and swirled with a toothpick or knife to create that iconic marbled look.
Step 3: Preparing the Cheesecake Filling
This is the heart of your dessert, so don’t rush it. A smooth, lump-free cheesecake batter is essential to get that bakery-perfect texture.
In a large mixing bowl, beat the softened cream cheese with an electric mixer on medium speed until creamy and smooth — about 2 minutes. Make sure you scrape down the sides of the bowl a few times.
Next, add the sugar and beat again until incorporated. Now mix in the sour cream and vanilla extract. Continue mixing until it looks glossy and smooth.
Add the eggs, one at a time, beating slowly on low speed just until each egg is mixed in. Overbeating the eggs can cause your cheesecake to crack while baking — so go easy here.
Lastly, add in the flour and give it a final mix. The batter should be thick but pourable, with no lumps.
At this point, taste-test a small spoonful — you’ll see how creamy and rich the flavor is even before baking. Don’t skip this part; it’s part of the fun!
Step 4: Layering the Cheesecake and Cinnamon Swirl
Now comes the fun (and slightly artistic) part: assembling the layers.
Pour about half of the cheesecake batter over the pre-baked cinnamon roll crust. Use a spatula to smooth it into an even layer.
Next, spoon about half of the cinnamon swirl mixture over the top in dollops. Don’t worry about spreading it perfectly. Use a toothpick, skewer, or butter knife to gently swirl the cinnamon mixture into the cheesecake. Create circular or S-shaped patterns to distribute it throughout.
Then, pour the remaining cheesecake batter on top. Repeat the swirl process using the rest of the cinnamon mixture. The final look should be a marbled top that’s almost too pretty to bake (but you will).
Give the pan a gentle tap on the counter to remove any air bubbles.
Step 5: Baking to Perfection
Baking cheesecake is more of a slow-and-steady process than a quick bake. You want it creamy, not overcooked.
Place the springform pan on a baking sheet (to catch any drips). You can also wrap the outside of the pan with foil to prevent leaks and place it in a water bath (optional but helps with even baking).
Bake at 325°F (163°C) for 55–65 minutes. The edges should look set, but the center should still jiggle slightly when shaken.
Once done, turn off the oven and crack the oven door open, letting the cheesecake cool inside for 1 hour. This gradual cooling process prevents cracks.
After an hour, remove it and let it cool completely on a wire rack. Then, transfer it to the refrigerator to chill for at least 4 hours, preferably overnight. Patience pays off here — cold cheesecake is easier to slice and more flavorful.
Step 6: Cooling and Chilling Properly
Cooling might seem like a boring step, but it’s absolutely essential to the texture and flavor of your cinnamon roll cheesecake. Rush this part, and you risk a runny middle or cracked top — both of which are easy to avoid with just a bit of patience.
After baking, your cheesecake needs to gradually return to room temperature. First, turn off the oven and let it sit inside with the door cracked open for at least 1 hour. This helps reduce the temperature slowly, preventing sudden shifts that can cause cracking.
Once out of the oven, place the pan on a wire rack and let it cool completely at room temperature. Avoid putting it straight into the fridge while still warm — that’ll cause condensation and may alter the texture of your crust.
After it’s fully cooled, cover the cheesecake with foil or plastic wrap (you can leave it in the springform pan for now) and place it in the refrigerator for a minimum of 4 hours, but overnight is ideal. This allows all the flavors to settle and makes the cheesecake firm enough to slice cleanly.
If you’re prepping for a party or special event, chilling it overnight ensures it’s set and perfect when you serve it the next day.
Step 7: Making the Cream Cheese Frosting
Now that your cheesecake is cool and ready, let’s add the crown jewel — the rich, velvety cream cheese frosting that transforms this dessert into a cinnamon roll lover’s dream.
In a medium mixing bowl, beat together the softened cream cheese and butter until completely smooth. Add the powdered sugar gradually, mixing on low to avoid a sugar storm in your kitchen. Then, stir in the vanilla extract and just enough milk to reach a spreadable, glaze-like consistency.
You want the frosting to be pourable but not watery. It should slowly cascade over the edges when you spoon it on.
Drizzle or spread the frosting over the top of your chilled cheesecake using a spoon or spatula. You can go for a rustic drizzle look or fully frost the top — your choice! For extra flair, sprinkle a light dusting of cinnamon on top, or even a few crushed pecans if you’re feeling fancy.
This final touch gives your cheesecake the nostalgic feel of a cinnamon roll fresh from the oven.
Step 8: Frosting and Garnishing
Time to make it look as good as it tastes. While the frosting alone is delicious, you can add some bonus garnishes to elevate the final presentation.
Here are a few garnishing ideas:
- Cinnamon Sugar Dusting: Mix a little cinnamon with powdered sugar and sift it over the top.
- Mini Cinnamon Rolls: Top the cheesecake with mini baked cinnamon rolls (store-bought or homemade) around the edges.
- Caramel Drizzle: For extra indulgence, drizzle warm caramel sauce over the top of the frosting.
- Crushed Pecans or Walnuts: Add a crunch and nutty flavor that complements the cinnamon perfectly.
- Whipped Cream Rosettes: Pipe little clouds of whipped cream around the edges.
Don’t forget to carefully remove the springform pan ring before serving. Use a sharp knife dipped in warm water for slicing — wipe the blade between each cut to get those clean, picture-perfect slices.
Presentation may not change the flavor, but it definitely ups the “wow” factor when serving!
Pro Tips for the Best Cinnamon Roll Cheesecake
You’ve followed the recipe — now here are some pro tips to take your cheesecake to bakery-level brilliance:
- Room Temperature Ingredients: Make sure your cream cheese, eggs, and sour cream are all at room temp. It ensures a smoother batter with no lumps.
- Don’t Overmix: Especially once the eggs go in. Overmixing can incorporate too much air, leading to cracks during baking.
- Water Bath: If you’ve had trouble with cracked cheesecakes in the past, try a water bath (wrap the pan in foil and set it in a larger pan with hot water). It helps regulate baking temp and adds moisture to the oven.
- Use Full-Fat Cream Cheese: No low-fat substitutions here — the real deal gives the best texture and flavor.
- Swirl with Care: Too much swirling can muddy the layers. Use a light hand to keep those distinct ribbons of cinnamon.
- Chill Thoroughly: Cheesecake only reaches its full flavor and texture after chilling for several hours. Plan ahead and don’t rush it.
Variations You Can Try
Feeling inspired? You can make this cinnamon roll cheesecake your own with some creative twists:
Gluten-Free Option
Use gluten-free cinnamon rolls (brands like Annie’s or Immaculate Baking have great options) and substitute the all-purpose flour with a 1:1 gluten-free baking blend. The rest of the recipe stays the same, but you’ll get a dessert everyone can enjoy.
Vegan or Dairy-Free Twist
Go full plant-based by using vegan cream cheese (like Kite Hill or Miyoko’s), a dairy-free sour cream alternative, and an egg replacer like flax eggs. Use dairy-free cinnamon rolls (check health food stores) and vegan butter in the swirl and frosting. The taste might slightly differ, but the result is still dreamy.
Mini Cheesecakes for Individual Servings
Instead of one big cheesecake, divide the crust, swirl, and filling among a muffin tin lined with cupcake wrappers. Bake for about 18–22 minutes. These mini cheesecakes are perfect for parties, portion control, or just saving some for later.
How to Store and Serve Your Cheesecake
Once you’ve put in all that effort to bake a perfect cinnamon roll cheesecake, the last thing you want is for it to dry out or lose flavor. Luckily, cheesecake stores beautifully — if you do it right.
Storing in the Refrigerator
After the cheesecake has cooled and been topped with frosting, cover it tightly with plastic wrap or foil. If you’ve removed it from the springform pan, transfer it to a plate and cover it with an airtight cake dome or wrap. Stored properly, it will stay fresh in the fridge for up to 5 days.
If you plan to serve slices over several days, consider keeping the frosting separate and adding it just before serving. This prevents the top from becoming soggy.
Freezing for Later
Yes, you can freeze cinnamon roll cheesecake! Here’s how:
- Chill the cheesecake fully in the fridge.
- Slice it (or freeze whole), then wrap tightly in plastic wrap and a layer of foil.
- Place in a freezer-safe bag or airtight container.
It will keep well in the freezer for up to 2 months. To serve, thaw overnight in the fridge. The texture holds up surprisingly well, making it perfect for prepping ahead of time for parties or holidays.
Serving Tips
- Let refrigerated cheesecake sit at room temp for about 20 minutes before slicing — it makes cutting cleaner and the flavor more pronounced.
- Use a warm knife (dip in hot water and wipe dry) for ultra-smooth slices.
- Serve with a fresh cup of coffee or a scoop of vanilla ice cream for dessert perfection.
Nutritional Breakdown
Here’s a rough nutritional estimate per slice (assuming 12 servings):
| Nutrient | Amount per Slice |
|---|---|
| Calories | ~470 kcal |
| Total Fat | 32g |
| Saturated Fat | 18g |
| Carbohydrates | 39g |
| Sugar | 28g |
| Protein | 6g |
| Sodium | 310mg |
| Fiber | 1g |
Keep in mind, this is an indulgent treat — it’s not meant to be “light.” But hey, every now and then, we all deserve a slice of joy!
FAQs about Cinnamon Roll Cheesecake Recipe
1. Can I make this cheesecake ahead of time?
Absolutely! In fact, cheesecake tastes even better the next day. Make it a day ahead, let it chill overnight, and frost it right before serving for the best texture and flavor.
2. Do I need a water bath to bake it?
It’s optional but recommended. A water bath helps your cheesecake bake evenly and prevents cracks. Just wrap your pan in foil and place it in a larger pan filled with hot water before baking.
3. Can I use store-bought cinnamon rolls?
Yes — and we encourage it for convenience! Store-bought cinnamon rolls are perfect for the crust and cut down your prep time by half. Just make sure they’re the kind that unroll flat or can be pressed easily.
4. How long does cinnamon roll cheesecake last?
Stored properly in the fridge, your cheesecake will last up to 5 days. You can also freeze it for up to 2 months and thaw when needed.
5. Can I freeze this cheesecake?
Definitely. Wrap slices or the whole cheesecake tightly and freeze for up to 2 months. Thaw overnight in the fridge and enjoy like it’s fresh out of the oven.
Conclusion
With its buttery cinnamon roll base, luscious cheesecake filling, and silky frosting drizzle, every bite is a delicious reminder of why desserts should never be boring. Plus, it’s easier to make than it looks — especially with this step-by-step guide to walk you through.
Whether you’re an experienced home baker or just testing your skills, this recipe is a guaranteed win. Try it once, and don’t be surprised if it becomes a regular feature in your dessert rotation.
So, are you ready to wow your friends, family, and most importantly, yourself?


