Chocolate Trifle Recipe: Who doesn’t love a dessert that looks like a showstopper, tastes like heaven, and is surprisingly easy to make? That’s exactly what you get with a chocolate trifle. This rich, indulgent dessert layers moist chocolate cake, velvety pudding, whipped cream, and sweet surprises in a glass dish that’s as beautiful as it is delicious. Whether you’re prepping for a family gathering, a festive celebration, or just craving something chocolatey and irresistible, this guide will walk you through everything you need to know.
Let’s roll up those sleeves and dive into one of the most mouth-watering dessert creations ever—the ultimate chocolate trifle!
What Is a Chocolate Trifle?
A chocolate trifle is a layered dessert traditionally made with cake, custard or pudding, whipped cream, and often fruit or candy elements. The ingredients are stacked in alternating layers inside a large clear glass bowl—often a trifle bowl—so you can see every delicious layer. The result is a visually stunning dessert that’s rich, creamy, crunchy, soft, and full of texture.
Originating from England, the trifle was originally made using sponge cake soaked in sherry and topped with custard. Over time, variations emerged—especially in the U.S.—with chocolate trifles becoming a favorite among dessert lovers. It’s no surprise why. Chocolate pairs wonderfully with fruits, nuts, cookies, and creams, allowing endless room for creativity.
Why You’ll Love This Recipe
There are about a thousand reasons to adore this recipe, but let’s highlight a few of the best ones:
- Easy to Make – You don’t need to be a pastry chef. Just follow the layers.
- Visually Stunning – It looks like it took hours, but only takes minutes.
- Customizable – You can tweak every layer based on your preferences.
- Crowd-Pleaser – It’s guaranteed to vanish quickly at any gathering.
- Make-Ahead Friendly – Actually tastes better after a few hours in the fridge.
Plus, with all those luscious layers, it’s hard to go wrong.
List of Ingredients You’ll Need
Core Ingredients
To make a classic chocolate trifle, you’ll need the following core ingredients:
- Chocolate Cake or Brownies – You can use homemade, store-bought, or a box mix.
- Chocolate Pudding – Either instant pudding or homemade pudding works well.
- Whipped Cream – Freshly whipped cream gives the best flavor, but Cool Whip is a convenient option.
- Crushed Chocolate Bars or Chips – Think semi-sweet chocolate, dark chocolate, or your favorite candy bars.
- Optional: Fruit Layers – Strawberries, raspberries, or bananas work beautifully.
Here’s a quick shopping list for reference:
| Ingredient | Quantity (Approximate) |
|---|---|
| Chocolate Cake | 1 full 9×13 inch cake or 1 batch brownies |
| Chocolate Pudding | 4 cups |
| Heavy Whipping Cream | 2 cups (or 1 tub whipped topping) |
| Sugar (for whipped cream) | 2 tbsp |
| Vanilla Extract | 1 tsp |
| Chocolate Shavings | 1/2 cup |
| Optional Berries | 1 cup |
Optional Add-ons for Customization
Want to get fancy? Here are some optional ingredients to elevate your trifle:
- Crushed Oreos
- Peanut butter cups
- Toffee bits
- Espresso powder (for a mocha twist)
- Mini marshmallows
- Liqueur (like Baileys or Kahlúa) – Adults only!
These additions can be swapped in depending on your mood, theme, or event.
Tools and Equipment You’ll Need
Before you start, make sure you have the following tools:
- Trifle bowl or large glass bowl
- Mixing bowls for pudding and whipped cream
- Electric mixer (optional but helpful for whipping cream)
- Rubber spatula or spoon
- Knife for cutting cake/brownies
- Grater or peeler (for chocolate shavings)
If you don’t have a trifle bowl, don’t stress. Any clear glass dish or even small mason jars for mini trifles will do the trick!
Preparing the Ingredients
Baking the Chocolate Cake or Brownie Base
The foundation of your trifle is the cake or brownie layer. You’ve got three great options here:
- Bake from Scratch – If you’re a baking enthusiast, a rich chocolate fudge cake or moist brownie is ideal.
- Boxed Mix – Fast and easy. Most store-bought mixes taste amazing with little effort.
- Store-Bought Cake – Perfect when you’re in a rush.
No matter your choice, make sure the cake is cooled completely before cutting it into cubes. Hot cake will melt your cream and pudding, turning your trifle into soup.
Pro tip: Slightly underbake the brownie layer for an ultra-gooey texture that’s to die for.
Making the Chocolate Pudding Layer
This is the creamy heart of your trifle. You’ve got two main choices:
- Instant Pudding Mix – Just whisk with milk and let it set. Great for when you’re short on time.
- Homemade Chocolate Pudding – Made with cocoa, cornstarch, sugar, and milk. It takes a bit longer but adds a depth of flavor that’s hard to beat.
Whichever option you go with, the key is to let it chill until firm before layering.
Want to add an adult twist? Stir in a tablespoon of coffee liqueur or brandy into your pudding for a grown-up flavor boost.
Preparing Whipped Cream
Sure, store-bought whipped topping works—but nothing beats the taste of freshly whipped cream. It’s light, airy, and has zero preservatives.
Here’s how to make it:
- Chill your mixing bowl and beaters for 15 minutes.
- Pour in 2 cups of cold heavy whipping cream.
- Add 2 tablespoons of sugar and 1 tsp of vanilla extract.
- Whip on medium-high speed until soft peaks form.
Avoid over-whipping, or you’ll end up with butter!
Chopping Fruits and Chocolate Garnishes
If you’re including fruit, slice it now. Strawberries and raspberries are classic choices and add a tart contrast to the sweetness.
For the garnish, use a vegetable peeler to shave curls off a chocolate bar. You can also crush chocolate chips or use sprinkles for color and crunch.
Step-by-Step Guide to Assembling the Trifle
Step 1: Layer the Cake
Place a generous layer of your cubed chocolate cake or brownie pieces into the bottom of your trifle bowl. Press them down slightly with the back of a spoon to create a stable base. This will soak up some of the pudding and add that classic moist trifle texture.
Step 2: Add the Chocolate Pudding
Now comes the creamy, dreamy part—chocolate pudding. Spoon a generous amount of pudding over the cake layer, using the back of a spoon or a spatula to spread it evenly. Make sure it covers the cake completely. This rich, velvety layer sinks into the cake just slightly, giving it that moist, fudgy texture that melts in your mouth.
Don’t skimp! The pudding acts as a luscious glue that holds the trifle together and balances the sweetness of the cake. If you’re using homemade pudding, make sure it’s chilled and set before layering. If it’s still warm, it can cause the whipped cream layer to melt prematurely.
Want to add a twist? Mix some crushed Oreos or chocolate chips into the pudding for added crunch and surprise textures. You can also stir in a splash of espresso or flavored liqueur for an adult-friendly depth of flavor.
Step 3: Add the Whipped Cream
Next up, we add a fluffy cloud of whipped cream on top of the pudding. Use a large spoon to gently dollop the cream over the pudding layer, then spread it out evenly. You want this layer to be light and airy—not packed down.
This layer provides the perfect contrast to the richness of the chocolate layers. It also gives your trifle a beautiful, smooth finish that’s perfect for decorating later. If you’re making this dessert ahead of time, consider stabilizing your whipped cream with a touch of gelatin or using a thicker cream so it holds up overnight.
If you’re feeling a little extra, flavor your whipped cream with a touch of almond extract, cocoa powder, or even cinnamon for a twist. For a visual bonus, save a few spoonfuls of whipped cream to use as a decorative top layer at the very end.
Step 4: Repeat the Layers
Now, you repeat: cake → pudding → whipped cream. Depending on the depth of your bowl, you’ll typically get 2 to 3 full rounds of these layers. Try to keep each layer consistent in thickness so the trifle looks evenly stacked from the sides.
As you build up, press each cake layer down gently to remove any large air pockets. Don’t mash it—just enough to ensure it’s nestled into the previous layer. This helps everything settle nicely and gives a cleaner cut when serving.
Pro tip: For an elegant look, alternate colors or textures. For example, add a layer of fresh berries or sprinkle in mini chocolate chips between layers. This adds pops of color and makes every spoonful exciting.
Step 5: Final Toppings and Garnish
Here comes the fun part—decorating your trifle. The final whipped cream layer should be smooth and thick enough to support your toppings. Let your creativity run wild with the final garnish!
Here are some crowd-pleasing topping ideas:
- Chocolate curls or shavings
- Crushed candy bars (Snickers, Twix, etc.)
- Fresh berries or sliced bananas
- Toffee bits or nuts (like hazelnuts or almonds)
- Drizzle of chocolate or caramel sauce
- Dusting of cocoa powder
Want to wow your guests? Create a spiral pattern with chocolate sauce or place decorative whipped cream rosettes around the top. You can even pipe some whipped cream using a star tip for that bakery-style finish.
Once decorated, chill your trifle for at least 2–4 hours before serving. This allows the flavors to meld and the textures to settle into that perfect spoonable consistency.
Tips for the Perfect Chocolate Trifle
Do’s and Don’ts
Making a chocolate trifle isn’t rocket science, but there are some handy tips that can take it from good to unforgettable:
Do’s:
- Do let your cake cool completely before layering.
- Do chill the pudding until fully set to avoid runny layers.
- Do use a clear bowl for visual appeal—after all, this dessert is a showpiece!
- Do make it ahead of time to let the layers set and the flavors mingle.
- Do taste each component as you go. Balance is key.
Don’ts:
- Don’t over-whip the cream. You want soft peaks, not butter.
- Don’t use warm pudding. It will melt your whipped cream and ruin the texture.
- Don’t overload one layer. Keep it balanced for the best look and flavor.
- Don’t serve it immediately. It needs time to rest in the fridge to truly shine.
Make-Ahead and Storage Tips
A trifle is the ultimate make-ahead dessert. In fact, it gets better the longer it sits—up to a point.
Here’s how to store it:
- Fridge: Cover with plastic wrap and chill for up to 2-3 days. The cake will absorb the pudding, making it even more flavorful.
- Freezer: Not recommended. Whipped cream and pudding don’t freeze well and can separate when thawed.
- Make-ahead tip: Assemble the trifle a day before serving but hold off on adding delicate toppings like berries or chocolate curls until just before serving to keep them fresh.
Have leftovers? Spoon individual portions into airtight containers and refrigerate. They make an indulgent treat for the next day (or midnight snack!).
Variations of Chocolate Trifle
Oreo Chocolate Trifle
Swap out the traditional cake for crushed Oreo cookies or alternate between cake and cookie layers. Add chopped Oreos into the pudding for a cookies-and-cream twist.
Top with whipped cream and extra Oreos for that double crunch.
Mocha Chocolate Trifle
Add espresso powder to the pudding and drizzle coffee liqueur over the cake layer. The coffee enhances the chocolate, giving the dessert a sophisticated, bittersweet edge.
Top with chocolate-covered espresso beans for a crunchy, caffeinated finish.
Fruity Chocolate Trifle
Chocolate and fruit? Yes, please. Add sliced strawberries, bananas, or raspberries between layers. The acidity of the fruit balances the richness of the chocolate and adds a refreshing touch.
For a tropical twist, try cherries and dark chocolate—just like a Black Forest trifle.
Chocolate Trifle for Occasions
Holidays and Celebrations
One of the most amazing things about a chocolate trifle is how perfectly it fits into any celebration. Whether it’s Christmas, Thanksgiving, Easter, or even Valentine’s Day, this dessert adapts beautifully with just a few tweaks in presentation and ingredients.
For Christmas, consider adding crushed peppermint candy or mint chocolate layers. You could even alternate red and white toppings with strawberries and whipped cream to give it a festive flair. Use a star tip to pipe the top with whipped cream and sprinkle with edible glitter for a magical holiday look.
During Thanksgiving, layer in some caramel, pecans, and a pinch of cinnamon for a warm, fall-inspired flavor profile. For Easter, you can decorate the top with pastel-colored candy eggs and mini marshmallows to make it kid-friendly and fun.
Valentine’s Day? You can’t go wrong with layers of chocolate, strawberries, and a drizzle of raspberry sauce, topped with heart-shaped chocolate pieces. It’s the ultimate romantic dessert to share.
And don’t forget birthdays or anniversaries! Personalize the trifle with name tags, candles, or even layers themed with their favorite candy bars.
Kids’ Parties and Potlucks
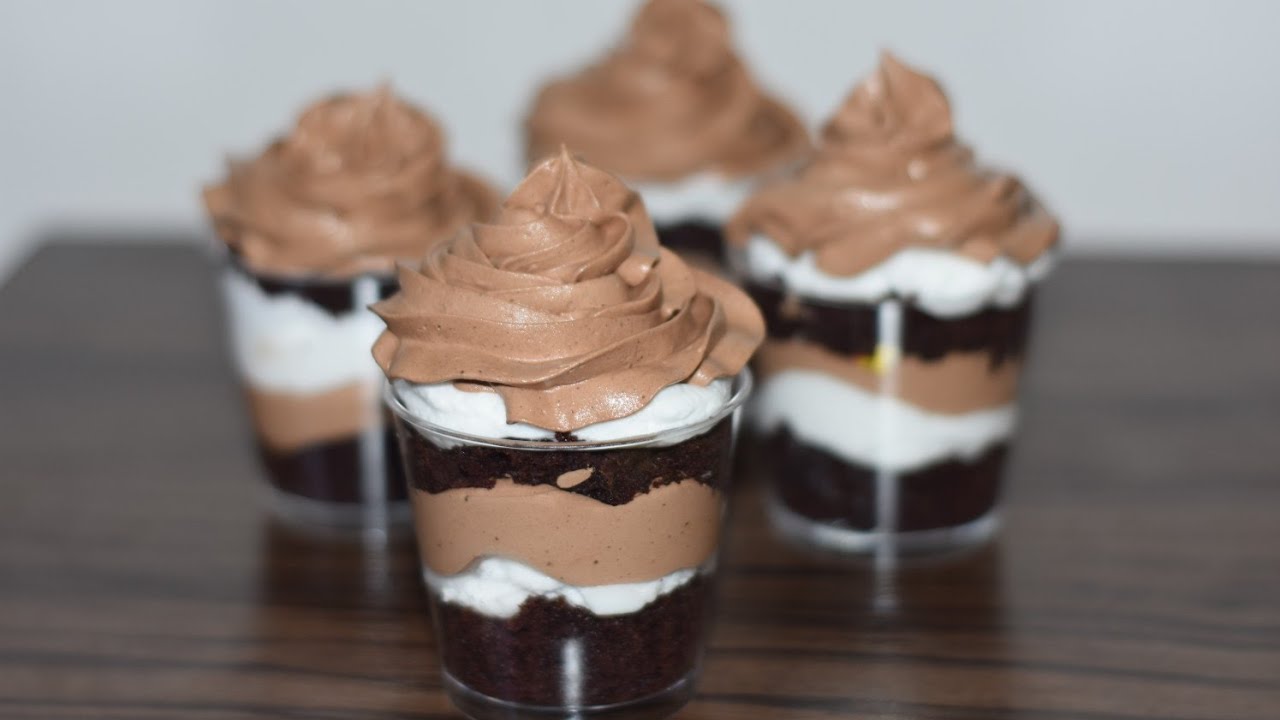
Want to be the hero of your next family get-together or potluck? Bring a chocolate trifle. This dessert is a guaranteed crowd-pleaser, especially when served in individual cups or mason jars for easy grab-and-go fun.
For kids’ parties, you can customize the trifle with fun toppings like:
- Crushed cookies (Oreos, Chips Ahoy)
- Mini M&M’s or gummy bears
- Sprinkles or edible glitter
- Marshmallows or cereal (like Cocoa Pebbles)
If you’re serving it at a potluck or picnic, pre-portion it in small plastic dessert cups with lids. This keeps it neat, mess-free, and transportable.
You can also set up a “trifle bar” at the party. Provide the cake, pudding, cream, and toppings separately and let guests build their own mini trifles. It’s interactive and fun for kids and adults alike!
Nutritional Information
Calories and Serving Size
Let’s be honest—chocolate trifle is not a diet food. But that’s okay. It’s meant to be indulgent. On average, a serving (about 1 cup) of traditional chocolate trifle contains:
- Calories: 350–450 kcal
- Fat: 20–25g
- Carbohydrates: 40–50g
- Protein: 4–6g
- Sugar: 25–35g
These numbers can vary greatly depending on what ingredients you use—especially the pudding (homemade vs. instant), the type of cake (brownies are denser), and the whipped cream (heavy cream vs. low-fat alternatives).
If you’re making a large batch for a party, one full trifle typically serves 12–16 people, depending on portion size.
Healthier Ingredient Swaps
Want to enjoy this dessert without the guilt? Try some of these health-conscious swaps:
- Use low-fat or sugar-free pudding mixes.
- Swap heavy cream for light whipped topping or even Greek yogurt for a tangy twist.
- Bake your cake with almond flour or whole wheat flour for added fiber.
- Reduce added sugar by using dark chocolate and unsweetened cocoa.
- Add fresh berries instead of candy toppings for a boost of antioxidants.
- Use unsweetened almond milk or coconut milk in pudding to cut down on calories.
These changes don’t sacrifice flavor—they just lighten things up a bit while keeping the indulgent experience.
Common Mistakes to Avoid
Even though making a chocolate trifle is fairly straightforward, there are a few common pitfalls to avoid if you want it to turn out picture-perfect and delicious.
Layering While Ingredients Are Warm
- Always let your cake, pudding, and cream cool completely. Warm ingredients can melt each other and create a runny mess.
Skipping the Chill Time
- The magic happens when the trifle chills for at least 4 hours. Don’t rush it! This gives the layers time to set and absorb flavors.
Using a Bowl That’s Too Small
- Trifles are tall desserts. If you don’t have a trifle bowl, use a deep glass bowl. Shallow containers won’t showcase the layers properly.
Overloading with Wet Ingredients
- Don’t soak your cake in too much liquid. A little drizzle is fine, but too much will result in a soggy bottom (and not the good kind!).
Not Leveling Each Layer
- Use a spatula to spread each layer evenly. Uneven layers lead to a lopsided trifle and uneven taste distribution.
Going Overboard on Sweetness
- Balance is key. If your cake and pudding are super sweet, consider unsweetened whipped cream or adding fruit to offset the richness.
Waiting Too Long to Serve
- While chilling is crucial, don’t leave it in the fridge for days. After 2 days, it starts losing its structure and freshness.
Avoid these missteps and your trifle will be the star of the show—every single time.
FAQs about Chocolate Trifle Recipe
1. Can I use store-bought pudding?
Yes! Store-bought pudding works perfectly in a trifle and saves time. Just make sure it’s thick and chilled before layering.
2. How long does a chocolate trifle last in the fridge?
A chocolate trifle stays fresh in the fridge for up to 3 days. Beyond that, the layers can start to get mushy.
3. Can I freeze chocolate trifle?
Freezing is not recommended. The whipped cream and pudding can separate when thawed, affecting the texture and presentation.
4. What if I don’t have a trifle bowl?
No worries! Use any large, clear glass bowl or even mason jars for individual servings. Presentation is flexible.
5. Is it okay to make trifle a day ahead?
Absolutely! In fact, making it a day ahead is ideal—it gives the flavors time to meld and the texture to set perfectly.
Final Thoughts
There you have it—a complete guide to making the most irresistible chocolate trifle you’ll ever lay your spoon into. Whether you’re serving it for a fancy holiday dinner or a casual weekend treat, this dessert is sure to be a crowd favorite. It’s easy, flexible, and endlessly customizable, which makes it a must-have in your dessert repertoire.
From the velvety pudding to the fluffy whipped cream and the rich cake base, every spoonful is a little piece of dessert heaven. Don’t be surprised if you find yourself making this trifle again and again—because once your family and friends taste it, they’ll never stop asking for more!
Now go ahead, grab that spoon, and make your kitchen smell like chocolatey joy.


