Chocolate Shake Recipe: Chocolate shakes are one of those timeless delights that never lose their charm. Whether you’re a child, a teenager, or an adult, the creamy sweetness of a chilled chocolate shake can instantly bring a smile to your face. Imagine a hot summer afternoon or even a cozy winter evening—you grab a tall glass of chocolate shake, and suddenly everything feels better. That’s the magic of this simple yet irresistible drink.
Why are chocolate shakes so popular? Because they combine two universally loved things—milk and chocolate. When blended together with ice cream and a touch of sweetness, they create a drink that’s indulgent yet comforting. Many people also consider it a quick energy booster since it’s rich in carbs, proteins, and a little fat. Unlike sodas or artificially flavored drinks, a homemade chocolate shake can be customized to your preference, whether you like it super sweet, extra creamy, or even slightly bitter with dark chocolate.
Making chocolate shakes at home has another advantage—it’s budget-friendly. Instead of paying high prices at cafes, you can whip one up in less than 10 minutes with basic ingredients you already have in your kitchen. Plus, you get to control the quality of the ingredients, which means no artificial additives or hidden preservatives. In this guide, we’ll walk through every step, from gathering your ingredients to blending and serving, so you can enjoy a perfect homemade chocolate shake whenever you crave one.
Why Chocolate Shakes Are Loved Worldwide
Chocolate shakes are universally adored for their rich, creamy texture and irresistible taste. But what makes them so appealing across cultures? First, chocolate itself has a global fan base. It’s one of the most traded and consumed flavors in desserts worldwide. When mixed with milk, the natural creaminess balances out the sweetness, creating a drink that’s both indulgent and refreshing.
Another reason is versatility. A chocolate shake can be as simple as blending chocolate syrup with milk and ice cream, or it can be elevated into a gourmet treat with whipped cream, chocolate chips, nuts, and even a drizzle of caramel. In many countries, restaurants and cafes compete to serve unique variations of chocolate shakes, from thick milkshakes topped with brownies to healthier versions using almond milk and cocoa powder.
On a deeper level, chocolate has mood-enhancing properties. Science shows that chocolate contains compounds that stimulate the release of endorphins, the “happy hormones.” No wonder people turn to chocolate shakes when they want comfort or a little mood boost. Add to that the nostalgia of childhood memories—most of us had our first chocolate shake as kids—and it becomes clear why this drink remains a favorite worldwide.
Benefits of Making Chocolate Shakes at Home
While store-bought or café-made shakes are delicious, there are plenty of reasons to make your chocolate shake at home. The biggest benefit is control over ingredients. You can choose full-fat milk for a creamier texture, low-fat milk for fewer calories, or even plant-based milk like almond, oat, or coconut for a dairy-free option. Similarly, you decide whether to use natural cocoa powder, high-quality chocolate, or a ready-made syrup.
Homemade shakes are also cost-effective. Instead of spending $5–$8 at a café, you can make multiple servings at home for a fraction of the price. Not to mention, you can avoid excess sugar and artificial flavors often added to commercial milkshakes. Another big plus is customization. Do you love extra-thick shakes? Add more ice cream. Want a protein boost? Throw in a scoop of whey protein. Prefer a nutty taste? Blend in some peanut butter or almond butter. The options are endless.
Finally, making chocolate shakes at home can be a fun family activity. Kids love helping with pouring milk or adding chocolate syrup, and it’s a great way to introduce them to simple cooking. Plus, serving a homemade shake instantly makes any gathering feel special, whether it’s a weekend brunch, a birthday treat, or just a surprise dessert after dinner.
Ingredients You’ll Need
Basic Ingredients for a Classic Chocolate Shake
To make a rich and creamy chocolate shake, you don’t need a long list of fancy items. The classic version only requires a few simple ingredients:
- Milk (2 cups): Whole milk works best for creaminess, but you can use skim, low-fat, or even non-dairy milk.
- Chocolate syrup or cocoa powder (4–5 tablespoons): This is the main flavoring ingredient. You can also melt chocolate bars for a more intense flavor.
- Vanilla ice cream (2–3 scoops): This makes the shake thick and indulgent.
- Sugar (optional): Depending on how sweet your chocolate syrup or cocoa is, you may want to add a teaspoon or two.
- Ice cubes (optional): To make the shake extra cold and refreshing.
These basics are enough to whip up a delicious chocolate shake in just a few minutes.
Optional Ingredients for Extra Flavor
If you want to get creative, here are some extras you can add:
- Whipped cream: For a café-style topping.
- Chocolate chips or shavings: Adds crunch and enhances the chocolate flavor.
- Cinnamon or nutmeg: For a warm, spiced twist.
- Peanut butter or Nutella: Creates a rich, nutty flavor.
- Banana: Adds natural sweetness and thickness.
- Protein powder: Ideal if you want a post-workout energy boost.
These optional ingredients allow you to tailor the shake to your mood—whether you want it indulgent, healthy, or somewhere in between.
Choosing the Best Quality Ingredients
The secret to a great chocolate shake lies in the quality of its ingredients. Instead of using cheap chocolate syrup loaded with artificial flavors, go for pure cocoa powder or real melted chocolate. If you prefer syrup, look for brands that use natural ingredients. For milk, fresh whole milk or organic alternatives usually yield the creamiest texture.
Ice cream plays a huge role in the flavor and texture of your shake. A rich, creamy vanilla ice cream will give the best results. If you’re health-conscious, you can use low-fat or sugar-free ice cream, though the texture may not be as thick. Also, if you’re using add-ons like bananas, make sure they are ripe for natural sweetness.
Remember, a chocolate shake is only as good as what goes into it. By choosing high-quality ingredients, you can easily transform a simple homemade shake into something that tastes like it came straight from a fancy café.
Tools and Equipment Required
Essential Kitchen Tools
To prepare a chocolate shake, you don’t need a professional chef’s kitchen setup. The essential tool is a blender. A high-speed blender will give you that smooth, frothy texture that makes milkshakes so enjoyable. Apart from the blender, you’ll need:
- Measuring cups and spoons for accuracy.
- A large mixing glass or pitcher to blend everything together.
- Tall serving glasses for that classic milkshake presentation.
- A long spoon or straw for easy sipping.
These basic tools are more than enough to get started.
Alternative Options if You Don’t Have a Blender
Don’t have a blender at home? No problem! You can still enjoy a chocolate shake with some creativity. Here are a few alternatives:
- Hand Mixer or Immersion Blender: Works great for blending milk, chocolate syrup, and softened ice cream.
- Shaker Bottle: Add milk, chocolate syrup, and ice cream, then shake vigorously until smooth.
- Whisk Method: If you’re patient, whisk everything together in a bowl until creamy. While it won’t be as smooth as a blender version, it still tastes delicious.
These alternatives might take a bit more effort, but they prove that you don’t need fancy equipment to enjoy a glass of homemade chocolate shake.
Step-by-Step Guide to Making Chocolate Shake
Step 1 – Gather Your Ingredients
The very first step in making a perfect chocolate shake is preparation. Having everything laid out in front of you not only saves time but also ensures you don’t miss any ingredient. For the classic version, you’ll need cold milk, chocolate syrup or cocoa powder, vanilla ice cream, and sugar (if you like it sweeter). If you’re planning to experiment, this is the stage to also get your extras—like bananas, peanut butter, or whipped cream—ready.
A good tip is to keep your milk chilled before you start. Using cold milk makes your shake extra refreshing and prevents the ice cream from melting too quickly. If you’re using cocoa powder instead of syrup, it’s better to mix it with a little warm milk first to avoid lumps. This small step ensures a smooth and rich flavor later when blending.
Preparation also means setting up your tools. Place your blender on the counter, plug it in, and make sure it’s clean and dry. Keep your measuring cups, tall glasses, and a straw or spoon handy. It may seem simple, but being organized at this stage makes the entire process smooth, quick, and enjoyable. After all, making a shake should feel fun—not stressful.
Step 2 – Blend the Base Ingredients
Now that everything is ready, it’s time to start blending. Begin by pouring about two cups of milk into your blender. Then add two to three generous scoops of vanilla ice cream. This forms the creamy base of your shake. Next, add four to five tablespoons of chocolate syrup or cocoa powder. If you prefer a darker, more intense flavor, you can add an extra spoon of cocoa or use melted dark chocolate instead.
Blending is where the magic happens. Start on a low speed to combine the ingredients, then gradually increase to high speed. This ensures the ice cream breaks down smoothly without leaving any chunks behind. Blend for about 30 to 45 seconds until everything looks well combined and frothy.
If you’re experimenting with add-ons like bananas or protein powder, this is the best time to include them. Toss them into the blender before blending to allow the flavors to mix evenly. Once blended, stop and taste the mixture. If it’s not sweet enough, add a teaspoon of sugar or honey and blend again briefly.
Step 3 – Add Chocolate Syrup or Cocoa Powder
This step is where you really bring out the chocolatey richness. Even though we already added syrup or cocoa in the base, an extra drizzle of syrup at this stage takes the flavor to another level. Pour in about one or two tablespoons more of chocolate syrup directly into the blender, or if using cocoa powder, dissolve it in a splash of warm milk first before adding.
Why add extra chocolate here? Because it creates depth. The first addition blends into the shake’s base, while this second boost enhances the richness and gives your shake that unmistakable café-like flavor. If you want to get a little fancy, you can even swirl chocolate syrup along the inside of the serving glass before pouring the shake. Not only does it look amazing, but it also adds little bursts of flavor with every sip.
If you’re a dark chocolate lover, you can melt a few squares of dark chocolate and add them instead of syrup. This adds a luxurious bitterness that balances the sweetness of the ice cream. Alternatively, for kids or those who prefer a sweeter taste, stick with milk chocolate syrup.
Step 4 – Blend Until Smooth and Creamy
At this point, your blender has all the ingredients needed to create a masterpiece. The goal here is to achieve that perfectly smooth and creamy texture that makes chocolate shakes so irresistible. Turn the blender on high speed and let it run for another 30–60 seconds. You’ll notice the mixture becoming thicker, creamier, and frothy on top.
If your shake seems too thick, don’t panic. Just add a little more milk and blend again until you reach your desired consistency. On the other hand, if the shake feels too thin, you can add another scoop of ice cream or a handful of ice cubes to thicken it. It’s all about balancing until it feels just right.
Remember, the key to a great shake is not over-blending. While it may be tempting to keep blending, too much air can make the shake frothy instead of creamy. Stop as soon as everything looks smooth and rich. Once done, take a small spoonful to taste. If the flavor feels spot-on—sweet, chocolaty, and creamy—you’ve nailed it.
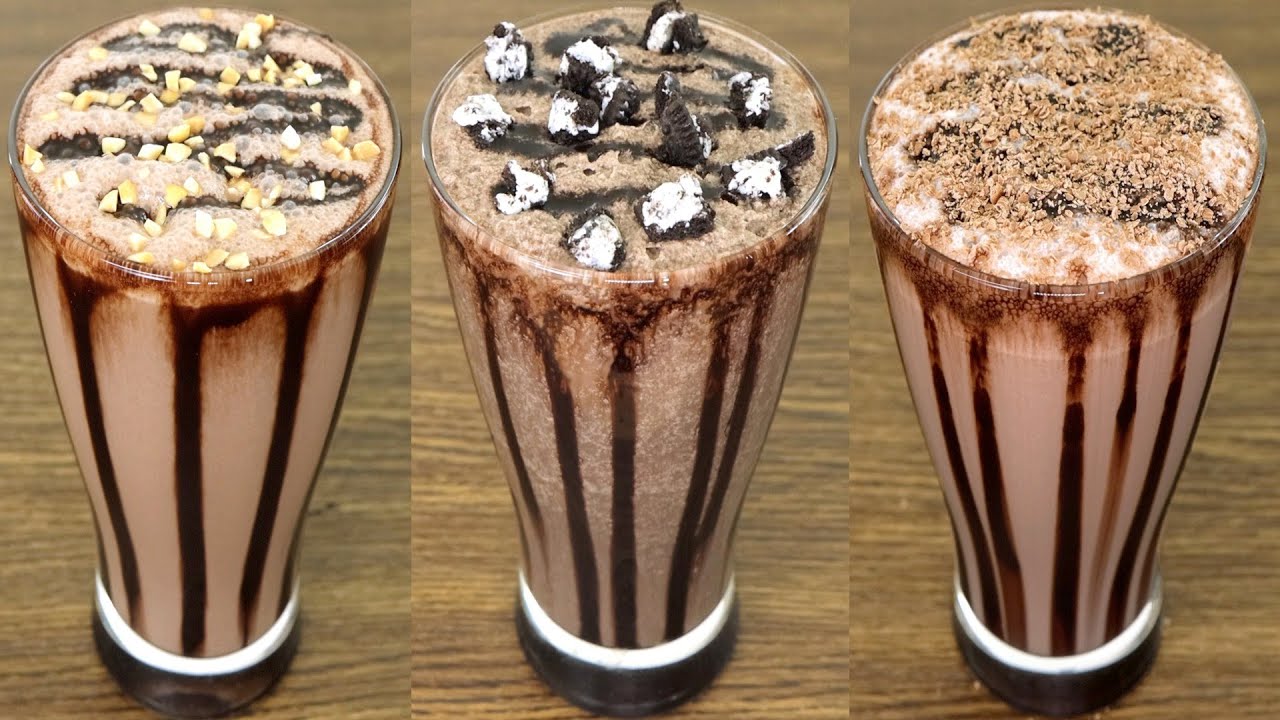
Step 5 – Serve and Garnish for Extra Delight
Now comes the most exciting part—serving your shake. Pour the creamy chocolate mixture into tall glasses, leaving some room at the top for toppings. For a classic touch, add a generous swirl of whipped cream and drizzle chocolate syrup over it. You can also sprinkle chocolate chips, shavings, or even crushed cookies on top for a crunchy surprise.
If you want to impress guests or make your shake Instagram-worthy, try rimming the glass with chocolate syrup before pouring the shake. Another fun idea is to top it with a scoop of ice cream and stick a wafer or chocolate stick inside. It transforms a simple shake into a dessert in itself.
Don’t forget the finishing touch—a straw or a long spoon. A colorful straw not only makes sipping easier but also adds to the presentation. Finally, serve the shake immediately while it’s cold, creamy, and fresh. Nothing beats that first sip of homemade chocolate shake, packed with flavor and love.
Tips for the Perfect Chocolate Shake
How to Get the Creamiest Texture
If you’ve ever wondered why café shakes taste so smooth, the secret lies in texture. The creaminess of a shake depends on three things: the type of milk, the quality of ice cream, and the blending process. Whole milk or full-cream milk works best, but if you’re health-conscious, you can opt for almond or oat milk with a splash of cream to mimic the richness.
Another trick is to use high-quality ice cream. Cheap ice creams often contain more ice than cream, which results in a watery shake. A premium vanilla ice cream, on the other hand, gives that luxurious mouthfeel. You can also add a tablespoon of heavy cream while blending to enhance smoothness.
Finally, the blending technique matters. Start slow, then increase speed gradually to avoid lumps. Don’t over-blend, as that introduces too much air and makes the shake foamy instead of creamy. A perfectly creamy chocolate shake should be thick enough to sip slowly through a straw but smooth enough to not feel heavy.
Sweetness Adjustment Tricks
Not all chocolate syrups and cocoas are the same—some are sweeter, while others are slightly bitter. That’s why adjusting sweetness is important. A simple way to control this is by tasting after the first blend and adjusting accordingly. You can add sugar, honey, or even maple syrup if you want a natural sweetener.
If you like your shakes less sweet, balance them with a ripe banana. Bananas add natural sweetness without making the shake overly sugary. Another clever trick is to sprinkle in a tiny pinch of salt. It may sound strange, but salt enhances chocolate flavor and balances sweetness beautifully.
Sweetness also depends on personal preference. Kids usually prefer sweeter shakes, while adults may enjoy a slightly bitter, dark chocolate version. That’s the beauty of homemade shakes—you can tailor the flavor exactly how you like it.
How to Make It Healthier Without Losing Flavor
A chocolate shake doesn’t always have to be guilty indulgence—it can be a healthy treat too. The trick is making smart ingredient swaps without sacrificing taste. Instead of full-fat ice cream, try frozen bananas or Greek yogurt. Frozen bananas give the shake a creamy base while naturally sweetening it, and Greek yogurt adds protein along with a tangy twist.
Milk is another area where you can make adjustments. If you’re lactose-intolerant or trying to cut calories, go for almond milk, oat milk, or soy milk. These plant-based alternatives not only lower fat content but also bring unique flavors. For instance, almond milk adds a nutty taste, while oat milk gives a naturally sweet creaminess.
When it comes to chocolate, skip artificial syrups loaded with sugar. Use unsweetened cocoa powder or melted dark chocolate instead. Dark chocolate is rich in antioxidants, which are good for heart health. If you still crave sweetness, add a touch of honey, maple syrup, or stevia. Finally, you can sprinkle in flaxseeds, chia seeds, or even a scoop of protein powder for an extra nutritional boost. This way, you’ll enjoy a decadent chocolate shake that satisfies cravings and fuels your body.
Variations of Chocolate Shake
Chocolate Banana Shake
If you love bananas and chocolate together, this variation will be your new favorite. Bananas add natural sweetness, creaminess, and thickness to the shake, reducing the need for extra ice cream or sugar. Simply add one ripe banana along with your usual ingredients and blend until smooth. The result is a rich, velvety drink with a fruity undertone that perfectly complements the chocolate.
This version is especially great for breakfast or post-workout energy because bananas are packed with potassium and fiber. You can even freeze the banana before blending for a colder, thicker shake. To take it up a notch, try adding a spoonful of peanut butter. The combination of banana, chocolate, and peanut butter is heavenly—like dessert in a glass, but still nutritious.
Chocolate Protein Shake
Fitness lovers don’t have to give up chocolate shakes. In fact, you can turn them into a high-protein, muscle-friendly drink. All you need is a scoop of chocolate or vanilla protein powder. Blend it with milk, ice, cocoa powder, and maybe a banana for extra creaminess. The result? A protein-packed shake that tastes like dessert but works like fuel.
The best part about this version is versatility. You can use whey protein, casein, or plant-based protein, depending on your dietary preference. Adding a spoonful of peanut butter or almond butter also enhances the protein content while making the shake more filling. It’s the perfect post-workout drink when your body needs both recovery and a treat.
Vegan/Dairy-Free Chocolate Shake
For those who avoid dairy, a vegan chocolate shake is just as delicious as the classic version. Start with almond, oat, or coconut milk as the base. Instead of ice cream, use frozen bananas or dairy-free ice cream. For the chocolate, go with vegan-friendly cocoa powder or dark chocolate.
To make it creamier, add a spoonful of nut butter or coconut cream. You can also sweeten it naturally with dates, maple syrup, or agave. This version isn’t just for vegans—it’s perfect for anyone looking for a lighter, dairy-free alternative. And the best part? It’s guilt-free yet every bit as satisfying.
Common Mistakes to Avoid
Using Too Much Ice
Many people think adding lots of ice will make their chocolate shake cold and refreshing, but in reality, it waters down the flavor. Too much ice can make the shake thin and tasteless. If you want a thicker shake without watering it down, use frozen bananas, extra ice cream, or just chill your milk beforehand. Ice should be used sparingly, only for a quick chill—not as a main ingredient.
Overpowering Flavors with Excess Chocolate
It might be tempting to dump in loads of chocolate syrup or cocoa powder, but too much can overwhelm the palate and make the shake bitter or overly sweet. Chocolate works best when balanced with milk and ice cream. Remember, less is more—you can always add a little more syrup after tasting, but you can’t take it out once blended.
A well-made chocolate shake should taste rich but not cloying. If you accidentally add too much chocolate, balance it with more milk or a scoop of vanilla ice cream. This evens out the flavor and restores that smooth, café-like taste.
Ignoring Proper Blending Techniques
A lumpy chocolate shake is a disappointing one. Many people don’t blend long enough, leaving chunks of ice cream or powder floating around. On the other hand, over-blending can introduce too much air, turning the shake frothy instead of creamy. The key is to start blending on low speed, then gradually increase to high until everything looks smooth.
Another mistake is not layering ingredients correctly. Always add liquids first (milk), then powders (cocoa), followed by ice cream or frozen ingredients. This ensures the blender blades move freely, preventing clumps and uneven mixing. A few extra seconds of careful blending makes all the difference between a mediocre shake and a perfect one.
Serving Suggestions
Best Toppings for Chocolate Shakes
The fun doesn’t stop after blending—toppings can transform your shake into a gourmet treat. The most popular option is whipped cream, topped with a drizzle of chocolate syrup. But why stop there? Try sprinkling chocolate chips, crushed Oreos, or rainbow sprinkles on top. For a crunchy twist, add chopped nuts like almonds, walnuts, or hazelnuts.
You can also get creative with dessert toppings. Mini marshmallows, brownie chunks, or a dusting of cocoa powder can elevate the presentation and taste. If you’re serving kids, candy toppings like M&M’s or gummy bears make it extra fun. Remember, toppings not only make the shake look appealing but also add new textures and flavors that keep every sip exciting.
Serving with Snacks or Meals
Chocolate shakes can be enjoyed on their own, but pairing them with snacks takes the experience to another level. Classic pairings include French fries, burgers, or sandwiches—just like in American diners. The salty-sweet contrast is unbeatable.
For a lighter option, pair your shake with cookies, muffins, or fruit slices. If you’re serving it at a party, consider offering mini shakes in small glasses alongside finger foods. This way, guests can enjoy the rich taste of chocolate shake without feeling too heavy. Whether it’s a casual snack, a weekend treat, or a fancy dessert, a chocolate shake always fits right in.
Storing Chocolate Shake
How Long Can You Store It in the Fridge?
Freshly made chocolate shakes taste best when enjoyed immediately, but sometimes you might make extra or want to prepare ahead. If stored properly in an airtight container or a glass jar with a lid, a chocolate shake can last in the refrigerator for up to 24 hours. Beyond that, the texture begins to change—the shake may separate, losing its creamy consistency.
If you do store it, make sure to give it a good stir or shake before drinking, as the chocolate and milk tend to settle. To keep it tasting fresh, avoid leaving it uncovered, since it can absorb other fridge odors. It’s also a good idea to store it in glass rather than plastic, which helps maintain the flavor better.
However, remember that dairy-based shakes spoil quickly if not kept cold. Never leave your chocolate shake out at room temperature for more than an hour, especially during warm weather. Always refrigerate it as soon as possible to ensure safety and freshness.
Can You Freeze Chocolate Shake?
Yes, you can freeze chocolate shakes, but with a catch. Freezing them turns the liquid into more of an ice cream-like consistency. If you pour your leftover shake into an ice cube tray and freeze it, you can later re-blend the cubes with a little fresh milk to recreate the creamy texture. This trick works especially well if you don’t want to waste leftovers.
Another option is to freeze the shake in popsicle molds for a fun, frozen treat. Kids love this variation, and it’s a great way to repurpose shakes into a summer-friendly dessert.
Just remember, freezing may slightly change the flavor and texture. The shake won’t taste as fresh as when it’s first blended, but it’s still a smart way to save and enjoy it later.
Nutritional Value of Chocolate Shake
Calories and Nutrients Breakdown
A traditional chocolate shake is delicious but also calorie-dense. On average, a single serving (about 12 oz) of a homemade shake with milk, ice cream, and chocolate syrup contains:
- Calories: 350–450
- Protein: 8–12 g
- Fat: 15–20 g
- Carbohydrates: 40–55 g
- Sugar: 35–40 g
Of course, these values vary depending on portion size and the ingredients you use. Using whole milk and full-fat ice cream will increase calories, while using low-fat milk and less syrup can cut them down significantly.
The good news is that shakes provide calcium, protein, and some vitamins from the milk. If made with bananas, nuts, or protein powder, they become more nutrient-rich. However, like most desserts, moderation is key—enjoy them as an occasional treat rather than an everyday drink.
Healthy Alternatives for Low-Calorie Options
If you love chocolate shakes but don’t want the extra calories, there are plenty of healthy swaps you can try:
- Replace ice cream with frozen bananas or low-fat frozen yogurt.
- Use unsweetened almond milk or oat milk instead of whole milk.
- Swap chocolate syrup with unsweetened cocoa powder and natural sweeteners like honey, maple syrup, or stevia.
- Add chia seeds or flaxseeds for fiber and omega-3 fatty acids.
- Include protein powder to make it filling without needing extra sugar.
These adjustments can bring the calorie count down to around 200–250 per serving while still giving you that rich chocolate taste. That way, you can enjoy your shake guilt-free whenever the craving hits.
FAQs about Chocolate Shake Recipe
Can I Make It Without Ice Cream?
Yes! You can still enjoy a creamy chocolate shake without ice cream. Substitute with frozen bananas, Greek yogurt, or a few ice cubes blended with extra milk. These alternatives make the shake thick while cutting down on calories and sugar.
How Do I Make It Extra Thick?
For an extra-thick shake, use less milk and more ice cream or frozen bananas. You can also chill your serving glasses beforehand to keep the shake cold and thick for longer.
What’s the Best Milk for a Creamy Shake?
Whole milk is the creamiest choice, but if you’re avoiding dairy, oat milk is the best alternative because of its natural sweetness and rich texture. Almond milk and soy milk work too but may give a slightly lighter feel.
Can I Add Coffee for a Mocha Flavor?
Absolutely! Adding a shot of espresso or a spoonful of instant coffee to your chocolate shake turns it into a mocha shake. It’s perfect for coffee lovers who want a refreshing caffeine boost.
Is It Okay to Drink Chocolate Shakes Every Day?
While tempting, it’s best to enjoy chocolate shakes in moderation. They are high in sugar and calories, so having them daily might not be ideal for health. Instead, try healthier versions with cocoa powder, bananas, and plant-based milk if you want them more often.
Conclusion
A chocolate shake is more than just a drink—it’s comfort in a glass. From the classic version with ice cream and syrup to healthier variations with bananas or protein powder, it’s a recipe you can customize endlessly. By using quality ingredients, balancing flavors, and following the right blending techniques, you can make a shake at home that tastes just as good—if not better—than any café version.
Whether you enjoy it plain, topped with whipped cream, or served alongside fries and burgers, a chocolate shake is always a treat worth savoring. So, the next time you crave something sweet and creamy, skip the store-bought mix and make your own. With this step-by-step guide, you’ll never go wrong.