Chili Mac and Cheese Recipe: There’s something magical about combining two of the most comforting dishes—hearty chili and creamy mac and cheese—into one ultimate comfort meal: Chili Mac and Cheese. This dish is bold, flavorful, and satisfying enough to feed a crowd or enjoy as a cozy family dinner. If you’ve ever craved the rich flavors of chili but also wanted the creamy cheesiness of macaroni, this recipe will give you the best of both worlds.
Why is Chili Mac so popular? Because it’s versatile, budget-friendly, and customizable. You can keep it simple with ground beef, pasta, cheese, and spices, or elevate it with toppings like sour cream, jalapeños, or avocado slices. It’s also a lifesaver for busy weeknights since you can make it in under an hour with just one pot if you want to cut down on dishes.
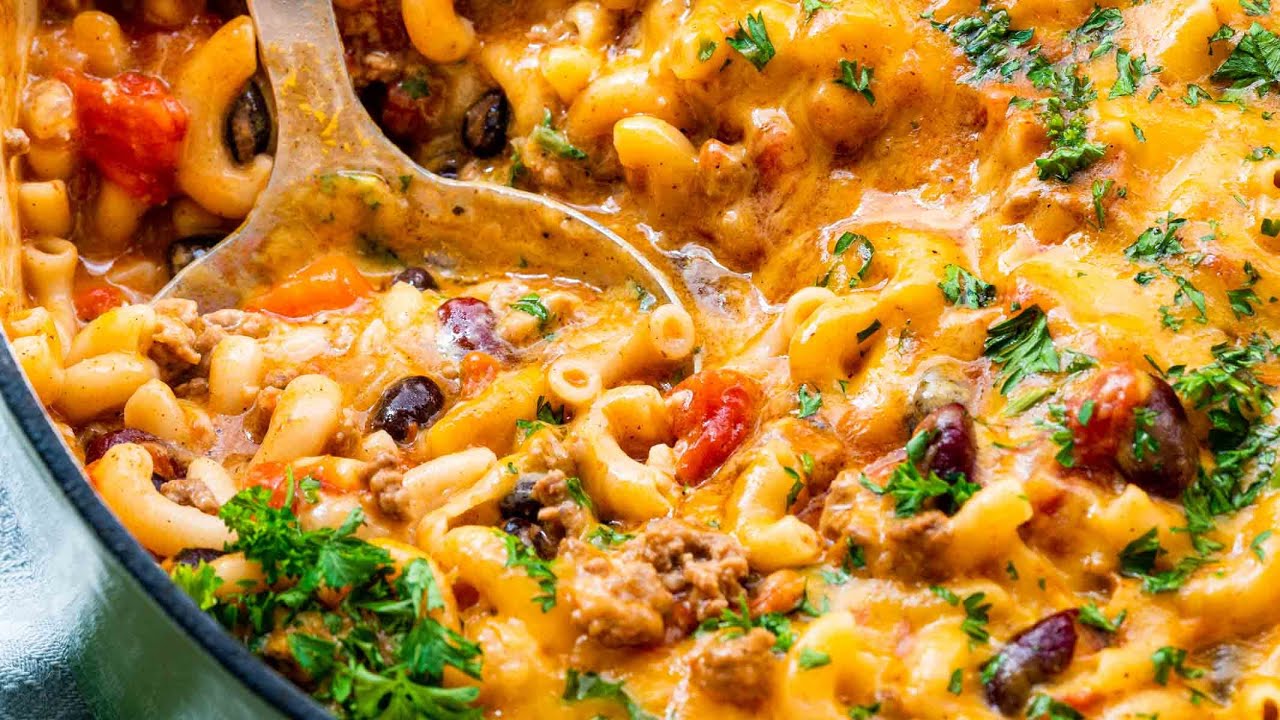
This recipe is all about layering flavors—savory meat, smoky spices, creamy cheese, and tender pasta. By the time you scoop it onto your plate, you’ll have a dish that’s rich, hearty, and guaranteed to satisfy even the hungriest eaters. Let’s dive into everything you’ll need to make the perfect Chili Mac and Cheese at home.
Ingredients You’ll Need
The beauty of Chili Mac and Cheese is that most of the ingredients are pantry staples or things you probably already have in your fridge. Here’s a breakdown to make sure you’re fully stocked before you start cooking.
Main Ingredients
- Elbow macaroni (or any short pasta) – classic choice for holding sauce and cheese.
- Ground beef or turkey – adds richness and protein.
- Kidney beans or black beans – traditional chili staple for texture and fiber.
- Diced tomatoes (canned or fresh) – brings acidity and balances flavors.
- Cheddar cheese (shredded) – gives that creamy, gooey mac and cheese base.
Optional Add-Ons for Extra Flavor
- Corn kernels – for sweetness and texture.
- Jalapeños or chili peppers – to kick up the spice level.
- Bell peppers and onions – sautéed with the meat for extra depth.
- Sour cream or Greek yogurt – for a creamy topping.
- Fresh herbs (cilantro, parsley, green onions) – to add freshness.
Pantry Staples You Likely Already Have
- Olive oil or butter (for cooking)
- Garlic (minced)
- Chili powder
- Paprika
- Cumin
- Salt and pepper
- Chicken or beef broth (for cooking the pasta and chili base)
Having these ingredients prepped and ready makes the cooking process smooth and enjoyable.
Kitchen Tools and Equipment
Cooking Chili Mac and Cheese doesn’t require fancy tools, but the right equipment can make the process faster and less stressful.
Must-Have Cookware
- Large pot or Dutch oven – perfect for one-pot chili mac.
- Medium saucepan – if making cheese sauce separately.
- Colander – for draining pasta.
- Wooden spoon or spatula – for stirring and combining ingredients.
Helpful Gadgets for Easier Cooking
- Cheese grater – freshly shredded cheese melts better than pre-packaged.
- Measuring spoons and cups – for accuracy with spices and broth.
- Sharp knife and cutting board – to prep onions, peppers, and garlic.
- Oven-safe dish – if you want to finish with a baked cheesy crust.
While you can definitely whip up Chili Mac with just the basics, having these extras on hand makes it easier to get that restaurant-quality finish at home.
Step-by-Step Guide to Making Chili Mac and Cheese
Now that you’ve gathered your ingredients and tools, it’s time to cook. Follow this step-by-step guide to make the perfect Chili Mac and Cheese from scratch.
Step 1 – Preparing the Pasta
Bring a large pot of salted water to a boil and cook your elbow macaroni until it’s just al dente (slightly firm to the bite). This step is crucial because the pasta will continue cooking when combined with the chili and cheese later. Overcooked pasta will turn mushy and ruin the texture of your dish.
Drain the pasta and set it aside while you prepare the chili base. Pro tip: drizzle a little olive oil on the pasta to prevent sticking.
Step 2 – Cooking the Chili Base
In your large pot or Dutch oven, heat a drizzle of olive oil over medium-high heat. Add ground beef (or turkey) and break it apart with a spoon as it browns. Once the meat is nearly cooked, toss in diced onions, bell peppers, and garlic. The veggies should soften and release their natural sweetness, creating a flavorful base.
Next, stir in your chili powder, cumin, paprika, salt, and pepper. Toasting the spices for about 1 minute before adding liquids intensifies their flavor. At this point, your kitchen should smell incredible—smoky, savory, and inviting.
Once the meat and spices are well combined, add diced tomatoes and a splash of broth. Let it simmer for about 10–15 minutes to allow the flavors to meld together.
Step 3 – Adding Beans, Spices, and Flavor
This is the part where your chili base truly comes to life. After your meat and tomatoes have simmered together, it’s time to stir in the beans. Traditional chili recipes often call for kidney beans, but feel free to mix things up with black beans, pinto beans, or even a combination. Not only do they add heartiness and texture, but they also soak up the rich, smoky flavors from the spices.
Add your drained beans directly into the pot, followed by additional seasonings. A second round of chili powder, cumin, and a pinch of cayenne pepper (if you like it spicy) deepens the flavor profile. Some cooks also like to add a splash of Worcestershire sauce for a subtle umami kick. If your chili seems too thick, pour in another half cup of broth until it reaches the consistency you prefer.
Let this mixture simmer for another 10–15 minutes, stirring occasionally. This simmering step is where magic happens—the beans absorb the spices, the broth reduces slightly, and the flavors blend into a hearty, savory chili that’s rich enough to stand on its own. If you were just making chili, you could stop here and serve it with cornbread. But since we’re taking it a step further, let’s move on to the cheesy, indulgent part of this recipe.
Step 4 – Making the Creamy Cheese Sauce
Now comes the element that transforms ordinary chili into a comfort food masterpiece: the cheese sauce. In a medium saucepan, melt a few tablespoons of butter over medium heat. Once melted, whisk in an equal amount of flour to form a roux. This step is crucial because it thickens your cheese sauce and prevents it from being watery.
Gradually pour in warm milk (whole milk or half-and-half for extra creaminess), whisking continuously to avoid lumps. The mixture will start to thicken into a silky béchamel-style sauce. Once it reaches a smooth, slightly thick consistency, reduce the heat to low and stir in shredded cheddar cheese by the handful. Always add cheese in batches to ensure it melts evenly.
At this stage, you can get creative with your cheese selection. Sharp cheddar adds tang, while Monterey Jack or mozzarella gives extra meltiness. If you like a little smoky flavor, try smoked gouda. The goal is to achieve a luxuriously creamy, cheesy sauce that will coat every piece of pasta. Season with a pinch of salt, pepper, and maybe even a dash of garlic powder for extra depth.
When you dip your spoon into the finished sauce, it should be rich, velvety, and irresistibly cheesy—the perfect partner for your chili.
Step 5 – Combining Chili and Macaroni
Here’s where the two worlds finally collide. Add your drained pasta directly into the pot of chili, stirring well to coat every noodle with that savory, spicy mixture. Once everything is evenly distributed, pour in the creamy cheese sauce and stir until the pasta is blanketed in a luscious, cheesy chili coating.
This step is pure comfort food heaven. Each bite delivers a perfect balance of flavors: tender pasta, smoky chili, and creamy cheese that ties everything together. If you prefer your Chili Mac extra saucy, you can hold back a little pasta or add an extra splash of broth. On the other hand, if you like it thick and hearty, let it cook for a few extra minutes to reduce slightly.
Taste and adjust the seasoning at this point—sometimes a squeeze of lime juice or a pinch of salt can brighten up the whole dish. Once you’re happy with the flavor, you can serve it straight from the pot for a cozy stovetop version. But if you want to take it to the next level, there’s one more optional step that makes this dish unforgettable.
Step 6 – Baking for a Golden Finish (Optional)
If you love crispy, cheesy crusts on your casseroles, this step is for you. Transfer your Chili Mac mixture into an oven-safe baking dish and sprinkle a generous layer of shredded cheese on top—cheddar, Monterey Jack, or even a three-cheese blend works beautifully. For extra texture, you can also mix breadcrumbs with melted butter and scatter them over the cheese layer.
Place the dish under a preheated broiler or in a 375°F (190°C) oven for about 10–15 minutes, just until the cheese melts into a golden, bubbling crust. The result? A Chili Mac that’s not only creamy and hearty on the inside but also topped with a satisfying, cheesy crunch on the outside.
Once baked, let it rest for a few minutes before serving. This allows the cheese to set slightly and makes scooping easier. Garnish with fresh herbs, jalapeño slices, or even a dollop of sour cream for a restaurant-worthy presentation.
At this point, your Chili Mac and Cheese is ready to steal the show at any dinner table.
Tips and Tricks for the Perfect Chili Mac and Cheese
Every great recipe has a few secrets that make it foolproof. Whether you’re a beginner in the kitchen or a seasoned cook, these tips will ensure your Chili Mac and Cheese comes out perfect every single time.
Adjusting Spice Levels
Not everyone has the same spice tolerance. If you’re cooking for kids or people sensitive to heat, reduce the chili powder and skip the cayenne. For spice lovers, add diced jalapeños, crushed red pepper flakes, or even a splash of hot sauce right before serving.
Making It Extra Creamy
The key to creaminess lies in the cheese sauce. Use freshly shredded cheese instead of pre-packaged, which often contains anti-caking agents that prevent smooth melting. You can also stir in a spoonful of cream cheese or sour cream for extra richness.
Storage and Reheating Tips
Chili Mac and Cheese tastes just as good the next day—sometimes even better after the flavors meld overnight. Store leftovers in an airtight container in the refrigerator for up to 4 days. To reheat, add a splash of milk or broth to restore creaminess and warm it over low heat on the stovetop or in the microwave.
For longer storage, freeze portions in freezer-safe containers for up to 2 months. Thaw overnight in the fridge before reheating.
Variations of Chili Mac and Cheese
One of the best things about Chili Mac and Cheese is how adaptable it is. You can easily change up the ingredients to fit your diet, taste preferences, or even whatever you have in your pantry. Here are some delicious variations you can try.
Vegetarian Version
If you’d like to skip the meat, simply replace the ground beef with extra beans, lentils, or even crumbled tofu. Black beans and kidney beans make a great combo because they add both texture and flavor. For extra heartiness, you can also toss in some chopped mushrooms—they soak up spices beautifully and give a meaty bite without the actual meat.
Vegan Adaptation
Want to go fully plant-based? Swap the cheese sauce with a dairy-free alternative. A creamy vegan “cheese” sauce made from cashews, nutritional yeast, and plant-based milk works surprisingly well. Use oil or vegan butter instead of regular butter, and you’ll still end up with a comforting, cheesy-tasting dish.
Spicy Tex-Mex Twist
Turn up the heat and flavor by adding jalapeños, diced green chilies, or chipotle peppers in adobo sauce. You can also mix in corn and top it with crushed tortilla chips for extra crunch. Don’t forget to garnish with avocado slices, fresh cilantro, and a squeeze of lime for that authentic Tex-Mex flair.
One-Pot Stovetop Method
If you’re short on time (or don’t want to wash a pile of dishes), you can make Chili Mac and Cheese all in one pot. Instead of boiling the pasta separately, add the dry macaroni directly into the chili base along with extra broth. Let it cook until the pasta is tender, then stir in the cheese sauce or shredded cheese. This method saves time and cleanup while still delivering bold flavor.
Nutritional Value of Chili Mac and Cheese
Chili Mac and Cheese is undeniably indulgent, but it also offers a balance of nutrients when made thoughtfully. Let’s break it down.
Calories and Macronutrients
- Protein: Thanks to ground beef, beans, and cheese, this dish is packed with protein, making it filling and satisfying.
- Carbohydrates: The pasta provides energy-rich carbs, while beans add fiber for better digestion.
- Fat: Cheese and butter contribute healthy fats, though you can reduce the fat content by using lean meat or low-fat dairy.
On average, one serving (about 1 ½ cups) of Chili Mac and Cheese provides 450–600 calories, depending on the ingredients used.
Healthier Ingredient Swaps
- Use whole wheat pasta for added fiber.
- Choose lean ground turkey or chicken instead of beef.
- Swap full-fat cheese for a reduced-fat version or use a smaller amount of a sharper cheese (like aged cheddar), which delivers more flavor in smaller quantities.
- Add extra veggies like zucchini, spinach, or carrots to increase the nutritional value without changing the flavor too much.
This way, you can enjoy the comfort of Chili Mac and Cheese without the guilt.
Common Mistakes to Avoid
Even though this recipe is fairly simple, a few mistakes can affect the final outcome. Here are some common pitfalls and how to avoid them.
Overcooking the Pasta
Remember, the pasta continues cooking once it’s mixed with the chili and cheese sauce. If you fully cook it in the beginning, it will end up mushy. Always aim for al dente (slightly firm).
Adding Cheese Too Early
If you add cheese directly into a hot chili base instead of making a sauce or mixing it in gently, it can clump together instead of melting smoothly. Always melt cheese slowly into a creamy base for the best results.
Overpowering with Spices
Chili is all about bold flavor, but too much chili powder or cayenne can overwhelm the dish and make it inedible. Start with smaller amounts, taste as you go, and adjust gradually.
Avoiding these mistakes ensures that your Chili Mac and Cheese will come out creamy, flavorful, and perfectly balanced every time.
Serving Suggestions
Chili Mac and Cheese is a complete meal on its own, but you can make it even more exciting with the right sides and toppings.
Best Sides to Pair With Chili Mac and Cheese
- Garlic bread – adds crunch and makes the meal even more comforting.
- Fresh green salad – balances out the richness with something light and refreshing.
- Roasted vegetables – a healthy side that complements the hearty pasta.
Toppings to Elevate the Dish
- Sour cream or Greek yogurt – for creaminess and tang.
- Fresh cilantro or parsley – for a burst of freshness.
- Pickled jalapeños – for heat and acidity.
- Crumbled tortilla chips – for crunch.
- Avocado slices – for creaminess and a Tex-Mex twist.
These little additions turn a simple pot of Chili Mac into a customizable feast that everyone at the table can enjoy.
Make-Ahead and Freezer-Friendly Tips
Life gets busy, and Chili Mac and Cheese is one of those dishes that actually tastes better the next day. Here’s how to plan ahead.
How to Freeze Chili Mac
- Prepare the dish as usual, but stop before baking (if you’re doing the baked version).
- Let it cool completely, then transfer to airtight containers or freezer bags.
- Freeze for up to 2 months.
Reheating for the Best Taste
- Thaw overnight in the refrigerator.
- Reheat on the stovetop with a splash of milk or broth to restore creaminess.
- If reheating in the oven, cover with foil to prevent drying out, then bake at 350°F (175°C) until heated through.
This makes it an excellent meal prep option—you can whip up a big batch and enjoy hearty dinners with minimal effort later.
FAQs about Chili Mac and Cheese Recipe
Can I Use Different Cheeses?
Absolutely! Cheddar is classic, but Monterey Jack, mozzarella, gouda, or even pepper jack all work beautifully. Mixing cheeses often gives the best flavor.
Can I Skip the Meat?
Yes, you can make it vegetarian or vegan by using beans, lentils, or plant-based meat substitutes.
How Long Does It Last in the Fridge?
Stored properly in an airtight container, Chili Mac and Cheese lasts up to 4 days in the refrigerator.
Can I Make It Gluten-Free?
Yes! Use gluten-free pasta and ensure your broth and spices are certified gluten-free.
Can I Make It Ahead for a Party?
Definitely. Assemble everything, refrigerate, and bake it right before serving for a hot, cheesy dish that impresses guests.
Conclusion
Chili Mac and Cheese is the ultimate comfort food—warm, hearty, and bursting with flavor. By combining two classics into one, you get a dish that’s versatile, customizable, and perfect for any occasion, from busy weeknight dinners to potluck gatherings. With the step-by-step guide, tips, and variations above, you’ll be able to whip up a version that suits your taste and lifestyle.
So next time you’re craving something cozy yet bold, don’t choose between chili and mac and cheese—make both in one dish and enjoy the best of both worlds.


