Cherry Crumble Recipe: Few desserts strike the perfect balance between sweet, tangy, and comforting quite like a cherry crumble. This timeless dessert is beloved for its juicy fruit base topped with a crunchy, buttery layer that makes every bite irresistible. Whether you’re baking it for a family gathering, a casual weekend treat, or as a holiday dessert centerpiece, a cherry crumble never fails to impress. The best part? It’s incredibly easy to prepare, even if you’re not an expert in the kitchen.
In this comprehensive guide, we’ll walk you through everything you need to know—from the ingredients to the tools and each detailed step. By the end, you’ll be ready to bake the most delicious cherry crumble you’ve ever tasted.
What is Cherry Crumble?
Cherry crumble is a baked dessert that features a layer of sweetened cherries topped with a crumbly mixture made of flour, sugar, butter, and oats. The magic lies in the contrast: soft, juicy cherries bubbling underneath and a golden, crisp topping on top. Unlike pies, which require careful dough preparation, crumbles are far easier to put together—making them perfect for beginner bakers.
This dessert has its roots in British cuisine, where fruit crumbles became popular during World War II as a substitute for pies due to food rationing. Since then, it has become a classic comfort food across the globe. Today, you’ll find countless variations, but the cherry version remains one of the most popular thanks to its bold, tangy flavor that pairs beautifully with the sweetness of the crumble.
Why You’ll Love This Recipe
- Easy to make: You don’t need advanced baking skills.
- Customizable: You can adjust sweetness, add spices, or mix in other fruits.
- Comforting and versatile: Works well for family dinners, parties, or even a quick weekday dessert.
- Seasonal delight: A fantastic way to enjoy fresh summer cherries, though frozen cherries work just as well year-round.
If you’re looking for a dessert that’s as simple as it is satisfying, cherry crumble is your go-to recipe.
Ingredients You’ll Need
Fresh or Frozen Cherries?
The star of this dish is undoubtedly the cherries. You can use either fresh or frozen, depending on what’s available.
- Fresh cherries bring a natural tartness and vibrant flavor that shines through in every bite. They’re best during the summer months when cherries are in season.
- Frozen cherries are a convenient option if you want to make cherry crumble out of season. They’re typically frozen at peak ripeness, ensuring a burst of flavor.
Tip: If using frozen cherries, thaw them and drain excess liquid to prevent a watery filling.
Pantry Staples for the Perfect Crumble
Here’s a breakdown of the basic ingredients you’ll need:
- Cherries (4–5 cups) – fresh or frozen, pitted.
- Sugar (½ to ¾ cup) – white, brown, or a mix, depending on your sweetness preference.
- Cornstarch (2 tbsp) – helps thicken the cherry juices.
- Lemon juice (1 tbsp) – brightens the flavor and balances sweetness.
- All-purpose flour (1 cup) – forms the base of the crumble topping.
- Oats (1 cup, rolled oats preferred) – for added crunch and texture.
- Brown sugar (½ cup) – gives the crumble topping a rich caramel-like flavor.
- Butter (½ cup, cold and cubed) – essential for that buttery crumble texture.
Optional Ingredients for Extra Flavor
Want to elevate your cherry crumble? Try these optional add-ins:
- Cinnamon or nutmeg – warm spices that add depth.
- Almond extract – pairs beautifully with cherries.
- Vanilla extract – enhances the sweetness.
- Chopped nuts (walnuts, pecans, or almonds) – for extra crunch.
- Shredded coconut – adds a tropical twist.
These additions aren’t necessary, but they can take your cherry crumble from good to unforgettable.
Tools and Equipment Required
Baking Essentials
You don’t need fancy kitchen gadgets for this recipe, but a few essentials will make the process smoother:
- Mixing bowls: For preparing the cherry filling and crumble topping separately.
- Measuring cups and spoons: Accuracy is key in baking.
- 9×9-inch baking dish (or similar size): Perfect for baking and serving.
Handy Kitchen Tools
- Cherry pitter: A lifesaver if you’re using fresh cherries.
- Wooden spoon or spatula: For mixing the filling and topping.
- Pastry cutter or fork: To cut butter into the flour for the crumble topping.
- Oven mitts: Safety first! Always use them when handling hot dishes.
Having these tools ready before you start baking will ensure a stress-free experience.
Step-by-Step Guide to Making Cherry Crumble
Step 1: Prepare the Cherries
Start by washing, pitting, and halving your cherries if using fresh ones. Place them in a mixing bowl and toss them with sugar, cornstarch, and lemon juice. This mixture not only sweetens the cherries but also helps thicken the juices as they bake, preventing your crumble from turning into a soupy mess.
If using frozen cherries, make sure they’re thawed and well-drained. Excess moisture can dilute the flavor and ruin the texture of your dessert.
Step 2: Make the Crumble Topping
The crumble topping is what sets this dessert apart, and it’s surprisingly simple to make. In a large mixing bowl, combine flour, rolled oats, and brown sugar. For extra flavor, you can add a pinch of cinnamon or nutmeg at this stage. Mix the dry ingredients together until well combined.
Next, add cold cubed butter. Using a pastry cutter, fork, or even your fingers, work the butter into the mixture until it resembles coarse crumbs. You’re aiming for a balance of small buttery clumps and loose flour-oat mix. The butter is crucial—it’s what creates that rich, golden crunch on top when baked.
Pro Tip: Don’t overwork the mixture. A little unevenness is good—it gives you both crispy bits and softer, chewy pieces in the topping.
If you want to experiment, fold in chopped nuts like walnuts, pecans, or almonds for added texture. Some bakers even sprinkle in shredded coconut for a hint of sweetness and chewiness. Once prepared, set the crumble aside while you assemble the dessert.
Step 3: Assemble the Dessert
This step is where all the magic comes together. Take your greased baking dish (a 9×9-inch square pan works perfectly) and pour the prepared cherry filling into the bottom. Spread it evenly so every spoonful will be packed with cherries.
Now, sprinkle the crumble topping evenly over the cherry mixture. Don’t press it down—just let it fall naturally. This ensures the topping stays light and crisp as it bakes instead of turning dense and heavy.
Optional step: If you love extra crunch, drizzle a tablespoon of melted butter over the topping before baking. It will give your crumble a beautiful golden finish.
At this stage, your kitchen already smells promising. With cherries glistening beneath a layer of buttery crumbs, your dessert is officially ready for the oven.
Step 4: Bake to Golden Perfection
Preheat your oven to 350°F (175°C) before assembling the crumble. Once the oven is hot, place your dish on the middle rack and bake for 35–40 minutes.
As it bakes, the cherries will bubble up, releasing their juices, while the topping turns golden brown and crisp. The smell alone will tempt you to pull it out early, but patience pays off here. The crumble needs time to set and caramelize.
To check doneness, look for two signs:
- The cherry filling should be bubbling around the edges.
- The topping should be golden brown with a slightly crunchy texture.
If your topping starts browning too quickly, cover the dish loosely with aluminum foil and continue baking until the cherries are fully cooked.
Step 5: Cooling and Serving
Once your cherry crumble is baked to perfection, remove it from the oven and let it cool for at least 15–20 minutes. This cooling time is crucial—it allows the filling to thicken slightly so it’s easier to serve.
When it comes to serving, cherry crumble is incredibly versatile. You can enjoy it warm, at room temperature, or even chilled. Here are some serving ideas:
- Classic style: Serve warm straight from the dish.
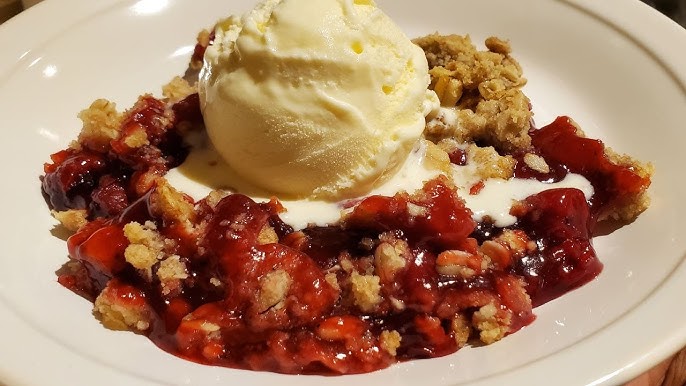
- With ice cream: A scoop of vanilla ice cream melting over warm crumble is heavenly.
- With whipped cream: Light, airy cream balances the rich crumble topping.
- With custard or yogurt: A less traditional but equally delicious option.
Cherry crumble is best enjoyed the same day while the topping is still crunchy, but don’t worry—we’ll cover storage and reheating later in this guide.
Tips for the Best Cherry Crumble
Choosing the Right Sweetness Level
Not all cherries are the same. Some varieties, like Bing cherries, are naturally sweet, while others, like sour cherries, need more sugar. Taste your cherries before baking, then adjust the sugar in your filling accordingly. You want to enhance their flavor, not overpower it.
If you’re using frozen cherries, they tend to be a little tart, so you may want to increase the sugar slightly. On the other hand, if you prefer a less sweet dessert, reduce the sugar and let the natural fruit flavor shine.
Preventing a Soggy Crumble
A common issue with crumbles is sogginess, especially if using frozen fruit. To avoid this:
- Drain thawed cherries thoroughly.
- Add cornstarch to thicken the filling.
- Bake long enough for the filling to bubble and the topping to crisp.
These small steps will keep your crumble perfectly balanced with a juicy base and a crunchy top.
Adjusting for Dietary Preferences
Cherry crumble can easily be adapted to fit different diets:
- Gluten-free: Swap all-purpose flour with almond flour or a gluten-free flour blend.
- Vegan: Replace butter with coconut oil or vegan margarine.
- Low-sugar: Use less sugar or substitute with natural sweeteners like honey or maple syrup.
By making these tweaks, you can ensure everyone at your table can enjoy this delightful dessert.
Variations of Cherry Crumble
One of the best things about cherry crumble is how versatile it is. While the classic recipe is delightful on its own, you can experiment with different flavors and ingredients to create your own signature version. Let’s explore a few mouth-watering variations.
Classic Cherry Crumble
The traditional version is all about simplicity—cherries, sugar, a touch of lemon juice, and that buttery oat topping. It’s the go-to recipe for anyone new to baking or looking for a timeless dessert that never disappoints. Serve it warm with vanilla ice cream for that nostalgic, comfort-food vibe.
Cherry and Apple Mix
If you want to balance out the tartness of cherries with something naturally sweet, apples are the perfect partner. A cherry-apple crumble gives you the best of both worlds—juicy cherries mixed with tender, spiced apples. Sprinkle a little cinnamon into the fruit filling for a cozy, autumn-inspired twist.
Gluten-Free Cherry Crumble
For a gluten-free version, simply swap the all-purpose flour with almond flour, oat flour, or a gluten-free blend. Rolled oats are naturally gluten-free, but make sure they’re certified to avoid cross-contamination. The result? A crumble that’s just as crunchy and delicious without the gluten.
Vegan Cherry Crumble
It’s easy to make this dessert vegan-friendly. Replace the butter in the topping with coconut oil or a plant-based margarine. You can also use maple syrup instead of sugar for a naturally sweet, earthy flavor. Pair it with vegan vanilla ice cream or coconut whipped cream, and you’ll have a dessert that satisfies everyone at the table.
Serving Suggestions
Cherry crumble is already a treat on its own, but the right pairing can elevate it into something unforgettable.
Best Toppings for Cherry Crumble
- Vanilla Ice Cream: The ultimate classic—cold, creamy ice cream melting over warm crumble.
- Whipped Cream: Light and fluffy, it balances out the richness of the topping.
- Custard: A British favorite, adding a smooth, creamy element.
- Yogurt or Crème Fraîche: Perfect for a tangy contrast, especially if you want a lighter option.
- Caramel Sauce: Drizzle over the top for an extra indulgent finish.
Pairing with Beverages
The right drink can make your cherry crumble experience even better:
- Coffee: A hot cup of coffee pairs perfectly with the buttery topping.
- Tea: Earl Grey or chamomile works beautifully with fruity desserts.
- Dessert Wine: A sweet wine, like Moscato or Port, complements the tart cherries.
- Milk: Sometimes, nothing beats a cold glass of milk with a warm dessert.
Storage and Reheating Instructions
How to Store Leftovers
Cherry crumble can easily be stored if you happen to have leftovers (though it usually disappears fast!). Once cooled, cover the dish with plastic wrap or transfer the crumble into an airtight container. Store it in the refrigerator for up to 3–4 days.
If you want to freeze it, wrap it tightly in foil or store it in a freezer-safe container. It can last up to 2 months in the freezer. Just be sure to thaw it overnight in the fridge before reheating.
Reheating Without Losing Crispiness
The key to reheating crumble is preserving that crunchy topping.
- Oven method (best): Preheat your oven to 350°F (175°C), place the crumble in an oven-safe dish, and warm it for 15–20 minutes. This method restores the topping’s crisp texture.
- Microwave method (quick): While convenient, microwaving tends to soften the topping. If you choose this method, reheat in short bursts and, if possible, finish it off in a toaster oven to bring back some crunch.
Nutritional Value of Cherry Crumble
Health Benefits of Cherries
Cherries aren’t just delicious—they’re also packed with nutrients. They’re rich in antioxidants, vitamin C, potassium, and fiber. Cherries are known for their anti-inflammatory properties and can even help improve sleep quality thanks to natural melatonin. So, while cherry crumble is a dessert, it still delivers some healthy perks.
Calorie Breakdown per Serving
A typical serving (about 1 cup) of cherry crumble contains:
- Calories: 280–350 (depending on sugar and butter amounts)
- Carbohydrates: 45–50g
- Protein: 3–5g
- Fat: 10–14g
- Fiber: 3–4g
Of course, the exact nutrition will vary based on ingredients and portion size. If you’re looking for a lighter version, you can reduce sugar, swap butter with coconut oil, or use oats and almond flour for a healthier twist.
Common Mistakes to Avoid
Even though cherry crumble is simple to make, a few common mistakes can affect the final result. Let’s go over them so you can avoid them.
Overmixing the Crumble Topping
The crumble should be rustic, with uneven clumps of butter, oats, and flour. Overmixing creates a dense topping that won’t crisp properly. Keep it light and crumbly.
Using Too Much Sugar
Remember, cherries already have natural sweetness. Adding too much sugar can overwhelm the fruit and make the dessert overly sweet. Always taste your cherries before adding sugar and adjust accordingly.
Baking Time Errors
Underbaking leads to a runny filling, while overbaking can dry out the topping. The sweet spot is when the filling is bubbling and the topping is golden brown. Keep a close eye during the last 10 minutes of baking.
FAQs about Cherry Crumble Recipe
Can I use canned cherries for cherry crumble?
Yes, but make sure to drain them well and reduce added sugar since canned cherries are often packed in syrup.
Do I need to peel the cherries?
No, the cherry skins soften beautifully as they bake and add extra flavor and nutrients.
Can I make cherry crumble ahead of time?
Yes! Assemble it and store in the fridge for up to 24 hours before baking. Just add 5–10 extra minutes to the baking time.
What’s the difference between a crumble and a crisp?
Both are similar, but a crisp typically includes oats in the topping, while a crumble may not. In modern baking, though, the terms are often used interchangeably.
How do I make cherry crumble more tart?
Use sour cherries or reduce the sugar in the filling. You can also add a splash of lemon juice for extra tang.
Conclusion
Cherry crumble is one of those desserts that’s as easy to make as it is satisfying to eat. With its juicy cherry filling and golden, crunchy topping, it strikes the perfect balance between comfort food and indulgence. Whether you stick to the classic recipe or experiment with variations like gluten-free or vegan versions, this dessert is sure to become a favorite in your kitchen.
So, the next time you’re craving something sweet yet homemade, grab some cherries, whip up a crumble, and watch how fast it disappears from the table.


