Cheese Sandwich Recipe: Let’s face it—when hunger strikes and time is short, nothing hits the spot quite like a cheese sandwich. It’s the ultimate go-to comfort food. Warm, gooey cheese encased in crisp, buttery bread—what’s not to love? Whether you’re making it for a quick lunch, a midnight snack, or something indulgent to pair with tomato soup, the cheese sandwich has earned its place in kitchens around the world.
What makes this humble meal so universally adored is its simplicity. You don’t need to be a trained chef or have a kitchen full of gadgets to make one. A couple of slices of bread, your favorite cheese, and a bit of heat—that’s all it takes. But simplicity doesn’t mean boring. With the right ingredients and techniques, this classic can be elevated to gourmet levels.
And here’s the best part—cheese sandwiches are endlessly customizable. From spicy jalapeños to crispy bacon or even avocado slices, you can make it exactly how you want. You could stick with the nostalgic version your mom made you as a kid or turn it into a five-star meal with artisanal cheeses and bakery bread. Either way, it’s always satisfying.
A Comfort Food That Never Fails
Comfort food is all about warmth, nostalgia, and satisfaction—and a cheese sandwich delivers on all fronts. It’s the food equivalent of a warm blanket on a cold day. Whether you’re having a bad day or just want something easy and delicious, this sandwich has your back. It’s familiar, yet it never gets old.
Let’s dive into what you need to craft the ultimate cheese sandwich and learn each step of the process so your next one is your best yet.
Ingredients You’ll Need
To make a truly great cheese sandwich, you need more than just bread and cheese—you need the right kind. The magic is in the details.
Bread Selection
When it comes to cheese sandwiches, the bread is your canvas. And not all bread is created equal.
- White Bread: A classic choice for its soft texture and mild flavor. It crisps up beautifully and lets the cheese shine.
- Sourdough: Tangy, chewy, and rustic—perfect if you want something a bit more gourmet.
- Whole Wheat: Adds a nutty flavor and is a healthier option, though slightly denser.
- Rye or Multigrain: Great for flavor variety and a heartier bite.
- Artisan Breads: Ciabatta, baguette slices, or brioche can take your sandwich up a notch.
Pro Tip: Avoid super thin or very dry breads—they can burn easily or get soggy fast.
Cheese Varieties
Cheese is the heart and soul of your sandwich. You want something that melts beautifully and has a rich flavor.
- American Cheese: Melts like a dream—perfect for the classic grilled cheese.
- Cheddar: Sharp or mild, it adds bold flavor and good meltiness.
- Mozzarella: Stretchy and soft, ideal for a gooey experience.
- Swiss or Gruyère: Nutty and sophisticated—great for a fancy twist.
- Provolone: Smooth, with a mild taste and great melting ability.
- Pepper Jack: If you like a kick of spice, this is your go-to.
Mixing cheeses can bring out new flavors and textures. A slice of cheddar with a slice of mozzarella? Heaven.
Additional Ingredients
Now for the fun part—add-ons! While a pure cheese sandwich is great, adding some extras can make it a whole new dish.
- Vegetables: Tomato slices, spinach, grilled onions, or roasted peppers.
- Proteins: Cooked bacon, ham, or turkey can make it more filling.
- Extras: Avocado, pickles, or even a fried egg on top!
Just remember—don’t overload. Too many ingredients can make your sandwich fall apart or cook unevenly.
Condiments and Spices
Sometimes it’s the little things that elevate your sandwich from good to great.
- Butter: Essential for that golden, crispy crust. Always spread it on the outer side of the bread.
- Mayonnaise: A game changer for grilling instead of butter—adds richness and helps with browning.
- Mustard: Dijon or whole grain adds a tangy punch.
- Hot Sauce or Sriracha: For a spicy twist.
- Herbs: Dried oregano, basil, or garlic powder for added aroma.
Experiment until you find your favorite flavor combo. The beauty of a cheese sandwich is that it’s totally customizable.
Kitchen Tools You’ll Need
Before you start cooking, it helps to gather everything you’ll need. A well-prepped kitchen is the secret to stress-free cooking.
Basic Utensils
Here are the everyday tools that’ll make the process easier:
- Knife: For slicing cheese, bread, and any add-ons.
- Cutting Board: To prep your ingredients safely.
- Spatula: Essential for flipping your sandwich without a mess.
- Butter Knife: For spreading butter, mayo, or other condiments.
Cooking Equipment
A great cheese sandwich doesn’t need fancy equipment, but using the right tools makes a difference.
- Skillet or Frying Pan: Non-stick or cast iron is ideal for even browning.
- Grill or Sandwich Press: For a crispy exterior and melted interior.
- Toaster Oven: A quick and mess-free method for melting cheese perfectly.
- Microwave: If you’re really in a hurry (though you’ll miss the crispy crust).
Make sure everything is clean and within reach before you start assembling your sandwich.
Step-by-Step Guide to Making a Cheese Sandwich
Time to roll up your sleeves and get cooking. Here’s the ultimate step-by-step guide to making the perfect cheese sandwich every time.
Step 1: Choose and Prepare Your Bread
Pick your bread based on what texture and flavor you’re aiming for. Want a soft and gooey sandwich? Go for white or brioche. Want something rustic? Choose sourdough.
Lay the slices flat on a cutting board. Butter one side of each slice—this side will face outward for that crispy, golden crust. If you’re using mayonnaise instead, spread a thin, even layer for the best browning.
Optional Tip: Toast the inner side of the bread lightly before assembling. This keeps it from getting soggy when the cheese melts.
Step 2: Select and Slice the Cheese
Cheese choice can make or break your sandwich. You want cheese that melts well, has great flavor, and complements your chosen bread.
If you’re going for a classic grilled cheese, American cheese or mild cheddar are top choices. For a more refined palate, mix cheddar with mozzarella for gooeyness and sharpness. Want bold flavor? Add some Gruyère or blue cheese for an adult twist.
Slice your cheese evenly—too thick, and it might not melt properly; too thin, and you won’t get that satisfying pull. Around 1/8 to 1/4 inch thick slices are perfect. If you’re using shredded cheese, distribute it evenly across the bread to avoid uneven melting or gaps.
Pro Tip: Don’t pile it too high. Too much cheese can lead to overflow and a greasy sandwich. Aim for balance.
Some great combinations include:
- Cheddar + Mozzarella (Classic gooey pull with flavor)
- Pepper Jack + Provolone (Spicy meets smooth)
- Swiss + Gruyère (Nutty and bold)
Prepping your cheese ahead of time makes assembly a breeze and helps ensure even melting.
Step 3: Add Condiments and Seasonings
Here’s where you can get creative and personalize your sandwich. A cheese sandwich doesn’t need a ton of condiments, but the right additions can elevate flavor and texture.
Start with a base layer:
- Butter or Mayonnaise (Outside): This goes on the outer side of your bread for that golden, crispy finish.
- Mayo, Mustard, or Garlic Aioli (Inside): Spread on the inner side of the bread if you want a zesty kick or creamy richness.
Next, season your sandwich lightly:
- Salt & Pepper: A dash can bring out the flavors of your cheese.
- Dried Herbs: Oregano, basil, or rosemary can add depth.
- Garlic Powder or Chili Flakes: For a punch of flavor or heat.
Optional layer additions:
- Hot Sauce or Sriracha: A few drops go a long way for spice lovers.
- Pesto: Adds herby richness and complements mozzarella or provolone well.
- Honey or Fig Jam: Sweet contrast that pairs beautifully with sharp cheeses like blue or goat cheese.
The goal is to enhance the cheese, not overpower it—less is more here.
Step 4: Assemble the Sandwich
Now that all your components are ready, it’s time to bring them together.
Start by placing your cheese slices evenly on the unbuttered side of one slice of bread. If you’re adding other ingredients (tomato slices, onions, bacon), layer them on top of the cheese. Make sure they’re evenly distributed so every bite is balanced.
Top with the second slice of bread, buttered side facing out. Press down gently with your hand to make sure everything is in place.
Assembly Tips:
- Keep your layers thin to avoid a messy sandwich.
- Avoid watery ingredients like raw tomatoes without drying them—this can make your bread soggy.
- Want extra crispiness? Sprinkle a bit of grated Parmesan on the buttered side before grilling.
Your sandwich should now look picture-perfect and ready to hit the heat!
Step 5: Grill or Toast Your Sandwich to Perfection
Here’s the moment of truth—cooking your sandwich to melty, golden perfection.
Pan Method (Classic):
- Heat a non-stick skillet over medium-low heat.
- Place your sandwich in the pan (buttered side down).
- Cook for 3-4 minutes until the bread is golden brown.
- Flip carefully with a spatula and grill the other side for another 3-4 minutes.
Sandwich Press or Grill:
- Preheat your press and cook the sandwich for 3-5 minutes until golden and melty.
- No need to flip—heat comes from both sides.
Toaster Oven:
- Place on a tray and toast at 375°F (190°C) for about 7-8 minutes, flipping halfway through.
Watch closely to avoid burning. The key is low and slow—it gives the cheese time to melt without scorching the bread.
Final Touch: Let it rest for a minute before slicing—it helps the cheese set slightly so it doesn’t ooze out immediately.
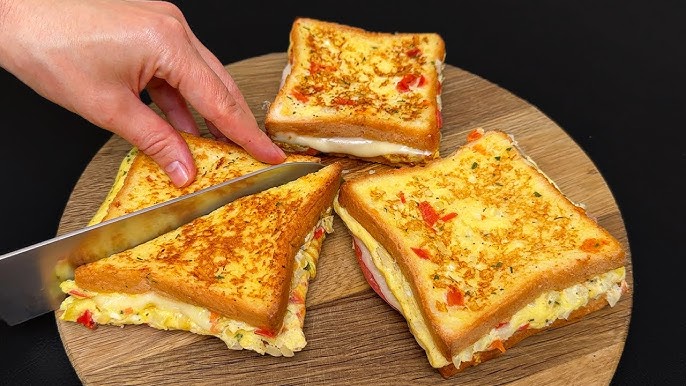
Cut Tip: Diagonal cuts not only look better but give that classic grilled cheese feel.
Tips for the Best Cheese Sandwich Ever
Crafting the perfect cheese sandwich is more than just slapping ingredients between bread. It’s an art—and a science. If you’re aiming for next-level deliciousness, these tips will turn your humble cheese sandwich into a gourmet masterpiece.
Melting Cheese Properly
One of the biggest issues people face is unevenly melted cheese. Nobody wants a sandwich with half-melted, rubbery cheese in one bite and lava-hot goo in the next. The solution? Temperature control and cheese prep.
Here’s how to nail that perfect melt every time:
- Room Temperature Cheese: Let your cheese sit out for 5–10 minutes before using. Cold cheese takes longer to melt and may cause uneven cooking.
- Grated Cheese Melts Faster: Shredded or thinly sliced cheese heats and melts evenly. If you’re in a hurry or using a tough-to-melt cheese like cheddar, shred it.
- Use a Lid: When cooking in a skillet, cover the pan. The steam helps heat everything evenly, ensuring gooey cheese without over-toasting the bread.
- Don’t Rush It: Cook over medium or medium-low heat. High heat burns the bread before the cheese gets a chance to melt.
Want that Instagram-worthy cheese pull? Use mozzarella or a mix of mozzarella and cheddar. It’s the best combo for dramatic, stretchy goodness.
Getting the Perfect Crunch
The crunch is what sets a good cheese sandwich apart from a soggy mess. You want the exterior crispy, golden, and buttery, while the inside remains tender and melty.
To achieve that:
- Use Softened Butter: Spread it evenly from edge to edge for full coverage. No dry corners allowed.
- Mayo Magic: Believe it or not, mayonnaise gives a perfectly golden, even crust. It contains oil and eggs, which promote browning. You can use it instead of—or alongside—butter.
- Press Gently While Cooking: Lightly pressing the sandwich with a spatula helps it cook evenly and encourages crisping without crushing the bread.
- Watch the Heat: Keep it at medium-low. Slow and steady wins the crunch race.
Want to go extra crispy? Try a sprinkle of grated Parmesan on the buttered side. It’ll toast into a savory, crispy crust you didn’t know you needed.
Balancing Flavors
At its core, a cheese sandwich is simple—but that doesn’t mean it has to be boring. Flavor balance is what elevates a good sandwich to a great one.
Here’s how to make sure every bite is bursting with deliciousness:
- Use Complementary Cheese Blends: Pair sharp cheddar with creamy mozzarella, or nutty Gruyère with mellow provolone. Think of it like building layers of taste.
- Season Wisely: A pinch of salt and a dash of pepper can enhance the cheese’s natural flavor. Garlic powder, mustard, or smoked paprika can add depth.
- Balance Richness with Acid: Cheese is rich and fatty, so pair it with something tangy like pickles, mustard, or a few drops of hot sauce to cut through the heaviness.
- Mind the Add-ons: Keep them minimal and strategic. A thin slice of tomato, a couple of jalapeño rings, or some crispy onions can take it to the next level without overpowering the cheese.
Above all, taste as you go (or after the first attempt) and tweak. Cooking is about making it yours.
Variations of Cheese Sandwiches
Tired of the same old grilled cheese? Good news—you don’t have to be stuck in a sandwich rut. Cheese sandwiches are a blank canvas for creativity. Here are some variations that’ll spice up your next meal:
Grilled Cheese Deluxe
This one’s for the cheese lovers who want it all. Think of it as the classic grilled cheese’s older, fancier sibling.
What to Add:
- Double cheese (cheddar + mozzarella or provolone)
- Tomato slices (patted dry)
- Crispy bacon or ham
- Fresh basil or arugula
- Garlic aioli for extra flavor
Best Bread: Sourdough or ciabatta
This sandwich is a flavor bomb. Rich, gooey, crunchy, salty, and fresh all in one bite.
Spicy Cheese Sandwich
For those who like it hot, this version adds a fiery twist to the classic.
Spicy Upgrades:
- Pepper Jack or jalapeño cheddar
- Thinly sliced jalapeños or banana peppers
- Sriracha mayo or chipotle spread
- Red chili flakes or smoked paprika
Optional Add-ons: Avocado (for creamy balance), crushed tortilla chips (for crunch)
Best Bread: Multigrain or white sandwich bread
This one brings the heat and still keeps the cheese as the hero.
Vegan Cheese Sandwich
Yes, you can enjoy all the melty goodness of a cheese sandwich—without the dairy. Plant-based cheeses have come a long way.
What You’ll Need:
- Vegan cheese that melts (like Daiya, Violife, or Miyoko’s)
- Vegan butter or oil
- Optional: Grilled mushrooms, spinach, or caramelized onions
- Vegan mayo or mustard
Pro Tip: Add a pinch of turmeric or nutritional yeast to boost the cheesy flavor.
Best Bread: Whole grain or gluten-free, if desired
Whether you’re vegan or just trying to cut back on dairy, this version is totally satisfying.
What to Serve with Cheese Sandwiches
A cheese sandwich is a meal in itself, but pair it with the right sides, and you’ve got a feast.
Perfect Side Dishes
- Tomato Soup: The classic pairing. The tangy tomato balances the richness of the cheese.
- French Fries or Sweet Potato Fries: Crunchy and indulgent.
- Salad: A fresh green salad with vinaigrette adds contrast and freshness.
- Coleslaw: Creamy, tangy, and crunchy—perfect balance to the soft, cheesy sandwich.
- Pickles: Their acidity cuts the richness of the sandwich beautifully.
Mix and match based on your mood—comfort food, or a lighter lunch? You choose.
Drinks That Pair Well
The right drink enhances the whole experience. Here are some top picks:
- Iced Tea or Lemonade: Refreshing, and balances out the cheese.
- Cold Beer: A crisp lager or IPA pairs perfectly with the richness.
- Wine: White wines like Chardonnay or red like Pinot Noir work great with cheese.
- Milk or Chocolate Milk: For a nostalgic twist!
- Sparkling Water: A clean palate cleanser.
Drinks may not be the main act, but they help make your meal feel complete.
Storing and Reheating Tips
So, you made an amazing cheese sandwich, but you couldn’t finish it—or maybe you made a few extras. Good news: cheese sandwiches store and reheat fairly well if you know what you’re doing.
Refrigerating Cheese Sandwiches
If you plan to store your sandwich for later, proper handling is key to keeping it fresh and tasty.
How to Store:
- Let it Cool First: Never store a hot sandwich. Let it cool completely at room temperature to prevent sogginess.
- Wrap It Right: Use aluminum foil or parchment paper for short-term storage (up to 24 hours). For longer storage, wrap tightly in plastic wrap or place in an airtight container.
- Fridge Life: A cheese sandwich will last 2–3 days in the refrigerator. After that, the bread may become soggy, and the cheese might lose its texture.
Pro Tip: Don’t add watery ingredients like tomatoes or pickles if you plan to store your sandwich—they’ll make it mushy.
Reheating Without Losing Texture
Reheating can be tricky—you want the cheese to melt again, but without turning the bread soggy or hard. Here’s how to bring that sandwich back to life.
Best Reheating Methods:
1. Skillet Method (Best Option):
- Heat a non-stick pan over medium heat.
- Place the sandwich in the pan (no added butter needed).
- Cover with a lid to trap heat and help melt the cheese.
- Heat for 2–3 minutes per side until crispy and warm.
2. Oven or Toaster Oven:
- Preheat to 375°F (190°C).
- Place sandwich on a baking tray.
- Bake for 10–12 minutes, flipping halfway through.
- Optional: wrap in foil for a softer crust or leave open for crispiness.
3. Microwave (Only in a Pinch):
- Not ideal, but quick.
- Wrap sandwich in a paper towel.
- Microwave for 30–45 seconds.
- Tip: After microwaving, toast in a dry pan for 1–2 minutes to regain crunch.
Avoid reheating in plastic containers or plastic wrap—use microwave-safe dishes and materials only.
Want to freshen up the sandwich? Add fresh herbs, a new cheese slice, or even a fried egg on top before serving!
FAQs about Cheese Sandwich Recipe
1. Can I use any cheese for a cheese sandwich?
Yes, but not all cheeses melt the same. Soft cheeses like mozzarella, cheddar, provolone, and American work best. Hard cheeses like parmesan or aged gouda may need to be combined with softer varieties for better meltability.
2. What’s the best bread for a grilled cheese sandwich?
Classic white bread is a favorite for its softness and mild flavor, but sourdough, whole wheat, and even brioche can take your sandwich to gourmet levels. Choose bread that balances well with your cheese choice.
3. How do I make a vegan cheese sandwich?
Use plant-based cheese that melts well, like Daiya or Violife, and vegan butter or oil. You can also add grilled vegetables, spinach, or mushrooms for added texture and flavor.
4. Can I freeze a cheese sandwich?
Yes, but it’s best frozen before cooking. Assemble the sandwich (no watery ingredients), wrap it in foil, and store it in a freezer-safe bag. When ready to eat, grill straight from frozen—just cook a little longer.
5. How do I prevent my cheese sandwich from becoming soggy?
Use low-moisture cheeses, pat dry any wet ingredients (like tomatoes), and toast the inside of the bread slightly before assembling. Cook on medium-low heat for an even, crispy crust.
Conclusion
There you have it—the ultimate step-by-step guide to making a cheese sandwich that’s not just good, but unforgettable. Whether you’re going for a nostalgic grilled cheese or a gourmet masterpiece, the beauty of this sandwich lies in its versatility.
From selecting the perfect bread and cheese combo to mastering the art of the crispy crust, you’re now equipped with all the tools (and tips) to build a sandwich that satisfies your cravings and impresses your taste buds. The next time someone asks what’s for lunch, you won’t just say “a cheese sandwich”—you’ll say, “THE cheese sandwich.”
Now go forth, melt that cheese, toast that bread, and enjoy every golden, gooey bite.


