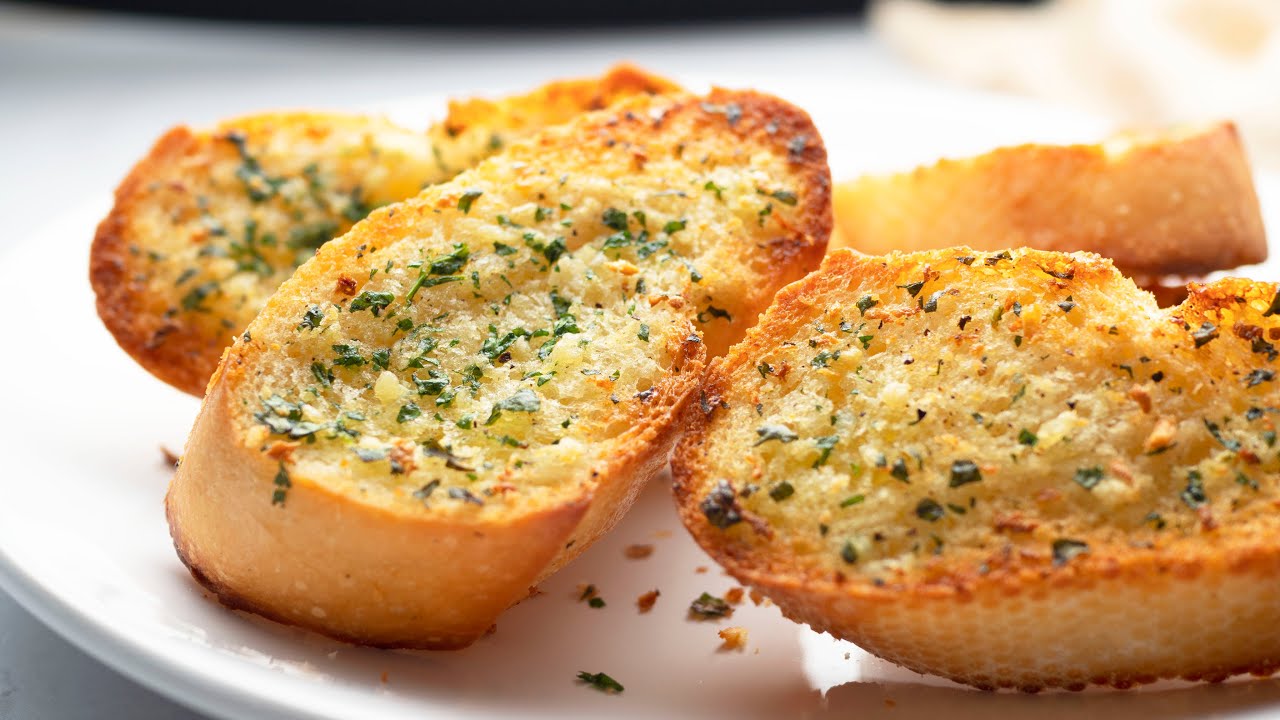
Cheese Garlic Bread Recipe: There’s something universally comforting about cheese garlic bread. It’s warm, cheesy, crisp on the outside, and soft on the inside. This simple yet satisfying side dish has found its place next to pastas, soups, and even as a standalone snack. Whether you’re throwing a dinner party, need a quick appetizer, or want something indulgent for movie night, cheese garlic bread always fits the bill.
The smell of garlic butter sizzling on fresh bread, combined with gooey, stretchy cheese, can turn even the dullest meal into a flavorful experience. And the best part? You don’t need to be a culinary expert to make it at home. With just a few ingredients and a basic oven or toaster, you can whip up a batch that tastes like it’s straight from your favorite Italian restaurant.
The Perfect Side Dish or Snack
Cheese garlic bread is incredibly versatile. It’s great as a side dish with spaghetti or lasagna, works well dipped into soup, or can simply be enjoyed on its own. It’s also a crowd-pleaser—kids love it, guests devour it, and even picky eaters can’t resist it. You can also get creative with toppings or turn it into a mini pizza or sandwich.
Whether served at brunch or late at night, it never feels out of place. That’s the beauty of cheese garlic bread—it’s humble, hearty, and always welcome at the table.
Ingredients You’ll Need
Bread Base – Choosing the Right Type
The bread is the foundation of your cheese garlic bread. Picking the right kind makes all the difference. You want something that’s sturdy, can handle the weight of cheese and butter, and has a bit of chew.
Here are some excellent options:
- French Baguette – Crispy crust and soft interior. Great for individual slices.
- Italian Bread – Slightly softer, more absorbent. Perfect for buttery richness.
- Sourdough – Adds a tangy flavor and holds up well to toppings.
- Ciabatta – Rustic and full of air pockets—ideal for holding the garlic butter.
Avoid sandwich bread or anything too soft—it’ll get soggy and won’t crisp up the way you want.
Garlic Butter Mixture – The Flavor Maker
This is where the magic happens. The garlic butter mixture infuses the bread with deep, aromatic flavor. Here’s what you’ll need:
- Unsalted Butter – Softened to room temperature for easy spreading.
- Fresh Garlic – Minced or grated for maximum flavor. Avoid garlic powder if possible.
- Fresh Parsley or Basil – Finely chopped to add color and freshness.
- Salt & Pepper – Season to taste.
- Optional Add-ins:
- Crushed red pepper flakes (for a spicy kick)
- Oregano or Italian seasoning
- A touch of olive oil for extra richness
Mash everything together until it forms a creamy, spreadable paste. The more garlic you like, the more you can add—it’s totally customizable.
Cheese Options – Melty, Gooey Goodness
The cheese is what makes garlic bread into cheese garlic bread. You want something that melts well but also has great flavor. Here are some popular choices:
- Mozzarella – The gold standard for meltiness.
- Cheddar – Adds sharpness and color.
- Parmesan – For a nutty, salty finish.
- Provolone – A smooth, mild flavor that melts beautifully.
- Fontina or Gruyère – Fancy but worth it for special occasions.
For the best results, combine 2–3 kinds of cheese. Shred your cheese fresh instead of using pre-shredded bags (they have anti-caking agents that affect melt quality).
Optional Ingredients – Customize to Your Taste
Want to go beyond the basic? Here are a few add-ons you can include to elevate your cheese garlic bread:
- Chili flakes or jalapeños – for heat lovers
- Cooked bacon bits – smoky and savory
- Sun-dried tomatoes – adds a tangy, sweet contrast
- Olives or caramelized onions – for a Mediterranean twist
The beauty of this recipe is how adaptable it is. You can keep it classic or make it your own with a twist.
Equipment You’ll Need
Basic Kitchen Tools
You don’t need any fancy gadgets to make cheese garlic bread, but having the right tools can make things smoother.
- Baking tray or sheet pan – Line it with parchment for easy cleanup.
- Mixing bowl – For combining your garlic butter mixture.
- Knife & cutting board – To mince garlic and chop herbs.
- Spoon or spatula – To spread the garlic butter.
- Grater – For freshly shredding cheese.
- Oven mitts – Safety first!
These are all standard in most kitchens, and once you’ve gathered them, you’re all set for bread magic.
Recommended Appliances for Best Results
- Oven – Ideal for getting even heat and crispy edges.
- Toaster Oven – Great for small batches or quick toasting.
- Air Fryer – Surprisingly effective for crispy garlic bread in less time.
- Microwave (optional) – Only for reheating, not baking.
If you want that golden, bubbly top, an oven broiler is your best friend. Just keep an eye on it—cheese can go from perfect to burnt in seconds!
Step-by-Step Guide to Making Cheese Garlic Bread
Step 1: Prepping the Garlic Butter
This step is where all the flavor begins. Making the garlic butter spread is simple but powerful. Start with softened unsalted butter—let it sit at room temperature for at least 30 minutes before use. If you forget, just microwave it for 10 seconds (not melted, just soft).
Next, finely mince 4–5 garlic cloves. Fresh garlic gives that punchy flavor you just can’t replicate with powder. Add the garlic to the softened butter in a bowl.
Now, finely chop fresh parsley or basil (about 2 tablespoons). This adds a bright, fresh kick that balances the richness of the butter and cheese. Sprinkle in a pinch of salt and cracked black pepper. Add a teaspoon of olive oil if you want it extra spreadable or more luxurious.
Mix it all together with a fork or small whisk. The goal is a smooth, spreadable mixture full of aroma and flecks of green. You’ll want to taste it before applying—adjust seasoning as needed. If you love spice, throw in a pinch of red chili flakes here too.
Make extra! This butter stores well in the fridge and can be used on veggies, pasta, or even steak.
Step 2: Preparing the Bread
Now let’s talk about bread prep. Take your chosen loaf (like baguette or Italian bread) and slice it lengthwise for large, sharable pieces, or into thick rounds for individual servings. You can even slice it into sticks if you’re aiming for a dipping-style appetizer.
Thickness matters here. Cut it too thin, and it won’t hold the toppings. Go for about 1 to 1.5 inches thick. That way, the bread will be crispy on the outside, soft inside, and supportive enough to carry the cheesy goodness.
Place your slices on a baking tray lined with parchment paper or foil for easy cleanup. Don’t stack them—give each slice space so the heat circulates properly.
Want crispier bread? Lightly toast the bread before spreading the garlic butter. A quick 3-minute pre-toast in the oven at 350°F will do the trick. It forms a barrier that keeps the bread from soaking up too much butter and getting soggy.
Step 3: Spreading the Garlic Butter
This is the moment when your kitchen starts to smell amazing. Take a generous amount of your prepared garlic butter and spread it evenly across each slice of bread. Don’t skimp—this is the foundation of the flavor.
Use a spoon or offset spatula to ensure you cover every corner. Make sure it goes right to the edges. The edges tend to dry out, and a good slather of butter prevents that. For an even richer taste, you can do both sides of the bread, but that’s entirely optional (and a bit indulgent!).
This is also your chance to personalize things. Want a little zing? Sprinkle lemon zest over the butter. Craving spice? Add crushed red pepper or a few dashes of hot sauce.
After you’ve buttered them up, let the slices sit for a minute to absorb some flavor. Meanwhile, you can prep your cheese mix.
Step 4: Adding the Cheese
Now for the best part—cheese! Grab your shredded cheese blend and start layering it over the buttered bread slices. Cover them fully, but don’t pile it so high that it spills over during baking.
A great combo is:
- 1 cup Mozzarella (for the stretch)
- ½ cup Cheddar (for flavor)
- ¼ cup Parmesan (for salt and depth)
You can pre-mix your cheese in a bowl to make topping easier. Sprinkle the cheese mix evenly, pressing it down gently so it adheres to the butter.
Want more flavor? Add a light drizzle of olive oil or garlic-infused oil over the top. Some people also sprinkle a touch of Italian seasoning or oregano for an extra aromatic lift.
For a gourmet touch, add thin tomato slices, caramelized onions, or bacon bits before you bake. If you’re vegan, substitute with plant-based butter and dairy-free cheese shreds.
Step 5: Baking It to Perfection
Time to bake! Preheat your oven to 375°F (190°C). Place the baking tray on the middle rack for even cooking. Bake the bread for about 10 to 12 minutes, or until the cheese is fully melted and bubbly.
Want that crispy, golden cheese top? Switch your oven to broil mode for the last 2–3 minutes. Watch closely—cheese can go from perfectly golden to burned in seconds.
Once done, remove from the oven and let the bread cool for 2–3 minutes. This helps the cheese set a bit and prevents mouth burns (we’ve all been there).
Before serving, you can sprinkle some extra chopped parsley or grated parmesan on top for presentation. Slice the bread into strips or wedges and serve immediately.
That’s it! You’ve just made mouthwatering, cheesy, garlicky bread better than most takeout versions.
Tips for the Perfect Cheese Garlic Bread
How to Get a Crispy Crust
No one likes soggy garlic bread, right? Here are some foolproof tips for that perfect crunch:
- Toast before topping: A quick pre-bake makes the bread sturdier.
- Use a high-quality crusty loaf: Soft bread gets soggy fast.
- Don’t overload on butter or cheese: More isn’t always better—too much moisture ruins the crisp.
- Use parchment paper or bake directly on the rack: This improves airflow under the bread, creating a crunchier bottom.
- Broil the top, toast the bottom: A combination of baking and broiling ensures melted cheese on top and crispness underneath.
If you’re using an air fryer, reduce cooking time by 2–3 minutes. It crisps faster than a traditional oven.
Making it Extra Cheesy Without Getting Greasy
Cheese is wonderful—until it turns your bread into a grease bomb. To strike the perfect balance:
- Use a cheese blend: Don’t rely on one type. Mozzarella melts well but is mild. Cheddar adds flavor, and Parmesan balances the saltiness.
- Grate your own cheese: Pre-shredded cheese contains anti-caking agents that prevent smooth melting.
- Use room temperature cheese: It melts more evenly and quickly, preventing oily puddles.
- Sprinkle in layers: Cheese, a bit of seasoning, more cheese—this keeps it flavorful without overwhelming the bread.
And finally, if your cheese releases too much oil during baking, simply dab it gently with a paper towel before serving.
Variations of Cheese Garlic Bread
Stuffed Cheese Garlic Bread
If you love your cheese garlic bread with a little more drama, stuffed cheese garlic bread is the way to go. Instead of just topping the bread, you stuff it with cheesy, garlicky goodness from the inside out.
Start with a large round or oval loaf, like a boule or ciabatta. Use a sharp bread knife to cut deep criss-cross slits, making sure not to cut all the way through. The idea is to create pockets or cubes while keeping the loaf intact.
Next, take your garlic butter mixture and use a spoon or piping bag to push it down into all those cuts. Follow with your cheese blend, tucking it into every crack and crevice. Mozzarella works best for the inside because of its melt factor, but feel free to mix in some cheddar or provolone.
Wrap the loaf in foil and bake at 375°F for 15–20 minutes, then uncover and broil for 2–3 minutes to crisp up the top.
Pull-apart style, oozing with cheese—this one’s perfect for parties, game nights, or just treating yourself to something epic.
Spicy Garlic Bread
Want to add a fiery kick to your cheesy garlic bread? Here’s how to spice things up:
- Add crushed red pepper flakes to your garlic butter.
- Use pepper jack or spicy cheddar in your cheese blend.
- Finely dice some pickled jalapeños or fresh chili peppers and mix into the cheese.
- Drizzle a bit of sriracha or hot honey on top before or after baking.
Spicy garlic bread pairs amazingly with creamy pastas and hearty soups—it adds just the right contrast.
For heat lovers, this version is a total game-changer. You can also tone it down or dial it up based on your preferences. It’s customizable and absolutely delicious.
Vegan Garlic Bread Options
Vegan? No worries—you don’t have to miss out. Cheese garlic bread can be just as tasty without dairy or animal products.
Here’s how to make a plant-based version:
- Butter Substitute: Use vegan margarine or spread. Make sure it’s garlic-friendly (some have a coconut base that’s too sweet).
- Cheese Substitute: Try dairy-free mozzarella shreds (brands like Violife, Daiya, or Follow Your Heart melt well).
- Bread: Double-check ingredients—most baguettes or sourdough are naturally vegan, but avoid ones with milk or eggs.
Use the same method: mix vegan butter with garlic and herbs, spread it over your bread, top with dairy-free cheese, and bake until melty and golden.
Pro tip: Add a sprinkle of nutritional yeast for a cheesy, umami flavor without any dairy.
Serving Suggestions
What to Serve With Cheese Garlic Bread
Cheese garlic bread is like that friend who gets along with everyone. It complements a variety of meals and can easily be turned into the star of the show.
Here are some delicious pairings:
- Pasta Dishes: Spaghetti Bolognese, Fettuccine Alfredo, or Pesto Pasta.
- Soups: Tomato basil, minestrone, or creamy broccoli soup.
- Salads: Caesar salad, Greek salad, or arugula with balsamic.
- Grilled Meats: Steak, grilled chicken, or even barbecue ribs.
It also makes a great base for:
- Mini pizzas (just add sauce and toppings)
- Garlic bread sandwiches (fill with grilled veggies or meats)
Want to serve it as a snack? Slice it into sticks and serve with marinara or ranch dip.
Great Occasions for This Dish
Cheese garlic bread is a party favorite and an everyday treat. It’s versatile and crowd-pleasing. Here are some perfect occasions to serve it:
- Game nights
- Birthday parties
- Potlucks and BBQs
- Movie nights at home
- Date night dinners
It’s quick, easy to scale up for groups, and always disappears first from the table. Pro tip: Bake extra. You’ll need it.
Storage and Reheating Tips
How to Store It Properly
If you have leftovers (rare, but possible), storing cheese garlic bread correctly will help preserve its flavor and texture.
Here’s what to do:
- Cool it completely before storing to avoid sogginess.
- Wrap slices tightly in foil or plastic wrap.
- Store in an airtight container or ziplock bag.
- Keep in the refrigerator for up to 3 days.
For longer storage, you can freeze it:
- Place cooled slices in a single layer on a tray.
- Once frozen, transfer them to a freezer-safe bag.
- Store for up to 1 month.
Always label the date so you know when to use them by.
Best Ways to Reheat Without Losing Texture
Reheating cheese garlic bread without turning it into a chewy mess takes a bit of finesse. Here’s how:
Oven Method (Best):
- Preheat to 350°F.
- Place bread on a baking tray.
- Cover loosely with foil to prevent burning.
- Heat for 8–10 minutes or until warm and crispy.
Air Fryer (Quickest):
- Heat at 320°F for 3–4 minutes.
- No need to thaw frozen slices—just adjust time slightly.
Microwave (Not ideal):
- Wrap in a damp paper towel.
- Heat for 20–30 seconds.
- Bread will be soft, not crispy.
Microwave is fine in a pinch, but the oven is your best friend for texture and flavor.
Healthier Alternatives
Low-Calorie Ingredients You Can Use
Craving garlic bread but watching your calorie intake? Good news—you can still enjoy a lighter version of cheese garlic bread without sacrificing flavor. The key is making smarter swaps and controlling portion sizes.
Here are some effective substitutions:
- Bread: Choose whole wheat or multigrain bread instead of white bread. These offer more fiber and nutrients with fewer processed carbs.
- Butter: Use light butter or a blend of butter and olive oil to reduce saturated fats.
- Cheese: Opt for low-fat mozzarella, part-skim cheeses, or reduced-fat cheddar.
- Garlic: No need to change—garlic is already low-calorie and packed with antioxidants.
Portion control also helps. Instead of loading every inch with cheese, lightly sprinkle cheese over the buttered bread—you’ll still get that creamy, savory flavor without overdoing it.
You can also add vegetables like spinach, mushrooms, or tomatoes to your bread. These add bulk and nutrients, making each bite more satisfying and healthier.
Even with these tweaks, it still feels indulgent—and most people won’t even notice the difference.
Gluten-Free & Keto Garlic Bread Options
Whether you’re on a gluten-free or keto diet, garlic bread is still within reach.
For Gluten-Free:
- Use gluten-free baguettes or bread from brands like Udi’s, Canyon Bakehouse, or Schär.
- Follow the same recipe, using your preferred gluten-free loaf as the base.
For Keto or Low-Carb:
- Make your own keto bread using almond flour, eggs, cheese, and baking powder (tons of easy recipes online).
- Alternatively, use portobello mushrooms or zucchini boats as bread substitutes.
- Top with garlic butter and cheese, then bake.
Cheese and butter are naturally keto-friendly, so you don’t need to change those. Just watch for hidden sugars in packaged garlic salts or processed spreads.
You’ll still get that same mouthwatering, garlicky goodness—just minus the carbs or gluten.
Common Mistakes to Avoid
Avoiding Soggy Bread
There’s nothing worse than soggy garlic bread. It ruins the texture and feels more like a wet sponge than a crisp delight. Here’s how to avoid that culinary tragedy:
- Toast the bread before adding toppings: Even 2–3 minutes in the oven helps create a protective barrier.
- Use crusty bread like baguettes or ciabatta, which hold up better under moisture.
- Don’t overdo the butter or cheese: Too much fat will pool and soak into the bread.
- Avoid soft sandwich bread, which lacks the structure to stay crisp.
Always let the bread rest for a couple of minutes after baking. This prevents the steam from softening the crust right before serving.
Not Burning the Garlic
Burnt garlic tastes bitter and will completely throw off your cheese garlic bread. Here’s how to avoid this common mistake:
- Never fry garlic before spreading unless you’re experienced. Fresh minced garlic should go into the butter raw.
- Mix garlic into the butter so it’s insulated during baking.
- Keep an eye on the oven, especially during the broil phase. The cheese can brown before the garlic is fully cooked, and if it burns—game over.
Use medium-low heat and cook until just golden. That gives you the sweet, aromatic flavor that makes garlic bread irresistible.
If you’re unsure, you can roast the garlic first. Roasted garlic is milder, creamier, and much less likely to burn.
FAQs about Cheese Garlic Bread Recipe
Can I Use Any Bread for This Recipe?
While you technically can use any bread, crusty varieties like baguette, sourdough, or ciabatta work best. They hold up under cheese and butter without going soggy.
What Cheese Works Best?
Mozzarella for stretch, cheddar for flavor, and parmesan for saltiness. A blend gives the best results. Avoid pre-shredded cheese if possible—freshly grated melts better.
Can I Freeze Garlic Bread?
Absolutely! Assemble and freeze it before baking. Wrap tightly and store for up to 1 month. Bake directly from frozen—just add a few extra minutes to the cook time.
How Do I Keep It Crispy After Baking?
Let it rest a minute or two to set, then serve immediately. Reheat in the oven or air fryer instead of the microwave to retain the crispy texture.
Can I Make It Without an Oven?
Yes! You can use a toaster oven, air fryer, or even a stovetop griddle. Just make sure the bread gets evenly heated and the cheese is fully melted.
Conclusion
Cheese garlic bread is more than just a side dish—it’s an experience. Crispy on the outside, soft and fluffy inside, dripping with buttery garlic and covered in gooey cheese… it’s everything a comfort food should be. And the best part? You can make it at home with just a few ingredients and minimal prep time.
Whether you stick to the classic version, spice it up, or go full gourmet with stuffed loaves, this is a recipe that delivers every time. It’s easy to customize, quick to prepare, and always crowd-approved. So next time you’re planning dinner or hosting guests, whip up a batch of this cheesy garlic perfection—you won’t regret it.
Happy cooking and happy eating!


